Creating an FAQ section for your WordPress website is incredibly simple. We're going to use WordPress Custom Post Types for the questions & answers. Then we'll use a jQuery UI accordion to make a nice cross-browser accordion widget. Finally we'll assign a shortcode so that we can put our FAQ on any page or post.
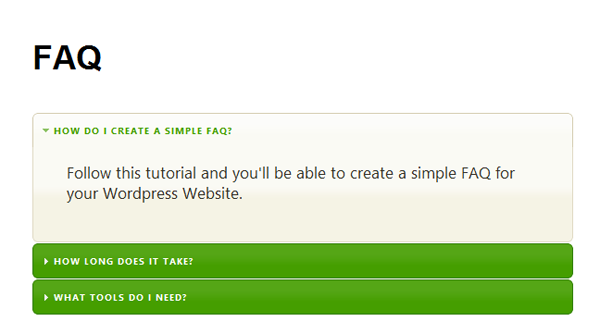
We'll be creating this:

Step 1 Create the Directory and Files
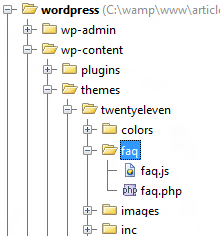
- Create a new folder inside your theme folder called faq
- Inside the 'faq' folder, create a new file called faq.php
- Create another file called faq.js

Step 2 Include the faq.php File
In your functions.php (located in the root directory of your theme) – include the faq.php file you created at the top.
/* functions.php */
include('faq/faq.php');
Step 3 Create the Custom Post Type
- To register the Custom Post Type, we are going to hook into the
initaction. We are using an anonymous function as the second parameter to help keep everything encapsulated in one place. This helps with readability and maintainability. - Set up
$labelsand$argsas seen below. - At the end we call
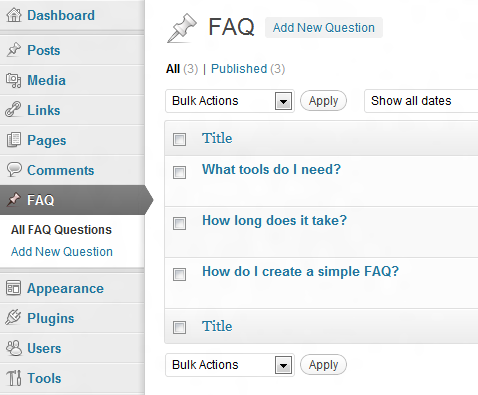
register_post_type('FAQ', $args) - Now if you go into your Admin area you will see a new option in the menu – FAQ (as seen in the image below)
- Click Add New Question and enter a few Questions and Answers so that we have something to work with later on. Use the
titlefield for the question, and the main content field for the answer. This allows us to enter any type of content into our answer (such as images & videos) as well as text.
/* Register the Custom Post Type */
/* faq.php */
add_action('init', function() {

	$labels = array(
		'name' => _x('FAQ', 'post type general name'),
		'singular_name' => _x('Question', 'post type singular name'),
		'add_new' => _x('Add New Question', 'Question'),
		'add_new_item' => __('Add New Question'),
		'edit_item' => __('Edit Question'),
		'new_item' => __('New Question'),
		'all_items' => __('All FAQ Questions'),
		'view_item' => __('View Question'),
		'search_items' => __('Search FAQ'),
		'not_found' => __('No FAQ found'),
		'not_found_in_trash' => __('No FAQ found in Trash'),
		'parent_item_colon' => '',
		'menu_name' => 'FAQ'
	);

	$args = array(
		'labels' => $labels,
		'public' => true,
		'publicly_queryable' => true,
		'show_ui' => true,
		'show_in_menu' => true,
		'query_var' => true,
		'rewrite' => true,
		'capability_type' => 'post',
		'has_archive' => true,
		'hierarchical' => false,
		'menu_position' => null,
		'supports' => array('title', 'editor', 'page-attributes')
	);
	register_post_type('FAQ', $args);
});

Step 4 Include jQuery, jQuery UI, and faq.js
- Load jQuery
- Load jQuery UI
- Load the stylesheet for the jQuery UI library
- Load our custom script faq.js
add_action( 'wp_enqueue_scripts', 'wptuts_enqueue' );
function wptuts_enqueue() {
	wp_register_style('wptuts-jquery-ui-style', 'http://ajax.googleapis.com/ajax/libs/jqueryui/1.8.21/themes/south-street/jquery-ui.css');
	wp_enqueue_style('wptuts-jquery-ui-style');

	wp_register_script('wptuts-custom-js', get_template_directory_uri() . '/faq/faq.js', 'jquery-ui-accordion', '', true);
	wp_enqueue_script('wptuts-custom-js');
}
You'll notice we only used one
wp_enqueue_scriptcall, because it's important the JavaScript files are loaded in order as they are dependent on each other. Settingjquery-ui-accordionas a dependency makes sure this happens.
Step 5 Setup the Shortcode
Because we want to be able to put our FAQ Accordion on any page/post, we're going to generate a shortcode. Using a shortcode means that we only have to type [faq] inside any post/page in the WordPress Editor to display our FAQ.
add_shortcode('faq', function() {
	return "Shortcode test";
});
Step 6 Get the FAQ Questions & Answers
We can get the data from our custom post type by using the get_posts() function.
-
numberposts– Here you can limit how many FAQ questions are retrieved -
orderbyandorder– Allows us to change the order of the questions -
post_type– This is how we tell WordPress to only fetch our custom post type
add_shortcode('faq', function() {
	$posts = get_posts( array(
		'numberposts' => 10,
		'orderby' => 'menu_order',
		'order' => 'ASC',
		'post_type' => 'faq'
	)); //array of objects returned
});
/* example */
echo $posts[0]->post_content; // will output the answer from the first faq question.
Step 7 Generate the Markup for the jQuery UI Accordion
This is the markup needed for the jQuery UI Accordion :
<!-- Markup needed for jQuery UI Accordion -->
<div id="wptuts-accordion">
	<h3><a href="">Question Will Go Here</a></h3>
	<div>Answer will be in this div.</div>
</div>
We can generate this by looping over the $posts array.
- First we use
$faqto store the start of our HTML – we open up adivwith an id ofwptuts-accordion - Next we start looping through all the posts and adding the result of
sprintfto the$faqvariable. -
sprintfwill replace%1$swith the value retrieved from$post->post_titleand%2$swith the value returned from$post->post_content - We run
$post->post_contentthroughwpautop()to ensure it displays as it was authored in the admin area. - Finally we close off the
divand return$faqto output the HTML onto our page.
	$faq  = '<div id="wptuts-accordion">'; // the container, before the loop

	foreach ( $posts as $post ) {
		$faq .= sprintf(('<h3><a href="">%1$s</a></h3><div>%2$s</div>'),
			$post->post_title,
			wpautop($post->post_content)
		);
	}

	$faq .= '</div>'; // finish off by closing the container

	return $faq;
The Full Shortcode
add_shortcode('faq', function() {

	$posts = get_posts(array(  //Get the FAQ Custom Post Type
		'numberposts' => 10,
		'orderby' => 'menu_order',
		'order' => 'ASC',
		'post_type' => 'faq',
	));

	$faq  = '<div id="wptuts-accordion">'; //Open the container
	foreach ( $posts as $post ) { // Generate the markup for each Question
		$faq .= sprintf(('<h3><a href="">%1$s</a></h3><div>%2$s</div>'),
			$post->post_title,
			wpautop($post->post_content)
		);
	}
	$faq .= '</div>'; //Close the container

	return $faq; //Return the HTML.
});
Final Step
Phew! If you have got this far, well done – you're nearly there! At the moment we've managed to output all the data needed for our accordion, all that's left to do is place this in faq.js:
(function(){
	jQuery("#wptuts-accordion").accordion();
})();


Comments