Android users are always on the lookout for apps that can alter the behavior of their devices in new and innovative ways. The Android platform gives its developers a lot of freedom to build such apps. In this tutorial, you will learn how to create an app that randomizes the ringtone of an Android phone every time it receives a call.
Prerequisites
If you'd like to follow along, then make sure you have the latest version of Android Studio installed. You can get it from the Android Developer website.
Because this is an intermediate tutorial, I won't cover the basics in too much detail. I assume that you have already created one or more Android apps and are familiar with the basics of the Android SDK.
1. Create a New Project
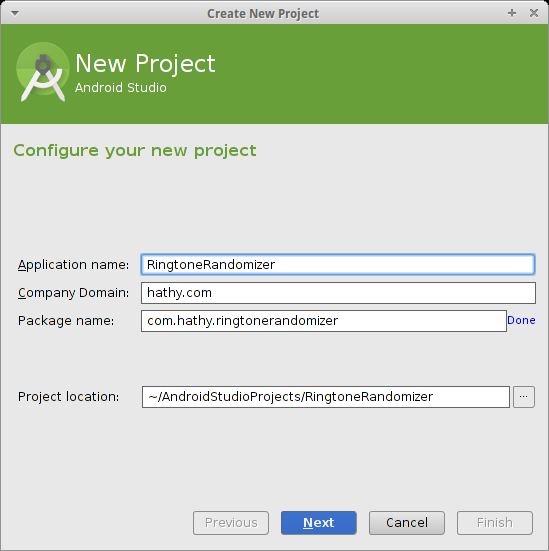
Start Android Studio and create a new project. Set the name of the application to RingtoneRandomizer. Make sure you choose a unique package name.
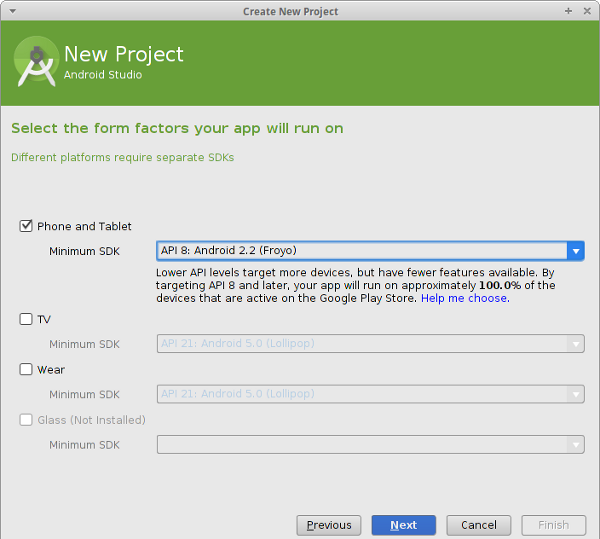
This app can run on all phones that have API level 8 or higher, so set the minimum SDK to Android 2.2.
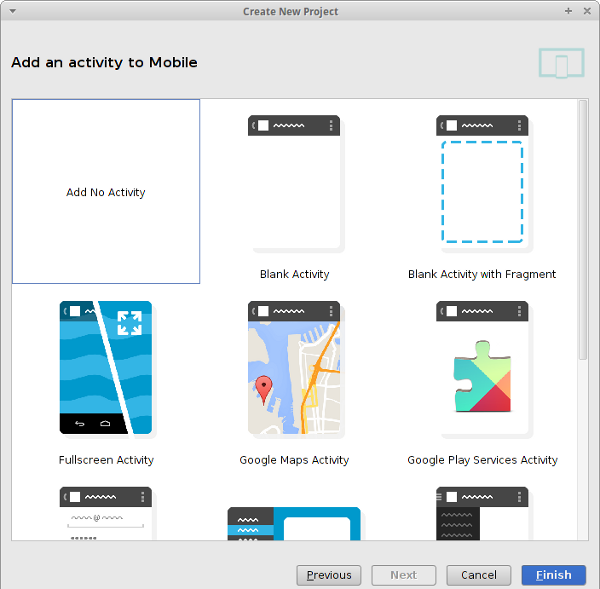
Next, choose Add No Activity and click Finish.
2. Edit Manifest
Our app will need the following permissions:
-
android.permission.READ_PHONE_STATEto detect incoming calls -
android.permission.WRITE_SETTINGSto change the default ringtone setting -
android.permission.READ_EXTERNAL_STORAGEto fetch the list of available ringtones
Add the following to AndroidManifest.xml:
<uses-permission android:name="android.permission.READ_PHONE_STATE"/>
<uses-permission android:name="android.permission.WRITE_SETTINGS"/>
<uses-permission android:name="android.permission.READ_EXTERNAL_STORAGE"/>
This app has one Activity, to allow the user to activate/deactivate the ringtone changing behavior.
<activity android:name=".MainActivity" >
    <intent-filter>
        <action android:name="android.intent.action.MAIN" />
        <category android:name="android.intent.category.LAUNCHER" />
    </intent-filter>
</activity>
It also has a BroadcastReceiver to detect call state changes. As shown below, the intent action that it listens to is android.intent.action.PHONE_STATE.
<receiver
    android:name=".RingReceiver"
    android:enabled="true">
    <intent-filter>
        <action android:name="android.intent.action.PHONE_STATE"/>
    </intent-filter>
</receiver>
3. Edit strings.xml
The strings.xml file contains the strings the app uses. Update values/strings.xml as shown below:
<?xml version="1.0" encoding="utf-8"?>
<resources>
    <string name="app_name">Ringtone Randomizer</string>

    <string name="activate">Activate Ringtone Randomizer</string>
    <string name="deactivate">Deactivate Ringtone Randomizer</string>

    <string name="list_of_ringtones">Ringtones available on this device:</string>
</resources>
4. Create Activity Layout
The Activity needs the following views:
- a
ToggleButtonto activate/deactivate the ringtone randomizer - a
ListViewto display all available ringtones - a
TextViewthat acts as a label
Create a file named layout/activity_main.xml and replace its contents with the following. As you can see, the layout is pretty simple and straightforward.
<?xml version="1.0" encoding="utf-8"?>
<LinearLayout xmlns:android="http://schemas.android.com/apk/res/android"
    android:orientation="vertical" android:layout_width="match_parent"
    android:layout_height="match_parent"
    android:padding="16dp"
    >

    <ToggleButton
        android:layout_width="match_parent"
        android:layout_height="wrap_content"
        android:textOff="@string/activate"
        android:textOn="@string/deactivate"
        android:id="@+id/toggle"
        />

    <TextView
        android:layout_width="match_parent"
        android:layout_height="wrap_content"
        android:text="@string/list_of_ringtones"
        android:textStyle="bold"
        />

    <ListView
        android:layout_width="match_parent"
        android:layout_height="match_parent"
        android:id="@+id/list_of_ringtones"
        />

</LinearLayout>
5. Create RingtoneHelper Helper Class
In order to avoid dealing with the RingtoneManager directly in the Activity or the BroadcastReceiver, we're going to create a helper class named RingtoneHelper.
public class RingtoneHelper {

}
The RingtoneHelper class will have two static methods that make use of the RingtoneManager class.
fetchAvailableRingtones
The fetchAvailableRingtones method fetches the list of available ringtones, returning a List of Ringtone objects.
public static List<Ringtone> fetchAvailableRingtones(Context context){

    List<Ringtone> ringtones = new ArrayList<>();
    RingtoneManager mgr = new RingtoneManager(context);
    mgr.setType(RingtoneManager.TYPE_RINGTONE);

    int n = mgr.getCursor().getCount();
    for(int i=0;i<n;i++){
        ringtones.add(mgr.getRingtone(i));
    }

    return  ringtones;
}
In fetchAvailableRingtones method, we start by creating an instance of the RingtoneManager class. The RingtoneManager object can list all the sounds available on the device. This includes the sounds for alarms and other notifications.
We use the setType method to set its type to TYPE_RINGTONE as we are only interested in ringtones.
We then invoke the getCount method to know how many ringtones are available and call the getRingtone method in a for loop, adding each ringtone to ringtones.
changeRingtone
The changeRingtone method is responsible for changing the ringtone of the device, the core feature of our app.
public static void changeRingtone(Context context){

    SharedPreferences preferences = context.getSharedPreferences("randomizer", Context.MODE_PRIVATE);
    if(!preferences.getBoolean("active", false))
        return;

    RingtoneManager mgr = new RingtoneManager(context);
    Random random = new Random(System.currentTimeMillis());

    int n = random.nextInt(mgr.getCursor().getCount());

    RingtoneManager.setActualDefaultRingtoneUri(context,
            RingtoneManager.TYPE_RINGTONE, mgr.getRingtoneUri(n));
}
We first check in SharedPreferences if the user has activated the ringtone randomizer. We then use the Random class to pick a random number that's less than the number of available ringtones.
The getRingtoneUri method is invoked to fetch the URI of the corresponding ringtone and pass it to the setActualDefaultRingtoneUri method to change the ringtone.
6. Create Broadcast Receiver
Create a new class named RingReceiver that inherits from BroadcastReceiver. The new class will have only one method named onReceive. In this method, all we do is call the helper class's changeRingtone method if the following criteria are met:
- the action of the received
Intentis equal toTelephonyManager.ACTION_PHONE_STATE_CHANGED - the value of the lookup key
EXTRA_STATEis equal toTelephonyManager.EXTRA_STATE_RINGING
This is what the RingReceiver class should look like:
public class RingReceiver extends BroadcastReceiver {

    @Override
    public void onReceive(Context context, Intent intent) {

        if(intent.getAction().equals(TelephonyManager.ACTION_PHONE_STATE_CHANGED)) {
            String callState = intent.getStringExtra(TelephonyManager.EXTRA_STATE);
            if (callState.equals(TelephonyManager.EXTRA_STATE_RINGING)) {
                RingtoneHelper.changeRingtone(context);
            }
        }
    }
}
7. Create Activity
Create a new class named MainActivity that inherits from Activity. We override the onCreate method and perform the following actions:
- invoke
setContentViewto use the layout defined in activity_main.xml - call the helper class's
fetchAvailableRingtonesmethod to populate aListof ringtones - initialize the
ListView - initialize the
ToggleButton
The MainActivity class should now look something like this:
public class MainActivity extends Activity {

    private ListView listOfRingtones;
    private ToggleButton toggleRandomizer;
    private List<Ringtone> ringtones;

    @Override
    protected void onCreate(Bundle savedInstanceState) {
        super.onCreate(savedInstanceState);

        setContentView(R.layout.activity_main);
        listOfRingtones = (ListView)findViewById(R.id.list_of_ringtones);
        toggleRandomizer = (ToggleButton)findViewById(R.id.toggle);

        ringtones = RingtoneHelper.fetchAvailableRingtones(this);
        initializeList();
        initializeToggle();
    }
}
initializeToggle
In the initializeToggle method we set the state of the toggle button based on a boolean value named active in SharedPreferences. This value is set to false by default.
We also add an OnCheckedChangeListener to the toggle button to update the value in SharedPreferences. The putBoolean and commit methods of the Editor are used to accomplish this.
private void initializeToggle(){
    final SharedPreferences preferences = getSharedPreferences("randomizer", Context.MODE_PRIVATE);
    boolean active = preferences.getBoolean("active", false);
    toggleRandomizer.setChecked(active);

    toggleRandomizer.setOnCheckedChangeListener(new CompoundButton.OnCheckedChangeListener() {
        @Override
        public void onCheckedChanged(CompoundButton buttonView, boolean isChecked) {
            preferences.edit().putBoolean("active", isChecked).commit();
        }
    });
}
initializeList
The initializeList method creates an Adapter based on the List of ringtones. Use android.R.layout.simple_list_item_1 as the layout of the items of the ListView. It is nothing but a TextView. It should display the title of the ringtone, using the Ringtone class's getTitle method. This should be done inside the getView method of the Adapter, after overriding it.
Once the Adapter is ready, assign it to the ListView by using the ListView's setAdapter method.
private void initializeList(){
    ArrayAdapter<Ringtone> adapter = new ArrayAdapter<Ringtone>(this,
            android.R.layout.simple_list_item_1, ringtones) {
        @Override
        public View getView(int position, View convertView, ViewGroup parent) {
            TextView item = (TextView)super.getView(position, convertView, parent);
            item.setText(ringtones.get(position).getTitle(MainActivity.this));
            return item;
        }
    };

    listOfRingtones.setAdapter(adapter);
}
8. Compile and Run
Our app is now ready to be deployed on an Android phone. You should be able to see all the ringtones available on your phone when you start the app. Click on the toggle button to activate the randomizer.
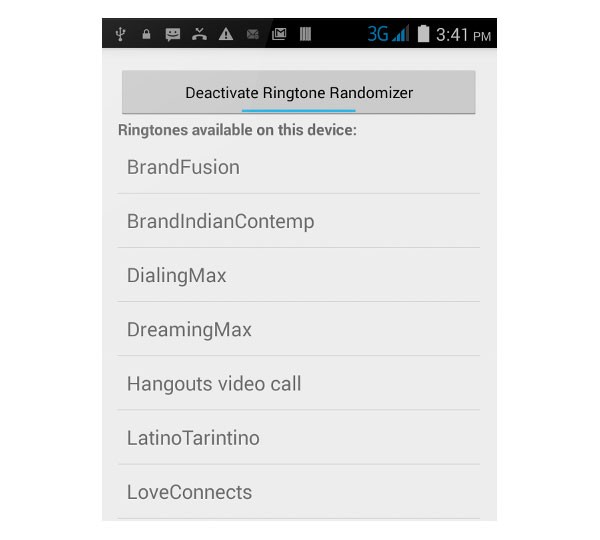
Call yourself from another phone a couple of times. The first time you receive a call, your original ringtone will be played. From the next call onwards, you will hear a random ringtone every time.
Note that this app changes the default ringtone of your phone. If you have assigned a specific ringtone to a contact or a group of contacts, that ringtone will still be used.
Conclusion
You now know how to make use of functionality available in the RingtoneManager class. You have also learned how to detect incoming calls. Feel free to build on this app to randomize other notifications in a similar manner. Visit the Android Developer website to learn more about the RingtoneManager class.

Comments