In this article, I'll demonstrate how to create a custom dashboard module in OpenCart. The dashboard modules provide a high-level view of the happenings and statistics of the store. Although you'll find certain useful dashboard modules already in the core itself, sometimes you want to be more specific about the information which is going to be displayed. Thus, you end up creating your custom dashboard module.
Today, we'll create an example dashboard module and integrate it with the admin dashboard display. To keep things simple, we'll make a block of the most recent customers available in the store. We'll use the latest version of OpenCart, and I assume that you're familiar with the basic module development process in OpenCart.
What Is a Dashboard Module?
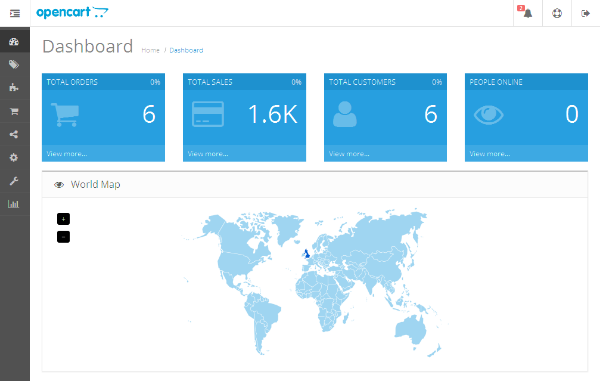
Once you're logged in to the back-end of OpenCart, you'll be redirected to the screen where you'll see the blocks like "Total Orders", "Total Sales", "World Map", etc. These blocks are the different dashboard modules which provide useful information about what's going on in the store. One of the most common uses of any dashboard module is to provide some kind of statistics.

Technically, the dashboard module is similar to the other modules in OpenCart and follows the same structure and conventions as any OpenCart module. But what makes them special is the way they are attached to the dashboard display in the back-end.
So we'll start with the usual custom module development process for our custom dashboard module. Finally, we'll attach our module to the dashboard section.
Create a Custom Dashboard Module
Go ahead and create a file admin/controller/dashboard/recentcustomers.php with the following contents. We'll use recentcustomers as our module name.
<?php
class ControllerDashboardRecentcustomers extends Controller {
public function index() {
$this->load->language('dashboard/recentcustomers');
$data['heading_title'] = $this->language->get('heading_title');
$data['column_customer_id'] = $this->language->get('column_customer_id');
$data['column_customer_name'] = $this->language->get('column_customer_name');
$data['column_customer_email'] = $this->language->get('column_customer_email');
$data['column_date_added'] = $this->language->get('column_date_added');
$data['text_no_results'] = $this->language->get('text_no_results');
$data['recentcustomers'] = array();
$this->load->model('report/recentcustomers');
$results = $this->model_report_recentcustomers->getRecentCustomers();
foreach ($results as $result) {
$data['recentcustomers'][] = array(
'customer_id' => $result['customer_id'],
'name' => $result['firstname'] . ' ' . $result['lastname'],
'email' => $result['email'],
'date_added' => $result['date_added']
);
}
return $this->load->view('dashboard/recentcustomers.tpl', $data);
}
}
It's a fairly straightforward controller setup! The important thing to note here is that we're loading the recentcustomers model and calling the getRecentCustomers method to fetch the recent customers.
Let's go ahead and quickly create a language file at admin/language/english/dashboard/recentcustomers.php.
<?php
// Heading
$_['heading_title']                = 'Recent Customers';

// Text
$_['column_customer_id']           = 'Customer ID';
$_['column_customer_name']         = 'Customer Name';
$_['column_customer_email']        = 'Customer Email';
$_['column_date_added']            = 'Date Added';
$_['text_no_results']              = 'No customer(s) found.';
Again, this is nothing more than setting up the labels which will be used in the view file.
Further, create a model file at admin/model/report/recentcustomers.php with the following contents.
<?php
class ModelReportRecentcustomers extends Model {
  public function getRecentCustomers() {
    $query = $this->db->query("SELECT * FROM `" . DB_PREFIX . "customer` ORDER BY date_added DESC LIMIT 5");

    return $query->rows;
  }
}
In the model file, we've defined a getRecentCustomers method which will simply fetch the five most recent customers in the store.
Finally, we'll go ahead and create a view file at admin/view/template/dashboard/recentcustomers.tpl.
<div class="panel panel-default">
  <div class="panel-heading">
    <h3 class="panel-title"><i class="fa fa-users"></i> <?php echo $heading_title; ?></h3>
  </div>
  <div class="table-responsive">
    <table class="table">
      <thead>
        <tr>
          <td class="text-right"><?php echo $column_customer_id; ?></td>
          <td><?php echo $column_customer_name; ?></td>
          <td><?php echo $column_customer_email; ?></td>
          <td><?php echo $column_date_added; ?></td>
        </tr>
      </thead>
      <tbody>
        <?php if ($recentcustomers) { ?>
            <?php foreach ($recentcustomers as $customer) { ?>
                <tr>
                  <td class="text-right"><?php echo $customer['customer_id']; ?></td>
                  <td><?php echo $customer['name']; ?></td>
                  <td><?php echo $customer['email']; ?></td>
                  <td><?php echo $customer['date_added']; ?></td>
                </tr>
            <?php } ?>
        <?php } else { ?>
        <tr>
          <td class="text-center" colspan="6"><?php echo $text_no_results; ?></td>
        </tr>
        <?php } ?>
      </tbody>
    </table>
  </div>
</div>
In the view, we're iterating over the customer records and displaying it in a nice, responsive table format.
So, that's it as far as our custom module is concerned! You should have noticed that the procedure is exactly the same as that of any custom module development process. In the next section, we'll see exactly how our custom module will be attached to the dashboard section!
Attach Our Module to the Dashboard
To attach our custom module to the dashboard, we'll have to change a couple of core files in the back-end. For the sake of simplicity, we'll look at the changes required in the core files. Having said that, you should strictly avoid altering the core files directly and instead use OCMOD, which allows you to do that in a much better way.
Go ahead and open the admin/controller/common/dashboard.php file in your favorite text editor. Find the $data['recent'] = $this->load->controller('dashboard/recent'); snippet and add the following snippet just next to that line.
$data['recentcustomers'] = $this->load->controller('dashboard/recentcustomers');
It's used to initialize our "Recent Customers" block.
Further, edit the file located at admin/view/template/common/dashboard.tpl. Find the <div class="col-lg-8 col-md-12 col-sm-12 col-sx-12"><?php echo $recent; ?></div> snippet in that file and add the following code after that line.
<div class="col-lg-8 col-md-12 col-sm-12 col-sx-12">
  <?php echo $recentcustomers; ?>
</div>
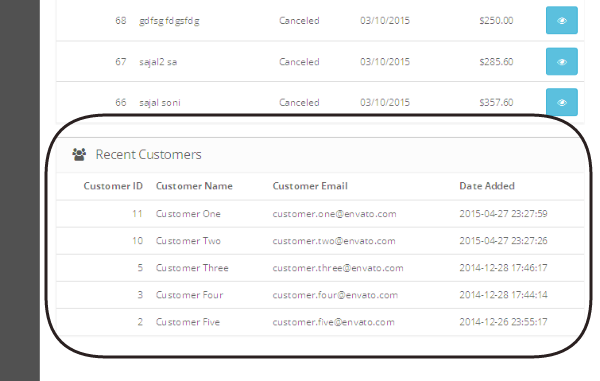
So, we've almost done it! Now, refresh your dashboard and you should be able to see a nice-looking Recent Customers module as shown in the following screenshot.

Conclusion
Today, we've learned how to create a custom dashboard module in OpenCart. It's a nice way to display the aggregated information in the store and keep an eye on what's going on in the store.
We have a lot of extensions for OpenCart available in the market that will help to expand your implementation beyond what the platform offers out-of-the-box, too.
I'm sure that it'll be useful to you, and don't forget to share your feedback and suggestions!


Comments