Introduction
The Core Data framework has been around for many years. It's used in thousands of applications and by millions of people, both on iOS and OS X. Core Data is maintained by Apple and is very well documented. It's a mature framework that has proven it's value over and over.
Even though Core Data relies heavily on the Objective-C runtime and integrates neatly with the Core Foundation framework, you can easily use the framework in your Swift projects. The result is an easy to use framework for managing an object graph that is elegant to use and incredibly efficient in terms of memory usage.
1. Prerequisites
The Core Data framework isn't difficult per se, but if you're new to iOS or OS X development, then I recommend you first go through our series about iOS development. It teaches you the fundamentals of iOS development and, at the end of the series, you will have enough knowledge to take on more complex topics, such as Core Data.
As I said, Core Data isn't as complex or difficult to pick up as most developers think. However, I've learned that a solid foundation is critical to get up to speed with Core Data. You need to have a proper understanding of the Core Data API to avoid bad practices and make sure you don't run into problems using the framework.
Every component of the Core Data framework has a specific purpose and function. If you try to use Core Data in a way it wasn't designed for, you will inevitably end up struggling with the framework.
What I cover in this series on Core Data is applicable to iOS 7+ and OS X 10.10+, but the focus will be on iOS. In this series, I will work with Xcode 7.1 and Swift 2.1. If you prefer Objective-C, then I recommend reading my earlier series on the Core Data framework.
2. Learning Curve
The Core Data framework can seem daunting at first, but the API is intuitive and concise once you understand how the various pieces of the puzzle fit together. And that's exactly why most developers run into problems using the framework. They try to use Core Data before they've seen that proverbial puzzle, they don't know how the pieces of the puzzle fit together and relate to one another.
In this article, I will help you become familiar with the Core Data stack. Once you understand the key players of the Core Data stack, the framework will feel less daunting and you will even start to enjoy and appreciate the framework's well-crafted API.
In contrast to frameworks like UIKit, which you can use without understanding the framework in its entirety, Core Data requires a proper understanding of its building blocks. It's important to set aside some time to become familiar with the framework, which we'll do in this tutorial.
3. What Is Core Data?
Developers new to the Core Data framework often confuse it with and expect it to work as a database. If there's one thing I hope you'll remember from this series, it is that Core Data isn't a database and you shouldn't expect it to act like one.
What is Core Data if it isn't a database? Core Data is the model layer of your application in the broadest sense possible. It's the Model in the Model-View-Controller pattern that permeates the iOS SDK.
Core Data isn't the database of your application nor is it an API for persisting data to a database. Core Data is a framework that manages an object graph. It's as simple as that. Core Data can persist that object graph by writing it to disk, but that isn't the primary goal of the framework.
4. Core Data Stack
As I mentioned earlier, the Core Data stack is the heart of Core Data. It's a collection of objects that make Core Data tick. The key objects of the stack are the managed object model, the persistent store coordinator, and one or more managed object contexts. Let's start by taking a quick look at each component.
NSManagedObjectModel
The managed object model represents the data model of the application. Even though Core Data isn't a database, you can compare the managed object model to the schema of a database, that is, it contains information about the models or entities of the object graph, what attributes they have, and how they relate to one another.
The NSManagedObjectModel object knows about the data model by loading one or more data model files during its initialization. We'll take a look at how this works in a few moments.
NSPersistentStoreCoordinator
As its name indicates, the NSPersistentStoreCoordinator object persists data to disk and ensures the persistent store(s) and the data model are compatible. It mediates between the persistent store(s) and the managed object context(s) and also takes care of loading and caching data. That's right. Core Data has caching built in.
The persistent store coordinator is the conductor of the Core Data orchestra. Despite its important role in the Core Data stack, you will rarely interact with it directly.
NSManagedObjectContext
The NSManagedObjectContext object manages a collection of model objects, instances of the NSManagedObject class. It is possible for an application to have multiple managed object contexts. Each managed object context is backed by a persistent store coordinator.
You can see a managed object context as a workbench on which you work with your model objects. You load them, you manipulate them, and save them on that workbench. Loading and saving are mediated by the persistent store coordinator. You can have multiple workbenches, which is useful if your application is multithreaded, for example.
While a managed object model and persistent store coordinator can be shared across threads, managed object contexts should never be accessed from a thread different than the one they were created on. We'll discuss multithreading in more detail later in this series.
5. Exploring the Core Data Stack
Step 1: Project Setup
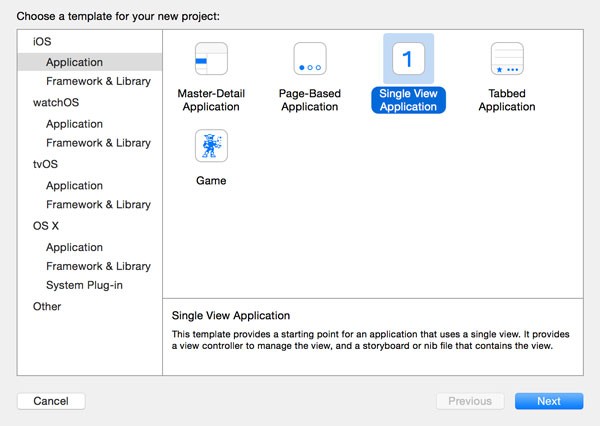
Let's explore the Core Data stack in more detail by taking a look at an example. Create a new project in Xcode 7 by selecting New > Project... from the File menu. Choose the Single View Application template from the list of iOS > Application templates on the left.

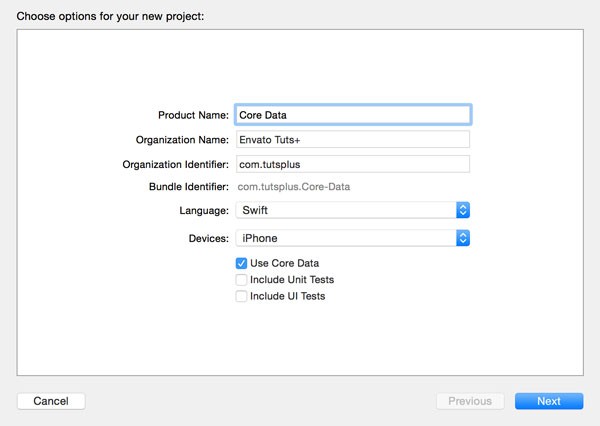
Name the project Core Data, set Language to Swift, Devices to iPhone, and check the checkbox labeled Use Core Data. Tell Xcode where you'd like to store the project files and click Create.

Step 2: Overview
By default, Apple puts code related to Core Data in the application's delegate class, the AppDelegate class in our example. Open AppDelegate.swift and let's start exploring the implementation of the AppDelegate class.
At the top of AppDelegate.swift, you should see an import statement for the Core Data framework.
import UIKit
import CoreData
The AppDelegate class further contains four lazy stored properties:
-
applicationDocumentsDirectoryof typeNSURL -
managedObjectModelof typeNSManagedObjectModel -
managedObjectContextof typeNSManagedObjectContext -
persistentStoreCoordinatorof typeNSPersistentStoreCoordinator
The first property, applicationDocumentsDirectory, is nothing more than a helper for accessing the application's Documents directory. The implementation is pretty simple as you can see below. The NSFileManager class is used to fetch the location of the application's Documents directory.
lazy var applicationDocumentsDirectory: NSURL = {
    let urls = NSFileManager.defaultManager().URLsForDirectory(.DocumentDirectory, inDomains: .UserDomainMask)
    return urls[urls.count-1]
}()
The remaining three lazy stored properties are more interesting and directly related to the Core Data framework. We're first going to explore the managedObjectContext property.
Step 3: Managed Object Context
The class you'll use most often, apart from NSManagedObject, when interacting with Core Data is NSManagedObjectContext.
lazy var managedObjectContext: NSManagedObjectContext = {
    let coordinator = self.persistentStoreCoordinator
    var managedObjectContext = NSManagedObjectContext(concurrencyType: .MainQueueConcurrencyType)
    managedObjectContext.persistentStoreCoordinator = coordinator
    return managedObjectContext
}()
Note that the NSManagedObjectContext object is instantiated and configured in a closure. In the closure, we first get a reference to the persistent store coordinator. We then instantiate the NSManagedObjectContext, passing in .MainQueueConcurrencyType as the first argument. You'll learn more about concurrency types later in this series. By passing in .MainQueueConcurrencyType, we indicate that the managed object context will do its work using the queue of the main thread.
Before we return the managed object context, we set the object's persistentStoreCoordinator property. Without a persistent store coordinator, a managed object context is useless. That wasn't too difficult. Was it?
In summary, the managed object context manages a collection of model objects, instances of the NSManagedObject class, and keeps a reference to a persistent store coordinator. Keep this in mind while reading the rest of this article.
Step 4: Persistent Store Coordinator
As we saw a moment ago, the persistentStoreCoordinator property is accessed during the configuration of the managed object context. Take a look at the implementation of the persistentStoreCoordinator property, but don't let it scare you. It's actually not that complicated.
lazy var persistentStoreCoordinator: NSPersistentStoreCoordinator = {
    let coordinator = NSPersistentStoreCoordinator(managedObjectModel: self.managedObjectModel)
    let url = self.applicationDocumentsDirectory.URLByAppendingPathComponent("SingleViewCoreData.sqlite")
    var failureReason = "There was an error creating or loading the application's saved data."
    do {
        try coordinator.addPersistentStoreWithType(NSSQLiteStoreType, configuration: nil, URL: url, options: nil)
    } catch {
        var dict = [String: AnyObject]()
        dict[NSLocalizedDescriptionKey] = "Failed to initialize the application's saved data"
        dict[NSLocalizedFailureReasonErrorKey] = failureReason

        dict[NSUnderlyingErrorKey] = error as NSError
        let wrappedError = NSError(domain: "YOUR_ERROR_DOMAIN", code: 9999, userInfo: dict)
        NSLog("Unresolved error \(wrappedError), \(wrappedError.userInfo)")
        abort()
    }

    return coordinator
}()
You will almost always want to store Core Data's object graph to disk and Apple's implementation of the persistentStoreCoordinator property uses a SQLite database to accomplish this. This is a common scenario for Core Data applications.
In the closure of the persistentStoreCoordinator property, we start by instantiating an instance of the NSPersistentStoreCoordinator class, passing in the managed object model as an argument. We'll explore the managedObjectModel property in a moment.
As you can see, creating an NSPersistentStoreCoordinator object is easy. However, a persistent store coordinator is of little use if it doesn't have any persistent stores to manage. In the remainder of the closure, we attempt to load a persistent store and add it to the persistent store coordinator.
We start by specifying the location of the store on disk, using the applicationDocumentsDirectory property we saw earlier. The result, an NSURL object, is passed to the addPersistentStoreWithType(_:configuration:URL:options:) method of the NSPersistentStoreCoordinator class. As the method's name indicates, the method adds a persistent store to the persistent store coordinator. The method accepts four arguments.
We first specify the store type, NSSQLiteStoreType in this example. Core Data also supports binary stores (NSBinaryStoreType) and an in-memory store (NSInMemoryStoreType).
The second argument tells Core Data which configuration to use for the persistent store. We pass in nil, which tells Core Data to use the default configuration. The third argument is the location of the store, which is stored in url.
The fourth argument is a dictionary of options that lets us alter the behavior of the persistent store. We'll revisit this aspect later in this series and pass in nil for now.
Because addPersistentStoreWithType(_:configuration:URL:options:) is a throwing method, we wrap the method call in a do-catch statement. If no errors pop up, this method returns an NSPersistentStore object. We don't keep a reference to the persistent store, because we don't need to interact with it once it's added to the persistent store coordinator.
If adding the persistent store fails, though, it means that there's a problem with the persistent store of the application and we need to take the necessary steps to resolve the problem. When this happens and why it happens is the subject of a future installment of this series.
In the catch clause, we log any errors to the console and abort is invoked. You should never call abort in a production environment, because it crashes the application. We will implement a less aggressive solution later in this series.
Step 5: Managed Object Model
The third and final piece of the puzzle is the managed object model. Let's take a look at the implementation of the managedObjectModel property.
lazy var managedObjectModel: NSManagedObjectModel = {
    let modelURL = NSBundle.mainBundle().URLForResource("Core_Data", withExtension: "momd")!
    return NSManagedObjectModel(contentsOfURL: modelURL)!
}()
The implementation is very easy. We store the location of the application's model in modelURL and use it during the instantiation of the managed object model.
Because the initializer, init(contentsOfURL:), returns an optional, we force unwrap it before returning the result. Isn't that dangerous? Yes and no. It's not recommended to force unwrap optionals. However, failing to initialize the managed object model means that the application is unable to find the data model in the application's bundle. If that happens, then something went wrong that is beyond the control of the application.
At this point, you're probably wondering what that model is modelURL is pointing to and what the file with the .momd extension is. To answer these questions, we need to find out what else Xcode has created for us during the project's setup.
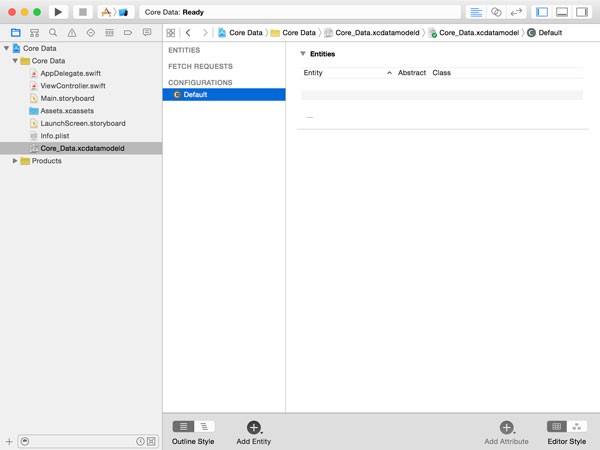
In the Project Navigator on the left, you should see a file named Core_Data.xcdatamodeld. This is the data model of the application that's compiled to an .momd file. It's that .momd file that the managed object model uses to create the application's data model.

It is possible to have several data model files. The NSManagedObjectModel class is perfectly capable of merging multiple data models into one, that is one of the more powerful and advanced features of Core Data.
The Core Data framework also supports data model versioning as well as migrations. This ensures that the data stored in the persistent store(s) doesn't get corrupted. We will cover versioning and migrations later in this series.
The data model file in your project is empty at the moment, which means that your data model contains no entities. We'll remedy this in the next tutorial that will focus exclusively on the data model.
6. Putting It All Together
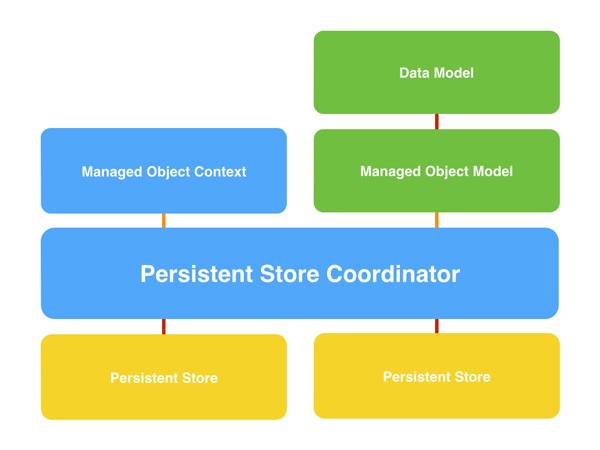
Before we wrap up this article, I'd like to show you a diagram that illustrates the three components of the Core Data stack.

The above diagram is a visual representation of what we explored in the example project a moment ago. The NSPersistentStoreCoordinator object is the brain of the application's Core Data stack. It talks to one or more persistent stores and makes sure data is saved, loaded, and cached.
The persistent store coordinator knows about the data model, the schema of the object graph if you like, through the NSManagedObjectModel object. The managed object model creates the application's data model from one or more .momd files, binary representations of the data model.
Last but not least, the application accesses the object graph through one or more instances of the NSManagedObjectContext class. A managed object context knows about the data model through the persistent store coordinator, but it doesn't know or keep a reference to the managed object model. There is no need for such a reference.
The managed object context asks the persistent coordinator for data and tells it to save data when necessary. This is all done for you by the Core Data framework and your application rarely needs to talk to the persistent store coordinator directly.
Conclusion
In this article, we covered the key players of the Core Data stack, the persistent store coordinator, the managed object model, and the managed object context. Make sure you understand the role of each component and, more importantly, how they work together to make Core Data do its magic.
In the next installment of this series, we dive into the data model. We take a look at the data model editor in Xcode and we create a few entities, attributes, and relationships.


Comments