This tutorial is the last in a three-part series on working with the push notification features of iOS 3.0+. It focuses on using some of the more elaborate features of Apple's Push Notification Service (APNS). This installment builds on the code we created in the first and second tutorials, so be sure to read those first if you haven't already.
Localization
At the end of the last installment, we sent our first push to our app. It wasn't anything fancy. Just a simple alert message: "You have been poked by Tyler." It doesn't take a genius to realize that this message is in English, but what would have happened if we had sent it out to the millions of people using our app around the world? Chances are, some of them would not have understood what we sent. That's where localization comes in.
Note: For an in-depth explanation of localization and how it works on iOS, see Apple's developer documentation. I'm going to assume you understand the basics...
Changes to the push
Look again at Urban Airship's Test Push Notifications console:
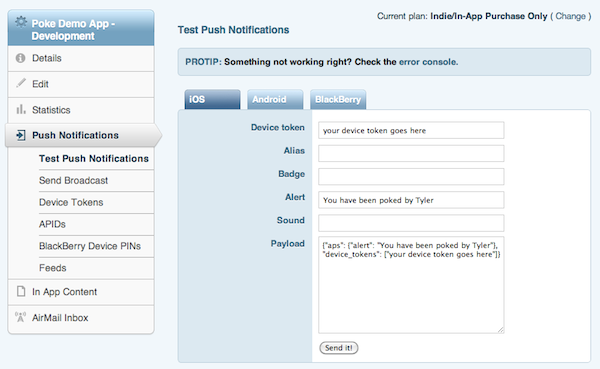
You'll notice that as you change the contents of the upper fields it updates the JSON in the "Payload" field. You can also manually adjust the JSON, which is what we're going to do now.
Here is the original JSON, reformatted for legibility:
{
    "aps": {
        "alert": "You have been poked by Tyler"
    },
    "device_tokens": ["your device token goes here"]
}
The "aps" dictionary is a required part of any APNS JSON payload. It tells iOS what to do with the notification. Currently, the "alert" key has a string value ("You have been poked[...]"), but APNS allows a dictionary value for this key as well. You will need to use a dictionary if you want to support localization.
For alerts, you can localize the message body as well as the action button name that appears on the alert (which defaults to "View"). Additionally, you can either send the localized message body already as part of the message payload or you can use pre-localized strings in your app bundle. We're going to do the latter.
Let's update the "alert" key in the "aps" dictionary in the payload with the necessary fields:
{
    "aps": {
        "alert": {
            "loc-key": "PokeMessageFormat",
            "loc-args": ["Tyler"]
        }
    },
    "device_tokens": ["your device token goes here"]
}
"loc-key" specifies the name of a string in our Localizable.strings file in our app bundle. Any format specifiers in our format string (PokeMessageFormat) will be replaced by the strings in "loc-args." So now, instead of displaying "You have been poked by Tyler," iOS will grab the PokeMessageFormat localized string from our bundle, insert Tyler into the appropriate place, and display the localized message in the alert. Now we just need to update our app to support localization.
Changes to the app
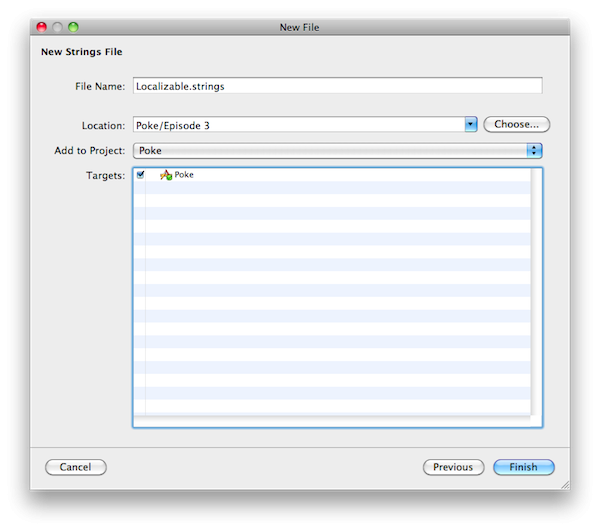
Open the app's project in Xcode. With "Resources" selected from the Groups & Files pane on the left, select "New File..." from the File menu. Under the Mac OS X: Resource section, select "Strings File" and click "Next."

Name the file Localizable.strings and click "Finish."
Now that the file is created, we need to make it localizable. Select the file from the Groups & Files pane at the left and click "Info" in the toolbar (or Command-I). At the very bottom of the General tab, there should be a button titled "Make File Localizable." Click it. Then close the Info window.
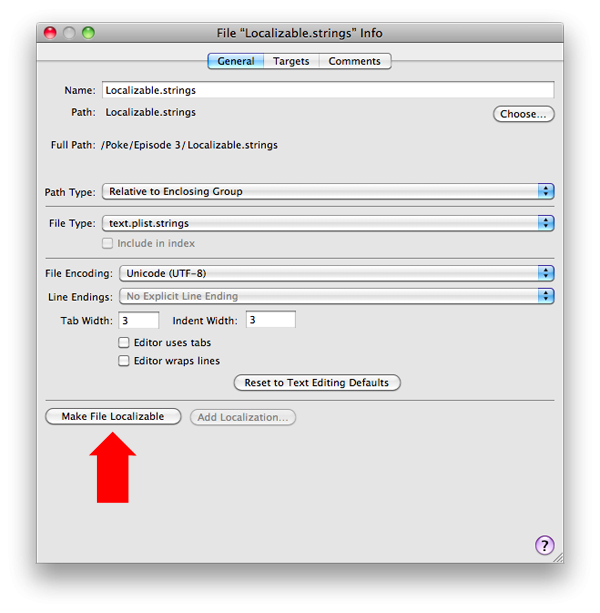
Though it may seem like voodoo magic, all that this button does is create a English.lproj folder in your project directory (if necessary) and move the Localizable.strings file inside it. Again, if you want more information on the "Why?" of this, go read Apple's developer documentation on internationalization and localization - I'll wait...
No takers? OK, moving on.
Now that our strings file has been created, we need to add the string we referenced earlier - PokeMessageFormat:
// Localizable.strings
"PokeMessageFormat" = "You have been poked by %@";
You'll notice that our string looks much the same as our original message but with a format specifier in place of the name. Now, when the new push arrives, iOS will grab our localized poke string, insert the name of the person poking us, and display the alert. Violá! 10 million happy users, just like that.
OK, OK, slight oversimplification. You still have to add localizations for all the languages you want to support and translate our poke message into those languages. But the basics are in place - the rest I leave as an exercise to you, the reader.
Sounds
Another great way to notify your users that your app has new info for them is via sound. This can either be in addition to or in place of the alert. If you plan on adding sound to your push messages, Apple strongly encourages you to use branded sounds - sounds that can easily be distinguished as belonging to your app. Think of the default SMS or email sounds - you know without even looking what they mean and to which apps they belong. That's exactly what you want to have happen with your sounds.
As noted in the first installment, sounds must be included in your app bundle and need to be in one of the following formats:
- Linear PCM
- MA4
- μLaw
- aLaw
If your sound isn't in one of the supported formats already, you'll need to use an audio utility to convert it. Apple's developer documentation has some pointers on converting audio files via the command line.
After adding our suitably-formatted audio file to our Xcode project, we're ready to update the payload again:
{
    "aps": {
        "alert": {
            "loc-key": "PokeMessageFormat",
            "loc-args": ["Tyler"]
        },
        "sound": "myAwesomeSound.caf"
    },
    "device_tokens": ["your device token goes here"]
}
"sound" specifies the name of our custom sound file. As noted by Apple's documentation:
If the sound file doesn't exist or default is specified as the value, the default alert sound is played.
And with these few, simple changes we now have sound!
Additional Payload Info
Our push notification payload isn't limited to just the info specified by Apple. Outside of the reserved "aps" dictionary, we can add any other valid JSON to our payload, up to the 256-byte maximum. In our Poke app, for example, we might include the id for the poke that was sent, so that we can display more information about it if the receiver chooses to tap "View" and open the app:
{
    "aps": {
        "alert": {
            "loc-key": "PokeMessageFormat",
            "loc-args": ["Tyler"]
        },
        "sound": "myAwesomeSound.caf"
    },
    "device_tokens": ["your device token goes here"],
    "poke_id": "1234567890"
}
We receive the "poke_id" as part of the launch options in our app delegate:
// in PokeAppDelegate.m
- (BOOL)application:(UIApplication*)application
   didFinishLaunchingWithOptions:(NSDictionary*)launchOptions
{
   // Register for alert notifications
   [application registerForRemoteNotificationTypes:UIRemoteNotificationTypeAlert];

   // Check for push notification info
   NSDictionary *pushInfo = [launchOptions valueForKey:UIApplicationLaunchOptionsRemoteNotificationKey];
   if (pushInfo)
   {
      // TODO: Pull the poke's info from our server and update the UI to display it
      NSLog(@"Here's our poke id: %@", [pushInfo valueForKey:@"poke_id"]);
   }

   // Add the view controller's view to the window and display.
   [window addSubview:viewController.view];
   [window makeKeyAndVisible];

   return YES;
}
As a reminder, sensitive user data should never be sent as part of a push notification payload.
Quiet Time
Finally, there is one feature of Urban Airship's push service that I'd like to show: Quiet Time. From their developer docs:
Often end users don't want to receive push notifications at certain times, such as when they're asleep. Urban Airship supports setting a "quiet time" via the device registration API during which time no push notifications for your app will be delivered to that device token. Push notifications containing a badge update will still be sent during quiet time, but the alert and sound will be removed.
Given the nature of our app, I don't think it's unreasonable to assume that some users may not want to get poked at three in the morning and have our loud, branded sound go off. So, we'll go ahead and quickly implement this feature.
To do so, all we need to do is update our app's device registration call with Urban Airship. Here it is in its original form:
// in PokeAppDelegate.m
- (void)application:(UIApplication*)application
   didRegisterForRemoteNotificationsWithDeviceToken:(NSData*)deviceToken
{
   // ** Pass the token to Urban Airship **

   // Convert the token to a hex string and make sure it's all caps
   NSMutableString *tokenString = [NSMutableString stringWithString:
                                   [[deviceToken description] uppercaseString]];
   [tokenString replaceOccurrencesOfString:@""
                                withString:@""
                                   options:0
                                     range:NSMakeRange(0, tokenString.length)];
   [tokenString replaceOccurrencesOfString:@" "
                                withString:@""
                                   options:0
                                     range:NSMakeRange(0, tokenString.length)];

   NSLog(@"Token: %@", tokenString);

   // Create the NSURL for the request
   NSString *urlFormat = @"https://go.urbanairship.com/api/device_tokens/%@";
   NSURL *registrationURL = [NSURL URLWithString:[NSString stringWithFormat:
                                                  urlFormat, tokenString]];

   // Create the registration request
   NSMutableURLRequest *registrationRequest = [[NSMutableURLRequest alloc]
                                               initWithURL:registrationURL];
   [registrationRequest setHTTPMethod:@"PUT"];

   // And fire it off
   NSURLConnection *connection = [NSURLConnection connectionWithRequest:registrationRequest
                                                               delegate:self];
   [connection start];
}
We need to pass the start and stop time as well as the timezone to Urban Airship. Let's go with their example values of 22:00 as the start time (i.e. 10:00PM) and 8:00 (AM) as the stop time. We'll grab the id of the user's current timezone from the system.
// in PokeAppDelegate.m
- (void)application:(UIApplication*)application
   didRegisterForRemoteNotificationsWithDeviceToken:(NSData*)deviceToken
{
   // ** Pass the token to Urban Airship **

   // Convert the token to a hex string and make sure it's all caps
   NSMutableString *tokenString = [NSMutableString stringWithString:
                                   [[deviceToken description] uppercaseString]];
   [tokenString replaceOccurrencesOfString:@""
                                withString:@""
                                   options:0
                                     range:NSMakeRange(0, tokenString.length)];
   [tokenString replaceOccurrencesOfString:@" "
                                withString:@""
                                   options:0
                                     range:NSMakeRange(0, tokenString.length)];

   NSLog(@"Token: %@", tokenString);

   // Create the NSURL for the request
   NSString *urlFormat = @"https://go.urbanairship.com/api/device_tokens/%@";
   NSURL *registrationURL = [NSURL URLWithString:[NSString stringWithFormat:
                                                  urlFormat, tokenString]];

   // Create the registration request
   NSMutableURLRequest *registrationRequest = [[NSMutableURLRequest alloc]
                                               initWithURL:registrationURL];
   [registrationRequest setHTTPMethod:@"PUT"];

   // Create the JSON request body
   //   Note: You should NEVER generate JSON manually like this...
   NSString *startTime = @"22:00";
   NSString *endTime = @"8:00";
   NSString *timezoneName = [[NSTimeZone localTimeZone] name];
   NSString *body = [NSString stringWithFormat:@"{\"quiettime\":{\"start\":\"%@\",\"end\":\"%@\"}," \
                     "\"tz\":\"%@\"}", startTime, endTime, timezoneName];

   // Add it to the request
   NSData *bodyData = [body dataUsingEncoding:NSUTF8StringEncoding];
   [registrationRequest setHTTPBody:bodyData];
   [registrationRequest setValue:[NSString stringWithFormat:@"%u", [bodyData length]]
              forHTTPHeaderField:@"Content-Length"];
   [registrationRequest setValue:@"application/json" forHTTPHeaderField:@"Content-Type"];

   // And away it goes...
   NSURLConnection *connection = [NSURLConnection connectionWithRequest:registrationRequest
                                                               delegate:self];
   [connection start];
}
And now our users won't be kept awake from a bombardment of 3 A.M. pokes.
Well, that wraps up this series on using the Push Notification capabilities of iOS 3.0+. I hope that it gave you a good overview of how the service works and the basic steps required to begin leveraging it in your app. If you have any questions or get stuck on anything, let me know in the comments.

Comments