This tutorial is the first in a three-part series on working with the push notification features of iOS 3.0+. It will cover everything you need to do to get push notifications working in your app: registering for notifications, configuring your app in the iOS Provisioning Portal, sending notifications to Apple's Push Notification Service (APNS), and handling them in your app.
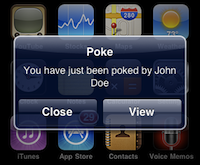
In this tutorial, we will create a demo app called Poke. It will allow you to "poke" users via push notification alerts. Though arguably not a great use of the service, this tutorial will teach you the basics of what you need to know to get started.
1. Push overview
Many desktop applications utilize background processes to constantly provide users with updated information. These background applications usually implement a pull design - they actively poll a server for changes to their data. It's not uncommon to have several of these programs running on your computer, connecting to a number of third-party servers.
While this might not be an issue on a desktop machine with lots of available memory and processing throughput and an endless supply of power, this methodology quickly becomes a problem on a mobile device with a much more limited quantity of all three.
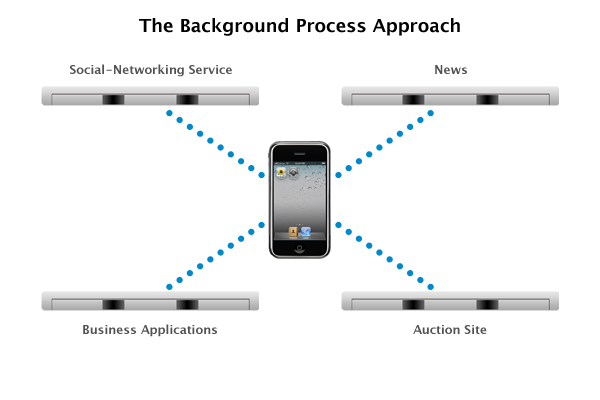
With push notifications, introduced in iOS 3.0, Apple has worked around these limitations with a push-based design. Rather than forcing your app to remain open and constantly querying for updates as in the pull model, iOS itself instead listens for updates and notifies your app when they arrive. The result is decreased processor, memory, and battery use. Additionally, instead of each app connecting to its own server, a single persistent connection is maintained between the iOS device and the APNS.
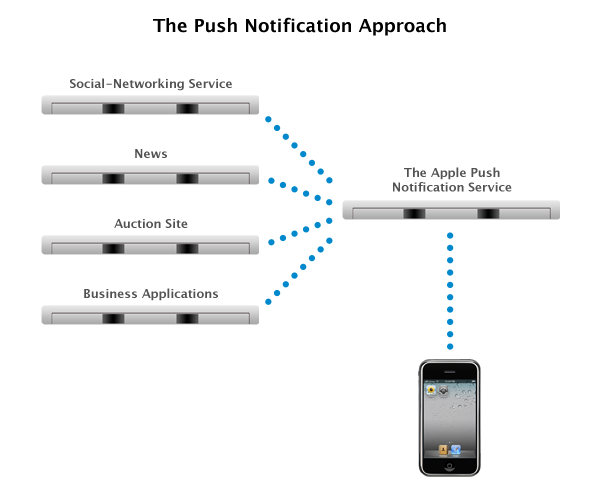
As noted in the diagram above, with push notifications your server connects to the APNS instead of the end user's device. When data in which a given user is interested changes, your server sends a message to the APNS which will then notify the user. The user can then decide what to do with that information (i.e. act on it now or wait until later).
Note: Your app may still have to actually download some or all of the changed data from your server, but the difference is the user's device has not wasted processing cycles, battery life, and network bandwidth asking your server every 15 minutes if there is anything new. We'll get into more details on this in a later segment.
Push notifications work over any network connection and there is no additional cost (levied by Apple) for you, as a developer, to add this great feature to your apps.
In the recently-released App Store Guidelines, Apple has laid out a number of rules regarding the service. Most are common sense, but you might want to have a look at them if you haven't already.
2. Workflow and push requirements
In a nutshell, this is the basic app workflow for push notifications:
- Your app submits a request to the OS to register for notifications.
- The OS makes a secure connection to the APNS, gets back a device token, and passes it to your app. Note that, for security reasons, this token is not the same as the device identifier (as pulled from UIDevice's deviceIdentifier property). If a user remote wipes his lost iPhone, for example, when the device registers for notifications again it will receive a different device token.
- Your app passes this token to your server, where it is stored.
- When you want to send a push notification to a particular user, your server grabs that user's device token and sends it in a specially formatted payload to the APNS.
- The APNS forwards the message on to the given user's device.
We will cover each item on the list as we go through this series.
There are three basic requirements for the Apple Push Notification Service:
A Server
As mentioned earlier, Apple does not charge developers to use this service. However, the service does not provide any kind of frontend from which you can send notifications - you need to have your own server that connects to Apple's servers and sends pushes, and there may be hosting and other fees associated with that process.
A number of third-party services have cropped up to address this issue. These services act as a middleman between you and the APNS - they handle setting up the SSL connection to the APNS and usually expose an API that you can use to more easily send pushes. Some even have a web frontend that you can use to quickly send notifications without having to even write any code. In this series, we will be using Urban Airship, mostly due to their ease-of-use and great pricing.
An SSL certificate
The certificate identifies your app to the service and is used to establish the secure connection between your server and APNS. These certificates are generated (for free) in the iOS Provisioning Portal, and instructions on how to do so are given below in step 5.
A Properly Configured Provisioning Profile
This is also covered in detail in step 5, below. Let's dig in.
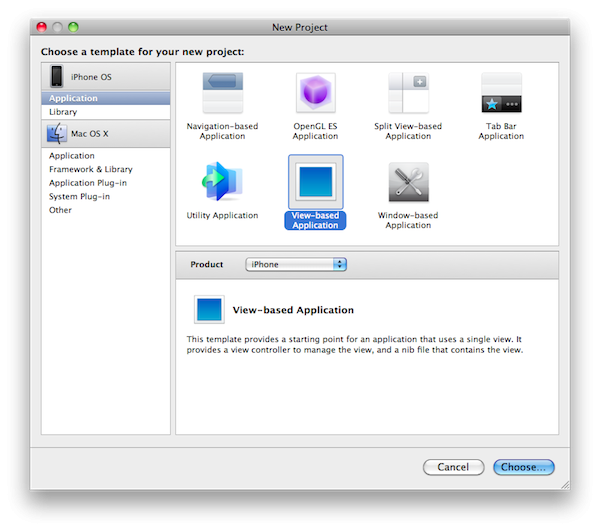
3. Create a new iPhone project in Xcode
Open Xcode and create a new iPhone project. For this tutorial, we will be using the simple "View-based Application" template for iPhone and will name our project "Poke."
4. Register for push notifications
As this part of the tutorial will be focusing mostly on the getting push notifications set up, we won't spend any time configuring our view to show any sort of useful information just yet. We'll pick that up in the third installment. Instead, let's jump right into registering our app with the Apple Push Notification Service.
In order for your app to receive push notifications, it first has to tell the Apple Push Notification Service what kinds of notifications it wishes to receive. Your app can support any combination of the following three types (listed in order of least to most intrusive):
-
Badges - displays a small number in a red circle on top of your app icon (as on the Mail and App Store apps below):

-
Sounds - plays either the default system sound (as heard when a SMS arrives) or your own branded sound. If you're going to use your own sound, it needs to be included in your app bundle and must be in one of the following formats:
- Linear PCM
- MA4
- µLaw
- aLaw
-
Alerts - displays a UIAlertView with your message:

Because alerts force the user to stop what he is doing to interact with them, Apple highly recommends that they be used sparingly. Don't abuse your users with alerts (or any kind of push notification, for that matter) - they will either turn off push notifications to your app or just delete your app altogether.
For this part of the tutorial, we will be focusing on alerts. In the final installment, we will come back and experiment with the other two.
Let's go ahead and inform iOS that our app wants to receive alert notifications.
Open up PokeAppDelegate.m (or whatever your app delegate happens to be named) and update the application:didFinishLaunchingWithOptions: callback to look like this:
- (BOOL)application:(UIApplication*)application
   didFinishLaunchingWithOptions:(NSDictionary*)launchOptions
{
   // Register for alert notifications
   [application registerForRemoteNotificationTypes:UIRemoteNotificationTypeAlert];

   // Add the view controller's view to the window and display.
   [window addSubview:viewController.view];
   [window makeKeyAndVisible];

   return YES;
}
Note that we're only passing UIRemoteNotificationTypeAlert, because all we want to receive right now is alerts. If you want to receive other notifications, go ahead and add them with a bitwise or:
[...]Types:UIRemoteNotificationTypeAlert | UIRemoteNotificationTypeBadge];
With these modifications to our app delegate, the OS will begin registering with the Apple Push Notification Service. If it succeeds, it will send an application:didRegisterForRemoteNotificationsWithDeviceToken: message to your app delegate with the device token; if it fails, it will send an application:didFailToRegisterForRemoteNotificationsWithError: message. Ideally, you should implement both.
Add the following two methods to your app delegate to handle the two possible outcomes of registration:
- (void)application:(UIApplication*)application
   didRegisterForRemoteNotificationsWithDeviceToken:(NSData*)deviceToken
{
   // TODO: Pass the token to our server

   NSLog(@"We successfully registered for push notifications");
}

- (void)application:(UIApplication*)application
   didFailToRegisterForRemoteNotificationsWithError:(NSError*)error
{
   // Inform the user that registration failed
   NSString* failureMessage = @"There was an error while trying to \
     register for push notifications.";
   UIAlertView* failureAlert = [[UIAlertView alloc] initWithTitle:@"Error"
                                                          message:failureMessage
                                                         delegate:nil
                                                cancelButtonTitle:@"OK"
                                                otherButtonTitles:nil];
   [failureAlert show];
   [failureAlert release];
}
We'll come back to the success callback in a later segment - for now, it just logs a quick message. Our failure callback informs the user of the failure. Note that registration will always fail on the iPhone Simulator, as it does not support push notifications. To properly test your code, you need to use an actual device.
5. Configure your app in the iOS Provisioning Portal
Now that we have a basic app created on our end, let's move over to Apple's side of things and get everything set up in the iOS Provisioning Portal.
If you are already a paying member of the iOS Developer Program, login to the iOS Dev Center and click the link on the right to go to the iOS Provisioning Portal. If you are not yet a member, you can sign up for $99 here.
The first thing you will need to do is ensure that you have already set up your account with the necessary developer certificates and have added your devices. Instructions for doing so are outside the scope of this tutorial, but Apple does provide a setup assistant as well as videos and other resources to walk you through the process. Check out the "Home" section of the portal for more info.
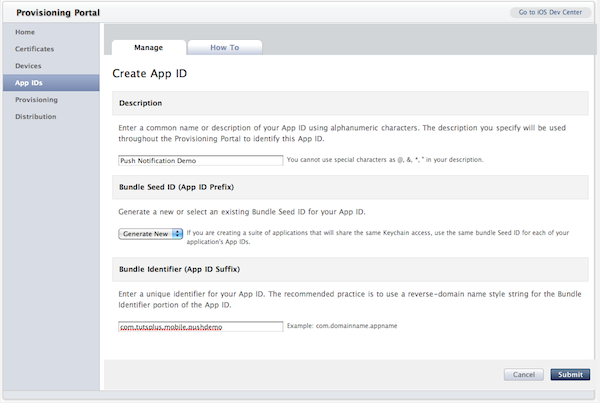
The next step is to create a new App ID. In order to properly associate pushes sent to the service with a specific application, the Apple Push Notification Service does not support apps with a "wildcard" bundle identifier (ie an identifier with a trailing asterisk such as com.acme.*). The reason being, the push service has to be able to identify the specific app to which the push belongs, but wildcard identifiers allow you to build multiple apps with the same provisioning profile. So, if you already have a wildcard identifier set up for development, you will need to create a new one for this app in order to enable push notification support. If your App ID does not use a wildcard bundle identifier, you can skip this step.
Click the "New App ID" button in the top-right corner. Fill in your app's information and click the "Submit" button.
Find your newly-created (or already-existing) App ID in the list and click the "Configure" link on the right. In the page that comes up, check "Enable for Apple Push Notification service."
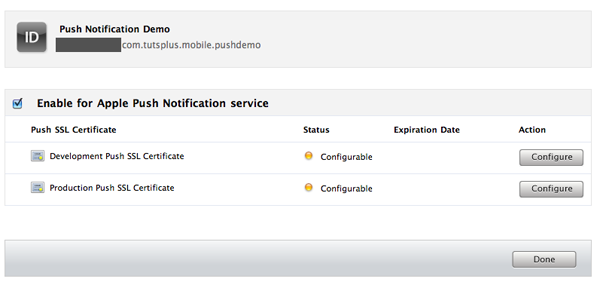
If "Enable for Apple Push Notification service" is not showing up, your App ID is probably not configured correctly. Go back to the previous step and make sure you did not enter a wildcard bundle identifier.
You'll notice that there are two certificates listed - one for development and the other for production. The APNS has test servers and live production servers. Each uses and requires a different client SSL certificate. The test servers can be used to send pushes to apps built with development provisioning profiles; the production servers can be used to send pushes to apps built with distribution provisioning profiles (Ad Hoc, In House, or App Store builds).
For now, we don't need to worry too much about the distinction, but this will come into play in the next installment when we start setting up our account at Urban Airship.
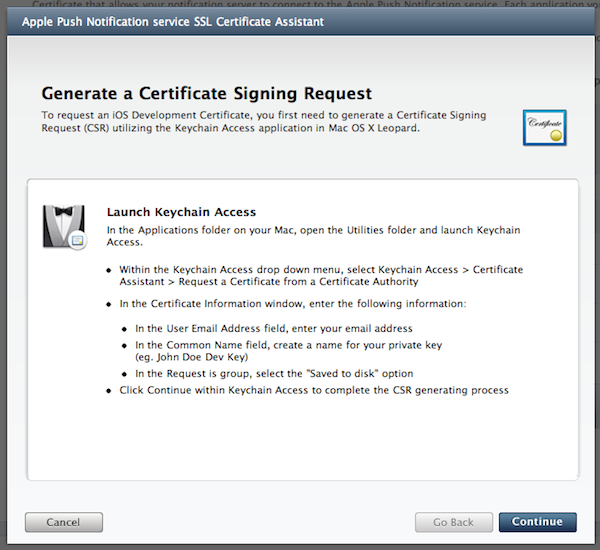
As we will currently be working with a development build of our app, click the "Configure" button for the Development Push SSL Certificate. Follow the directions in the box that appears to create a certificate signing request, then click "Continue."
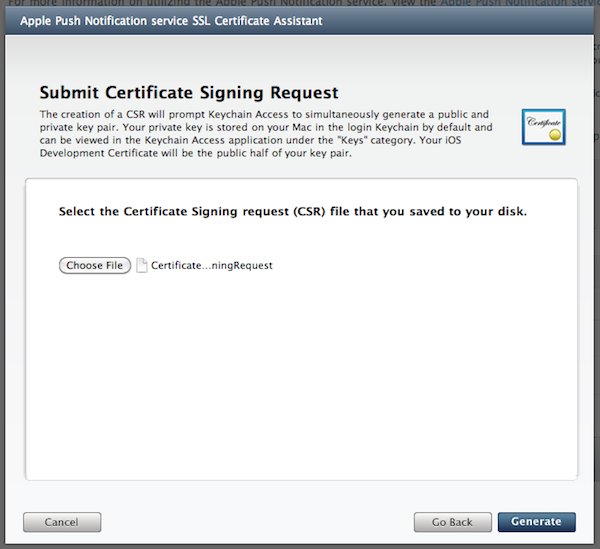
Select your newly-generated CSR by clicking "Choose File," and then click "Generate" to generate your SSL certificate.
You should see a progress meter and afterward the following confirmation:
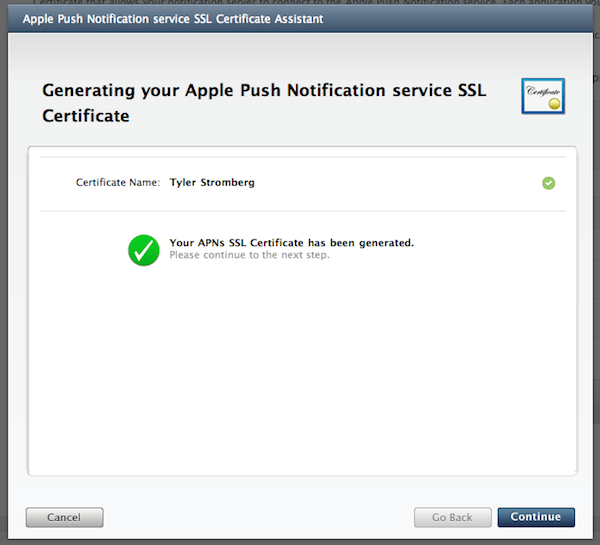
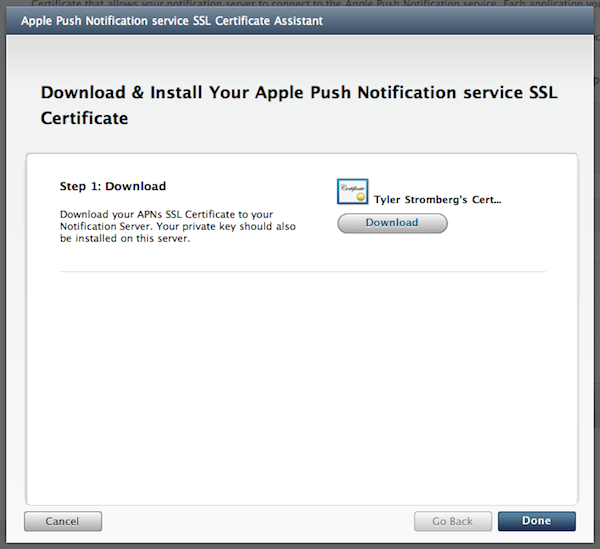
Click "Continue" and you'll be taken to the Download & Install step. We'll get into what to do with this certificate in the second installment of this tutorial, but for now go ahead and click "Download" to download your new APNS client SSL Certificate.
Next, we need to create a provisioning profile for our new (or existing, non-wildcard) App ID.
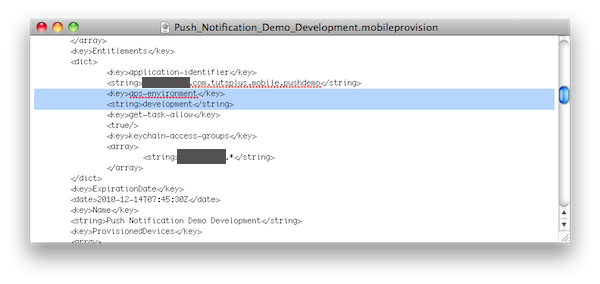
Note: according to Apple's Local and Push Notification Guide, if you already created a provisioning profile for your existing App ID prior to enabling push notifications for that ID, you will need to modify the profile in some way (i.e. change the name) so that the portal will regenerate it with the necessary push entitlements.
You can verify that a profile has the proper push entitlements by opening it in a text editor. It should have an aps-environment key:
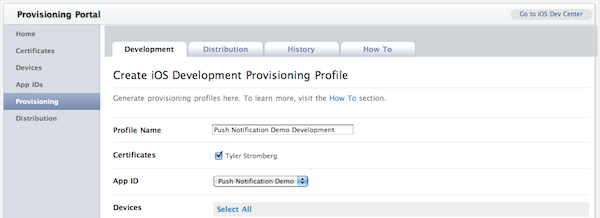
Back in the iOS Provisioning Portal, select "Provisioning" from the main menu at the left. Click the "Development" tab and select the "New Profile" button. Enter a descriptive name in the Profile Name field and select the certificates for the developers who can use this profile to build apps. If you signed up as an individual, only one certificate will be listed (yours); if you signed up as a company, there may be more than one listed.
Choose the App ID you created in the earlier step (or your existing one) from the App ID list, and select the devices on which you want to test your app from the list at the bottom. Then click "Submit" to generate the new provisioning profile.
After a few minutes, your profile will be issued and a "Download" button will appear in the Actions column at the right (You might need to refresh your browser). Once it does, click it to download your new development provisioning profile.
To install your profile, drag the newly-downloaded .mobileprovision file onto Xcode or iTunes in the Dock.
6. Configure your app to use the new provisioning profile
Go back to your project in Xcode.
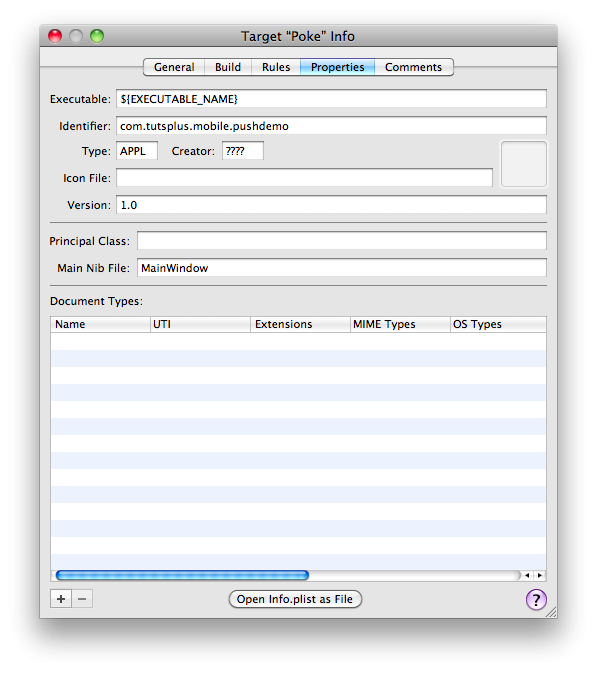
Select "Edit Active Target 'Poke'" from the Project menu. Navigate to the Properties tab and enter the bundle identifier you set up in the iOS Provisioning Portal earlier (in our case, com.tutsplus.mobile.pushdemo).
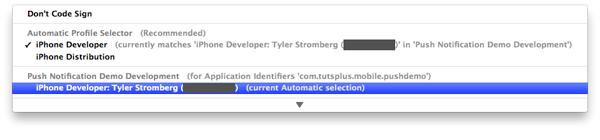
Next, switch to the Build tab. Make sure that the configuration selected at the top is Debug. Find the Code Signing section in the table. The second item in the list should be Code Signing Identity and it should have one child item, Any iOS Device. This setting tells Xcode which provisioning profile to use to sign your app when building for an iOS device. The value for Any iOS Device should be "iPhone Developer (currently matches 'iPhone Developer: [Your name]' [...])."
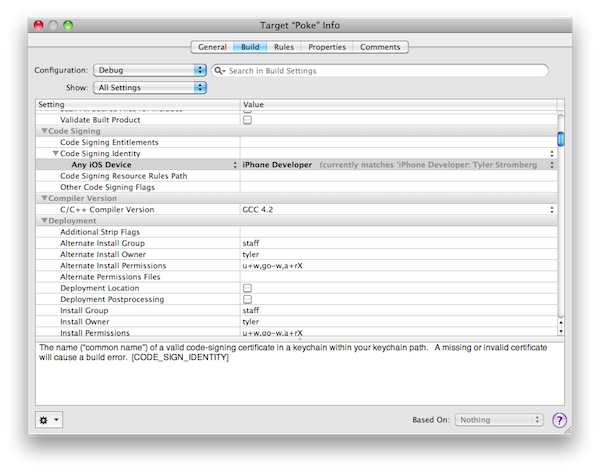
This currently-selected option is the Automatic Profile Selector. It looks at your app's bundle ID (which we set in the last step) and finds the provisioning profile with a matching ID (or a wildcard ID that matches). While you can probably get away with leaving this option as-is, I usually try to minimize the potential sources of code signing errors by selecting the profile I want to use manually.
And that's it! You've successfully created a new iPhone project and configured it for push notifications! In the next installment, we will start talking about the server side of things and how to actually send a push to your newly-created app.

Comments