In the first tutorial of this series, we explored the CloudKit framework and infrastructure. We also laid the foundation for the sample application that we're going to build, a shopping list application. In this tutorial, we are focusing on adding, editing, and removing shopping lists.
Prerequisites
As I mentioned in the previous tutorial, I will be using Xcode 7 and Swift 2. If you are using an older version of Xcode, then keep in mind that you are using a different version of the Swift programming language.
In this tutorial, we will continue working with the project we created in the first tutorial. You can download it from GitHub.
1. Setting Up CocoaPods
The shopping list application will make use of the SVProgressHUD library, a popular library created by Sam Vermette that makes it easy to display a progress indicator. You can add the library manually to your project, but I strongly recommend using CocoaPods for managing dependencies. Are you new to CocoaPods? I've written an introductory tutorial to CocoaPods that will help you get up to speed.
Step 1: Creating a Podfile
Open Finder and navigate to the root of your Xcode project. Create a new file, name it Podfile, and add the following lines of Ruby to it.
platform :ios, '8.0'
use_frameworks!

target 'Lists' do
  pod 'SVProgressHUD', '~> 1.1'
end
The first line specifies the platform, iOS, and the project's deployment target, iOS 8.0. The second line is important if you're using Swift. Swift does not support static libraries, but CocoaPods does provide the option since version 0.36 to use frameworks. We then specify the dependencies for the Lists target of the project. Replace Lists with your target's name if your target is named differently.
Step 2: Installing Dependencies
Open Terminal, navigate to the root of your Xcode project, and run pod install. This will do a number of things for you, such as installing the dependencies specified in Podfile and creating an Xcode workspace.
After completing the CocoaPods setup, close the project and open the workspace CocoaPods created for you. The latter is very important. Open the workspace, not the project. The workspace includes two projects, the Lists project and a project named Pods.
2. Listing Shopping Lists
Step 1: Housekeeping
We're ready to refocus on the CloudKit framework. First, however, we need to do some housekeeping by renaming the ViewController class to the ListsViewController class.
Start by renaming ViewController.swift to ListsViewController.swift. Open ListsViewController.swift and change the name of the ViewController class to the ListsViewController class.
Next, open Main.storyboard, expand View Controller Scene in the Document Outline on the left and select View Controller. Open the Identity Inspector on the right and change Class to ListsViewController.
Step 2: Adding a Table View
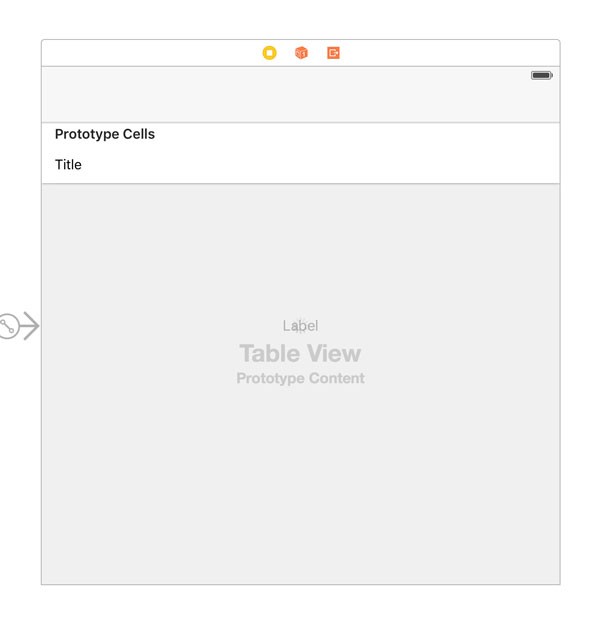
When the user opens the application, it is presented with their shopping lists. We'll display the shopping lists in a table view. Let's start by setting up the user interface. Select the Lists View Controller in the Lists View Controller Scene and choose Embed In > Navigation Controller from Xcode's Editor menu.
Add a table view to the view controller's view and create the necessary layout constraints for it. With the table view selected, open the Attributes Inspector and set Prototype Cells to 1. Select the prototype cell and set Style to Basic and Identifier to ListCell.
With the table view selected, open the Connections Inspector. Connect the table view's dataSource and delegate outlets to the Lists View Controller.
Step 3: Empty State
Even though we're only creating a sample application to illustrate how CloudKit works, I'd like to display a message if something goes wrong or if no shopping lists were found on iCloud. Add a label to the view controller, make it as large as the view controller's view, create the necessary layout constraints for it, and center the label's text.
Since we're dealing with network requests, I also want to display an activity indicator view as long as the application is waiting for a response from iCloud. Add a activity indicator view to the view controller's view and center it in its parent view. In the Attributes Inspector, tick the checkbox labeled Hides When Stopped.
Step 4: Connecting Outlets
Open ListsViewController.swift and declare an outlet for the label, the table view, and the activity indicator view. This is also a good time to make the ListsViewController class conform to the UITableViewDataSource and UITableViewDelegate protocols.
Note that I've also added an import statement for the SVProgressHUD framework and that I've declared a static constant for the reuse identifier of the prototype cell we created in the storyboard.
import UIKit
import CloudKit
import SVProgressHUD

class ListsViewController: UIViewController, UITableViewDataSource, UITableViewDelegate {
    static let ListCell = "ListCell"

    @IBOutlet weak var messageLabel: UILabel!
    @IBOutlet weak var tableView: UITableView!
    @IBOutlet weak var activityIndicatorView: UIActivityIndicatorView!

    ...

}
Head back to the storyboard and connect the outlets with the corresponding views in the Lists View Controller Scene.
Step 5: Preparing the Table View
Before we fetch data from iCloud, we need to make sure the table view is ready to display the data. We first need to create a property, lists, to hold the records we're about to fetch. Remember that records are instances of the CKRecord class. This means the property that will hold the data from iCloud is of type [CKRecord], an array of CKRecord instances.
class ListsViewController: UIViewController, UITableViewDataSource, UITableViewDelegate, AddListViewControllerDelegate {
    static let ListCell = "ListCell"

    @IBOutlet weak var messageLabel: UILabel!
    @IBOutlet weak var tableView: UITableView!
    @IBOutlet weak var activityIndicatorView: UIActivityIndicatorView!

    var lists = [CKRecord]()

    ...

}
To get started, we need to implement three methods of the UITableViewDataSource protocol:
numberOfSectionsInTableView(_:)numberOfRowsInSection(_:)cellForRowAtIndexPath(_:)
If you have any experience working with table views, then the implementation of each of these methods is straightforward. However, cellForRowAtIndexPath(_:) may require some explanation. Remember that a CKRecord instance is a supercharged dictionary of key-value pairs. To access the value of a particular key, you invoke objectForKey(_:) on the CKRecord object. That's what we do in cellForRowAtIndexPath(_:). We fetch the record that corresponds with the table view row and ask it for the value for key "name". If the key-value pair doesn't exist, we display a dash to indicate the list doesn't have a name yet.
// MARK: -
// MARK: Table View Data Source Methods
func numberOfSectionsInTableView(tableView: UITableView) -> Int {
    return 1;
}

func tableView(tableView: UITableView, numberOfRowsInSection section: Int) -> Int {
    return lists.count
}

func tableView(tableView: UITableView, cellForRowAtIndexPath indexPath: NSIndexPath) -> UITableViewCell {
    // Dequeue Reusable Cell
    let cell = tableView.dequeueReusableCellWithIdentifier(ListsViewController.ListCell, forIndexPath: indexPath)

    // Configure Cell
    cell.accessoryType = .DetailDisclosureButton

    // Fetch Record
    let list = lists[indexPath.row]

    if let listName = list.objectForKey("name") as? String {
        // Configure Cell
        cell.textLabel?.text = listName

    } else {
        cell.textLabel?.text = "-"
    }

    return cell
}
Step 6: Preparing the User Interface
There's one more step for us to take, prepare the user interface. In the view controller's viewDidLoad method, remove the fetchUserRecordID method call and invoke setupView, a helper method.
override func viewDidLoad() {
    super.viewDidLoad()

    setupView()
}
The setupView method prepares the user interface for fetching the list of records. We hide the label and the table view, and tell the activity indicator view to start animating.
// MARK: -
// MARK: View Methods
private func setupView() {
    tableView.hidden = true
    messageLabel.hidden = true
    activityIndicatorView.startAnimating()
}
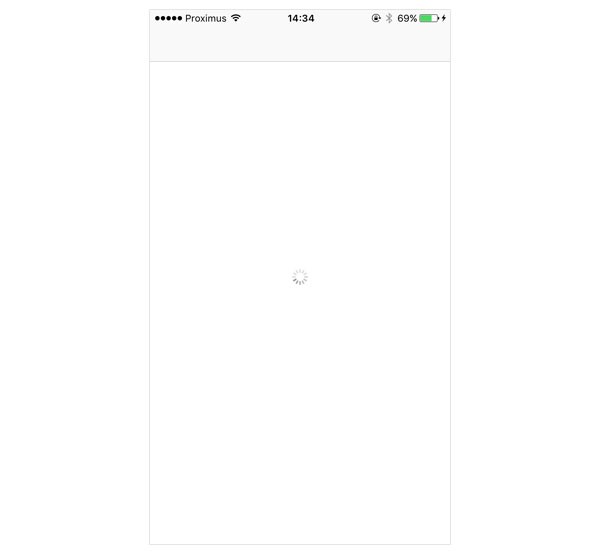
Build and run the application on a device or in the iOS Simulator. If you've followed the above steps, you should see an empty view with a spinning activity indicator view in the center.
Step 7: Creating a Record Type
Before we fetch any records, we need to create a record type for a shopping list in the CloudKit dashboard. The CloudKit dashboard is a web application that lets developers manage the data stored on Apple's iCloud servers.
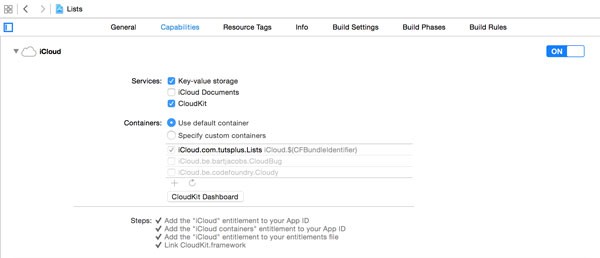
Select the project in the Project Navigator and choose the Lists target from the list of targets. Open the Capabilities tab at the top and expand the iCloud section. Below the list of iCloud containers, click the button labeled CloudKit Dashboard.
Sign in with your developer account and make sure the Lists application is selected in the top left. On the left, select Record Types from the Schema section. Every application has by default a Users record type. To create a new record type, click the plus button at the top of the third column. We will follow Apple's naming convention and name the record type Lists, not List.

Note that the first field is automatically created for you. Set Field Name to name and verify that Field Type is set to String. Don't forget to click the Save button at the bottom to create the Lists record type. We'll revisit the CloudKit Dashboard later in this series.
Step 8: Performing a Query
With the Lists record type created, it's finally time to fetch some records from iCloud. The CloudKit framework provides two APIs to interact with iCloud, a convenience API and an API based on the NSOperation class. We will use both APIs in this series, but we're going to keep it simple for now and use the convenience API.
In Xcode, open ListsViewController.swift and invoke the fetchLists method in viewDidLoad. The fetchLists method is another helper method. Let's take a look at the method's implementation.
override func viewDidLoad() {
    super.viewDidLoad()

    setupView()
    fetchLists()
}
Because a shopping list record is stored in the user's private database, we first get a reference to the default container's private database. To fetch the user's shopping lists, we need to perform a query on the private database, using the CKQuery class.
// MARK: -
// MARK: Helper Methods
private func fetchLists() {
    // Fetch Private Database
    let privateDatabase = CKContainer.defaultContainer().privateCloudDatabase

    // Initialize Query
    let query = CKQuery(recordType: RecordTypeLists, predicate: NSPredicate(format: "TRUEPREDICATE"))

    // Configure Query
    query.sortDescriptors = [NSSortDescriptor(key: "name", ascending: true)]

    // Perform Query
    privateDatabase.performQuery(query, inZoneWithID: nil) { (records, error) -> Void in
        dispatch_async(dispatch_get_main_queue(), { () -> Void in
            // Process Response on Main Thread
            self.processResponseForQuery(records, error: error)
        })
    }
}
We initialize a CKQuery instance by invoking the init(recordType:predicate:) designated initializer, passing in the record type and an NSPredicate object. To avoid typos, I've created a constant for the record type. The constant, RecordTypeLists, is declared at the top of ListsViewController.swift.
import UIKit
import CloudKit
import SVProgressHUD

let RecordTypeLists = "Lists"

class ListsViewController: UIViewController, UITableViewDataSource, UITableViewDelegate {
...
Before we execute the query, we set the query's sortDescriptors property. We create an array containing an NSSortDescriptor object with key "name" and ascending set to true.
Executing the query is as simple as calling performQuery(_:inZoneWithID:completionHandler:) on privateDatabase, passing in query as the first argument. The second parameter specifies the identifier of the record zone on which the query will be performed. By passing in nil, the query is performed on the default zone of the database.
The third argument is a completion handler. The closure accepts an optional array of CKRecord objects and an optional NSError instance. The CloudKit documentation explicitly mentions that the completion handler can be invoked from any thread. We therefore dispatch the processing of the response to the main thread by wrapping the processResponseForQuery(_:error:) method call in a dispatch_async closure. That's how easy it is to perform a query. Let's see how we handle the query's response.
Step 9: Processing the Response
The implementation of processResponseForQuery(_:error:) isn't difficult if you're familiar with the Swift language. We inspect the contents of the records and error parameters, and update the message variable accordingly.
private func processResponseForQuery(records: [CKRecord]?, error: NSError?) {
    var message = ""

    if let error = error {
        print(error)
        message = "Error Fetching Records"

    } else if let records = records {
        lists = records

        if lists.count == 0 {
            message = "No Records Found"
        }

    } else {
        message = "No Records Found"
    }

    if message.isEmpty {
        tableView.reloadData()
    } else {
        messageLabel.text = message
    }

    updateView()
}
At the end of the method, we invoke updateView. In this helper method, we update the user interface based on the contents of the lists property.
private func updateView() {
    let hasRecords = lists.count > 0

    tableView.hidden = !hasRecords
    messageLabel.hidden = hasRecords
    activityIndicatorView.stopAnimating()
}
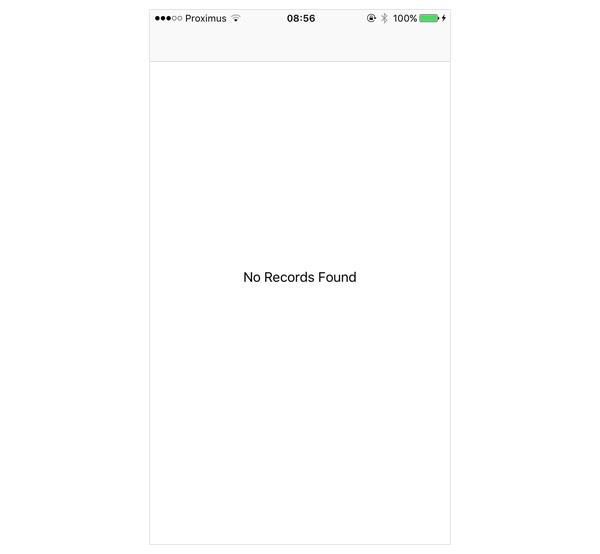
Build and run the application to test what we've got so far. We currently don't have any records, but we'll fix that in the next section of this tutorial.
3. Adding a Shopping List
Step 1: Creating the AddListViewController Class
Because adding and editing a shopping list are very similar, we are going to implement both at the same time. Create a new file and name it AddListViewController.swift. Open the newly created file and create a UIViewController subclass named AddListViewController. At the top, add import statements for the UIKit, CloudKit, and SVProgressHUD frameworks. Declare two outlets, one of type UITextField! and one of type UIBarButtonItem!. Last but not least, create two actions, cancel(_:) and save(_:).
import UIKit
import CloudKit
import SVProgressHUD

class AddListViewController: UIViewController {

    @IBOutlet weak var nameTextField: UITextField!
    @IBOutlet weak var saveButton: UIBarButtonItem!

    @IBAction func cancel(sender: AnyObject) {

    }

    @IBAction func save(sender: AnyObject) {

    }

}
Step 2: Creating the User Interface
Open Main.storyboard and add a view controller to the storyboard. With the view controller selected, open the Identity Inspector on the right and set Class to AddListViewController.
The user will be able to navigate to the add list view controller by tapping a button in the lists view controller. Drag a bar button item from the Object Library to the navigation bar of the lists view controller. With the bar button item selected, open the Attributes Inspector and set System Item to Add. Press Control and drag from the bar button item to the add list view controller and select push from the menu that appears.
It's important that you choose push from the Action Segue section. It should be the first item in the menu. Select the segue you jus created and set Identifier to ListDetail in the Attributes Inspector on the right.
Add two bar button items to the navigation bar of the add list view controller, one on the left and one on the right. Set System Item of the left bar button item to Cancel and that of the right bar button item to Save. Finally, add a text field to the add list view controller. Center the text field and set its Alignment to center in the Attributes Inspector.
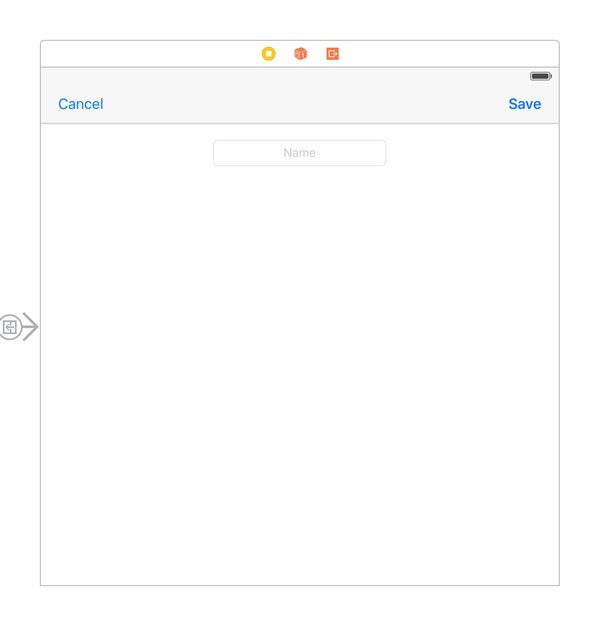
It is possible that, after creating the segue from the lists view controller to the add list view controller, no navigation item was created for the Add List View Controller Scene. I believe this is a bug in Xcode 7.
To resolve this issue, select the segue and, in the Attributes Inspector, set Segue to Deprecated Segues > Push. This will add a navigation item to the scene. Next, set Segue back to Adaptive Segues > Show.
Finally, connect the outlets and actions you created in AddListViewController.swift to the corresponding user interface elements in the scene.
Step 3: AddListViewControllerDelegate Protocol
Before we implement the AddListViewController class, we need to declare a protocol that we'll use to communicate from the add list view controller to the lists view controller. The protocol defines two methods, one for adding and one for updating a shopping list. This is what the protocol looks like.
protocol AddListViewControllerDelegate {
    func controller(controller: AddListViewController, didAddList list: CKRecord)
    func controller(controller: AddListViewController, didUpdateList list: CKRecord)
}
We also need to declare three properties, one for the delegate, one for the shopping list that is created or updated, and a helper variable that indicates whether we're creating a new shopping list or editing an existing record.
import UIKit
import CloudKit
import SVProgressHUD

protocol AddListViewControllerDelegate {
    func controller(controller: AddListViewController, didAddList list: CKRecord)
    func controller(controller: AddListViewController, didUpdateList list: CKRecord)
}

class AddListViewController: UIViewController {

    @IBOutlet weak var nameTextField: UITextField!
    @IBOutlet weak var saveButton: UIBarButtonItem!

    var delegate: AddListViewControllerDelegate?
    var newList: Bool = true

    var list: CKRecord?

    @IBAction func cancel(sender: AnyObject) {

    }

    @IBAction func save(sender: AnyObject) {

    }

}
The implementation of the AddListViewController class is no rocket science. The methods related to the view life cycle are short and easy to understand. In viewDidLoad, we first invoke the setupView helper method. We'll implement this method in a moment. We then update the value of the newList helper variable based on the value of the list property. If list is equal to nil, then we know that we're creating a new record. In viewDidLoad, we also add the view controller as an observer for UITextFieldTextDidChangeNotification notifications.
// MARK: -
// MARK: View Life Cycle
override func viewDidLoad() {
    super.viewDidLoad()

    setupView()

    // Update Helper
    newList = list == nil

    // Add Observer
    let notificationCenter = NSNotificationCenter.defaultCenter()
    notificationCenter.addObserver(self, selector: "textFieldTextDidChange:", name: UITextFieldTextDidChangeNotification, object: nameTextField)
}

override func viewDidAppear(animated: Bool) {
    nameTextField.becomeFirstResponder()
}
In viewDidAppear(_:), we call becomeFirstResponder on the text field to present the keyboard to the user.
In setupView, we invoke two helper methods, updateNameTextField and updateSaveButton. In updateNameTextField, we populate the text field if list is not nil. In other words, if we're editing an existing record, then we populate the text field with the name of that record.
The updateSaveButton method is in charge of enabling and disabling the bar button item in the top right. We only enable the save button if the name of the shopping list is not an empty string.
// MARK: -
// MARK: View Methods
private func setupView() {
    updateNameTextField()
    updateSaveButton()
}

// MARK: -
private func updateNameTextField() {
    if let name = list?.objectForKey("name") as? String {
        nameTextField.text = name
    }
}

// MARK: -
private func updateSaveButton() {
    let text = nameTextField.text

    if let name = text {
        saveButton.enabled = !name.isEmpty
    } else {
        saveButton.enabled = false
    }
}
Step 4: Implementing Actions
The cancel(_:) action is as simple as it gets. We pop the top view controller from the navigation stack. The save(_:) action is more interesting. In this method, we extract the user's input from the text field and get a reference to the default container's private database.
If we're adding a new shopping list, then we create a new CKRecord instance by invoking init(recordType:), passing in RecordTypeLists as the record type. We then update the name of the shopping list by setting the value of the record for the key "name".
Because saving a record involves a network request and can take a non-trivial amount of time, we show a progress indicator. To save a new record or any changes to an existing record, we call saveRecord(_:completionHandler:) on privateDatabase, passing in the record as the first argument. The second argument is another completion handler that is invoked when saving the record completes, successfully or unsuccessfully.
The completion handler accepts two arguments, an optional CKRecord and an optional NSError. As I mentioned before, the completion handler can be invoked on any thread, which means that we need to code against that. We do this by explicitly invoking the processResponse(_:error:) method on the main thread.
// MARK: -
// MARK: Actions
@IBAction func cancel(sender: AnyObject) {
    navigationController?.popViewControllerAnimated(true)
}

@IBAction func save(sender: AnyObject) {
    // Helpers
    let name = nameTextField.text

    // Fetch Private Database
    let privateDatabase = CKContainer.defaultContainer().privateCloudDatabase

    if list == nil {
        list = CKRecord(recordType: RecordTypeLists)
    }

    // Configure Record
    list?.setObject(name, forKey: "name")

    // Show Progress HUD
    SVProgressHUD.show()

    // Save Record
    privateDatabase.saveRecord(list!) { (record, error) -> Void in
        dispatch_async(dispatch_get_main_queue(), { () -> Void in
            // Dismiss Progress HUD
            SVProgressHUD.dismiss()

            // Process Response
            self.processResponse(record, error: error)
        })
    }
}
In processResponse(_:error:), we verify if an error was thrown. If we did run into problems, we display an alert to the user. If everything went smoothly, we notify the delegate and pop the view controller from the navigation stack.
// MARK: -
// MARK: Helper Methods
private func processResponse(record: CKRecord?, error: NSError?) {
    var message = ""

    if let error = error {
        print(error)
        message = "We were not able to save your list."

    } else if record == nil {
        message = "We were not able to save your list."
    }

    if !message.isEmpty {
        // Initialize Alert Controller
        let alertController = UIAlertController(title: "Error", message: message, preferredStyle: .Alert)

        // Present Alert Controller
        presentViewController(alertController, animated: true, completion: nil)

    } else {
        // Notify Delegate
        if newList {
            delegate?.controller(self, didAddList: list!)
        } else {
            delegate?.controller(self, didUpdateList: list!)
        }

        // Pop View Controller
        navigationController?.popViewControllerAnimated(true)
    }
}
Last but not least, when the view controller receives a UITextFieldTextDidChangeNotification notification, it invokes updateSaveButton to update the save button.
// MARK: -
// MARK: Notification Handling
func textFieldTextDidChange(notification: NSNotification) {
    updateSaveButton()
}
Step 5: Tying Everything Together
In the ListsViewController class, we still need to take care of a few things. Let's start by conforming the class to the AddListViewControllerDelegate protocol.
class ListsViewController: UIViewController, UITableViewDataSource, UITableViewDelegate, AddListViewControllerDelegate {
...
This also means that we need to implement the methods of the AddListViewControllerDelegate protocol. In the controller(_:didAddList:) method, we add the new record to the array of CKRecord objects. We then sort the array of records, reload the table view, and invoke updateView on the view controller.
// MARK: -
// MARK: Add List View Controller Delegate Methods
func controller(controller: AddListViewController, didAddList list: CKRecord) {
    // Add List to Lists
    lists.append(list)

    // Sort Lists
    sortLists()

    // Update Table View
    tableView.reloadData()

    // Update View
    updateView()
}
The sortLists method is pretty basic. We call sortInPlace on the array of records, sorting the array based on the record's name.
private func sortLists() {
    lists.sortInPlace {
        var result = false
        let name0 = $0.objectForKey("name") as? String
        let name1 = $1.objectForKey("name") as? String

        if let listName0 = name0, listName1 = name1 {
            result = listName0.localizedCaseInsensitiveCompare(listName1) == .OrderedAscending
        }

        return result
    }
}
The implementation of the second method of the AddListViewControllerDelegate protocol, controller(_:didUpdateList:), looks almost identical. Because we're not adding a record, we only need to sort the array of records and reload the table view. There's no need to call updateView on the view controller since the array of records is, by definition, not empty.
func controller(controller: AddListViewController, didUpdateList list: CKRecord) {
    // Sort Lists
    sortLists()

    // Update Table View
    tableView.reloadData()
}
To edit a record, the user needs to tap the accessory button of a table view row. This means that we need to implement the tableView(_:accessoryButtonTappedForRowWithIndexPath:) method of the UITableViewDelegate protocol. Before we implement this method, declare a helper property, selection, to store the user's selection.
class ListsViewController: UIViewController, UITableViewDataSource, UITableViewDelegate, AddListViewControllerDelegate {
    static let ListCell = "ListCell"

    @IBOutlet weak var messageLabel: UILabel!
    @IBOutlet weak var tableView: UITableView!
    @IBOutlet weak var activityIndicatorView: UIActivityIndicatorView!

    var lists = [CKRecord]()

    var selection: Int?

    ...

}
In tableView(_:accessoryButtonTappedForRowWithIndexPath:), we store the user's selection in selection and tell the view controller to perform the segue that leads to the add list view controller. If you're curious, I've created a constant in ListsViewController.swift for the segue identifier, SegueListDetail.
// MARK: -
// MARK: Table View Delegate Methods
func tableView(tableView: UITableView, accessoryButtonTappedForRowWithIndexPath indexPath: NSIndexPath) {
    tableView.deselectRowAtIndexPath(indexPath, animated: true)

    // Save Selection
    selection = indexPath.row

    // Perform Segue
    performSegueWithIdentifier(SegueListDetail, sender: self)
}
We're almost there. When the segue with identifier ListDetail is performed, we need to configure the AddListViewController instance that is pushed onto the navigation stack. We do this in prepareForSegue(_:sender:).
The segue hands us a reference to the destination view controller, the AddListViewController instance. We set the delegate property, and, if a shopping list is updated, we set the view controller's list property to the selected record.
// MARK: -
// MARK: Segue Life Cycle
override func prepareForSegue(segue: UIStoryboardSegue, sender: AnyObject?) {
    guard let identifier = segue.identifier else { return }

    switch identifier {
    case SegueListDetail:
        // Fetch Destination View Controller
        let addListViewController = segue.destinationViewController as! AddListViewController

        // Configure View Controller
        addListViewController.delegate = self

        if let selection = selection {
            // Fetch List
            let list = lists[selection]

            // Configure View Controller
            addListViewController.list = list
        }
    default:
        break
    }
}
Build and run the application to see the result. You should now be able to add a new shopping list and edit the name of existing shopping lists.
4. Deleting Shopping Lists
Adding the ability to delete shopping lists isn't much extra work. The user should be able to delete a shopping list by swiping a table view row from right to left and tapping the delete button that is revealed. To make this possible, we need to implement two more methods of the UITableViewDataSource protocol:
tableView(_:canEditRowAtIndexPath:)tableView(_:commitEditingStyle:forRowAtIndexPath:)
The implementation of tableView(_:canEditRowAtIndexPath:) is trivial as you can see below.
func tableView(tableView: UITableView, canEditRowAtIndexPath indexPath: NSIndexPath) -> Bool {
    return true
}
In tableView(_:commitEditingStyle:forRowAtIndexPath:), we fetch the correct record from the array of records and invoke deleteRecord(_:) on the view controller, passing in the record that needs to be deleted.
func tableView(tableView: UITableView, commitEditingStyle editingStyle: UITableViewCellEditingStyle, forRowAtIndexPath indexPath: NSIndexPath) {
    guard editingStyle == .Delete else { return }

    // Fetch Record
    let list = lists[indexPath.row]

    // Delete Record
    deleteRecord(list)
}
The deleteRecord(_:) method should look familiar by now. We show a progress indicator and call deleteRecordWithID(_:completionHandler:) on the default container's private database. Note that we're passing in the record identifier, not the record itself. The completion handler accepts two arguments, an optional CKRecordID and an optional NSError.
private func deleteRecord(list: CKRecord) {
    // Fetch Private Database
    let privateDatabase = CKContainer.defaultContainer().privateCloudDatabase

    // Show Progress HUD
    SVProgressHUD.show()

    // Delete List
    privateDatabase.deleteRecordWithID(list.recordID) { (recordID, error) -> Void in
        dispatch_async(dispatch_get_main_queue(), { () -> Void in
            // Dismiss Progress HUD
            SVProgressHUD.dismiss()

            // Process Response
            self.processResponseForDeleteRequest(list, recordID: recordID, error: error)
        })
    }
}
In the completion handler, we dismiss the progress indicator and invoke processResponseForDeleteRequest(_:recordID:error:) on the main thread. In this method, we inspect the values of recordID and error that the CloudKit API has given us and we update message accordingly. If the delete request was successful, then we update the user interface and the array of records.
private func processResponseForDeleteRequest(record: CKRecord, recordID: CKRecordID?, error: NSError?) {
    var message = ""

    if let error = error {
        print(error)
        message = "We are unable to delete the list."

    } else if recordID == nil {
        message = "We are unable to delete the list."
    }

    if message.isEmpty {
        // Calculate Row Index
        let index = lists.indexOf(record)

        if let index = index {
            // Update Data Source
            lists.removeAtIndex(index)

            if lists.count > 0 {
                // Update Table View
                tableView.deleteRowsAtIndexPaths([NSIndexPath(forRow: index, inSection: 0)], withRowAnimation: .Right)

            } else {
                // Update Message Label
                messageLabel.text = "No Records Found"

                // Update View
                updateView()
            }
        }

    } else {
        // Initialize Alert Controller
        let alertController = UIAlertController(title: "Error", message: message, preferredStyle: .Alert)

        // Present Alert Controller
        presentViewController(alertController, animated: true, completion: nil)
    }
}
That's it. It's time to properly test the application with some data. Run the application on a device or in the iOS Simulator and add a few shopping lists. You should be able to add, edit, and delete shopping lists.
Conclusion
Even though this article is fairly long, it's good to remember that we only briefly interacted with the CloudKit API. The convenience API of the CloudKit framework is lightweight and easy to use.
This tutorial, however, has also illustrated that your job as a developer isn't limited to interacting with the CloudKit API. It's important to handle errors, show the user when a request is in progress, update the user interface, and tell the user what is going on.
In the next article of this series, we take a closer look at relationships by adding the ability to fill a shopping list with items. An empty shopping list isn't of much use and it certainly isn't fun. Leave any questions you have in the comments below or reach out to me on Twitter.


Comments