In the next two lessons, we'll put the knowledge learned in this series into practice by creating a basic shopping list application. Along the way, you'll also learn a number of new concepts and patterns, such as creating a custom model class and implementing a custom delegate pattern. We've got a lot of ground to cover so let's get started.
Outline
The shopping list application that we're about to create has two core features, managing a list of items and creating a shopping list by selecting one or more items from the list of items.
We'll build the application around a tab bar controller to make switching between the two views fast and straightforward. In this lesson, we're going to focus on the first core feature, the list of items.
In the next lesson, we'll put the finishing touches on the list of items and we'll zoom in on the shopping list, the application's second core feature.
Even though the shopping list application isn't complicated from a user's perspective, there are several decisions that we need to make during its development. What type of store will we use to store the list of items? Can the user add, edit, and delete items in the list? These are questions that we'll address in the next two lessons.
In this lesson, I'll also show you how to seed the shopping list application with dummy data to give new users something to start with. Seeding an application with data is often a great idea to help new users get up to speed quickly.
1. Creating the Project
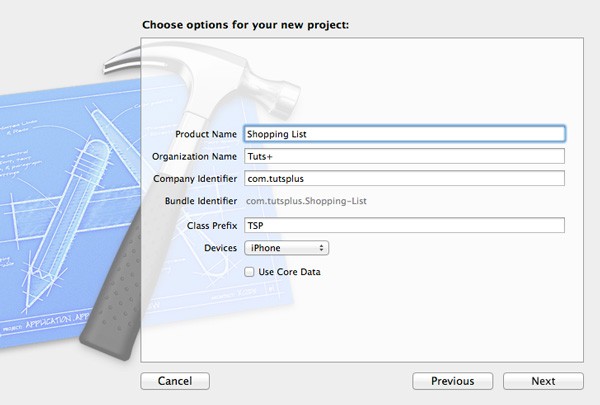
Launch Xcode and create a new iOS project based on the Empty Application project template.

Name the project Shopping List and enter an organization name, company identifier, and class prefix. Set Devices to iPhone and make sure the checkbox labeled Use Core Data is unchecked. Tell Xcode where to save the project and click Create.
2. Creating the Storyboard
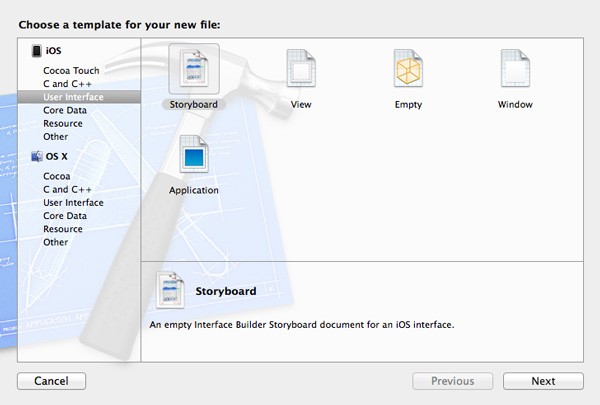
Create a new storyboard by selecting New > File... from the File menu. Choose Storyboard from the list of iOS User Interface templates.
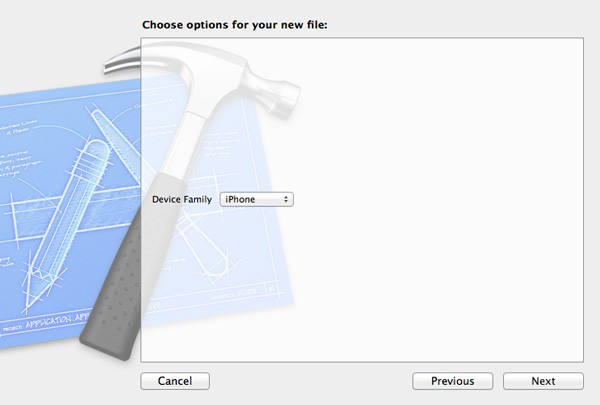
Set Device Family to iPhone and name the storyboard Main.
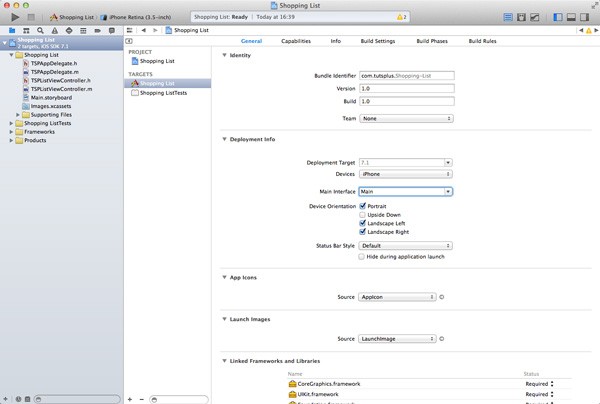
Select the project in the Project Navigator, choose the Shopping List target from the list of targets, and set the Main Interface to Main.storyboard or Main.
3. Creating the List View Controller
As you might have expected, the list view controller is going to be a subclass of UITableViewController. Create a new Objective-C class by selecting New > File... from the File menu.
Name the class TSPListViewController and make it a subclass of UITableViewController. Tell Xcode where you want to save the files of the new class and click Create.
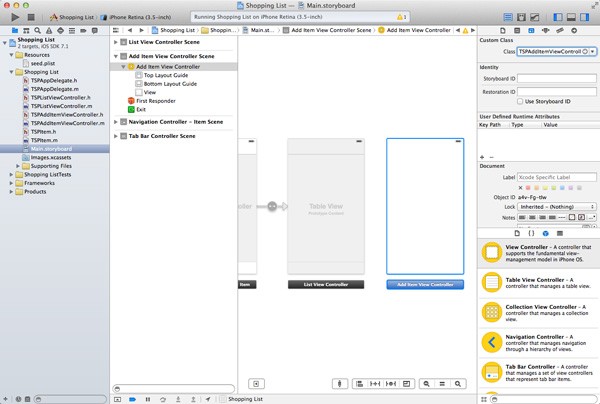
Open the storyboard, drag a UITabBarController instance from the Object Library, and delete the two view controllers that are linked to the tab bar controller. Drag a UITableViewController from the Object Library, set its class to TSPListViewController in the Identity Inspector on the right, and create a relationship segue from the tab bar controller to the list view controller. You may want to read that sentence again.
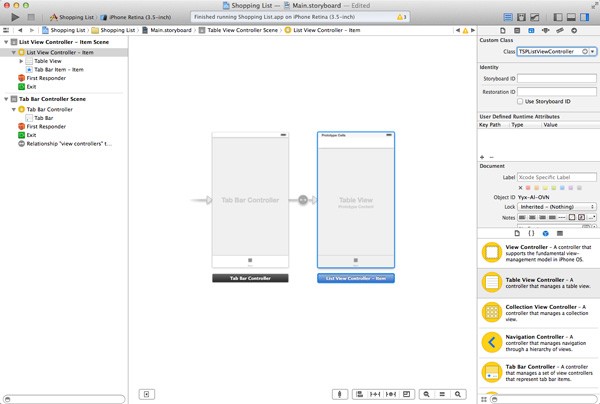
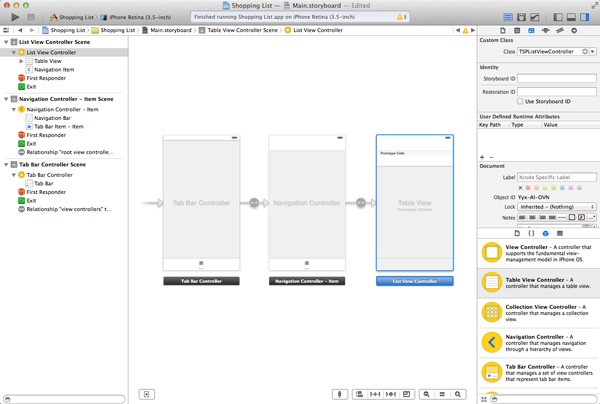
The list view controller needs to be the root view controller of a navigation controller. Select the list view controller and choose Embed In > Navigation Controller from the Editor menu.
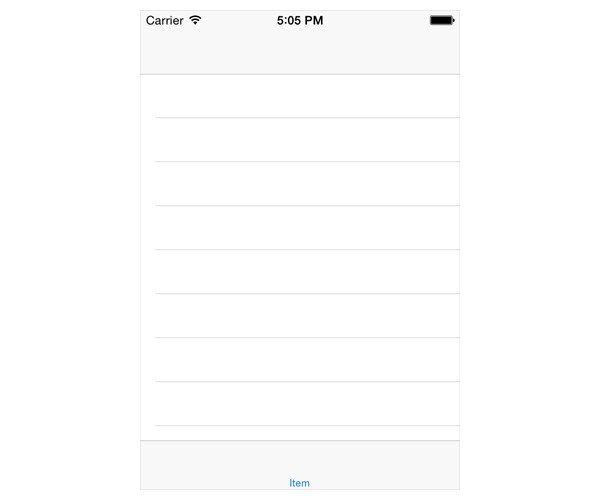
Select the table view of the list view controller and set the number of Prototype Cells in the Attributes Inspector to 0.
Before running the application in the iOS Simulator, open TSPAppDelegate.h and update the implementation of application:didFinishLaunchingWithOptions: as shown below. There's no need to create a UIWindow instance since the storyboard takes care of this for us.
- (BOOL)application:(UIApplication *)application didFinishLaunchingWithOptions:(NSDictionary *)launchOptions {
    return YES;
}
Run the application in the iOS Simulator to see if everything works as expected. You should see an empty table view with a navigation bar at the top and a tab bar at the bottom.
4. Creating the Item Model Class
How are we going to work with items in the shopping application? In other words, what type of object will we use to store the properties of an item, such as its name, price, and a string that uniquely identifies each item?
The most obvious choice is to store the item's properties in a dictionary (NSDictionary). Even though this would work just fine, it would severely limit and slow us down as the application increases in complexity.
For the shopping list application, we're going to create a custom model class. It requires a bit more work to set up, but it'll make development much easier down the road.
Create a new Objective-C class with a name of TSPItem and make it a subclass of NSObject. Tell Xcode where to save the class and click Create.
Properties
Add four properties to the header file of the new model class:
-
uuidof typeNSStringto uniquely identify each item -
namealso of typeNSString -
priceof typefloat -
inShoppingListof typeBOOLto indicate if the item's present in the shopping list
It's essential that the TSPItem class conforms to the NSCoding protocol. The reason for this will become clear in a few moments. Take a look at the complete header file (comments are omitted) to make sure we're on the same page.
#import <Foundation/Foundation.h>

@interface TSPItem : NSObject <NSCoding>

@property NSString *uuid;
@property NSString *name;
@property float price;
@property BOOL inShoppingList;

@end
Archiving
One strategy to save custom objects, such as instances of the TSPItem class, to disk is through a process known as archiving. We'll use NSKeyedArchiver and NSKeyedUnarchiver to archive and unarchive instances of the TSPItem class.
Both classes are defined in the Foundation framework as their class prefix (NS) indicates. The NSKeyedArchiver class takes a set of objects and stores them to disk as binary data. An added benefit of this approach is that binary files are generally smaller than plain text files containing the same information.
If we want to use NSKeyedArchiver and NSKeyedUnarchiver to archive and unarchive instances of the TSPItem class, the latter needs to adopt the NSCoding protocol—like we specified in the header file of the class.
Remember from the lesson about the Foundation framework, the NSCoding protocol declares two methods that a class must implement to allow instances of the class to be encoded and decoded. Let's see how this works.
If you create custom classes, then you are responsible for specifying how instances of the class should be encoded (converted to binary data).
Encoding
In encodeWithCoder:, the class conforming to the NSCoding protocol specifies how instances of the class should be encoded. Take a look at the implementation below. The keys that we use are not that important, but you generally want to use the property names for clarity.
- (void)encodeWithCoder:(NSCoder *)coder {
    [coder encodeObject:self.uuid forKey:@"uuid"];
    [coder encodeObject:self.name forKey:@"name"];
    [coder encodeFloat:self.price forKey:@"price"];
    [coder encodeBool:self.inShoppingList forKey:@"inShoppingList"];
}
Decoding
Whenever an encoded object needs to be converted back to an instance of the respective class, it's sent a message of initWithCoder:. The same keys that we used in encodeWithCoder: are used in initWithCoder:. This is very important.
- (id)initWithCoder:(NSCoder *)decoder {
    self = [super init];

    if (self) {
        [self setUuid:[decoder decodeObjectForKey:@"uuid"]];
        [self setName:[decoder decodeObjectForKey:@"name"]];
        [self setPrice:[decoder decodeFloatForKey:@"price"]];
        [self setInShoppingList:[decoder decodeBoolForKey:@"inShoppingList"]];
    }

    return self;
}
You never need to call any of these methods directly. They are only called by the operating system. By conforming the TSPItem class to the NSCoding protocol, we only tell the operating system how to encode and decode instances of the class.
Creating Instances
To make the creation of new instances of the TSPItem class easier, we create a custom class method. This is completely optional, but it will make development easier as you'll see later in this lesson.
Open the header file of the TSPItem class and add the following method declaration. The + sign preceding the method declaration indicates that this is a class method as opposed to an instance method.
+ (TSPItem *)createItemWithName:(NSString *)name andPrice:(float)price;
The implementation of the class method contains one new element, the NSUUID class. In createItemWithName:andPrice:, we start with the creation of a new instance of the class, followed by the configuration of the new instance by setting its properties. By default, a new item isn't present in the shopping list so we set the inShoppingList property to NO.
Setting the uuid property is done by asking the NSUUID class for an instance of the class and asking the returned instance for a uuid string. As I said, it's important that we can uniquely identify each instance of the TSPItem class. The uuid will look something like 90A0CC77-35BA-4C09-AC28-D196D991B50D.
+ (TSPItem *)createItemWithName:(NSString *)name andPrice:(float)price {
    // Initialize Item
    TSPItem *item = [[TSPItem alloc] init];

    // Configure Item
    [item setName:name];
    [item setPrice:price];
    [item setInShoppingList:NO];
    [item setUuid:[[NSUUID UUID] UUIDString]];

    return item;
}
5. Loading and Saving Items
Data persistence is going to be key in our shopping list application so let's take a look at how to implement this. Open the implementation file of TSPListViewController, add a private property of type NSMutableArray, and name it items.
#import "TSPListViewController.h"

@interface TSPListViewController ()

@property NSMutableArray *items;

@end
The items displayed in the view controller's table view will be stored in items. It is important that items is a mutable array, because we will add the ability to add new items a bit later in this lesson.
In the class's initialization method, we load the list of items from disk and store it in the private items property that we declared a few moments ago. We also set the view controller's title to Items as shown below.
- (id)initWithCoder:(NSCoder *)aDecoder {
    self = [super initWithCoder:aDecoder];

    if (self) {
        // Set Title
        self.title = @"Items";

        // Load Items
        [self loadItems];
    }

    return self;
}
The view controller's loadItems method is nothing more than a helper method to keep the class's initWithCoder: method concise and readable. Let's take a look at the implementation of loadItems.
Loading Items
The loadItems method starts with retrieving the path of the file in which the list of items is stored. We do this by calling pathForItems, another helper method that we'll look at in a few moments.
- (void)loadItems {
    NSString *filePath = [self pathForItems];

    if ([[NSFileManager defaultManager] fileExistsAtPath:filePath]) {
        self.items = [NSKeyedUnarchiver unarchiveObjectWithFile:filePath];
    } else {
        self.items = [NSMutableArray array];
    }
}
The NSFileManager class, in the next line of code, is a class that we haven't worked with yet. The NSFileManager class provides an easy-to-use Objective-C API for working with the file system. We obtain a reference to an instance of the class by asking it for the default manager.
The default manager is sent a message of fileExistsAtPath: and passed the file path we obtained in the first line. If a file exists at the location specified by the file path, then we load the contents of the file into the items property. If no file exists at that location, then we instantiate an empty mutable array.
Loading the file into the view controller's items property is done through the NSKeyedUnarchiver class as we discussed earlier. The class is able to read the binary data contained in the file and convert it to an object graph, an array of TSPItem instances in this case. This process will become clearer when we look at the saveItems method in a minute.
If we were to load the contents of a file that doesn't exist, then the items property would be set to nil instead of an empty mutable array. This is a subtle but important difference as we'll see a bit later in this tutorial.
Let's now take a look at the pathForItems helper method. The method starts with retrieving the path of the Documents directory in the application's sandbox. This step should be familiar.
- (NSString *)pathForItems {
    NSArray *paths = NSSearchPathForDirectoriesInDomains(NSDocumentDirectory, NSUserDomainMask, YES);
    NSString *documents = [paths lastObject];

    return [documents stringByAppendingPathComponent:@"items.plist"];
}
The method returns the path to the file containing the application's list of items by appending a string to the path of the documents directory. You may want to read the previous sentence a few times to let it sink in.
The beauty of using stringByAppendingPathComponent: is that the insertion of path separators is done for us wherever necessary. In other words, the system makes sure that we receive a valid file path.
Saving Items
Even though we won't be saving items until later in this lesson, it's a good idea to implement it while we're at it. The implementation of saveItems is very concise thanks to the pathForItems helper method.
We first retrieve the path to the file that contains the application's list of items and then write the contents of the items property to that location. Easy. Right?
- (void)saveItems {
    NSString *filePath = [self pathForItems];
    [NSKeyedArchiver archiveRootObject:self.items toFile:filePath];
}
As we saw earlier, the process of writing an object graph to disk is known as archiving. We use the NSKeyedArchiver class to accomplish this by calling archiveRootObject:toFile: on the NSKeyedArchiver class.
During this process, every object in the object graph is sent a message of encodeWithCoder: to convert it into binary data. As I told you earlier, you usually don't call encodeWithCoder: directly.
To verify that loading the list of items from disk works, place a log statement in the viewDidLoad method of the TSPListViewController class as shown below. Run the application in the iOS Simulator and check if everything's working.
- (void)viewDidLoad {
    [super viewDidLoad];

    NSLog(@"Items > %@", self.items);
}
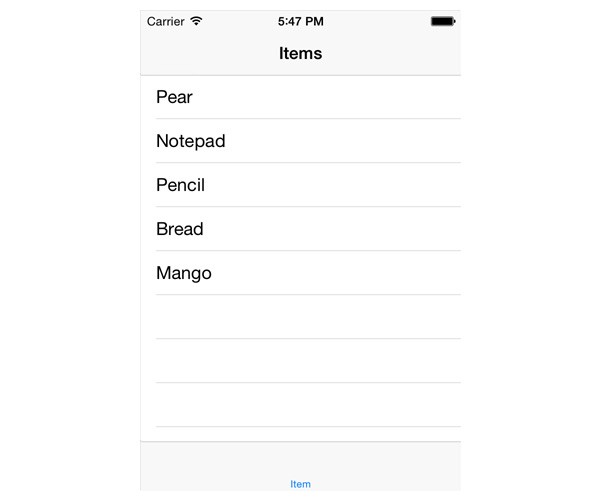
If you take a look at the output in the console window, you'll notice that the items property is equal to en empty array as we expect at this point. It's important that items is not equal to nil. In the next step, we'll give the user a few items to work with, a process known as seeding.
6. Seeding the Data Store
Seeding an application with data can often mean the difference between an engaged user and a user quitting the application after using it for less than a minute. Seeding an application with dummy data not only helps users getting up to speed, it also shows new users how the application looks and feels with data in it.
Seeding the shopping list application with an initial list of items isn't difficult. When the application launches, we first check if the data store has already been seeded with data, because we don't want to create duplicate items. This would only confuse or frustrate the user. If the data store hasn't been seeded yet, we load a list with seed data and use that list to create the data store of the application.
The logic for seeding the data store can be called from a number of locations in an application, but it's important to think ahead. We could put the logic for seeding the data store in the TSPListViewController class, but what if, in a future version of the application, other view controllers also have access to the list of items. A good place to seed the data store is in the TSPAppDelegate class. Let's see how this works.
Open TSPAppDelegate.m and amend the implementation of application:didFinishLaunchingWithOptions: to look like the one shown below.
- (BOOL)application:(UIApplication *)application didFinishLaunchingWithOptions:(NSDictionary *)launchOptions {
    // Seed Items
    [self seedItems];

    return YES;
}
The only difference with the previous implementation is that we first call seedItems on the application delegate. It's important that seeding the data store takes place before the initialization of any of the view controllers, because the data store needs to be seeded before any of the view controllers loads the list of items.
The implementation of seedItems isn't complicated. We start by storing a reference to the shared user defaults object and we then check if the user defaults database has an entry for a key with name TSPUserDefaultsSeedItems and whether this entry is a boolean with a value of YES.
- (void)seedItems {
    NSUserDefaults *ud = [NSUserDefaults standardUserDefaults];

    if (![ud boolForKey:@"TSPUserDefaultsSeedItems"]) {
        // Load Seed Items
        NSString *filePath = [[NSBundle mainBundle] pathForResource:@"seed" ofType:@"plist"];
        NSArray *seedItems = [NSArray arrayWithContentsOfFile:filePath];

        // Items
        NSMutableArray *items = [NSMutableArray array];

        // Create List of Items
        for (int i = 0; i < [seedItems count]; i++) {
            NSDictionary *seedItem = [seedItems objectAtIndex:i];

            // Create Item
            TSPItem *item = [TSPItem createItemWithName:[seedItem objectForKey:@"name"] andPrice:[[seedItem objectForKey:@"price"] floatValue]];

            // Add Item to Items
            [items addObject:item];
        }

        // Items Path
        NSString *itemsPath = [[self documentsDirectory] stringByAppendingPathComponent:@"items.plist"];

        // Write to File
        if ([NSKeyedArchiver archiveRootObject:items toFile:itemsPath]) {
            [ud setBool:YES forKey:@"TSPUserDefaultsSeedItems"];
        }
    }
}
The key can be whatever you like as long as you are consistent in naming the keys that you use. The key in the user defaults database tells us if the application has already been seeded with data or not. This is important since we only want to seed the shopping list application once.
If the application hasn't been seeded yet, we load a property list from the application bundle named seed.plist. This file contains an array of dictionaries with each dictionary representing an item with a name and a price.
Before iterating through the seedItems array, we create a mutable array to store the TSPItem instances that we're about to create. For each dictionary in the seedItems array, we create a TSPItem instance, using the class method we declared earlier in this lesson, and we add the instance to the items array.
Finally, we create the path to the file in which we will store the list of items and we write the contents of the items array to disk as we saw in the saveItems method in the TSPListViewController class.
The method archiveRootObject:toFile: returns YES if the operation ended successfully and it's only then that we update the user defaults store by setting the boolean value for the key TSPUserDefaultsSeedItems to YES. The next time the application launches, the data store will not be seeded again.
You've probably noticed that we made use of another helper method to retrieve the application's documents directory. You can find its implementation below. It's very similar to the implementation of the pathForItems method in the TSPListViewController class.
- (NSString *)documentsDirectory {
    NSArray *paths = NSSearchPathForDirectoriesInDomains(NSDocumentDirectory, NSUserDomainMask, YES);
    return [paths lastObject];
}
Before you run the application, import the header file of the TSPItem class and make sure to copy the property list, seed.plist, to your project. It doesn't matter where you store it as long as it's included in the application's bundle.
#import "TSPItem.h"
Run the application once more and inspect the output in the console to see if the data store was successfully seeded with the contents of seed.plist.
Note that seeding a data store with data or updating a database takes time. If the operation takes too long, the system may kill your application before it has had the chance to finish launching. Apple calls this phenomenon the watchdog killing your application.
Your application is given a limited amount of time to launch. If it fails to launch within that timeframe, the operating system kills your application. This means that you have to carefully consider when and where you perform certain operations such as seeding your application's data store.
7. Displaying the List of Items
We now have a list of items to work with. Displaying the items in the table view of the list view controller isn't difficult. Take a look at the implementation of the three methods of the UITableViewDataSource protocol shown below. Their implementations should be familiar to you by now. Don't forget to import the header file of the TSPItem class.
#import "TSPItem.h"
- (NSInteger)numberOfSectionsInTableView:(UITableView *)tableView {
    return 1;
}
- (NSInteger)tableView:(UITableView *)tableView numberOfRowsInSection:(NSInteger)section {
    return [self.items count];
}
- (UITableViewCell *)tableView:(UITableView *)tableView cellForRowAtIndexPath:(NSIndexPath *)indexPath {
    // Dequeue Reusable Cell
    UITableViewCell *cell = [tableView dequeueReusableCellWithIdentifier:CellIdentifier forIndexPath:indexPath];

    // Fetch Item
    TSPItem *item = [self.items objectAtIndex:[indexPath row]];

    // Configure Cell
    [cell.textLabel setText:[item name]];

    return cell;
}
Before running the application, declare the cell reuse identifier immediately after the @implementation compiler directive as we saw earlier in this series.
@implementation TSPListViewController

static NSString *CellIdentifier = @"Cell Identifier";
And finally, register the UITableViewCell class for the cell reuse identifier you just declare in the view controller's viewDidLoad method.
- (void)viewDidLoad {
    [super viewDidLoad];

    // NSLog(@"Items > %@", self.items);

    // Register Class for Cell Reuse
    [self.tableView registerClass:[UITableViewCell class] forCellReuseIdentifier:CellIdentifier];
}
Build the project and run the application in the iOS Simulator to see the list of items being displayed in the list view controller's table view.
8. Adding Items - Part 1
No matter how well we craft the list of seed items, the user will certainly want to add additional items to the list. The most common approach on iOS to add new items to a list is by presenting the user with a modal view in which new data can be entered.
This means that we'll need to:
- add a button to add new items
- create a view controller that manages the view that accepts user input
- create a new item based on the user's input
- add the newly created item to the table view
Adding a Button
Adding a button to the navigation bar requires one line of code. Revisit the viewDidLoad method of the TSPListViewController class and update it to reflect the implementation below.
- (void)viewDidLoad {
    [super viewDidLoad];

    // NSLog(@"Items > %@", self.items);

    // Register Class for Cell Reuse
    [self.tableView registerClass:[UITableViewCell class] forCellReuseIdentifier:CellIdentifier];

    // Create Add Button
    self.navigationItem.leftBarButtonItem = [[UIBarButtonItem alloc] initWithBarButtonSystemItem:UIBarButtonSystemItemAdd target:self action:@selector(addItem:)];
}
In the lesson about tab bar controllers, we saw that every view controller has a tabBarItem property. Similarly, every view controller has a navigationItem property, a unique instance of UINavigationItem representing the view controller in the navigation bar of the parent view controller—the navigation controller.
The navigationItem property has a leftBarButtonItem property, which is an instance of UIBarButtonItem, and references the bar button item displayed on the left side of the navigation bar. The navigationItem property also has a titleView and a rightBarButtonItem property.
In the viewDidLoad method, we set the leftBarButtonItem property of the view controller's navigationItem to an instance of UIBarButtonItem by invoking initWithBarButtonSystemItem:target:action: and passing UIBarButtonSystemItemAdd as the first argument. This method creates a system-provided instance of UIBarButtonItem.
Even though we've already encountered the target-action pattern, the second and third parameter of initWithBarButtonSystemItem:target:action: might need some explaining. Whenever the button in the navigation bar is tapped, a message of addItem: is sent to target, self or the TSPListViewController instance.
As I said, we've already encountered the target-action pattern when we connected a button's touch event to an action in the storyboard a few lessons ago. This is very similar, the only difference is that the connection is made programmatically.
The target-action pattern is very common in Cocoa. The idea is simple. An object keeps a reference to the message or action selector that needs to be sent to a particular object and the target, an object to which the message needs to be sent.
Wait a minute. What is a selector? A selector is the name or the unique identifier that is used to select a method that an object is expected to execute. A selector is of type SEL and can be created using the @selector compiler directive. You can read more about selectors in Apple's Cocoa Core Competencies guide.
Before running the application in the iOS Simulator, we need to create the corresponding addItem: method in the view controller. If we don't do this, the view controller will not be able to respond to the message it receives when the button is tapped and an exception will be thrown.
Take a look at the format of the method definition in the code snippet below. As we saw earlier in this series, the action accepts one argument, the object that sends the message to the view controller (target), which is the button in the navigation bar in our example.
- (void)addItem:(id)sender {
    NSLog(@"Button was tapped.");
}
I've added a log statement to the method implementation to test if the setup works correctly. Build the project and run the application to test the button in the navigation bar.
Creating a View Controller
Create a new UIViewController subclass (not a UITableViewController subclass) and name it TSPAddItemViewController.
We first need to declare two outlets in the class's header file for the two text fields that we'll create in a few moments. This process should be familiar by now. Take a look at the header file shown below (comments are omitted).
#import <UIKit/UIKit.h>

@interface TSPAddItemViewController : UIViewController

@property IBOutlet UITextField *nameTextField;
@property IBOutlet UITextField *priceTextField;

@end
We also need to declare two actions in the class's implementation file (MTAddItemViewController.m). The first action, cancel:, will cancel the creation of a new item, whereas the second action, save:, will save the newly created item.
- (IBAction)cancel:(id)sender {

}
- (IBAction)save:(id)sender {

}
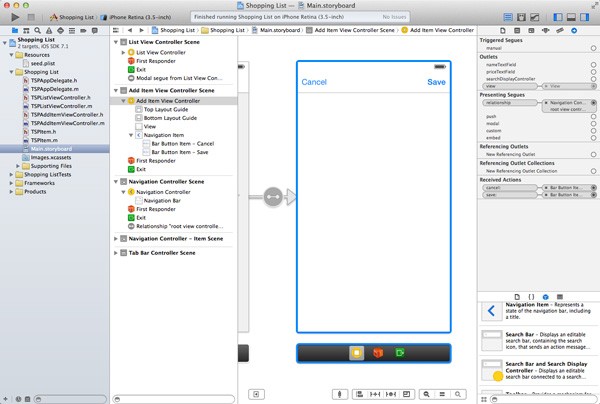
Open the storyboard, drag a UIViewController instance from the Object Library, and set its class to TSPAddItemViewController in the Identity Inspector.
Create a manual segue by pressing Control and dragging from the List View Controller object to the Add Item View Controller object. Select Modal from the menu that pops up.

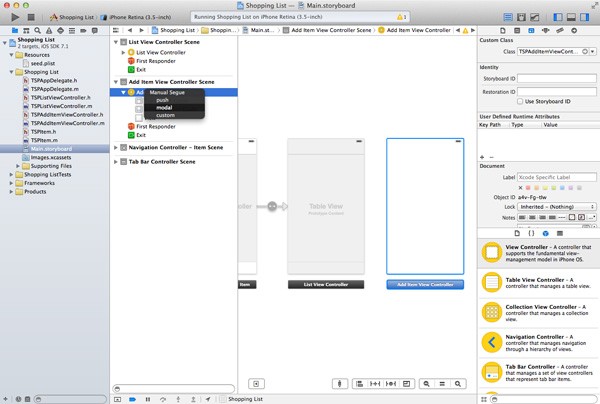
Select the segue you just created, open the Attributes Inspector, and set its Identifier to AddItemViewController.
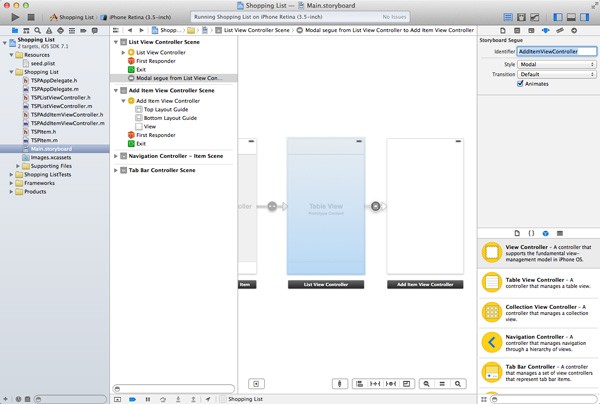
Before we add the text fields, select the add item view controller and embed it in a navigation controller by selecting Embed In > Navigation Controller from the Editor menu.
Earlier in this lesson, we programmatically added a UIBarButtonItem to the list view controller's navigation item. Let's explore how this works in a storyboard. Zoom in on the add item view controller, add two UIBarButtonItem instances to its navigation bar, positioning one on each side. Select the left bar button item, open the Attributes Inspector, and set Identifier to Cancel. Do the same for the right bar button item, but instead set the Identifier to Save.
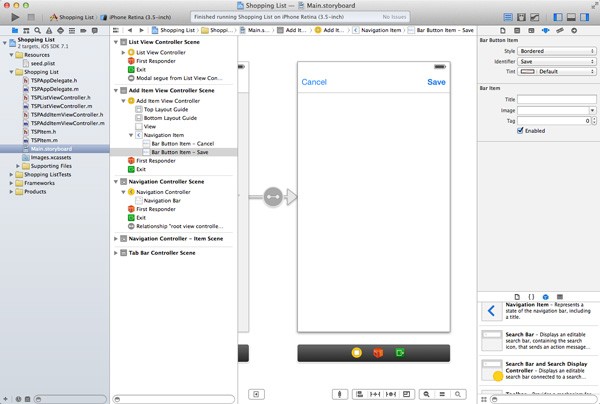
Select the Add Item View Controller object, open the Connections Inspector on the right, and connect the cancel: action with the left bar button item and the save: action with the right bar button item.
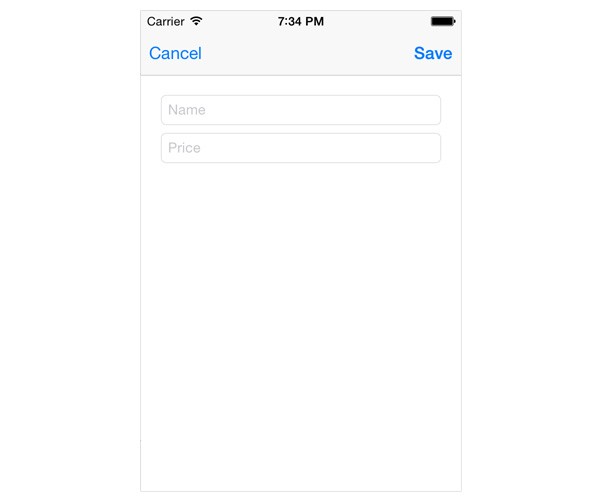
Drag two UITextField instances from the Object Library to the add item view controller's view. Position the text fields as shown in the screenshot below.
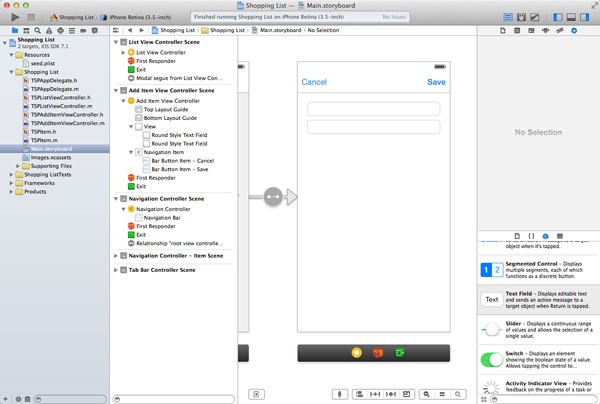
Select the top text field, open the Attributes Inspector, and enter Name in the Placeholder field. Select the bottom text field and, in the Attributes Inspector, set its placeholder text to Price and Keyboard to Number Pad. This ensures that users can only enter numbers in the bottom text field. Select the Add Item View Controller object, open the Connections Inspector, and connect the nameTextField and priceTextField outlets to the corresponding text fields in the view controller's view.
That was quite a bit of work. Everything we've done in the storyboard can also be accomplished programmatically. Some developers don't even use storyboards and create the entire application's user interface programmatically. That's exactly what happens under the hood anyway.
Implementing addItem:
With the TSPAddItemViewController class ready to use, let's revisit the addItem: action in the TSPListViewController class. Before we do, however, import the header file of theTSPAddItemViewController class at the top.
#import "TSPAddItemViewController.h"
The implementation of the addItem: action is short as you can see below. We invoke performSegueWithIdentifier:sender: and pass the AddItemViewController identifier we set in the storyboard and self, the view controller, as the second argument.
We create a new instance of the MTAddItemViewController class and present it modally by calling presentViewController:animated:completion: on self, the list view controller instance. When presentViewController:animated:completion: is called, the view of the addItemViewController instance will slide up from the bottom and will be presented full screen. The method accepts a completion block as its third argument. Despite their usefulness, I won't cover blocks in this tutorial as it is a more complicated topic for beginners. Instead of passing a block as the third argument, we pass nil.
- (void)addItem:(id)sender {
    // Perform Segue
    [self performSegueWithIdentifier:@"AddItemViewController" sender:self];
}
Dismissing the View Controller
The user should also be able to dismiss the view controller by tapping the cancel or save button of the add item view controller. Revisit the cancel: and save: actions in the TSPAddItemViewController class and update their implementations as shown below. We will revisit the save: action a bit later in this tutorial.
- (IBAction)cancel:(id)sender {
    [self dismissViewControllerAnimated:YES completion:nil];
}
- (IBAction)save:(id)sender {
    [self dismissViewControllerAnimated:YES completion:nil];
}
The dismissViewControllerAnimated:completion: is interesting. When we call this method on the view controller whose view is presented modally, the modal view controller forwards the message to the view controller that presented the view controller. In our example, this means that the add item view controller forwards the message to the navigation view controller, which on its turn forwards it to the list view controller.
The second argument of dismissViewControllerAnimated:completion: is a block that's executed when the animation is completed. Blocks have been added to the C language by Apple. They are often compared to closures in other languages. If you want to learn more about blocks, then take a look at this tutorial by Collin Ruffenach.
Build the project and run the application in the iOS Simulator to see the TSPAddItemViewController class in action.
8. Adding Items - Part 2
How will the list view controller know when a new item has been added by the add item view controller? Should we keep a reference to the list view controller that presented the add item view controller? This would introduce tight coupling, which isn't a good idea, because it makes our code less independent and less reusable.
The problem that we're faced with can be solved by implementing a custom delegate protocol. Let's see how this works.
Delegation
The idea is simple. Whenever the user taps the save button, the add item view controller will collect the information from the text fields and notify its delegate that a new item has been saved.
The delegate object will be an object conforming to a custom delegate protocol that we will define. It's up to the delegate object to decide what needs to be done with the information the add item view controller sends. The add item view controller is only responsible for capturing the input of the user and notifying its delegate.
Open TSPAddItemViewController.h and add a forward protocol declaration at the top. A forward protocol declaration is a promise to the compiler that the TSPAddItemViewControllerDelegate protocol is defined and exists.
#import <UIKit/UIKit.h>

@protocol TSPAddItemViewControllerDelegate;

@interface TSPAddItemViewController : UIViewController

@property IBOutlet UITextField *nameTextField;
@property IBOutlet UITextField *priceTextField;

@end
Declare a property for the delegate. The delegate is of type id, which means that it can be any Objective-C object. However, the delegate is required to conform to the TSPAddItemViewControllerDelegate protocol as specified by the name of the protocol between angle brackets after the property type. This is the reason that we added the forward protocol declaration at the top. The weak specifier in the property declaration is for memory management purposes. It indicates that the reference that the add item view controller keeps to its delegate is a weak reference as opposed to a strong reference. Even though memory management is an important aspect of Cocoa development, I won't cover weak and strong references in this lesson.
#import <UIKit/UIKit.h>

@protocol TSPAddItemViewControllerDelegate;

@interface TSPAddItemViewController : UIViewController

@property (weak) id<TSPAddItemViewControllerDelegate> delegate;

@property IBOutlet UITextField *nameTextField;
@property IBOutlet UITextField *priceTextField;

@end
Below the class interface of TSPAddItemViewController, we declare the TSPAddItemViewControllerDelegate protocol. In contrast to the UITableViewDataSource and UITableViewDelegate protocols, the TSPAddItemViewControllerDelegate is short and simple.
A protocol declaration starts with @protocol and ends with @end, similar to a class interface starting with @interface and ending with @end.
As a reminder, a protocol declaration defines or declares the methods that objects conforming to the protocol should implement. Methods in a protocol declaration are required by default. To declare optional methods, the @optional compiler directive should be used.
By adding the NSObject protocol (between angle brackets) after the name of the protocol, we declare that the TSPAddItemViewControllerDelegate protocol extends the NSObject protocol.
The TSPAddItemViewControllerDelegate protocol defines only one method. The method informs the delegate object when a new item has been added by the user and passes the name and price of the new item.
@protocol TSPAddItemViewControllerDelegate <NSObject>
- (void)controller:(TSPAddItemViewController *)controller didSaveItemWithName:(NSString *)name andPrice:(float)price;
@end
As I mentioned in the lesson about table views, it's good practice to pass the sender of the message, the object notifying the delegate object, as the first argument of each delegate method. This makes it easy for the delegate object to communicate with the sender if necessary.
Notifying the Delegate
It's time to use the delegate protocol that we declared a moment ago. Revisit the save: method in the TSPAddItemViewController class and update its implementation as shown below.
- (IBAction)save:(id)sender {
    // Extract User Input
    NSString *name = [self.nameTextField text];
    float price = [[self.priceTextField text] floatValue];

    // Notify Delegate
    [self.delegate controller:self didSaveItemWithName:name andPrice:price];

    // Dismiss View Controller
    [self dismissViewControllerAnimated:YES completion:nil];
}
The contents of the text fields are first stored in the name and price variables, which are then passed as arguments to the controller:didSaveItemWithName:andPrice: delegate method.
Responding to Save Events
The final piece of the puzzle is to make the TSPListViewController class conform to the TSPAddItemViewControllerDelegate protocol. Open TSPListViewController.h, import the header file of the TSPAddItemViewController class, and update the interface declaration of TSPListViewController to make the class conform to the new protocol.
#import <UIKit/UIKit.h>

#import "TSPAddItemViewController.h"

@interface TSPListViewController : UITableViewController <TSPAddItemViewControllerDelegate>

@end
The import statement is required to tell the compiler about the TSPAddItemViewControllerDelegate protocol that we declared in the header file of the TSPAddItemViewController class. Because we already import the header file of TSPAddItemViewController in TSPListViewController.h, you can remove the import statement in the implementation file, TSPListViewController.m.
As we did with the UITableViewDataSource and UITableViewDelegate protocols, we need to implement the methods defined in the TSPAddItemViewControllerDelegate protocol. In TSPListViewController.m, add the following implementation of controller:didSaveItemWithName:andPrice:.
- (void)controller:(TSPAddItemViewController *)controller didSaveItemWithName:(NSString *)name andPrice:(float)price {
    // Create Item
    TSPItem *item = [TSPItem createItemWithName:name andPrice:price];

    // Add Item to Data Source
    [self.items addObject:item];

    // Add Row to Table View
    NSIndexPath *newIndexPath = [NSIndexPath indexPathForItem:([self.items count] - 1) inSection:0];
    [self.tableView insertRowsAtIndexPaths:@[newIndexPath] withRowAnimation:UITableViewRowAnimationNone];

    // Save Items
    [self saveItems];
}
We create a new instance of the TSPItem class, by invoking the class method we created earlier, and pass the name and price that we receive from the add item view controller instance.
In the next step, the items property is updated by adding the newly created item. Of course, the table view doesn't automagically reflect the addition of a new item. We need to manually insert a new row in the table view. To save the new item to disk, we call saveItems on the view controller, which we implemented earlier in this tutorial.
Setting the Delegate
The final piece of this somewhat complex puzzle is to set the delegate of the add item view controller when we present it to the user. We do this in prepareForSegue:sender: as we saw earlier in this series.
- (void)prepareForSegue:(UIStoryboardSegue *)segue sender:(id)sender {
    if ([segue.identifier isEqualToString:@"AddItemViewController"]) {
        // Destination View Controller
        UINavigationController *nc = (UINavigationController *)segue.destinationViewController;

        // Fetch Add Item View Controller
        TSPAddItemViewController *vc = [nc.viewControllers firstObject];

        // Set Delegate
        [vc setDelegate:self];
    }
}
If the segue's identifier is equal to AddItemViewController, we ask the segue for its destinationViewController. You may think the destination view controller is the add item view controller, but remember that the add item view controller is embedded in a navigation controller.
In other words, we need to fetch the first item in the navigation controller's navigation stack, which gives us the root view controller or the add item view controller object we're looking for. We then set the delegate property of the add item view controller to self, the view controller.
Build the project and run the application one more time to see how everything works together—as by magic.
Conclusion
That was a lot to take in, but we've accomplished quite a bit already. In the next lesson, we will make some changes to the list view controller to edit and remove items from the list, and we'll also add the ability to create a shopping list from the list of items.

Comments