The UIGestureRecognizer class makes it easy to detect and respond to complex gestures in an iOS SDK application. This tutorial will teach you how to use the UIGestureRecognizer class by demonstrating how to build a simple photo gallery library.
The UIGestureRecognizer has been available since iOS 3.2. However, you may be surprised to find that you will rarely work with this class directly. Instead, you'll implement one of several subclasses designed to respond to specific touch gestures. The following UIGestureRecognizer subclasses are shipped with the iOS SDK:
- UITapGestureRecognizer: Looks for single or multiple taps. This gesture will be recognized if a specified number of fingers tap a view a set number of times within a predefined timeframe.
- UIPinchGestureRecognizer: Looks for pinching gestures. When the user moves two fingers toward each other, the "zoom-out" action is triggered, and if the user moves two fingers away from each other, the "zoom-in" action is triggered.
- UIRotationGestureRecognizer: Looks for rotation gestures. If the users moves their fingers in a circular motion, the underlaying view should rotate in the same direction and speed.
- UISwipeGestureRecognizer: Looks for swiping gestures in one or more directions. A swipe is a discrete gesture, so the associated method will only be called once per swipe.
- UIPanGestureRecognizer: Looks for dragging gestures. The users must be pressing one or more fingers on a view while they drag it.
- UILongPressGestureRecognizer: Looks for long-press gestures. The users must press one or more fingers on a view for a longer time period before the method will be called. If your fingers move a specified distance while held down, the gesture will fail.
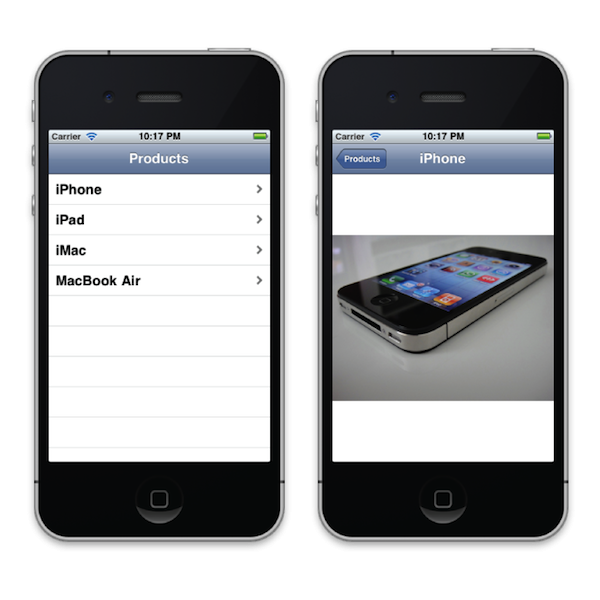
In this tutorial we will make a simple photo gallery. First you will see a list with products from Apple. If you select one, you will see an image of that product. You can zoom, rotate, move, and reset that image to its default state with gestures.
In addition to using the predefined gestures listed above, you can also subclass UIGestureRecognizer yourself, so you can create and detect your own custom gestures, like a check mark or a circle. We won’t do that in this tutorial, but you can find more information about it in the Apple documentation.
Step 1: Creating the Project
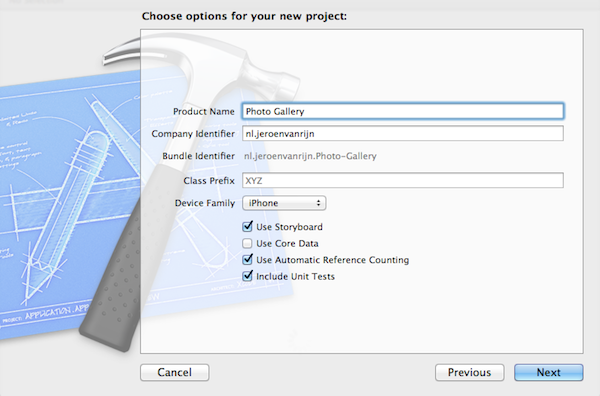
Open Xcode and select “Create a new Xcode project”. Select a Master-Detail Application and click Next. Enter a name for your project, I called mine ”Photo Gallery”. Enter your Company Identifier and make sure you selected iPhone for Device Family, because we are going to make an iPhone app. Also make sure that all the checkboxes are selected, except the Use Core Data checkbox. As you can see, we will use the new iOS 5 Storyboard and Automatic Reference Counting (ARC) features in this tutorial. If you are done, click Next. Choose a place to save your project and click Create.
Because we use storyboards instead of nib files in this tutorial, you won't see the MainWindow.xib, but a file called MainStoryboard.storyboard. When you open this file, you will see the entire user interface, which contains a navigation controller and two view controllers.
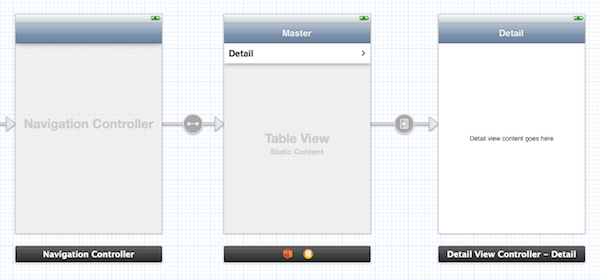
If you select the segue (arrow) between the two view controllers, you will see that the table view cell lights up. This means that the first view controller will push the second view controller. If you select the table view cell, we won't have to call pushViewController: anymore.
Also take a look at the the MasterViewController.m file. You will see that there is no dealloc method. This is because we use ARC, and ARC handles the memory related methods like retain, release, autorelease and dealloc for us.
Now Build and Run the project. You should see a navigation controller with the title Master and one cell called Detail. When you select this cell, you will be pushed to the second view controller which shows some text.
Step 2: Setup the Tableview
Open MasterViewController.h and modify the code to read as follows:
#import <UIKit/UIKit.h>

#import "DetailViewController.h"

@interface MasterViewController : UITableViewController
{
    NSArray *list;
}

@property (strong, nonatomic) NSArray *list;

@end
Here we import the DetailViewController class and create an array called list.
Now go to MasterViewController.m and add the following lines under the @implementation:
@synthesize list;
Now scroll down to the viewDidLoad method and modify the code to read as follows:
- (void)viewDidLoad
{
    [super viewDidLoad];

    self.title = @"Products";

    NSArray *listArray = [[NSArray alloc] initWithObjects:@"iPhone", @"iPad", @"iMac", @"MacBook Air", nil];
    self.list = listArray;
}
Here we set the title of the navigation bar to “products” and create a dummy array with Apple products to fill our list array. We don't have to release the listArray, because ARC will do that for us.
Now go to the shouldAutorotateToInterfaceOrientation: method and modify the code to read as follows, so our application will only work in portrait:
- (BOOL)shouldAutorotateToInterfaceOrientation:(UIInterfaceOrientation)interfaceOrientation
{
    return (interfaceOrientation == UIInterfaceOrientationPortrait);
}
Now add the following table view data source methods under the shouldAutorotateToInterfaceOrientation: method:
- (NSInteger)numberOfSectionsInTableView:(UITableView *)tableView
{
    return 1;
}

- (NSInteger)tableView:(UITableView *)tableView numberOfRowsInSection:(NSInteger)section
{
    return [list count];;
}

- (UITableViewCell *)tableView:(UITableView *)tableView cellForRowAtIndexPath:(NSIndexPath *)indexPath
{
    static NSString *CellIdentifier = @"Cell";

    UITableViewCell *cell = [tableView dequeueReusableCellWithIdentifier:CellIdentifier];

    cell.textLabel.text = [list objectAtIndex:[indexPath row]];

    return cell;
}
Here we set the number of sections of the table view to 1 and the number of rows of that section to the count of objects in our list array. We set the text of the cells in the table view to the products in our list array.
At last, add the following method under the table view data source methods:
- (void) prepareForSegue:(UIStoryboardSegue *)segue sender:(id)sender
{
    [segue.destinationViewController  setProductName:[list objectAtIndex:[self.tableView.indexPathForSelectedRow row]]];
}
Here we pass our product name string to the detail view controller. We will use this string for the navigation bar title and to set the image. You will get an error, because we haven’t defined the productName string in the DetailViewController yet. The storyboard will call this method at runtime when you trigger a segue in the current scene.
The last thing we will need to do is update our tableview in the storyboard, so open "MainStoryboard.storyboard" and select the tableview. Open the Attributes Inspector and change the content from Static Cells to Dynamic Prototypes.
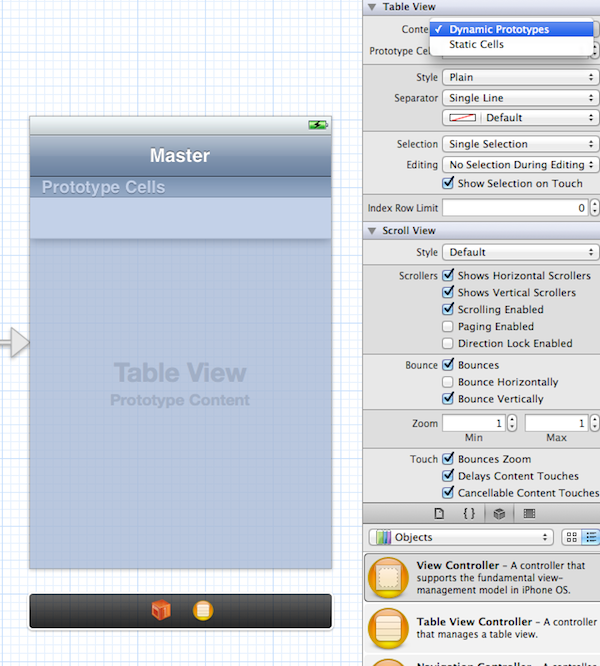
Now select the table view cell and set the Identifier to Cell. Also set the Accessory to Disclosure Indicator.
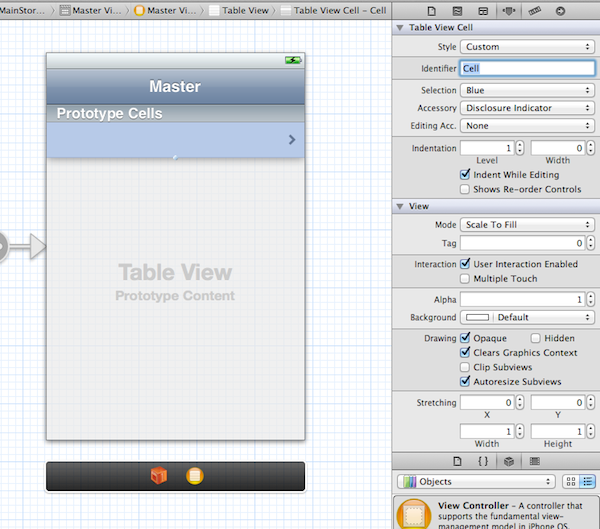
As you can see, the segue between the two view controllers has disappeared. This is because we changed the table view. To add this segue again, CTRL drag from the tableview to the DetailViewController and select Push for the Storyboard Segues.
Step 3: Creating the Interface
Open the MainStoryboard.storyboard, select the label in the last view controller and delete it. Now drag a UIImageView into the view and make it fill the whole space. In the Attributes Inspector set the Mode of the image view to Aspect Fit.
Now we only need to connect the image view, so select the middle button of the Editor to show the “Assistant editor”.

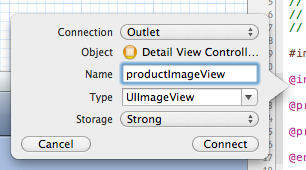
Select the image view and control-drag to under the DetailViewController @interface statement. A pop-up will appear. Enter “productImageView” for the name field, set the storage type to strong, and click Connect.
Step 4: Creating Some Variables
Open DetailViewController.h and modify the code to read as follows:
#import <UIKit/UIKit.h>

@interface DetailViewController : UIViewController
{
    NSString *productName;

    CGFloat previousScale;
    CGFloat previousRotation;

    CGFloat beginX;
    CGFloat beginY;
}

@property (strong, nonatomic) IBOutlet UIImageView *productImageView;
@property (strong, nonatomic) NSString *productName;

@end
Here, we create some variables that we will use to adjust the image. We also create the productName string we talked about earlier.
Now go to the DetailViewController.m file and delete the following lines:
@synthesize detailItem = _detailItem;
@synthesize detailDescriptionLabel = _detailDescriptionLabel;
Also delete these lines and the setDetailItem: and configureView methods:
@interface DetailViewController ()
- (void)configureView;
@end
now add the following line under the @implementation:
@synthesize productName;
Step 5: Change the orientation
Go to the shouldAutorotateToInterfaceOrientation: method and modify the code to read as follows, so our application will also in this view controller only work in portrait:
- (BOOL)shouldAutorotateToInterfaceOrientation:(UIInterfaceOrientation)interfaceOrientation
{
    return (interfaceOrientation == UIInterfaceOrientationPortrait);
}
Step 6: Adding the Images
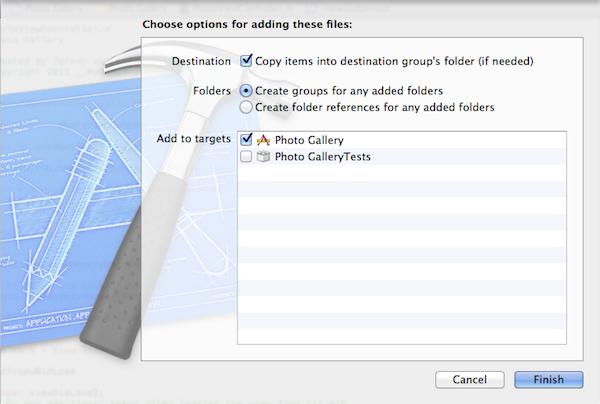
First we need to add the images to our project, so download the sample code attached to this project and drag the iMac, iPad, iPhone, and MacBook Air images into your project. Make sure “Copy items into destination group’s folder (if needed)” is checked, and then click Finish.
Now scroll down to the viewDidLoad method in the DetailViewController.m file and modify the code to read as follows:
- (void)viewDidLoad
{
    [super viewDidLoad];

    self.title = productName;

    NSString *imageName = [NSString stringWithFormat:@"%@.jpg", productName];
    self.productImageView.image = [UIImage imageNamed:imageName];
}
Here we set the title of the navigation bar to the selected product and after that we assign the corresponding image of that product to the image view.
Now, Build and Run the application. You should now see a list of Apple products. If you select one, you will go to the next view with a image of that product.
Step 7: UIRotationGestureRecognizer
Go to the viewDidLoad method in DetailViewController.m and add the following code to that method:
 UIRotationGestureRecognizer *rotationGesture = [[UIRotationGestureRecognizer alloc] initWithTarget:self action:@selector(rotateImage:)];
    [self.view addGestureRecognizer:rotationGesture];
Here, we created the rotation gesture recognizer. Now add the rotateImage: method:
- (void)rotateImage:(UIRotationGestureRecognizer *)recognizer
{

	if([recognizer state] == UIGestureRecognizerStateEnded) {

		previousRotation = 0.0;
		return;
	}

	CGFloat newRotation = 0.0 - (previousRotation - [recognizer rotation]);

	CGAffineTransform currentTransformation = self.productImageView.transform;
	CGAffineTransform newTransform = CGAffineTransformRotate(currentTransformation, newRotation);

    self.productImageView.transform = newTransform;

	previousRotation = [recognizer rotation];
}
In this method we first check if the rotation gestures has ended. If it has, we set the previousRotation value to 0. Next, we calculate the new rotation with the previous rotation and then set the current rotation. This is done so our next rotation will start with the current rotation. We want to apply this rotation to the current transformation. So, we get our current transformation and add the rotation to it. At last, we set the previousRotationValue to the current rotation of your fingers.
Step 8: UIPinchGestureRecognizer
Go to the viewDidLoad method and add the following code to that method:
   UIPinchGestureRecognizer *pinchGesture = [[UIPinchGestureRecognizer alloc] initWithTarget:self action:@selector(scaleImage:)];
    [self.view addGestureRecognizer:pinchGesture];
Here we create the pinch gesture recognizer. Now add the scaleImage: method:
- (void)scaleImage:(UIPinchGestureRecognizer *)recognizer
{

	if([recognizer state] == UIGestureRecognizerStateEnded) {

		previousScale = 1.0;
		return;
	}

	CGFloat newScale = 1.0 - (previousScale - [recognizer scale]);

	CGAffineTransform currentTransformation = self.productImageView.transform;
	CGAffineTransform newTransform = CGAffineTransformScale(currentTransformation, newScale, newScale);

        self.productImageView.transform = newTransform;

	previousScale = [recognizer scale];
}
This method is very similar to the rotateImage method, but instead of rotating the image, we scale the image.
Step 9: UITapGestureRecognizer
Go to the viewDidLoad method and add the following code to that method:
    UITapGestureRecognizer *tapGesture = [[UITapGestureRecognizer alloc] initWithTarget:self action:@selector(resetImage:)];
    [self.view addGestureRecognizer:tapGesture];
Here we created the tap gesture recognizer. Now add the scaleImage: method:
- (void)resetImage:(UITapGestureRecognizer *)recognizer
{
    [UIView beginAnimations:nil context:nil];
    [UIView setAnimationDuration:0.3];

    self.productImageView.transform = CGAffineTransformIdentity;

    [self.productImageView setCenter:CGPointMake(self.view.frame.size.width/2, self.view.frame.size.height/2)];

    [UIView commitAnimations];
}
In this method, we reset the image to its default state with a nice animation. We center the image and remove the transformations.
Step 10: UIPanGestureRecognizer
For the last time, go to the viewDidLoad method and add the following code to that method:
    UIPanGestureRecognizer *panGesture = [[UIPanGestureRecognizer alloc] initWithTarget:self action:@selector(moveImage:)];
    [panGesture setMinimumNumberOfTouches:1];
	[panGesture setMaximumNumberOfTouches:1];
    [self.view addGestureRecognizer:panGesture];
Here we created the pan gesture recognizer. We set the minimumNumberOfTouches and maximumNumberOfTouches property to 1, so this gesture will only work with 1 finger. Now add the moveImage: method:
- (void)moveImage:(UIPanGestureRecognizer *)recognizer
{
    CGPoint newCenter = [recognizer translationInView:self.view];

	if([recognizer state] == UIGestureRecognizerStateBegan) {

		beginX = self.productImageView.center.x;
		beginY = self.productImageView.center.y;
	}

	newCenter = CGPointMake(beginX + newCenter.x, beginY + newCenter.y);

	[self.productImageView setCenter:newCenter];

}
Here we create a CGPoint and set the value to the location of your finger. If we begin with the pan gesture. We set the value of the beginX and beginY variables to the x and y coordinates of the center of the image view. After that we calculate the new coordinates for the center of the image view, so the center of the image view will be at the same place as our finger. At last, we set the center of the image view to the newCenter CGPoint we just calculated.
Run the application again and this time you can rotate, zoom, and move the image. If you tap on the image the image will go to its default state.
Wrap Up
I hope you liked this tutorial about gestures. If you have some new ideas for iOS tutorials, please leave them in the comments section below!


Comments