In this tutorial series, we will develop a native Android application where the user interface is implemented using the jQuery Mobile framework. For this purpose, we will introduce a model for representing UI screens in a native Android application using jQuery Mobile page elements, in particular, container and content pages. Although the tutorial code is developed for contacts management, the basic concepts of the model are generic and can be applied to applications where the UI is suitable for constructing via HTML and JavaScript.
As part of the model, we discuss integrating JavaScript with back-end Java code and describe accessing Java methods from JavaScript and, conversely, accessing JavaScript/HTML from Java.
A summary of the main aspects of the model to be created are as follows:
- A physical HTML page contains one container page with one or more content pages where each content page represents one or more UI screens.
- Accessing Java from JavaScript is based on JavaScript binding of Java objects, made possible via the
addJavascriptInterface()method in theandroid.webkit.WebViewclass. - Accessing JavaScript/HTML from Java is accomplished via the
loadUrl()method in theandroid.webkit.WebViewclass. That method can be used to call a JavaScript function or to load a physical HTML page. - Java back-end code works as a service for the JavaScript code in the UI. JavaScript code invokes a Java method to request a particular activity and specifies a callback JavaScript function to receive the results back. In certain cases, JavaScript code invokes a Java method for controlling navigation, which is described next.
- Screen navigation is managed by the JavaScript code according to the following rules.
- Transition from one content page to another within the same container page is performed by JavaScript code.
- Transition from one container page to another is performed by Java code using
WebView.loadUrl(). The container page to display is passed to Java code from JavaScript as a parameter. - When passing an object from a JavaScript function to a Java method, or vice versa, JSON object representation is used.
Additional aspects of the tutorial are as follows.
- The UI elements for the tutorial application are constructed with jQuery Mobile list views, list dividers and collapsible blocks. We use jQuery Mobile version 1.0 Alpha 3. (An Alpha 4 release was recently made with various bug fixes. See the announcement.)
- According to the Android API, any non-UI thread that invokes
WebView.loadUrl()should use aandroid.os.Handlerobject to access theWebViewinstance. We explain how we fulfilled that requirement in our tutorial application. - We utilize Android contacts API for reading and manipulating contacts in an Android device. Various database tables that store basic elements of a contact are explained, such as phones, addresses, emails, etc. We describe how to query those tables using Android API.
- We discuss how to develop the project in Eclipse IDE with Android Development Tools plugin. Project configuration files are described and step-by-step instructions are given to import the project source code into the Eclipse development environment.
Organization Of The Tutorial
This tutorial series has been organized as follows. In Part 1, 'Screen Flow' we introduce the screens in the application and describe transitions between those screens. The section 'jQuery Mobile Page Structure' gives an overview of page elements in jQuery Mobile framework and explains how the screens in this application are constructed using those elements. In 'Integrating HTML/JavaScript Based UI With Android Java Back-end', we review basic concepts in integrating UI, composed of HTML and JavaScript, with the back-end Java classes that implement the business functionality. The subsections here are 'Accessing Java From JavaScript', 'Accessing HTML/JavaScript From Java' and 'Parameter Data Types In Method Calls'. In 'Application Startup', we begin review of the code for particular functional areas of the application. In each section, we describe the sequence of events that take place between UI and Java back-end to perform certain activities.
We start Part 2 of the tutorial with the section named 'Create Account', which describes how to create an account for associating with the newly created contacts. In 'Existing Contact', we describe editing and deleting an existing contact. Part 3 of the tutorial starts with 'Adding Contact', which explains how to add a brand new contact. In 'Reading Contacts Via ContactUtility Class', we discuss how to use Android Java API for accessing and manipulating contacts in an Android device.
In Part 4, the last installment of the tutorial, 'Write Operations For Contacts' explains deleting and saving a contact using Android Java API. This section, as well as 'Reading Contacts Via ContactUtility Class' (Part 3), describe how to use Jackson JSON Processor for converting back and forth between Java data objects and JSON formatted string representations of those objects. In 'Project Configuration And Supporting Files', we discuss the configuration files for the project. The section 'Application Launch Icon' describes how we generated the launch icons for the tutorial application according to the Android Icon Design Guidelines. In 'Native Android Application Development Environment', we describe the development environment for the application and explain individual steps for importing the project into Eclipse IDE. Finally, 'Conclusions' gives the concluding remarks for this tutorial.
Screen Flow
In our application, every contact should be associated with an account. Typically, accounts are identifiers for a user in an online service such as 'gmail'. For this demo application, we will create an account that will own all the contacts created by the application. For simplicity, that account will not be related to any online service. Contacts that belong to other accounts will still be displayed via the application, however, they cannot be edited or deleted. (This restriction is intentional to avoid accidental damage to contacts in an actual Android device.) When application starts, it checks if an account has been created for the application. When running for the first time, the account does not exist, therefore, user is displayed a 'Create Account' screen (Figure 1 below).

Once account is created, the initial screen to be displayed when the application starts is the 'Contact List' screen. The 'Contact List' screen gives a listing of all contacts in the device (Figure 2 below).

If user clicks the add button, an 'Empty Contact' screen is shown. On that screen, user can type in new contact information and save the contact. Once the contact is saved, the 'Contact List' screen is displayed with the newly added contact. On 'Empty Contact' screen user can cancel entering the new contact. In that case the 'Contact List' screen is displayed without saving the contact. The 'Empty Contact' screen is shown in Figure 3, left, below.
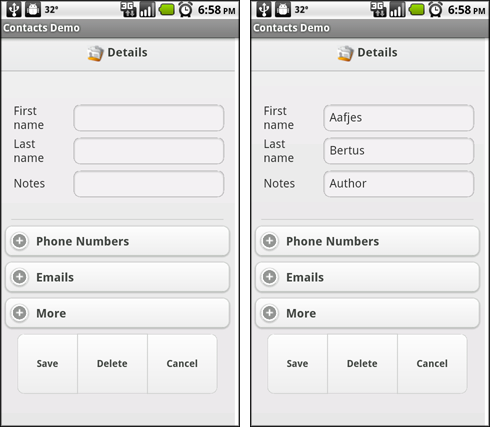
On 'Contact List', user can also select an existing contact and view its details on 'Existing Contact' screen, as shown in Figure 3, right, above. Here, user can edit the contact and save the changes, which returns the user to 'Contact List' screen with updated contact information. On 'Existing Contact', if cancel is selected, user is taken back to 'Contact List' and no changes are made to the contact information. The 'Existing Contact' screen is identical to 'Empty Contact' except that the contact details is filled in with existing contact information.
On 'Existing Contact', user can also press Delete button to delete the contact. When Delete button is pressed, the 'Confirm Delete' screen is displayed, Figure 4 below. On 'Confirm Delete', if Delete is pressed the contact is deleted and the user is taken back to 'Contact List' screen. On 'Confirm Delete' if Cancel is pressed, no action is taken and user is taken back to 'Existing Contact' screen.

In screen transitions that require a certain amount of data processing, the application displays a 'Progress' screen as user stands by (Figure 5 below). The Progress screen is always displayed before any of the 'Create Account', 'Contact List', 'Empty Contact' and 'Existing Contact' screens is shown.

Summarizing the discussion above, the following figure shows the screen flow in our application.

jQuery Mobile Page Structure
Let us discuss how the screens in our application will be represented using the jQuery Mobile page elements. (For a detailed discussion on how pages are constructed in jQuery Mobile framework, see the section in reference documentation named Anatomy of a Page.) A single HTML file in jQuery Mobile framework consists of one container page with one or more content pages inside the container. The container page has data-role="page" attribute whereas the content pages have data-role="content" attribute. A content page can optionally have header and footer. In the example below, there are two content pages with header and footer and one content page without header or footer.
<div data-role="page">

  <div data-role="header">...</div>
  <div id="contentWithHeaderAndFooter1" data-role="content">...</div>
  <div data-role="footer">...</div>

  <div data-role="header">...</div>
  <div id="contentWithHeaderAndFooter2" data-role="content">...</div>
  <div data-role="footer">...</div>

  <div id="contentWithNoHeaderAndFooter" data-role="content">...</div>
</div>
Within a container page, it is intended to display only one content page at a time. The idea is to group logically related screens together inside a single container page and define each of those as a content page. For example, those content pages may share common JavaScript code. Another example is one where a main content page is grouped together with several other content pages that represent dialogs related to main content.
In this tutorial application, each of 'Create Account' (Figure 1), 'Contact List' (Figure 2) and Progress screens (Figure 5) is represented as a content page in a container page which is stored in the physical page ListPage.html. Similarly, the physical page DetailPage.html has a container page with three content pages in it; one of those content pages is used to represent both 'Empty Contact' and 'Existing Contact' screens (Figure 3), another content page represents 'Confirm Delete' screen (Figure 4), and the third content page represents the Progress screen. The following figure summarizes this discussion.

Displaying/hiding of content pages is done programmatically. This will be shown during review of the code below.
Integrating HTML/JavaScript Based UI With Android Java Back-end
In this tutorial, we are developing a native Android application where UI is implemented with jQuery Mobile framework which consists of JavaScript and CSS libraries. The jQuery Mobile framework aims to help develop mobile web applications with uniform user experience across different mobile platforms, devices and browsers. As such, it does not have a specific integration mechanism, e.g. a plug-in, with Android out of the box. For this reason, integration of jQuery Mobile with Android must be custom developed.
Before starting a review of the HTML pages and JavaScript, as well as Java code of this tutorial, it makes sense to look at three main aspects of that integration:
- Accessing Java from JavaScript
- Accessing HTML/JavaScript From Java
- Parameter Data Types In Method Calls Between Java-JavaScript
Accessing Java From JavaScript
Android provides a generic way of exposing Android Java objects in JavaScript code using addJavascriptInterface(Object object, String interfaceName) method in android.webkit.WebView class. Basically, this method allows invoking public methods of a Java object from JavaScript code running in WebView. Note that WebView is a special kind of android.view.View built on WebKit and allows displaying web pages consisting of HTML and JavaScript. Whether they reside over the Internet or packaged together with the native Android application, those web pages are referenced via URLs for the WebView to find and display them. (Interested reader is referred to the original API documentation for more information on WebView and View.)
The figure below shows how a Java object is accessed by JavaScript code running in WebView where the HTML page is part of the Android Application Package. The Java object is exposed to JavaScript code as a JavaScript object.

The example listing below shows how to expose a Java object, an instance of ContactsActivity class, as a JavaScript object. In Activity.onCreate(), we first initialize the WebView instance. Then, the ContactsActivity object registers itself as a JavaScript object under name contactSupport. The ContactsActivity class has various public methods, e.g. deleteContact().
import android.webkit.WebView;
import android.app.Activity;
...
public class ContactsActivity extends Activity {
  WebView webView;
  ...
  public void onCreate(Bundle savedInstanceState) {
    ...
    webView = new WebView(this);
    ...
    webView.addJavascriptInterface(this, <B>"contactSupport"</B>);
    ...
  }
  public void <B>deleteContact</B>(String contactId, String displayPage){
    ...
  }
The code snippet below shows an example of accessing the ContactsActivity object from JavaScript code. It is as simple as calling any public method of the object using registered name of the object.
<script>
  ...
  function someJavaScriptFunction(){
    ..
    <B>contactSupport.deleteContact</B>(contactIdVar.val(),'ListPage.html');
  }
  ...
</script>
Accessing HTML/JavaScript From Java
In this tutorial application, we will use loadUrl(String url) method in WebView class for two different purposes: (1) load a new HTML page in WebView and (2) invoke a JavaScript method on the currently loaded HTML page in WebView. Putting those in perspective with the jQuery Mobile container and content pages, we adhere to the following rules.
- Transition from one content page to another within the same container page is performed by JavaScript code.
- Transition from one container page to another is performed by Java code using
WebView.loadUrl(String url). The container page to display is passed to Java code from JavaScript as a callback parameter.
In addition to loading a new HTML page, the WebView.loadUrl(String url) method is also used to invoke a JavaScript method on the currently loaded HTML page.The JavaScript method to invoke is passed to Java as a callback parameter from JavaScript code. For any JavaScript method that invokes a Java method, the diagram below summarizes the interaction between Java and JavaScript.
- Upon user stimulus or loading of the HTML page, the JavaScript code first displays the Progress screen.
- Then, the JavaScript code performs some data processing, depending on the particular scope, and invokes a Java method. The Java method is passed parameters to process (optional) and either a JavaScript function to call back or an HTML page to load, after the Java method completes processing its business logic.
- The Java method completes processing its business logic and then calls back the JavaScript function or loads the HTML page as requested.

Now let us look at how Java code implements those interactions.
Loading HTML Pages Via WebView
The code listing below gives an example of a Java method, deleteContact(). That function is called by JavaScript with id of a contact to be deleted and name of an HTML page that should be displayed after contact is deleted. (The id of a contact is unique identifier for that contact in contacts database of the Android device.)
import android.webkit.WebView;
import android.app.Activity;
import android.os.Handler;
...
public class ContactsActivity extends Activity {
  WebView webView;
  private Handler handler = null;
  ...
  public void onCreate(Bundle savedInstanceState) {
    ...
    webView = new WebView(this);
    ...
    handler = new Handler();
    ...
  }

  public void deleteContact(String contactId, String displayPage){
    ContactUtility.deleteContact(contactId,...);
    loadPage(displayPage);
  }

  public void loadPage(String in){
    final String url = "file:///android_asset/www/" + in;
    loadURL(url);
  }

  private void loadURL(final String in){
    handler.post(new Runnable() {
      public void run() {
        webView.loadUrl(in);
      }
    });
  }
Firstly, let us look at how we use android.os.Handler. The Android reference for android.view.View states that:
"...You must always be on the UI thread when calling any method on any view. If you are doing work on other threads and want to update the state of a view from that thread, you should use a Handler."
What this implies to us is that the deleteContact() method could not directly call WebView.loadUrl(). This is because of two reasons. Firstly, the WebView instance is created in the onCreate() method. Secondly, when the deleteContact() method is called by JavaScript, the thread that executes that method is different than the one that executed the onCreate() method of ContactsActivity. This is evident from the Android reference for WebView.addJavascriptInterface() method where it says "...The Java object that is bound (to JavaScript) runs in another thread and not in the thread that it was constructed in."
This is where android.os.Handler is helpful. From the Android reference, a Handler object allows us to execute an action (WebView.loadUrl() in this case) in the particular thread that is associated with the Handler object. In onCreate() method, we initialize both the WebView and Handler objects and therefore both those objects are associated with the same thread.
With that concept of Handler in mind, the listing above should now be straightforward to understand.
- In
deleteContact(), we delete the contact first (theContactUtilityclass will be reviewed later on). - Then, we call the
loadPage()method which simply puts a prefix in front of the name of HTML page to be displayed, converting name of the page to afile://based URL. - Finally, we call the
loadURL()method to have theHandlerobject call theWebView.
Invoking JavaScript Methods Via WebView
Having reviewed an example where Java code displayed an HTML page after request processing, let us look at another example where Java code invokes a JavaScript method after processing a request, to pass its results back.
public class ContactsActivity extends Activity {
  ...
  public void <B>getAllContacts</B>(String callback, String accountCallback){
    final String accountCallbackFunction = "javascript:" + accountCallback + "()";

    if(accountName == null){
      loadURL(accountCallbackFunction);
        return;
    }

    final String json = ContactUtility.getAllContactDisplaysJSON(getContentResolver());
    final String callbackFunction = "javascript:" + callback + "('" + json + "')";

    loadURL(callbackFunction);
  }
The getAllContacts() method generates a list of all contacts in JSON format and passes back the result to a specified callback JavaScript function. The method is passed two JavaScript callback function names. The first one should be used to pass the list of contacts. The second one is used only after initial installation where an account for the tutorial application has not been created yet. Invoking that second JavaScript function should guide the user to create an account.
The JavaScript code listing invoking ContactsActivity.getAllContacts() method is given below.
<script>
  $(document).ready(function () {
    ...
    contactSupport.<B>getAllContacts</B>('setContactsList','showAccount');
  });
</script>
The setContactsList() function is one that takes a listing of contacts in JSON format, parses it and displays the 'Contact List' screen in Figure 2 above. The showAccount() function displays the 'Create Account' screen in Figure 1 without any data processing. We will provide review of those functions later.
Parameter Data Types In Method Calls
In this application, we only use String data type during function calls back and forth between JavaScript and Java. Other primitives, such as Integer, are passed as a String and cast to the proper type later on. Complex object types are also serialized to a JSON formatted String and then parsed back into an object at the receiving end.
On the Java side, we use Jackson JSON Processor for conversion back and forth between Java data objects and JSON formatted string representations of those objects. On the JavaScript side, to parse a JSON formatted string, we use jQuery.parseJSON() method. On the other hand, generating the JSON formatted string in JavaScript is done programmatically. As we further review the code below, those functional areas will be described in more detail.
Application Startup
The ContactsActivity class is an android.app.Activity and the entry point to our tutorial application. For more about Android Activity class see http://developer.android.com/guide/topics/fundamentals.html. The ContactsActivity class is also the Android back-end interface to be used by JavaScript code in HTML pages representing the UI.
When our tutorial application loads, the ContactsActivity.onCreate() method is called.
package com.jquerymobile.demo.contact;

public class ContactsActivity extends Activity {
  WebView webView;
  private Handler handler = null;
  private String accountType = null;
  private String accountName = null;
  ...

  public void onCreate(Bundle savedInstanceState) {
      super.onCreate(savedInstanceState);

      // Initialize the WebView
      webView = new WebView(this);

      setContentView(webView);

      // Enable JavaScript
      webView.getSettings().setJavaScriptEnabled(true);

      // Check existence of account for this application
      accountType = "com.jquerymobile.demo.contact";
      Account[] accounts = AccountManager.get(this).getAccountsByType(accountType);
      if(accounts.length != 0){
        accountName = accounts[0].name;
      }
      handler = new Handler();

      // Bind this object as a JavaScript object
      webView.addJavascriptInterface(this, "contactSupport");

      // Load index.html
      loadPage("index.html");
  }
  ...
}
Important steps in onCreate() methods are as follows:
- We initialize a
WebViewinstance and enable it to run JavaScript. - Every contact created by our application must be associated with an
android.accounts.Account. We will utilize an account specific to our application. The type of the application iscom.jquerymobile.demo.contact, named after the application package. Using theandroid.accounts.AccountManagerclass, we search if there is any account by that type. If so, we initialize theaccountNamefield to that name. - We initialize the
handlerfield. - The
ContactsActivityinstance is bound to JavaScript as an object under namecontactSupport. - Finally, we load the
index.htmlfile in theWebView. This is the only HTML file with hardcoded name in our Java code. Names of all other HTML files are passed to the methods ofContactsActivityas parameters.
The listing for index.html is given below. All that file does is to call, in jQuery $(document).ready() function, the ContactsActivity.loadPage() method passing 'ListPage.html' as a parameter. As a result, the WebView loads ListPage.html.
index.html
<html>
  <head>
    <link rel="stylesheet" href="css-js/jquery.mobile-1.0a3.min.css" />
    <script src="css-js/jquery-1.5.min.js"></script>
    <script src="css-js/jquery.mobile-1.0a3.min.js"></script>
  </head>
    <body>
    ...
    <script>
      $(document).ready(function () {
        contactSupport.loadPage('ListPage.html');
      });
    </script>
  </body>
</html>
Initial Load Of ListPage.html
The ListPage.html has three content pages in it (see Figure 7). Those correspond to the 'Create Account' and 'Contact List' screens in Figures 1 and 2, respectively, and a Progress screen such as the one in Figure 5. Recall from previous discussion that only one of those pages will be displayed at any given time.
<html>
<head>
<B><!-- jQuery Mobile Libraries --></B>
  <link rel="stylesheet" href="css-js/jquery.mobile-1.0a3.min.css" />
  <script src="css-js/jquery-1.5.min.js"></script>
  <script src="css-js/jquery.mobile-1.0a3.min.js"></script>
</head>
<body>
<B><!-- Container Page --></B>
<div data-role="page" data-theme="c" id="containerPage">
  <B><!-- Contact List --></B>
  <div data-role="header" id="hdrList" data-nobackbtn="true">
    <h1><img align="top"  src="img/contacts.png"> Contacts</h1>
    <a id="buttonAddContact" data-icon="plus" class="ui-btn-right"
      href="<B>javascript:addContact();</B>return false;" data-role="button" data-inline="true">Add</a>
  </div>
  <div data-role="content" id="contentList" data-theme="c">
    <ul data-role="listview" data-dividertheme="c" id="contactSelections"></ul>
  </div>
  <div data-role="footer" id="ftrList"></div>

  <B><!--  Progress --></B>
  <div data-role="header" id="hdrProgress" data-nobackbtn="true"  data-theme="c">
    <h1>Processing...</h1>
  </div>
  <div data-role="content" id="contentProgress"  data-theme="c">
    <div align="CENTER"><h4>Please wait.</h4></div>
    <div align="CENTER"><img id="spin" src="img/wait.gif"/></div>
  </div>
  <div data-role="footer" id="ftrProgress"  data-theme="c"></div>

  <B><!--  Create Account --></B>
  <div data-role="header" id="hdrAccount" data-nobackbtn="true"  data-theme="c">
    <h1>Create Account</h1>
  </div>
  <div data-role="content" id="contentAccount"  data-theme="c">
    <div align="CENTER"><img src="img/contacts-master-bgd.png"></div>
    <div align="CENTER"><h4>Please enter name of the new account for this application</h4></div>
    <div align="CENTER">Contacts created with this application will be associated with the new account specified below.
    Other contacts can be viewed, however, cannot be deleted or modified with this application.</div>
    <div align="CENTER" id="accountDiv" data-role="fieldcontain">
      <input id="accountName" type="text" />
    </div>
    <div align="CENTER">
      <a href="javascript:createAccount();return false;" <B>data-role="button"
        data-inline="true"</B>>Save</a>
    </div>
    ...
  </div>
  <div data-role="footer" id="ftrAccount"  data-theme="c"></div>

</div> <B><!-- Container Page Ends Here --></B>
...
Please note the following.
- All three content pages have header, footer and content sections defined. All those sections have
data-theme="c"which specifies a particular color theme made available by jQuery Mobile. For details, please see the original reference on jQuery Mobile Theme Framework. - By default, jQuery Mobile places a back button in the header section. We control navigation in our program and therefore do not need the back button. As a result, we set
data-nobackbtn="true". (For further information on jQuery Mobile navigational model see the original reference on that subject.) - The header section in 'Contact List' has an Add button that invokes a JavaScript method named
addContact()which will be reviewed later. Initially, the 'Contact List' consists of an empty list,id="contentList", which will be programmatically populated based on data from the Java back-end. - The 'Create Account' screen has a button to save name of the account as input by the user. Notice
data-inline="true"on the definition of that button. This states that the button should wrap around the text 'Save'. Without it, the button would fill width of the screen by default. For details, see jQuery Mobile documentation on Inline Buttons.
We continue to explore ListPage.html. The listing below describes how to display one of 'Create Account', 'Contact List' and Progress screens. In jQuery $(document).ready() function, we initialize several variables representing the header, content and footer sections of the content pages for those screens using the id selector $('#...'). Then, define hidePage(), showPage() functions for each of the content pages. For example, showList() displays the 'Contact List' screen and hides the 'Create Account' and Progress screens.
<script>
  ...
  // Commonly used variables
  ...
  var hdrListVar;
  var contentListVar;
  var ftrListVar;
  var hdrProgressVar;
  var contentProgressVar;
  var ftrProgressVar;
  var hdrAccountVar;
  var contentAccountVar;
  var ftrAccountVar;


  $(document).ready(function () {
    // Initialize commonly used variables
    hdrListVar = $('#hdrList');
    contentListVar = $('#contentList');
    ftrListVar = $('#ftrList');
    hdrProgressVar = $('#hdrProgress');
    contentProgressVar = $('#contentProgress');
    ftrProgressVar = $('#ftrProgress');
    hdrAccountVar = $('#hdrAccount');
    contentAccountVar = $('#contentAccount');
    ftrAccountVar = $('#ftrAccount');
    ...
  });

  ...
  function hideList(){
    hdrListVar.hide();
    contentListVar.hide();
    ftrListVar.hide();
  }

  function showList(){
    hideProgress();
    hideAccount();
    hdrListVar.show();
    contentListVar.show();
    ftrListVar.show();
  }

  function hideProgress(){
    hdrProgressVar.hide();
    contentProgressVar.hide();
    ftrProgressVar.hide();
  }

  function showProgress(){
    hideList();
    hideAccount();
    hdrProgressVar.show();
    contentProgressVar.show();
    ftrProgressVar.show();
  }

  function hideAccount(){
    hdrAccountVar.hide();
    contentAccountVar.hide();
    ftrAccountVar.hide();
  }

  function showAccount(){
    hideList();
    hideProgress();
    hdrAccountVar.show();
    contentAccountVar.show();
    ftrAccountVar.show();
  }
  ...
</script>
The highlighted section below gives the remainder of $(document).ready() function in ListPage.html. The Progress screen is displayed and, via the JavaScript binding, ContactsActivity.getAllContacts() method is called. There are two parameters passed to the method: setContactsList is name of the JavaScript callback function to consume the JSON formatted list of contacts. The second parameter, showAccount, is the JavaScript callback function to be called if there is currently no account set up for this application. Both those callback functions are in ListPage.html, the current physical file.
  $(document).ready(function () {
    // Initialize commonly used variables
    hdrListVar = $('#hdrList');
    contentListVar = $('#contentList');
    ftrListVar = $('#ftrList');
    hdrProgressVar = $('#hdrProgress');
    contentProgressVar = $('#contentProgress');
    ftrProgressVar = $('#ftrProgress');
    hdrAccountVar = $('#hdrAccount');
    contentAccountVar = $('#contentAccount');
    ftrAccountVar = $('#ftrAccount');

    <B>showProgress();
    contactSupport.getAllContacts('setContactsList','showAccount');</B>
  });
ContactsActivity Responds
The listing below gives ContactsActivity.getAllContacts() method.
public void getAllContacts(String callback, String accountCallback){
  final String accountCallbackFunction = "javascript:" + accountCallback + "()";

  if(accountName == null){
    loadURL(accountCallbackFunction);
    return;
  }
  final String json = ContactUtility.getAllContactDisplaysJSON(getContentResolver());
  final String callbackFunction = "javascript:" + callback + "('" + json + "')";
  loadURL(callbackFunction);
}
We had partially reviewed that code before. To recap:
- If this application does not currently have an account created for it, the callback JavaScript function for 'Create Account' screen is called. This is done via
loadURL(accountCallbackFunction). - If the application has an account,
ContactUtility.getAllContactDisplaysJSON()is called to get a JSON formatted list of contacts in the device. The resulting JSON string is passed to the JavaScript callback function to display those contacts. This is done vialoadURL(callbackFunction). - A sample JSON formatted string for the contact list is given below. Contacts are grouped in alphabetical order by the first initial of their display names. Each group is identified by the
keyattribute, whose value is the letter representing the group, and consists of an array of contacts within the group, namedvalues. Each array element hascontactIdanddisplayNameattributes. The elements in the array are further sorted alphabetically based on thedisplayName. (The section named 'Getting JSON Formatted List Of Contacts' below gives a review of the code generating that list.)
{"contacts":[
  {"key":"A","values":[
    {"contactId":"257","displayName":"Aach Herb","key":"A"},
    ...,
    {"contactId":"256","displayName":"Aaker David","key":"A"}
    ]
  },
  {"key":"B","values":[
    {"contactId":"259","displayName":"Belanger Andre","key":"B"},
    ...,
    {"contactId":"260","displayName":"Bohme Jacob","key":"B"}
    ]
  },
  ...
  ]
}
Create Account Screen
When the ContactsActivity.getAllContacts() method invokes the JavaScript showAccount() function in ListPage.html, the 'Create Account' screen in Figure 1 is shown to user.
Contact List Screen
If there is an account for the application, the callback function setContactsList() in ListPage.html will parse the JSON formatted string of the contact list and display contacts to user. The listing of that function is given below.
  ..
  <div data-role="content" id="contentList" data-theme="c">
    <ul data-role="listview" data-dividertheme="c" id="<B>contactSelections</B>"></ul>
  </div>
  ...
<script>
  ...
  // Commonly used variables
  ...
  <B>var contactSelectionsVar;</B>

  $(document).ready(function () {
    // Initialize commonly used variables
    ...
    <B>contactSelectionsVar = $('#contactSelections');</B>
    ...
  }
  ...
  function setContactsList(jsonText){
    var tmpJson = $.parseJSON(jsonText);
    if(tmpJson != null && tmpJson.contacts != null){
      var tmpContacts = tmpJson.contacts;
      for(i = 0; i < tmpContacts.length; i++){
        var tmpKey = (tmpContacts[i]).key;
        var tmpKeyFragment = '<li data-role="list-divider">'+tmpKey+'</li>';
        <B>contactSelectionsVar.append(tmpKeyFragment);</B>
        var tmpValues = (tmpContacts[i]).values;
        if(tmpValues != null){
          var j;
          for(j = 0; j < tmpValues.length; j++){
            var tmpDisplayName = tmpValues[j].displayName;
            var tmpContactId = tmpValues[j].contactId;
            var tmpLiFragment = '<li><a href="javascript:showContact(' +
              tmpContactId + ');return false;">'+tmpDisplayName+'</a></li>';
            <B>contactSelectionsVar.append(tmpLiFragment);</B>
          }
        }
      }
    }
    <B>contactSelectionsVar.listview('refresh');</B>
    showList();
  }
  ...
</script>
- The jQuery parseJSON function is called to parse the JSON string and return the resulting JavaScript object.
- Recall that contacts are organized into groups based on the first initial of their displayName. For each group the
tmpKeyvariable is set to value of thekeyattribute of the group, whose value is the letter representing the group. - The
tmpKeyvariable is then used to construct a jQuery Mobile List Divider, which is represented as a string variable namedtmpKeyFragment. Each list divider signifies start of a new group and carries the letter representing the group. - The variable
contactSelectionsVaris a pointer to the empty list withid="contactSelections". Using thejQuery.append()function we add the list divider to that list. - The next step is to read the array of contacts in the group, which is accessed via
valuesattribute as defined in the JSON string. From each element of the array, we extractdisplayNameandcontactIdattributes and store them in variablestmpDisplayNameandtmpContactId, respectively. - The variables
tmpDisplayNameandtmpContactIdare used to construct another variable,tmpLiFragment, which represents a single list item for the contact. That list item is appended to the list identified by pointercontactSelectionsVar. - Finally, we refresh the contact list via
contactSelectionsVar.listview('refresh')to update view of the list. This will display the 'Contact List' screen in Figure 2. - The figure below shows how the code fragments above help construct the contact list.

Closing Remarks For Part 1 Of This Tutorial
In this initial part of the tutorial series, we introduced the goals of the tutorial and discussed the sample application that will be implemented. We also gave an overview of page elements in jQuery Mobile framework and explained how the screens in the sample application are constructed using those elements. We also reviewed basic concepts in integrating UI, composed of HTML and JavaScript, with the back-end Java classes that implement the business functionality.
In Part 2, we will continue the tutorial by demonstrating how to create an account for the newly created contacts. We will also describe how to edit and delete an existing contact.

Comments