Perhaps you’ve heard about augmented reality—it’s a hot topic in mobile right now. Learn about what augmented reality is and how you can leverage this technique in your Android applications in this introductory article.
Defining Augmented Reality
Before we start discussing how to write augmented reality applications, let's take a step back and define what it is. Wikipedia defines augmented reality as such:
"Augmented reality (AR) is a term for a live direct or indirect view of a physical, real-world environment whose elements are augmented by virtual computer-generated sensory input, such as sound or graphics. It is related to a more general concept called mediated reality, in which a view of reality is modified (possibly even diminished rather than augmented) by a computer. As a result, the technology functions by enhancing one’s current perception of reality."
Recently mobile developers have begun leveraging augmented reality techniques by taking input from the camera and overlaying images in real-time, usually meshed up with the image to either show where something real-world is (such as an icon for a restaurant) or perhaps a virtual sign or object.
This isn't to say there aren't other definitions or looser definitions or implementations of AR around today. One could argue, for instance, that Google Sky Map is augmented reality even though it's not drawing over the camera view, yet does just about everything else an augmented reality app would do (see figure below). Don't get too caught up in the definition and simply think of opportunities your applications might benefit from “overlaying” meta-data on real live data. For instance, eBay recently announced that they're adding an augmented reality feature to their fashion application. This feature allows users to see themselves with different pairs of sunglasses on.

The rest of this tutorial will discuss the various aspects of augmented reality and how they apply to Android. The tutorial will not dive in the specifics of implementation just yet. That's a bit beyond the scope of this introductory tutorial, but if readers show interest, we can continue down this road and provide some concrete tutorials on this topic.
Why Re-Invent The Wheel? Existing Options for Incorporating Lightweight AR Support in Your Apps
Already feeling overwhelmed? Perhaps you have data that you want others to be able to explore in an augmented reality environment but you don’t want to fully implement AR support in your own applications. If the aspect of pulling it all together in a coherent implementation seems like overkill for your project, what are you to do?
Try using an existing AR service, such as Layar. They provide clients for both the Android and iPhone platforms. For example, the Layar service allows anyone to add data that can be displayed for users and handles the details of the AR. As a bonus, it's also cross platform, so your data will be made available to their Android and iPhone clients.

Providing Your Own Custom AR Implementations: The Basics
Now that we have a shared definition of augmented reality, let's discuss how it all fits together and each of the Android components that might be leveraged in your typical AR application.
Your typical AR implementation contains two main parts: the “live” data we're augmenting and the “meta” data used for the augmentation. For a real-world overlay example, the live data we're augmenting will usually be a combination of information in the viewfinder of the rear-facing camera, the current location, and the direction the device is facing. This information is then cross-referenced with a list of “meta” data.
For instance, if we want to see the locations of gas stations in the view finder, the AR “service” must have augmentation data for each gas station, including its latitude and a longitude. Using this information, and the direction in which the device/camera is pointing, we can approximate the location of each gas station as an overlay on the view finder window and display a little fuel icon on or above its location.
The augmentation data source (e.g. the list of gas station locations) can be anything, but often it’s a preloaded database or a web service that can filter to nearby points of interest.
The rest of the AR implementation consists of using device camera APIs, graphics APIs, and sensor APIs to overlay the augmentation data over the live data and create a pleasant augmented experience.
Key AR Component #1: Camera Data
Displaying the live feed from the Android camera is the reality in augmented reality. The camera data is available by using the APIs available within the android.hardware.Camera package.
If your application doesn’t need to analyze frame data, then starting a preview in the normal way by using a SurfaceHolder object with the setPreviewDisplay() method is appropriate. With this method, you'll be able to display what the camera is recording on the screen for use. However, if your application does need the frame data, it's available by calling the setPreviewCallback() method with a valid Camera.PreviewCallback object.
Key AR Component #2: Location Data
Just having the camera feed for most augmented reality applications isn't enough. You'll also need to determine the location of the device (and therefore its user). To do this, you'll need to access fine or coarse location information, commonly accessed through the APIs available within the android.location package, with its LocationManager class. This way, your application can listen to location events and use those to determine where “live” items of interest are located in relation to the device.
If you're building an augmented reality application that will analyze the camera feed with computer vision (that is, where the computer "sees" things by extracting all the information it needs from the input images) to determine where to place augmentation data, you may not need to know the device location. Using computer vision is, in itself, a deep topic currently under research. Most solutions we’ve seen use the OpenCV libraries. More information on OpenCV can be found at the OpenCV wiki.
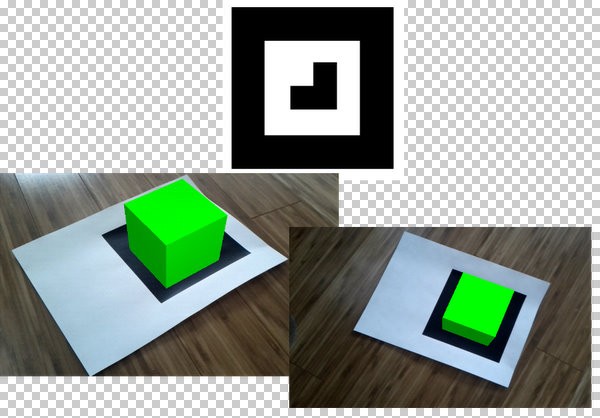
When location data isn't used, a "marker" or "tag" is often used. That is, an easily recognizable object where orientation and scale of an object to draw over it can be quickly determined. For instance, AndAR uses a simple marker to draw a cube over it, as a test of AR abilities.
Key AR Component #3: Sensor Data
Sensor data is often important to AR implementations. For example, knowing the orientation of the phone is usually very useful when trying to keep data synchronized with the camera feed.
To determine the orientation of an Android device,you'll need to leverage the APIS available in the android.hardware.SensorManager package. Some sensors you’re likely to tap include:
- Sensor.TYPE_MAGNETIC_FIELD
- Sensor.TYPE_ACCELEROMETER
- Sensor.TYPE_ROTATION_VECTOR
The use of sensors to allow the user to move the device around and see changes on the screen in relation to it really pulls the user into applications in an immersive fashion. When the camera feed is showing, this is critical, but in other applications, such as those exploring pre-recorded image data (such as with Google Sky Map or Street View), this technique is still very useful and intuitive for users.
Bringing It Together: The Graphics Overlay
Of course, the whole point of augmented reality is to draw something over the camera feed that, well, augments what the user is seeing live. Conceptually, this is as simple as simply drawing something over the camera feed. How you achieve this, though, is up to you.
You could read in each frame from of the camera feed, add an overlay to it, and draw the frame on the screen (perhaps as a Bitmap or maybe as a texture on a 3D surface). For instance, you could leverage the android.hardware.Camera.PreviewCallback class, which allows your application to get frame-by-frame images.
Alternately, you could use a standard SurfaceHolder with the android.hardware.Camera object and simply draw over the top of the Surface, as needed.
Finally, what and how you draw depends upon your individual application requirements—there are both 2D or 3D graphics APIs available on Android, most notably the APIs within the android.graphics and android.opengl packages.
Storing and Accessing Augmentation Data
So where does the augmentation data come from? Generally speaking, you'll either be getting this data from your own database, which might be stored locally or from a database online somewhere through a web or cloud service. If you've preloaded augmentation data on the device, you'll likely want to use a SQLite database for quick and easy lookups; you’ll find the SQLite APIs in the android.database.sqlite package. For web-based data, you'll want to connect up to a web service using the normal methods: HTTP and (usually) XML parsing. For this, you can simply use java.net.URL class with one of the XML parsing classes, such as the XmlPullParser class, to parse the results.
Conclusion
Augmented reality is a broad topic that touches on many aspects of Android development and many APIs. In this tutorial, you've learned what augmented reality is and what Android components are involved (with related Android APIs). Now you can combine this new knowledge with what you know of the Android SDK to enhance your existing applications or build new augmented reality applications.
About the Authors
Mobile developers Lauren Darcey and Shane Conder have coauthored several books on Android development: an in-depth programming book entitled Android Wireless Application Development and Sams TeachYourself Android Application Development in 24 Hours. When not writing, they spend their time developing mobile software at their company and providing consulting services. They can be reached via email to [email protected], via their blog at androidbook.blogspot.com, and on Twitter @androidwireless.
Need More Help Writing Android Apps? Check out our Latest Books and Resources!


Comments