With the recent official release of Angular 2, it's a good time to get up to speed on some of the biggest changes.
One thing that's changed a lot is the Angular 2 router, which was completely replaced in the lead-up to the final release. So in these two quick video tutorials from my course on Angular 2 Routing, I’ll show you how to create route configurations and how to use them in an app. You’ll learn about simple routes, redirecting, and wildcard routes. Then you'll see how to use a directive to configure your app component to display the routes.
The videos follow on from previous lessons in the course, but you should be able to follow the techniques we use. You can find the source files for the whole project on GitHub.
How to Create Routes in Angular 2
Why Use Routing?
It is possible to build a full app in Angular 2 without routing. So if we can do this, why do we need routing at all?
The main reason is that if we don't use routing, our app will depend solely on navigation through program control. We will have to switch out components based on user interaction such as when they click on something.
With routing, we will be able to navigate by switching URLs. All components will map to a route, allowing us to easily move around our app.
How to Set Up Routing
First, in order to make routing work, we need to add a base href in the head of our index.html file.

Previously, we would configure our routes inside of the component that hosts them. In this case, this would mean that we add our route configs to our app.component file. With the new router, it is suggested that we create our route configuration in a separate file.
app.routes.ts
So let's create a file called app.routes.ts in the root of the app folder.
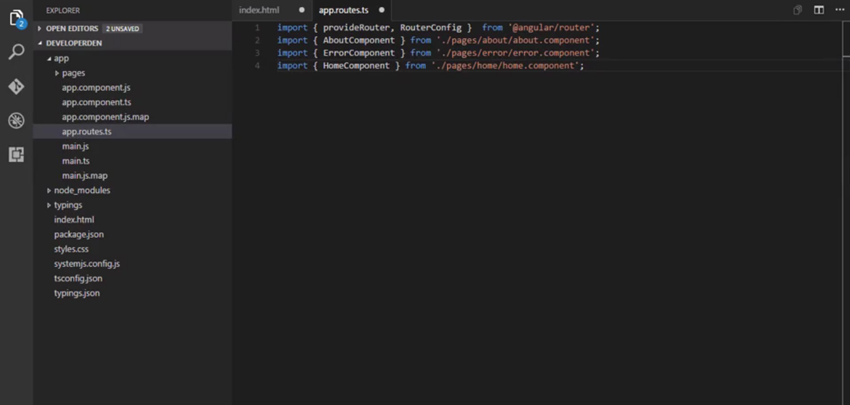
The first thing we will add to this file are the imports.
First, grab provideRouter or RouterConfig from the Angular router. Then import the About, Error, and Home components from the pages folder. We need to import these so that we can route to these components.

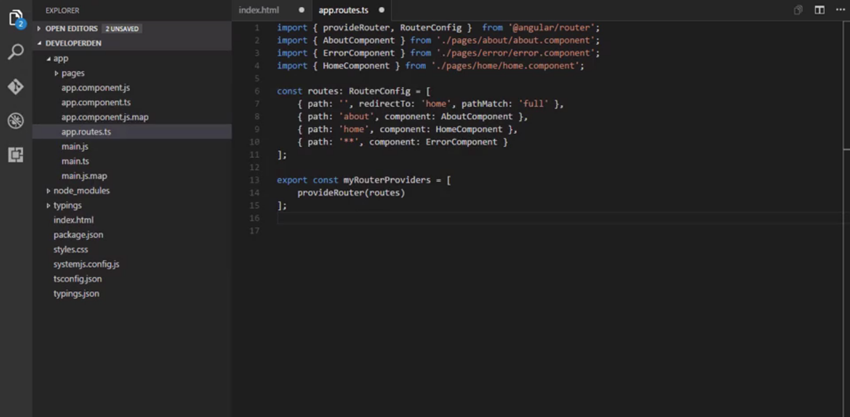
The next thing we will do is add our route config to hold our routes:
const routes: RouterConfig = [

    ];
Here we are using a const declaration. This is one of the ways we can declare a variable in TypeScript, and it represents a value that cannot be changed. In this case, we are using it to hold our RouterConfig.
Now, the first thing we will add is a redirect. In a moment, we will add a wildcard route for our error page. This by itself will cause our app to start from the error page. The reason is that when our app starts, it doesn't have a route. Therefore we need to specify a component as the default route.
We could easily add the component we want to start our app to the empty route, but the suggested way to handle this is with a redirect. The redirect has to come first or it will not work properly. Here's how it looks:

First we have our path, which is an empty route. This is the route our app will launch with. Then we have our redirect, which will change our path to home when it encounters an empty route. After that, we have our pathMatch. I won't go into much detail except to say that this causes the empty route to match the redirect.
Then we have our route that points at the AboutComponent. The path is set to 'about', which is what we will see in the address bar when we navigate to this route. The component that will be navigated to is the AboutComponent. After that, we have the HomeComponent. The path is 'home', and the component to launch is the HomeComponent.
This is the route that we will navigate to from the redirect. Then the last route we will add is a wildcard route. This will match any routes that we have defined. This is also why we added the redirect. If we didn't, our app would start at this route since we start from a route that is not defined, an empty route.
After adding the redirect, any route that we type that doesn't exist will get our error page. Then we export another const using the provide router method from Angular router. We use the routes that we configure with this method.
Once we do that, our routes are finished. The last thing we have to do is add routing to our app.
main.ts
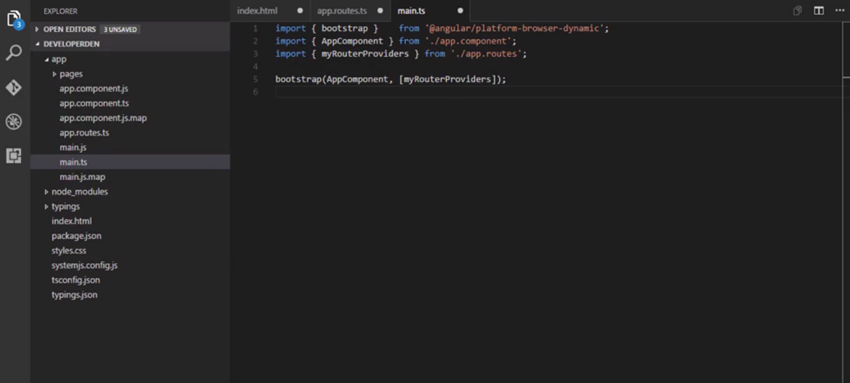
Go to the main.ts file. The first thing we will do in this file is import myRouterProviders from the app routes file that we created. Then we have to add it to our bootstrap function. Adding them here has the benefit of making the routes available to all of the components in our app.

Once we do that, we are finished setting up our routes. In the next video, we will finish up our routing configuration and preview the app.
How to Host Routes in Angular 2
Configuring the App to Host Routes
So far, we have configured our routes and added them to our bootstrap function. Now, we just need to configure our app component to host our routes.
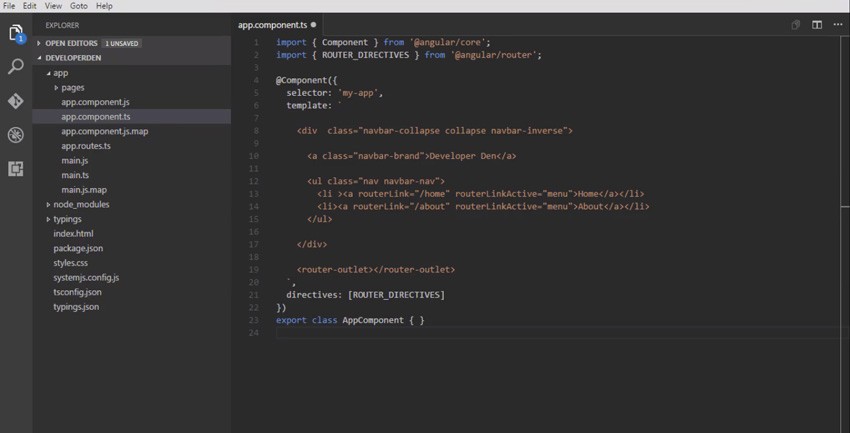
Here's how app.component.ts should look:

First, we import our router directives. We have seen this before when a component needs to use the router link. This component will use router link and another directive of Angular 2 router outlet. After that, we remove the template and add a backtick to make it a template string. This will allow us to create a multiline template.
First, we add a div for our bootstrap nav bar. This nav bar will appear on every page, since it is part of the template. Then inside the nav bar, we add our brand. This can be text or an image, and it represents the branding of your app.
Then we add an unordered list. Inside, we'll add our links for a nav bar. In our links, instead of a URL to navigate to, we have routerLink. This is how we navigate to a route under user interaction. Here we are set to navigate to the home route when we click this button.
We can also write the routerLink in another form inside an array. We normally do this when we need to supply more information to our route. Then we also have a routerLinkActive directive, which will apply the menu class to the link when the route is active. We are using this to display a visual cue as to what page we are on.
Then we will add another router link that navigates to the About page. Then we will add the router-outlet directive. This is why the components do not need a selector. When they are loaded to routing, this directive will host the components. While the rest of this template will appear static on each page, the router-outlet will change based on what route is navigated to. Finally for this file, we add the router directives.
After that, the last thing we need to do is add a CSS rule to the style.css file:
.menu {
    background-color: white;
}
This rule is for the class that will be applied when the route attached to the router link is active. The background of the link will be the color white. And now, routing is configured for our app.
Test the Routing
Go ahead and save the project and run npm start in the project folder.
If everything was done correctly, the app should compile and then launch from a web browser.

If you notice, the home link background is shaded in white. This is because this is the active route. Then if we click on the About button, we should go to the About page.

After that, let's type a nonexistent route into the address bar. When we do that, we should get an error page.

We now have routing working in our app, but there is so much more we can do with it. In the rest of the course, you'll dive into routing in much more depth.
Watch the Full Course
In the full course, Angular 2 Routing, I'll teach you how to use the new Angular 2 router in your apps. You'll see how to configure basic routing to static pages, how to extract parameters from the route path, and how to make your routing modular. You'll also see how user access control can be implemented with the Angular 2 router.


Comments