This tutorial will explore how to use the Google Maps API to overlay points of interest (POI) and use the available Location Based Services on your handset to show your position relative to the POI locations available. In this case, we shall be using Shopping Malls as the POI.
I have split this lesson into two parts. Part 1 (the lesson presented in this tutorial) will cover:
- Using the MapView object
- Using your MD5 fingerprint to get an API key to use Google Maps
- Implementing a Location Listener to obtain your current location
Part 2 will cover:
- Using external libraries in your application
- Creating overlays to represent your current location and various points of interest
Now let's begin!
Step 1: Create a New Android Project
Start the Eclipse IDE and create a new Android Project. To do this within the Eclipse IDE Navigate to:
File > Create > New Android Project
Create the new project with the following settings:
Project Name: MallFinder
Build Target: Google APIs Platform - 2.1 API Level 7
Application Name: Mall Finder
Package Name: com.shawnbe.mallfinder
Create Activity: MallFinderActivity
MinimumSDK: 7
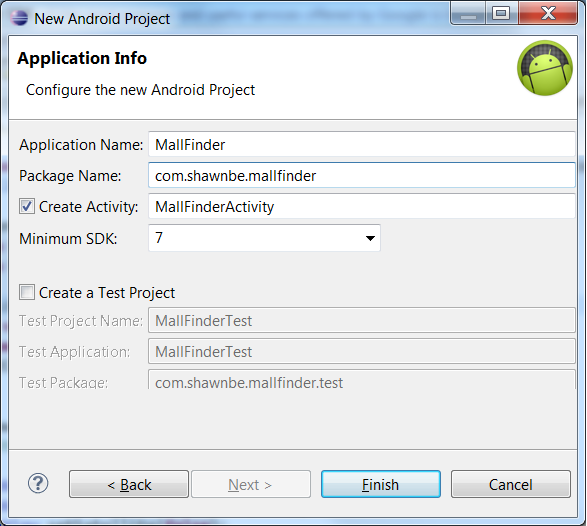
After configuring the settings, click finish.
Step 2: Register with Google for API Key
Because MapView objects use Google Maps, you are required to register with Google for an API Key and agree to the Terms of Service before you can use them. This process is fairly simple and painless and we will walk through this process step by step. For more information, check out this link on Obtaining a Maps API Key.
To generate an API Key, your MD5 fingerprint of the certificate that you will use to sign your application is required. Sounds confusing I know, but it isn't as hard as it sounds as you will discover while we walk through the various steps. Rather than using the command prompt method to get your MD5 fingerprint as described in the link above, we will be using a keytool plugin for Eclipse. For more information on the keytool plugin visit this website.
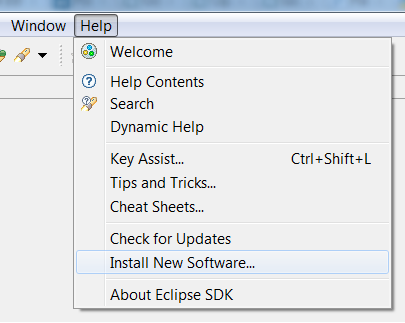
Step 3: Installing the Keytool Plugin
While in the Eclipse IDE, navigate to Help > Install New Software.
When the new window pops up, click on the "Add" button at the top of the window.
Enter "keytool" (without quotes) in the name field and
http://www.keytool.sourceforge.net/update in the location field.
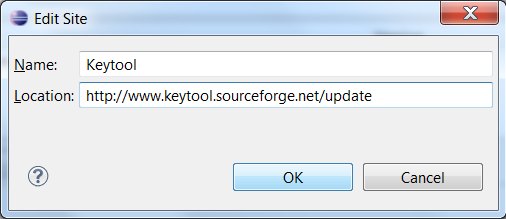
Click OK.
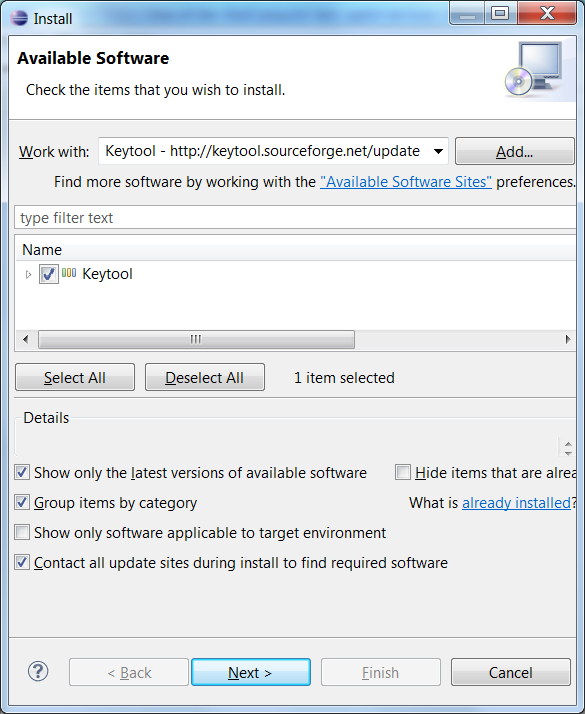
After a short load time, a checkbox labeled "keytool" will appear in the popup window. Select the checkbox and click Next. Review the terms of the license agreement and then click Next to finish.
Note: During the installation, you may be prompted to determine if you trust the security certificates. If you do, select the checkbox and click OK to continue the installation.
After the installation you will be prompted to restart Eclipse. Do so and continue.
Step 4: Getting the MD5 Fingerprint
After Eclipse restarts you should see a new menu item, "Keytool", with a small key icon beside it.

We are now going to open the debug keystore. Note: the location may vary depending on your operating system. The default locations for various operating systems are
- Windows Vista : C:\Users\<user>\.android\debug.keystore
- Windows XP : C:\Documents and Settings\<user>\.android\debug.keystore
- OS X and Linux : ~/.android/debug.keystore
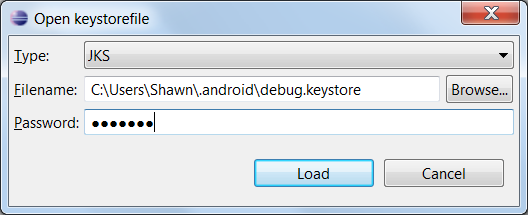
Click on the Keytool menu Item > open keystore.
Click on the Browse button located to the right of the Filename textbox and go to the location of the debug keystore (default location above) and select the debug.keystore file.
Click Open and type "android" (without the quotes), which is the default debug password and then click Load.
A new Keytool tab should now be visible at the bottom panel of the screen (If you do not see it, navigate to Window > Open Perspective > Java Browsing).

Click on the small arrow to the left of the debug.keystore path to display the androiddebugkey.
Double click on the androiddubugkey and copy the MD5 Fingerprint.
Open your web browser and go to the following URL. http://code.google.com/android/maps-api-signup.html
Read the terms and conditions, and if you agree, enter the MD5 fingerprint in the textfield and click “Generate API Key”. Make a note of your API key as this is needed for the MapView to work.
Step 5: Add the MapView to the Layout
In this step, we will be adding a MapView to the layout file.
Open the main.xml file located at MallFinder > res > layout > main.xml, and update the file to include a FrameLayout and MapView as shown below:
<?xml version="1.0" encoding="utf-8"?>
<LinearLayout xmlns:android="http://schemas.android.com/apk/res/android"
    android:layout_width="fill_parent"
    android:layout_height="fill_parent"
    android:orientation="vertical" >
	<FrameLayout
	android:layout_width="fill_parent"
	android:layout_height="fill_parent">
		<com.google.android.maps.MapView
	    android:id="@+id/mapView"
	    android:layout_width="fill_parent"
	    android:layout_height="fill_parent"
	    android:clickable="true"
	    android:apiKey="PUT YOUR API KEY HERE"/>
	</FrameLayout>
</LinearLayout>
The layout above creates a MapView across the entire available screen space. Before we can go ahead and run the app to see the MapView, there are several more steps to complete. Running the app in its current state will result in a Force Close.
Step 6: Setting up Permissions and Declaring Required Libraries
Since our application will be downloading data from Google Maps and also needs to access information from the handset's GPS or other Location Based Services, we will need to request the necessary permissions to use these services and features in the Android Manifest file.
To do this, open the Android manifest file located at MallFinder > AndroidManifest.xml.
Add the following lines after the closing application tag (</application>) but before the closing manifest tag (</manifest>) tag.
<uses-feature android:name="android.hardware.location.gps"/>
<uses-permission android:name="android.permission.ACCESS_FINE_LOCATION"/>
<uses-permission android:name="android.permission.INTERNET"/>
In this example I will not be needing FINE_LOCATION, but I have included this here as I imagine you may want to make adjustments to your code to test the various providers, if you would like to get the most accurate location you will require the FINE_LOCATION permissions. Generally as a rule for any production application, you should not request permissions that you do not need. This is a very bad practice and makes the user wary of your app as you request more permissions. If you have no intention of using the most accurate providers you can adjust the permission to android.permission.ACCESS_COARSE_LOCATION.
In order to use Google Maps in our MapView we need to declare the library in our Manifest file, so let's do this as well by adding the following code between the closing activity tag and the closing application tag:
<uses-library android:required="true" android:name="com.google.android.maps" />
Since we are already in the Android Manifest file, let's get rid of the title bar as I find this unnecessary. It uses too much of our limited screen space.To remove it add the line below within the application tag:
android:theme="@android:style/Theme.NoTitleBar"
That's it for editing our Manifest file, so our complete manifest file now looks like this:
<?xml version="1.0" encoding="utf-8"?>
<manifest xmlns:android="http://schemas.android.com/apk/res/android"
    package="com.shawnbe.mallfinder"
    android:versionCode="1"
    android:versionName="1.0" >
    <uses-sdk android:minSdkVersion="7" />
    <application
        android:icon="@drawable/ic_launcher"
        android:label="@string/app_name"
        android:theme="@android:style/Theme.NoTitleBar">
        <activity
            android:label="@string/app_name"
            android:name=".MallFinderActivity" >
            <intent-filter >
                <action android:name="android.intent.action.MAIN" />

                <category android:name="android.intent.category.LAUNCHER" />
            </intent-filter>
        </activity>
        <uses-library android:required="true" android:name="com.google.android.maps" />
    </application>
    <uses-feature android:name="android.hardware.location.gps"/>
    <uses-permission android:name="android.permission.ACCESS_FINE_LOCATION"/>
    <uses-permission android:name="android.permission.INTERNET"/>
</manifest>
Step 7: Setting Up the MapView
Before we can see the MapView in action we need to make a couple of adjustments to the MallFinderActivity class.
Open the main activity class (MallFinderActivity.java), which is located at:
MallFinder > src > com.shawnbe.mallfinder > MallFinderActivity.class
In our app we need this class to extend the MapActivity rather than the Activity for the MapView to work.
Update the line:
public class MallFinderActivity extends Activity {
to:
public class MallFinderActivity extends MapActivity {
When extending the MapActivity class, we need to implement the isRouteDisplayed() method, so we need to add the following skeleton method as well:
@Override
protected boolean isRouteDisplayed() {
    // TODO Auto-generated method stub
    return false;
}
At this point, we can launch the app and display the MapView, but let's set a couple of options such as the zoom level and visible layers. We start by declaring the following variables before the onCreate method:
private MapController mapController;
private MapView mapView;
Add the following lines of code to the onCreate method.
mapView = (MapView)findViewById(R.id.mapView);
mapView.setBuiltInZoomControls(true);
mapView.setSatellite(false);
mapView.setStreetView(true);
mapController = mapView.getController();
mapController.setZoom(13);
The above code displays only the Street layer and hides the Satellite layer. I have chosen this as a personal preference as I find it easier to read in this format. Feel free to adjust this as you see fit by changing the Boolean false and true values. Additionally, the zoom level is set to 13, however this can also be adjusted with 1 being an entire world view and 20 being the maximum zoom.
Finally we can go ahead and launch the application to ensure everything is running as expected up to this point.
There are several ways to run the application, the first:
Right click on the Project in the Package Explorer window > Run as > Android Application
Or
From the menu Click on Run > Run
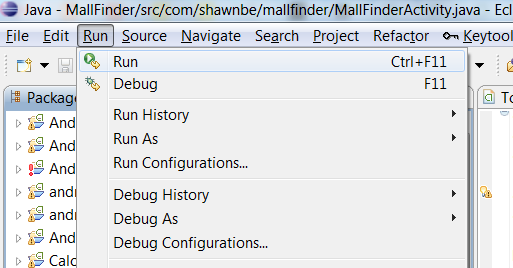
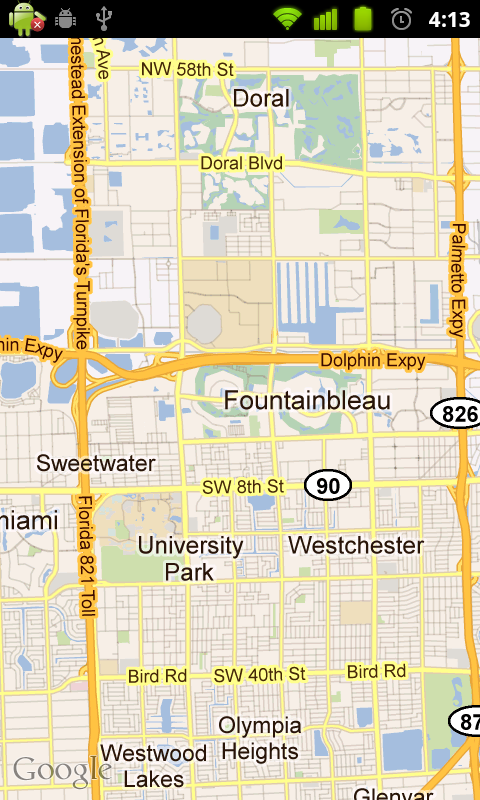
Then select your handset or emulator. You should see a map covering your entire screen except for the notification bar at the top of your screen as well as be able to scroll and use pinch to zoom.
Step 8: Obtaining Your Current Location
To obtain your current location, we use the locationManager class, which allows the application to get the device’s location. This process can take some time to get a fix on the current location, therefore a recommended approach is to use your lastKnownLocation until you can get a more accurate fix on your current location.
Declare two more variables right below the ones we declared in Step 7 above:
private LocationManager locationManager;
private GeoPoint currentLocation;
Additionally, add the following methods to the MallFinderActivity.java class:
public void getLastLocation(){
    String provider = getBestProvider();
    currentLocation = locationManager.getLastKnownLocation(provider);
    if(currentLocation != null){
        setCurrentLocation(currentLocation);
    }
    else
    {
        Toast.makeText(this, "Location not yet acquired", Toast.LENGTH_LONG).show();
    }
}

public void animateToCurrentLocation(){
    if(currentPoint!=null){
        mapController.animateTo(currentPoint);
    }
}

public String getBestProvider(){
    locationManager = (LocationManager) getSystemService(Context.LOCATION_SERVICE);
    Criteria criteria = new Criteria();
    criteria.setPowerRequirement(Criteria.NO_REQUIREMENT);
    criteria.setAccuracy(Criteria.NO_REQUIREMENT);
    String bestProvider = locationManager.getBestProvider(criteria, true);
    return bestProvider;
}

public void setCurrentLocation(Location location){
    int currLatitude = (int) (location.getLatitude()*1E6);
    int currLongitude = (int) (location.getLongitude()*1E6);
    currentLocation = new GeoPoint(currLatitude,currLongitude);

    currentLocation = new Location("");
    currentLocation.setLatitude(currentPoint.getLatitudeE6() / 1e6);
    currentLocation.setLongitude(currentPoint.getLongitudeE6() / 1e6);
}
Add the following two lines to the end of the onCreate method:
getLastLocation();
animateToCurrentLocation();
The onCreate method now looks like:
public void onCreate(Bundle savedInstanceState) {
    super.onCreate(savedInstanceState);
    setContentView(R.layout.main);
    mapView = (MapView)findViewById(R.id.mapView);
    mapView.setBuiltInZoomControls(true);
    mapView.setSatellite(false);
    mapView.setStreetView(true);
    mapController = mapView.getController();
    mapController.setZoom(13);
    getLastLocation();
    animateToCurrentLocation();
}
The getLastLocation method creates an instance of the locationManager class and based on the requirements determines which is the best provider to use for the location services. In the above code we are not specifying any criteria for the provider, however you can adjust the criteria based on your accuracy and power requirements by using the criteria.setAccuracy() and criteria.setPowerRequirement() methods. In Step 6 above, I mentioned that you may want to adjust your criteria to get the most precise location. If you wanted to do this you would set the accuracy criteria to ACCURACY_FINE and the line of code would look like:
criteria.setAccuracy(Criteria.ACCURACY_FINE);
The reason I did not choose the most accurate provider (which is GPS) is because I would be testing this code indoors and may never get a lock on my position, but feel free to test this out for yourself, change the accuracy and go outside and see if you can get a GPS lock on your current position.
Depending on the criteria specified your handset may use different providers, this is usally GPS or Network (but can be different). The last known location is then set as the currentLocation at least until we get a more accurate and updated location. The latitude and longitude of the current location is then found and we animate or scroll the map to center around those coordinates.
Now as we have the last known position, we use the location listener to detect changes in our location and update the app as these changes occur. To do this we need our activity class (MallFinderActivity.java) to implement locationListener. First we update the line:
public class MallFinderActivity extends MapActivity {
to:
public class MallFinderActivity extends MapActivity implements LocationListener{
Implementing the location listener requires us to override a couple of methods, so we add the following barebone methods below (When I refer to skeleton or barebone methods, I mean the shell for the methods are created, but they don't actually do anything at this time):
@Override
public void onLocationChanged(Location arg0) {
	// TODO Auto-generated method stub
}

@Override
public void onProviderDisabled(String arg0) {
	// TODO Auto-generated method stub
}

@Override
public void onProviderEnabled(String arg0) {
	// TODO Auto-generated method stub
}

@Override
public void onStatusChanged(String arg0, int arg1, Bundle arg2) {
	// TODO Auto-generated method stub
}
We will be using the onLocationChanged method to detect any updates in our location and then set this as our current location using the setcurrentLocation method.
Update the onlocationChanged method to reflect the following:
@Override
public void onLocationChanged(Location newLocation) {
	// TODO Auto-generated method stub
	setCurrentLocation(newLocation);
}
Add the following lines of code. These methods request updates every second when the app is launched or resumed and also stops checking for updates when the app is paused or killed.
@Override
protected void onResume() {
	super.onResume();
	locationManager.requestLocationUpdates(getBestProvider(), 1000, 1, this);
}

@Override
protected void onPause() {
	super.onPause();
	locationManager.removeUpdates(this);
}
If you run the application at this point the MapView should center around your last know location, and when your handset is able to get a fix it will update to center around your current location. Depending on the accuracy criteria set in Step 7, the length of time to get a fix on your location will vary. In this lesson we have learned how to use the MapView, implement the locationListener, and obtain your current location. In the next lesson we will be expanding on this and including an external library to handle the overlays on the MapView and show some information in balloon pop ups when the various points of interests are tapped.

Comments