One common feature of "reader"-type applications is keeping track of items that have been read, or previously viewed. This tutorial is going to show you, by way of implementation in an existing application, how one might go about incorporating a read flag feature into a ListView control.
The “read” flag is a great example of a conceptually simply feature that may have far-reaching consequences to the application as a whole. The implementation of such a feature can cross many disciplines and many portions of a code base. We'll use the TutList application, to demonstrate this phenomenon. First, we'll update the database, add some helper methods to the application’s content provider, update its shared preferences, add a new options menu item, update the cursor that provides data to the adapter for the ListView control, and finally modify the binder to change how items appear in the list. You'll even learn what to do when you have an empty list. All of these changes are required for the thorough implementation of what first appears to be a very simple feature request: a flag for read items.
When you've finished all of that, we'll give you a quick challenge.
Ready?
Step 0: Getting Started
The TutList application is an ongoing reader tutorial project. This tutorial builds upon many previous tutorials, including SQLite Crash Course for Android Developers and the continued series on our TutList application with the most recent tutorial, Android Fundamentals: Database Dates and Sorting. If you have trouble keeping up, feel free to post questions in the comment section -- many folks read and respond, including ourselves. Also, don't forget about the Android SDK reference.
The final sample code that accompanies this tutorial is available for browsing and download as open-source from the Google code hosting.
This tutorial assumes you will start coding where the previous tutorial in the series, Android Fundamentals: Database Dates and Sorting, left off. You can download that code and work from there or you can download the code for this tutorial and follow along. If you do work from the previous code, please note that we occasionally make changes outside the scope of any tutorial. Your final result may not look or behave exactly the same. Either way you choose, though, get ready by downloading one or the other project and importing it into Eclipse if you haven't done so already.
Step 1: Updating the Database
First we need a place to store the read/unread flag for each tutorial article displayed in the application. In order to persistent this information, we will add another column to the application database.
Begin by updating the database version, adding a new column name, and updating the schema, like so.
private static final int DB_VERSION = 4;
...
public static final String COL_READ = "read";
...
private static final String CREATE_TABLE_TUTORIALS = "CREATE TABLE "
        + TABLE_TUTORIALS + " (" + ID
        + " integer PRIMARY KEY AUTOINCREMENT, " + COL_TITLE
        + " text NOT NULL, " + COL_URL + " text UNIQUE NOT NULL, "
        + COL_DATE + " INTEGER NOT NULL DEFAULT (strftime('%s','now')), "
        + COL_READ + " INTEGER NOT NULL default 0" + ");";
SQLite doesn't support Boolean values. Most developers use integers with a value of 0 for false and 1 for true, by convention.
Now modify the onUpgrade() method. Supported old versions could either be 2 or 3. Since we're compiling in the new version, we'll just check it once (which may not even be necessary):
private static final String ALTER_ADD_COL_DATE = "ALTER TABLE "
        + TABLE_TUTORIALS + " ADD COLUMN " + COL_DATE
        + " INTEGER NOT NULL DEFAULT '1297728000' ";
...
private static final String ALTER_ADD_COL_READ = "ALTER TABLE "
        + TABLE_TUTORIALS + " ADD COLUMN " + COL_READ
        + " INTEGER NOT NULL DEFAULT 0";
...
@Override
public void onUpgrade(SQLiteDatabase db, int oldVersion, int newVersion) {
    if (newVersion == 4) {
        // do our best to keep the date, using alter tables
        if (oldVersion == 3) {
            db.execSQL(ALTER_ADD_COL_READ);
        } else if (oldVersion == 2) {
            db.execSQL(ALTER_ADD_COL_DATE);
            db.execSQL(ALTER_ADD_COL_READ);
        }
    } else {
        Log.w(DEBUG_TAG,
                "Upgrading database. Existing contents will be lost. ["
                        + oldVersion + "]->[" + newVersion + "]");
        db.execSQL("DROP TABLE IF EXISTS " + TABLE_TUTORIALS);
        onCreate(db);
    }
}
We've also cleaned up the method a bit. Since there are some redundant "ALTER" lines. (We could remove the redundancy, but this way each upgrade is clear and easy to test.)
Step 2: Updating the Content Provider
While no substantive changes to the content provider are required, it’s generally good form to add some static helper methods when you update your database schema so that your new features are easily accessible. We'll use these later, but you'll get an idea of what's to come:
public static void markAllItemsRead(Context context) {
    ContentValues values = new ContentValues();
    values.put(TutListDatabase.COL_READ, "1");
    int updated = context.getContentResolver().update(CONTENT_URI, values,
            TutListDatabase.COL_READ + "='0'", null);
    Log.d(DEBUG_TAG, "Rows updated: " + updated);
}

public static void markItemRead(Context context, long item) {
    Uri viewedTut = Uri.withAppendedPath(TutListProvider.CONTENT_URI,
            String.valueOf(item));
    ContentValues values = new ContentValues();
    values.put(TutListDatabase.COL_READ, "1");
    int updated = context.getContentResolver().update(viewedTut, values, null,
            null);
    Log.d(DEBUG_TAG, updated +" rows updated. Marked " + item + " as read.");
}
The implementation of these helper methods should be relatively straightforward.
Step 3: Adding a “View Only Unread” Preference
Although a visual depiction of an unread flag (which we'll get to) is useful, it's also useful to have a way to filter the list of tutorials to just the unread ones. For this purpose, we need to add a preference to the application preferences to set this mode of display.
Edit the prefs.xml file that controls the settings screen and add a new preference category with a checkbox preference, like this:
<PreferenceCategory
    android:title="@string/display_prefs">
    <CheckBoxPreference
        android:summary="@string/pref_summary_only_unread"
        android:title="@string/pref_title_only_unread"
        android:key="@string/pref_key_only_unread" />
</PreferenceCategory>
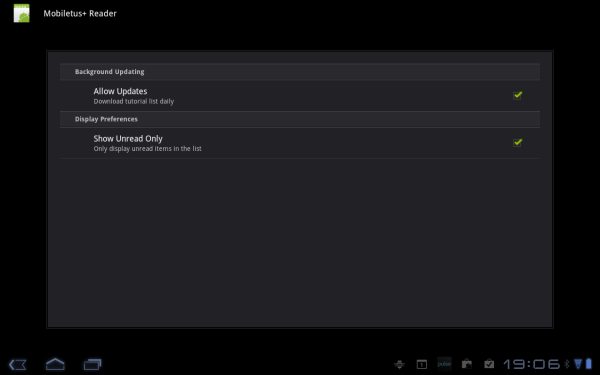
The updated settings screen wil now look like:

Then update the TutListSharedPrefs class to add another help method for retrieving this preference value:
public static boolean getOnlyUnreadFlag(Context context) {
    SharedPreferences prefs = context.getSharedPreferences(PREFS_NAME, 0);
    return prefs.getBoolean(
            context.getString(R.string.pref_key_only_unread),
            false);
}
The application can check this new preference and operate accordingly.
Step 4: Updating the TutListFragment Cursor
We've added a new database column, but the ListView knows nothing about it. First, we'll need to add that column to the Cursor that the ListView uses in its adapter. This is where any filtering should take place.
Update the onCreateLoader() method of the TutListFragment class to add the TutListDatabase.COL_READ column to the projection. Also, conditionally add a selection for if the user has the "only view unread" setting turned on.
@Override
public Loader<Cursor> onCreateLoader(int id, Bundle args) {
    String[] projection = { TutListDatabase.ID, TutListDatabase.COL_TITLE,
            TutListDatabase.COL_DATE, TutListDatabase.COL_READ };

    Uri content  = TutListProvider.CONTENT_URI;
    String selection = null;
    if (TutListSharedPrefs.getOnlyUnreadFlag(getActivity())) {
        selection = TutListDatabase.COL_READ + "='0'";
    }
    CursorLoader cursorLoader = new CursorLoader(getActivity(),
           content , projection, selection, null, TutListDatabase.COL_DATE+" desc");
    return cursorLoader;
}
Now the state of each item is part of the Cursor data. However, the user has no way changing the read state on a specific item, nor does the application automatically update an item as read once it is viewed.
Step 5: Adding a Mark All As Read Option
To resolve this first issue and quickly test our cursor, let's add an option to mark all items in the ListView as read. The easiest way to achieve this is to add a new options menu item. Update the options_menu.xml file and add a third item:
<item
    android:id="@+id/mark_all_read_item"
    android:icon="@drawable/ic_menu_mark"
    android:title="@string/mark_all_read"></item>
You'll need to add appropriate strings and graphic resources to support this new menu item as well. We borrowed the ic_menu_mark graphic from the Android SDK and placed it directly in our project. This menu item won't need any adjustments made in onCreateOptionsMenu(). In the onOptionsItemSelected() method, simply add a call to that helper method we created earlier, called markAllItemsRead():
case R.id.mark_all_read_item:
    TutListProvider.markAllItemsRead(getActivity()
            .getApplicationContext());
    break;
Now the user can mark all of the items as read. Doing so creates an "interesting" problem: the list is now completely empty. How boring.
Step 6: Handling an Empty List Gracefully
Luckily, the ListFragment has an easy method for dealing with this. The setEmptyText() method allows you to add some text to display when there are no items available. Call this method from within onActivityCreated() with a string to display. We used a string resource:
setEmptyText(getResources().getText(R.string.empty_list_label));
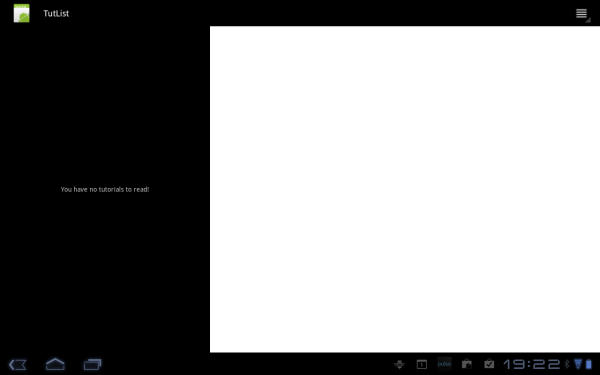
Now when the user marks all items as read, they'll see a list that looks like this:

Much more user-friendly.
Step 7: Updating the Read Flag as Items are Read
You might be inclined to just add a call to markItemRead() from within the onListItemClicked() method. While this is a reasonable place for that call, it introduces a bit of a glitch. Think on this: what happens when you mark an item that the user just selected as read and they have the preference set to only show unread items? While the tutorial stays visible, the list item disappears. This results in a strange experience.
Instead, let's mark the last item the user was viewing as read when they click on a new item (if they had been previously reading an item). Let's add this logic to the onListItemClick() method.
private long lastItemClicked = -1;
...
    public void onListItemClick(ListView l, View v, int position, long id) {
        if (lastItemClicked != -1) {
            TutListProvider.markItemRead(getActivity().getApplicationContext(),
                    lastItemClicked);
            Log.d(DEBUG_TAG, "Marking " + lastItemClicked
                    + " as read. Now showing " + id + ".");
        }
        lastItemClicked = id;
    }
We’re getting there. But still, unless the user is using the unread only viewing mode preference, the ListView still gives no indication as to the read state of an item.
Step 8: Indicating Read Items
There are plenty of ways to indicate state differences between ListView items. You could use icons, or background colors, or text differences. One easy way to indicate if an item has been read or not is by using a distinctive font to differentiate between the read and unread states. Let’s use bold to indicate an unread item and the default font to indicate a read item. To support this change, you'll need to modify the adapter bindings and the view binder.
Edit the bindings so that the read column is bound to the title, like this:
private static final String[] UI_BINDING_FROM = {
        TutListDatabase.COL_TITLE, TutListDatabase.COL_DATE,
        TutListDatabase.COL_READ };
private static final int[] UI_BINDING_TO = { R.id.title, R.id.date,
        R.id.title };
Now update the binder to watch for this pairing and change the font style by adding a new case to the setViewValue() method of the TutorialViewBinder class:
if (index == cursor.getColumnIndex(TutListDatabase.COL_READ)) {
    boolean read = cursor.getInt(index) > 0 ? true : false;
    TextView title = (TextView) view;
    if (!read) {
        title.setTypeface(Typeface.DEFAULT_BOLD, 0);
    } else {
        title.setTypeface(Typeface.DEFAULT);
    }
    return true;
}
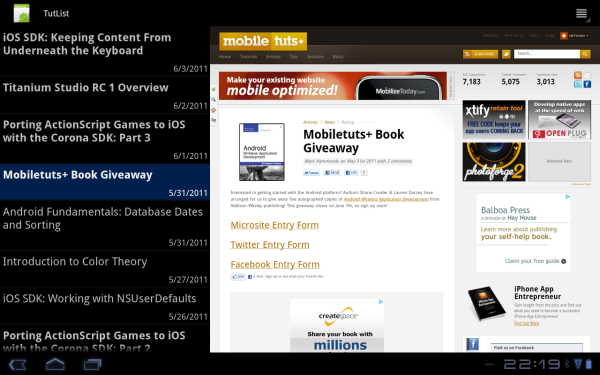
Now all unread items will display in bold font, clearly indicating they are new and ready for reading!

Step 9: Next Steps and a Challenge!
Up until now, this tutorial has gone over new and familiar territory in terms of list item management. But there are several lingering issues we have not discussed in detail, due to length. For instance, if the user is viewing mode read and unread items, then changes the viewing mode to unread only, and then hits the Back button, what happens? Similarly, what happens during an orientation change? What happens if a user never actually clicks to another item?
Our challenge for you, should you choose to accept it, is to identify the lingering issues with the read/unread state feature, and, if you want to, identify solutions and post them in the comment feed for discussion.
Some hints: Think about the lifecycles of activities and fragments. Consider that unused parameter to the onActivityCreated() method. The sample code addresses many of these lingering issues already.
Conclusion
In this tutorial, you added a "read" flag to the existing TutList application. You learned how to update a database, add new menu items and preferences settings, modify a style rather than a value in a view binder, and much more. We've also hinted that there's even more work to be done to make the read feature stable and bug-free. Finally, you've learned that a relatively simple feature request can touch code and resource files across an entire project while leverage several different skills.
As always, we look forward to your feedback.
About the Authors
Mobile developers Lauren Darcey and Shane Conder have coauthored several books on Android development: an in-depth programming book entitled Android Wireless Application Development, Second Edition and Sams Teach Yourself Android Application Development in 24 Hours, Second Edition. When not writing, they spend their time developing mobile software at their company and providing consulting services. They can be reached at via email to [email protected], via their blog at androidbook.blogspot.com, and on Twitter @androidwireless.


Comments