Last week, Apple announced the release date for Apple Watch. The company also released Xcode 6.2, which includes support for Apple Watch. With Xcode 6.2, you have everything you need to create your first application for Apple Watch.
With the Apple Watch release date set for April, it is time to learn the ropes of Apple Watch development. In this tutorial, you will create your first WatchKit application. Along the way, you will become familiar with the inner workings of a WatchKit application and find out that there are many similarities with iOS development.
Prerequisites
Because this tutorial focuses on Apple Watch development, I assume that you're already familiar with the basics of iOS development. If you don't know what actions and outlets are, for example, I recommend you first take our introductory course on iOS development.
To follow along, you need to have Xcode 6.2 or higher installed on your development machine. You can download Xcode from the iOS Dev Center or the Mac App Store. As I mentioned earlier, Xcode 6.2 includes support for Apple Watch. Without Xcode 6.2, you won't be able to follow along.
In this tutorial, I will be using Swift as the programming language. If you're not familiar with Swift, then you have two options. Your first option is to stick with Objective-C. You can create Apple Watch applications with both Swift and Objective-C, or a combination of the two. Your second option is to stop here and read my series on Swift or watch Derek Jensen's course on Swift development.
1. Introduction
You may be wondering what the difference is between an Apple Watch application and a WatchKit application. Last year, Apple announced that there will be two generations of Apple Watch applications, WatchKit applications and native Apple Watch applications. The term native is a bit misleading since WatchKit applications are also native applications. The main difference is the application architecture. Let's look at native applications first.
Native Applications
Apple hasn't told us much about native applications yet. The company only announced that native applications will arrive on Apple Watch in the fall of this year. It's unclear what the SDK will look like and what developers will be able to do with a native Apple Watch application. In other words, we have no choice but to focus on WatchKit applications for the time being.
That said, based on Apple's information, the main difference will be that native applications will be able to run without an extension running on a paired iPhone. From an architectural point of view, native application will resemble native iOS applications on iPhone and iPad.
WatchKit Applications
As the name implies, a WatchKit application completely relies on the WatchKit framework to do its work. The WatchKit framework is a nifty solution that bridges the gap between the Apple Watch and a paired iPhone.
While the idea is simple, the implementation is less so. The WatchKit application runs on the Apple Watch and is in charge of two things:
- presenting the user interface
- responding to user interaction
The business logic and heavy lifting is taken care of by a Apple Watch extension running on a paired iPhone. The following diagram visualizes the role of the WatchKit framework.
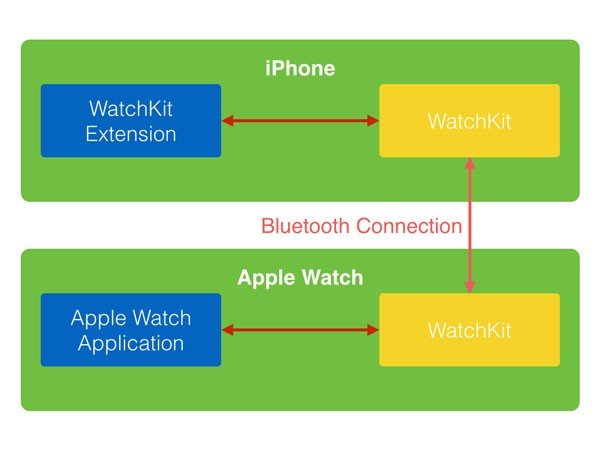
Any events triggered by the user interacting with the WatchKit application are forwarded to the extension that runs on the paired iPhone. This implies that the WatchKit application is of no use without a paired iPhone. It simply cannot do its work without the extension running on an iPhone.
2. Project Setup
With this in mind, it's time to create your first WatchKit application. The application we're about to create will show the user the weather conditions of various places on the planet. It's the equivalent of the weather application on iOS.
Step 1: Create Project
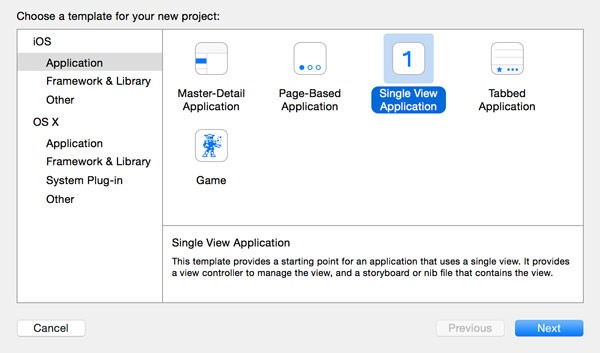
Launch Xcode and select New > Project... from the File menu. Select the Single View Application template from the list of iOS > Application templates. You may be wondering why we're not creating a WatchKit application. A WatchKit application is always part of an iOS application. This will become clearer once we've added the WatchKit application to the project.
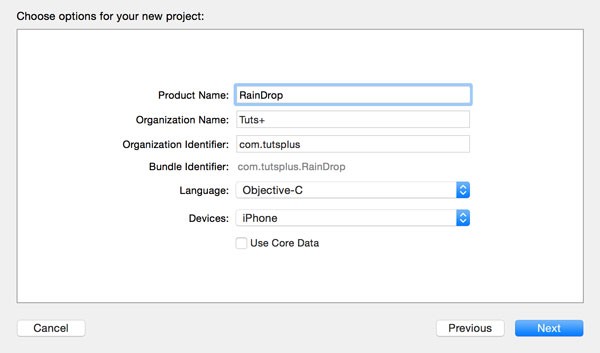
Name your application RainDrop, set Language to Swift, and Devices to iPhone. Make sure Use Core Data is unchecked.
Tell Xcode where you'd like to save the project files and hit Create. Note that we've created a plain vanilla Xcode project for a single view iOS application. If you build and run the RainDrop target in the iOS Simulator, you'll see a white view. This is what we expect from an iOS application based on the Single View Application template.
Before we continue, take a good look at the project structure in the Project Navigator and the list of targets. We currently have two targets, RainDrop, for the iOS application and RainDropTests, for the tests of the RainDrop target. Let's add a WatchKit application to the mix.
Step 2: Create WatchKit Targets
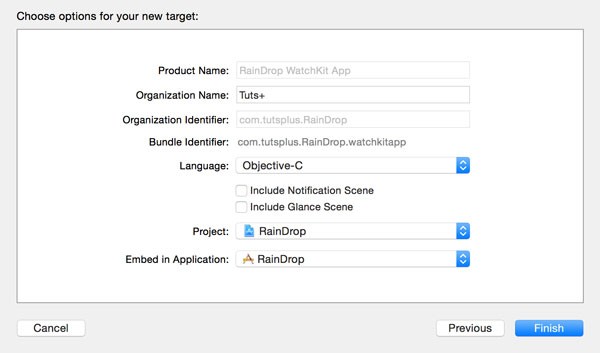
Select New > Target... from Xcode's File menu and choose WatchKit App from the iOS > Apple Watch section on the left.
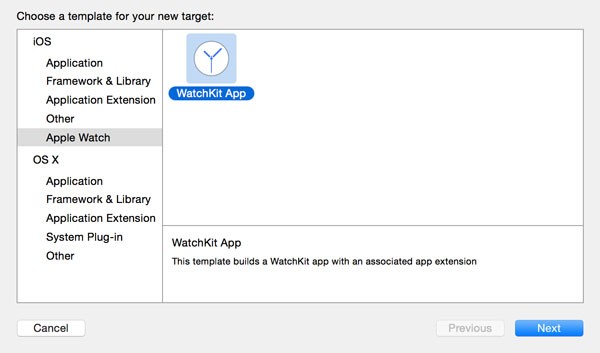
For the purpose of this tutorial, uncheck Include Notification Scene and Include Glance Scene. We won't be covering notifications and glances in this tutorial. Hit Finish in the lower right to add the WatchKit application to your Xcode project.
When you click Finish, Xcode will create a number of files, groups, and targets. Xcode will also create a scheme to run the WatchKit application in the iOS Simulator and it will ask you whether it should activate that scheme. Click Activate to activate it.

3. Project Anatomy
By adding a WatchKit application to our project, Xcode has created two targets for us, one for the WatchKit extension, RainDrop WatchKit Extension, and one for the WatchKit application, RainDrop WatchKit App.
The WatchKit extension will run on the iPhone paired to the Apple Watch. It is in charge of the business logic of the WatchKit application. The WatchKit application will run on the Apple Watch and will be responsible for presenting the user interface and handling events.
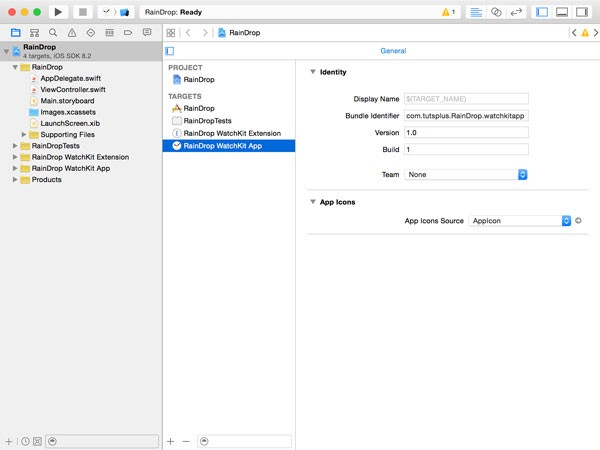
To keep everything nice and tidy, Xcode has created two groups for us in the Project Navigator. The first group, RainDrop WatchKit Extension, contains the source files and assets for the WatchKit extension. The second group, RainDrop WatchKit App, contains the assets for the WatchKit application.
The underlying architecture of a WatchKit application is evident based on the contents of these groups. The RainDrop WatchKit App group, for example, doesn't contain any source files. It only includes a storyboard and assets for the user interface of the WatchKit application. The RainDrop WatchKit Extension contains one source file, InterfaceController.swift, but it doesn't include a storyboard. This makes sense if you remember that the extension is in charge of the business logic of the WatchKit application while the WatchKit application is responsible for the user interface.
Apple uses the term application for several concepts. It's important that you understand that a WatchKit application consists of two parts, a WatchKit extension running on a paired iPhone and a WatchKit application running on the Apple Watch. A WatchKit application cannot do its work without its extension. That is key to understand the architecture of a WatchKit application.
4. Build and Run
Before we build and run the WatchKit application, it's useful to understand what's going to happen when you hit Command-R. When Xcode has finished building the iOS application, the WatchKit extension, and the WatchKit application, it will install the iOS application, the WatchKit extension, and the WatchKit application on the iOS Simulator. It will then run the WatchKit extension and the WatchKit application in the iOS Simulator.
If you're not familiar with extensions, then you may be wondering why it installs the iOS application on the iOS Simulator. An extension is always associated with an iOS application so the iOS application is required for the WatchKit extension to run. Along the same lines, a WatchKit application can only run on an Apple Watch if its counterpart, the WatchKit extension, is running on an iPhone paired with the Apple Watch. It's a fairly complex architecture if you're used to developing standalone iOS applications.
When you press Command-R on your keyboard or click the Run button in the top left, Xcode will build and run your WatchKit application in the iOS Simulator. If the WatchKit application isn't launched, then double-check that you're using the correct scheme.
Running the WatchKit application isn't very spectacular since you only see a black screen with the current time in the top right. Let's make the user interface of our WatchKit application a bit more interesting.
5. Create the User Interface
Since you're reading this tutorial, I'm assuming you're familiar with iOS development. As you know, modern iOS development involves Auto Layout and storyboards. This is only partially true for WatchKit development. We already discovered that a WatchKit application uses a storyboard for its user interface. Auto Layout, however, is absent.
Open Interface.storyboard in the RainDrop WatchKit App group to find out how to build a user interface for our WatchKit application.
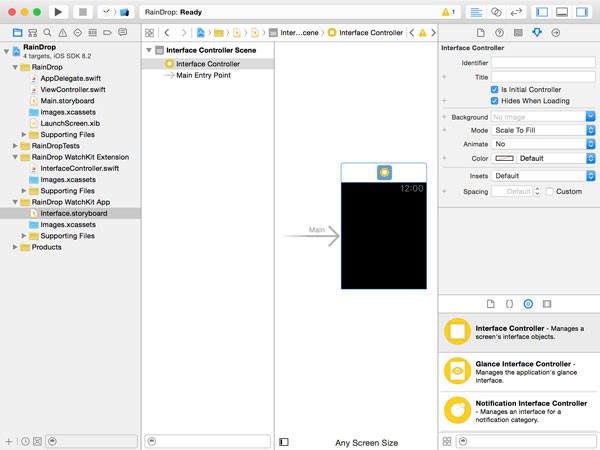
The storyboard contains a single scene, the Interface Controller Scene. In the Scene Navigator, on the right of the Project Navigator, you can see that the Interface Controller Scene includes an Interface Controller and an indication that this scene is the main entry point of our WatchKit application.
What Is an Interface Controller?
The two questions you're probably asking yourself are "What is an interface controller?" and "How does it differ from a view controller?" An interface controller is an instance of the WKInterfaceController class or a subclass thereof. The WKInterfaceController class is defined in the WatchKit framework.
The name of this class hints at the differences with UIViewController. As you know, a view controller controls a view or view hierarchy. An interface controller, however, doesn't control a view, instead it controls an interface, that is, a screenful of content. What this means will become clearer once we start implementing the interface controller.
An interface controller is still a true controller in that it controls the behavior of the user interface. With an interface controller, you can configure the user interface of your WatchKit application and respond to the events the WatchKit application forwards to the WatchKit extension. How this works will become clearer later in this tutorial.
Creating a Layout
The layout system WatchKit provides us with is primitive compared to the power and flexibility of Auto Layout. The layout system is reminiscent of how web pages are laid out with HTML and CSS.
One of the building blocks of the WatchKit layout system is the WKInterfaceGroup class. An instance of this class is nothing more than a container that can hold other interface elements, such as labels, tables, etc. You can compare it with a <div> element on a web page. It provides structure and determines the layout together with other groups of the layout.
From the Object Library on the right, add two groups to the interface controller as shown below.
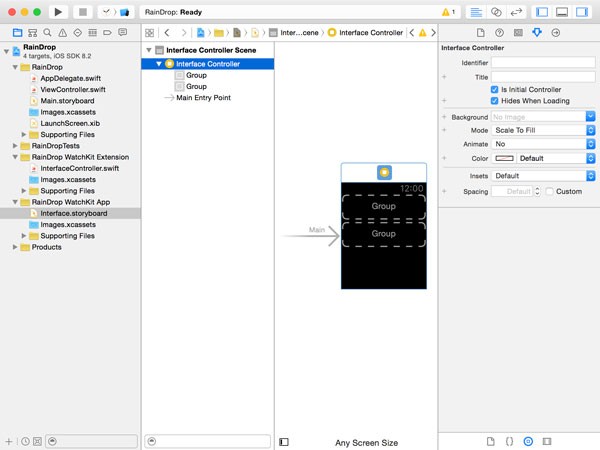
Did you notice that the groups automatically snap into place? The layout system behaves very differently from Auto Layout. Another important detail is that the container of the interface controller is also a group, not a view. This means that you added the groups to another group. This is fine since groups can be nested, allowing developers to create fairly complex layouts for their WatchKit applications.
Adding Interface Elements
Add a label from the Object Library to the top group and see what happens. The size of the group decreases to fit the size of the label. The outline of an empty group is nothing more than a placeholder. A group will always adjust its size to that of its contents.
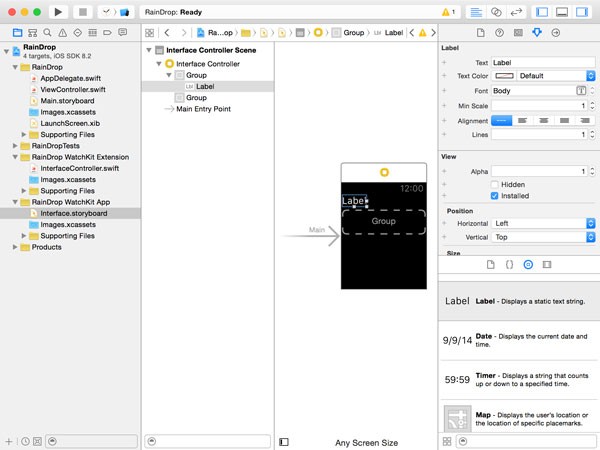
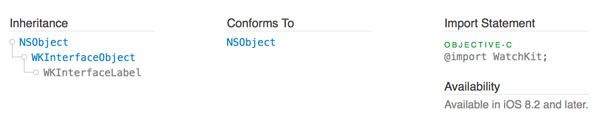
Select the label and open the Identity Inspector on the right. Note that the label you added is of type WKInterfaceLabel, not UILabel. Even though WatchKit applications can have many user interface elements that resemble those found in iOS applications, they are different. The WKInterfaceLabel class, for example, inherits from WKInterfaceObject instead of UIView and UIResponder.
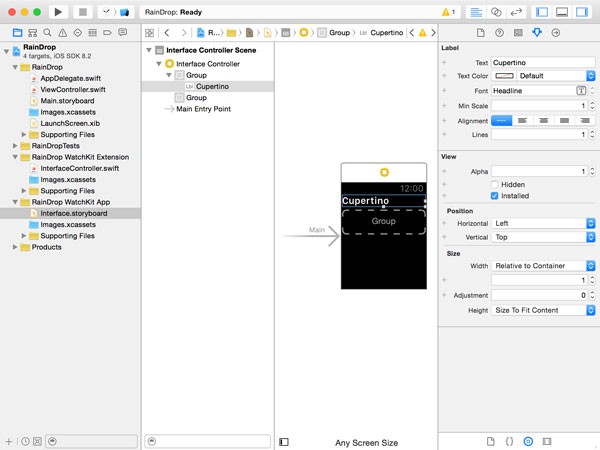
With the label selected, open the Attributes Inspector on the right. Under Size, set width to Relative to Container to make it as wide as the screen of the Apple Watch. Change the font to Headline to make it stand out a bit more and change the label's text to Cupertino. Notice that you cannot change the font family nor can you manually adjust the font size.
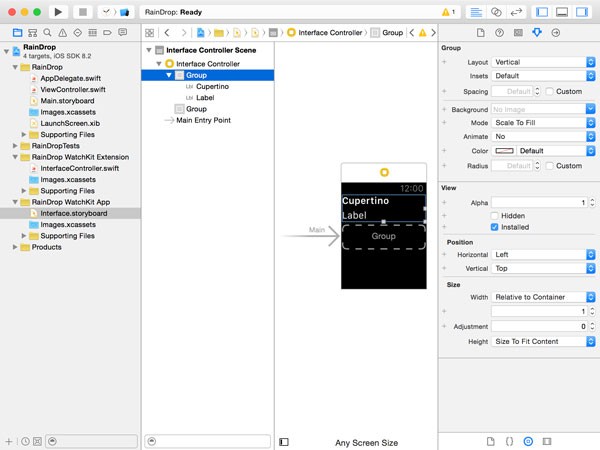
Since our WatchKit application will be displaying the weather conditions of various places on the planet, we also need to add a label for the temperature. It would also be nice to know the local date and time of the location.
Add a second label to the top group by dragging a label in the Scene Navigator. Wait. That's not right. You've added a label to the correct group, but it isn't showing up in the interface.

By default, a group has a horizontal layout. You can verify this by opening the Attributes Inspector and inspecting its Layout property. This means that the interface elements it contains are laid out horizontally. The temperature label is present in the group, but it's not visible at the moment. Change the group's Layout property to Vertical to resolve the issue.
Add a Date interface element to the second group. Date interface elements are instances of the WKInterfaceDate class. This interface element contains a label and is perfect for displaying and formatting dates. Start by changing the element's width to Relative to Container and the label's text alignment to right aligned.
There's no need to use the NSDateFormatter class to format dates. The WKInterfaceDate class handles date formatting for us. Change the Format of the WKInterfaceDate instance to Custom and set the format to M/d, h:mm a. The user interface should now look like this.
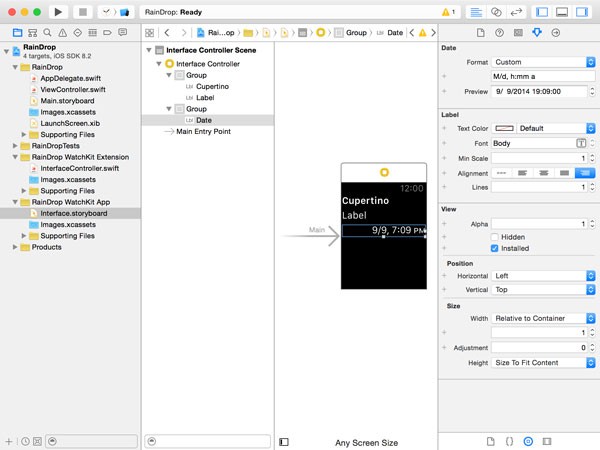
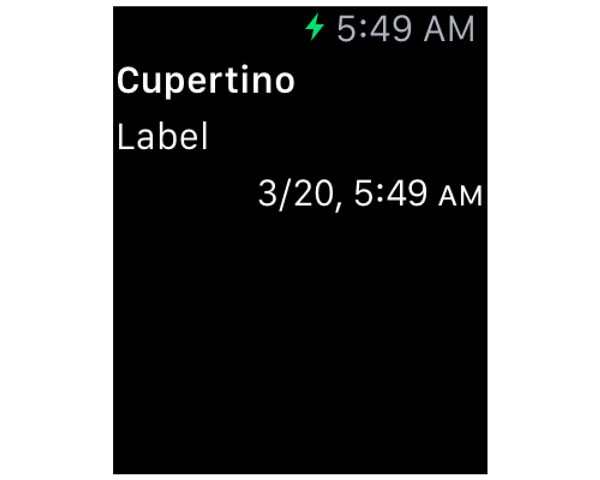
Build and run the WatchKit application in the iOS Simulator to see what we've got so far. The application isn't very useful at the moment since we're working with static content. We'll fix this in the next tutorial.
Conclusion
We've covered the very basics of WatchKit application development in this tutorial. I'm sure you agree that developing WatchKit applications feels both familiar and foreign. We can use the tools we're accustomed to, but there are a number of key differences that will take time to get comfortable with. In the second part of this tutorial, we will focus on the WatchKit extension to fetch weather data and display that data in the WatchKit application.

Comments