In the previous tutorial, we explored the fundamentals of WatchKit development. We created a project in Xcode, added a WatchKit application, and created a basic user interface.
The user interface of our WatchKit application currently displays static data. Unless you live in the desert, that's not very useful for a weather application. In this tutorial, we're going to populate the user interface with data and create a few actions.
1. Updating the User interface
Step 1: Replacing WKInterfaceDate
Before we populate the user interface with data, we need to make a small change. In the previous tutorial, we added a WKInterfaceDate instance to the bottom group to display the current time and date. It would be more useful, however, to display the time and date of the data we're displaying. The reason for this change will become clear in a few moments.
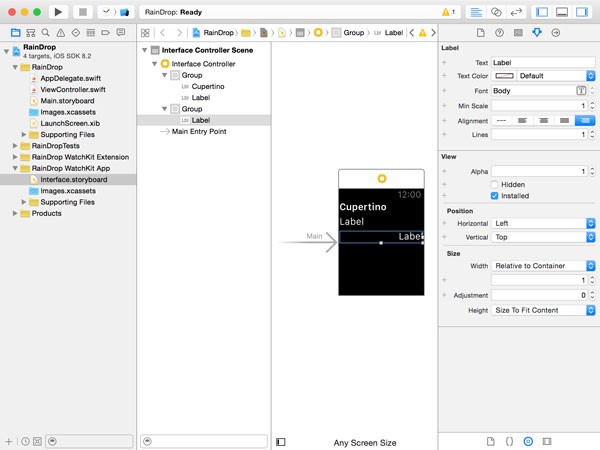
Open Interface.storyboard, remove the WKInterfaceDate instance in the bottom group and replace it with a WKInterfaceLabel instance. Set the label's Width attribute to Relative to Container and the label's Alignment to right aligned.
Step 2: Adding Outlets
To update the user interface with dynamic data, we need to create a few outlets in the InterfaceController class. Open the storyboard in the main editor and InterfaceController.swift in the Assistant Editor on the right. Select the top label in the first group and Control-Drag from the label to the InterfaceController class to create an outlet. Name the outlet locationLabel.
Repeat these steps for the other labels, naming them temperatureLabel and dateLabel respectively. This is what the InterfaceController class should look like when you're finished.
import WatchKit
import Foundation

class InterfaceController: WKInterfaceController {
    @IBOutlet weak var dateLabel: WKInterfaceLabel!
    @IBOutlet weak var locationLabel: WKInterfaceLabel!
    @IBOutlet weak var temperatureLabel: WKInterfaceLabel!

    override func awakeWithContext(context: AnyObject?) {
        super.awakeWithContext(context)
    }

    override func willActivate() {
        // This method is called when watch view controller is about to be visible to user
        super.willActivate()
    }

    override func didDeactivate() {
        // This method is called when watch view controller is no longer visible
        super.didDeactivate()
    }
}
Now may be a good time to take a closer look at the implementation of the InterfaceController class. In the previous tutorial, I mentioned that InterfaceController inherits from WKInterfaceController. At first glance, it may seem as if a WKInterfaceController instance behaves like a UIViewController instance, but we also learned in the previous tutorial that there are a number of key differences.
To help us, Xcode has populated the InterfaceController class with three overridden methods. It's important to understand when each method is invoked and what it can or should be used for.
awakeWithContect(_:)
In the awakeWithContext(_:) method, you set up and initialize the interface controller. You may be wondering how it differs from the init method. The awakeWithContext(_:) method is invoked after the interface controller is initialized. The method accepts one parameter, a context object that allows interface controllers to pass information to one another. This is the recommended approach for passing information across scenes, that is, interface controllers.
willActivate
The willActivate method is similar to the viewWillAppear(_:) method of the UIViewController class. The willActivate method is invoked before the user interface of the interface controller is presented to the user. It's ideal for tweaking the user interface before it's presented to the user.
didDeactivate
The didDeactivate method is the counterpart of the willActivate method and is invoked when the scene of the interface controller has been removed. Any cleanup code goes into this method. This method is similar to the viewDidDisappear(_:) method found in the UIViewController class.
With the above in mind, we can start loading data and updating the user interface of our WatchKit application. Let's start with loading weather data.
2. Loading Weather Data
Best Practices
You might be thinking that the next step involves an API call to a weather service, but that's not the case. If we were building an iOS application, you'd be right. However, we're creating a WatchKit application.
It isn't recommended to make complex API calls to fetch data to populate the user interface of a WatchKit application. Even though Apple doesn't explicitly mention this in the documentation, an Apple engineer did mention this unwritten best practice in Apple's developer forums.
The WatchKit application is part of an iOS application and it's the iOS application that's in charge of fetching data from a remote backend. There are several approaches we can take to do this, background fetching being a good choice. In this tutorial, however, we're not going to focus on that aspect.
Instead, we'll add dummy data to the bundle of the WatchKit extension and load it in the awakeWithContext(_:) method we discussed earlier.
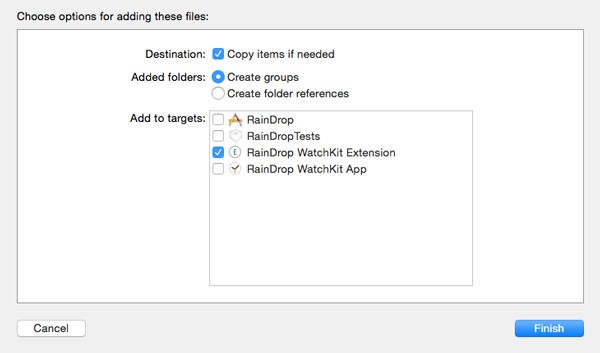
Create a blank file by selecting New > File... from the File menu. Choose Empty from the iOS > Other section and name the file weather.json. Double-check that you're adding the file to the RainDrop WatchKit Extension. Don't overlook this small but important detail. Populate the file with the following data.
{
  "locations" : [
    {
      "location" : "Cupertino",
      "temperature" : 24,
      "timestamp" : 1427429751
    },
    {
      "location" : "London",
      "temperature" : 11,
      "timestamp" : 1427429751
    },
    {
      "location" : "Paris",
      "temperature" : 9,
      "timestamp" : 1427429751
    },
    {
      "location" : "Brussels",
      "temperature" : 11,
      "timestamp" : 1427429751
    }
  ]
}
Sharing Data
Sharing data between the iOS application and the WatchKit application is an important topic. However, this tutorial focuses on getting your first WatchKit application up and running. In a future tutorial, I will focus on sharing data between an iOS and a WatchKit application.
Even though we won't be covering sharing data in this tutorial, it's important to know that the iOS application and the WatchKit extension don't share a sandbox. Both targets have their own sandbox and that's what makes sharing data less trivial than it seems.
To share data between the iOS and the WatchKit application, you need to leverage app groups. But that's a topic for a future tutorial.
Step 1: Adding SwiftyJSON
Swift is a great language, but some tasks are simpler in Objective-C than they are in Swift. Handling JSON, for example, is one such task. To make this task easier, I've chosen to leverage the popular SwiftyJSON library.
Download the repository from GitHub, unzip the archive, and add SwiftyJSON.swift to the RainDrop WatchKit Extension group. This file is located in the Source folder of the archive. Double-check that SwiftyJSON.swift is added the RainDrop WatchKit Extension target.
Step 2: Implementing WeatherData
To make it easier to work with the weather data stored in weather.json, we're going to create a structure named WeatherData. Select New > File... from the File menu, choose Swift File from the iOS > Source section, and name the file WeatherData. Make sure the file is added to the RainDrop WatchKit Extension target.
The implementation of the WeatherData structure is short and simple. The structure defines three constant properties, date, location, and temperature.
import Foundation

struct WeatherData {
    let date: NSDate
    let location: String
    let temperature: Double
}
Because the temperature value of weather.json is in Celcius, we also implement a computed property fahrenheit for easy conversion between Celcius and Fahrenheit.
var fahrentheit: Double {
    return temperature * (9 / 5) + 32
}
We also define two helper methods toCelciusString and toFahrenheitString to make formatting temperature values easier. Don't you love Swift's string interpolation?
func toCelciusString() -> String {
    return "\(temperature) °C"
}

func toFahrenheitString() -> String {
    return "\(fahrentheit) °F"
}
Like I said, the implementation of the WeatherData structure is short and simple. This is what the implementation should look like.
import Foundation

struct WeatherData {
    let date: NSDate
    let location: String
    let temperature: Double

    var fahrentheit: Double {
        return temperature * (9 / 5) + 32
    }

    func toCelciusString() -> String {
        return "\(temperature) °C"
    }

    func toFahrenheitString() -> String {
        return "\(fahrentheit) °F"
    }
}
Step 3: Loading Data
Before we load the data from weather.json, we need to declare a property for storing the weather data. The property, weatherData, is of type [WeatherData] and will contain the contents of weather.json as instances of the WeatherData structure.
var weatherData: [WeatherData] = []
For ease of use, we also declare a computed property, weather, that gives us access to the first item of the weatherData array. It's the data of this WeatherData instance that we'll display in the interface controller. Can you guess why we need to declare the weather property as an optional?
var weather: WeatherData? {
    return weatherData.first
}
We load the data from weather.json in the awakeWithContext(_:) method. To keep the implementation clean, we invoke a helper method named loadWeatherData.
override func awakeWithContext(context: AnyObject?) {
    super.awakeWithContext(context)

    // Load Weather Data
    loadWeatherData()
}
The implementation of loadWeatherData is probably the most daunting code snippet we'll see in this tutorial. Like I said, parsing JSON isn't trivial in Swift. Luckily, SwiftyJSON does most of the heavy lifting for us.
func loadWeatherData() {
    let path = NSBundle.mainBundle().pathForResource("weather", ofType: "json")

    if let path = path {
        let data = NSData(contentsOfFile: path)

        if let data = data {
            let weatherData = JSON(data: data)
            let locations = weatherData["locations"].array

            if let locations = locations {
                for location in locations {
                    let timestamp = location["timestamp"].double!
                    let date = NSDate(timeIntervalSinceReferenceDate: timestamp)

                    let model = WeatherData(date: date, location: location["location"].string!, temperature: location["temperature"].double!)

                    self.weatherData.append(model)
                }
            }
        }
    }
}
We obtain the path to weather.json and load its contents as an NSData object. We use SwiftyJSON to parse the JSON, passing in the NSData object. We obtain a reference to the array for the key locations and loop over each location.
We normalize the weather data by converting the timestamp to an NSDate instance and initialize a WeatherData object. Finally, we add the WeatherData object to the weatherData array.
I hope you agree that the implementation isn't all that difficult. Because Swift forces us to make a number of checks, the implementation looks more complex than it actually is.
3. Populating the User Interface
With the weather data ready to use, it's time to update the user interface. As I explained earlier, updating the user interface needs to happen in the willActivate method. Let's take a look at the implementation of this method.
override func willActivate() {
    // This method is called when watch view controller is about to be visible to user
    super.willActivate()

    if let weather = self.weather {
        locationLabel.setText(weather.location)

        // Update Temperature Label
        self.updateTemperatureLabel()

        // Update Date Label
        self.updateDateLabel()
    }
}
After invoking the willActivate method of the superclass, we unwrap the value stored in the weather property. To update the location label, we invoke setText, passing in the value stored in the location property of the weather object. To update the temperature and date labels, we invoke two helper methods. I prefer to keep the willActivate method short and concise, and, more importantly, I don't like to repeat myself.
Before we look at these helper methods, we need to know whether the temperature needs to be displayed in Celcius or Fahrenheit. To resolve this issue, declare a property, celcius, of type Bool and set its initial value to true.
var celcius: Bool = true
The implementation of updateTemperatureLabel is easy to understand. We safely unwrap the value stored in weather and update the temperature label based on the value of celcius. As you can see, the two helper methods of the WeatherData structure we created earlier come in handy.
func updateTemperatureLabel() {
    if let weather = self.weather {
        if self.celcius {
            temperatureLabel.setText(weather.toCelciusString())
        } else {
            temperatureLabel.setText(weather.toFahrenheitString())
        }
    }
}
The implementation of updateDateLabel isn't difficult either. We initialize an NSDateFormatter instance, set its dateFormat property, and convert the date of the weather object by calling stringFromDate(_:) on the dateFormatter object. This value is used to update the date label.
func updateDateLabel() {
    var date: NSDate = NSDate()

    // Initialize Date Formatter
    let dateFormattter = NSDateFormatter()

    // Configure Date Formatter
    dateFormattter.dateFormat = "d/MM HH:mm"

    if let weather = self.weather {
        date = weather.date
    }

    // Update Date Label
    dateLabel.setText(dateFormattter.stringFromDate(date))
}
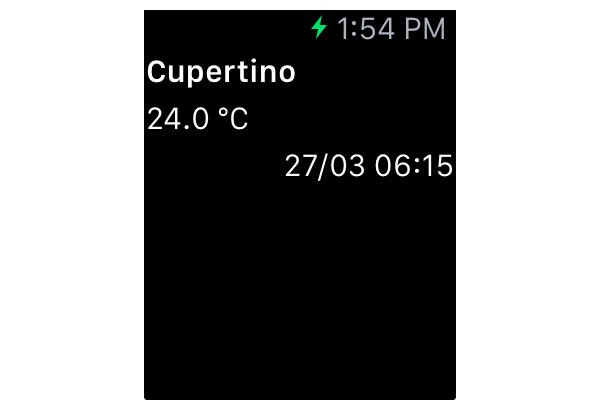
Build and run the application to see the result. The user interface should now be populated with the data from weather.json.
4. Switching to Fahrenheit
This looks good. But wouldn't it be great if we added support for both Celcius and Fahrenheit? This is easy to do since we've already laid most of the groundwork.
If the user force touches the user interface of a user interface controller, a menu is shown. Of course, this only works if a menu is available. Let's see how this works.
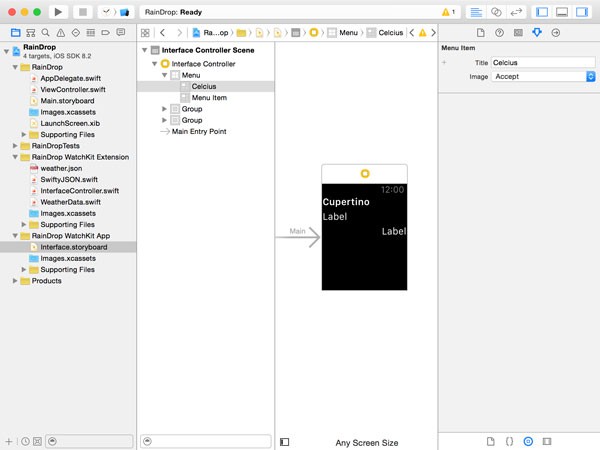
Open Interface.storyboard and add a menu to the Interface Controller in the Document Outline on the left. By default, a menu has one menu item. We need two menu items so add another menu item to the menu.
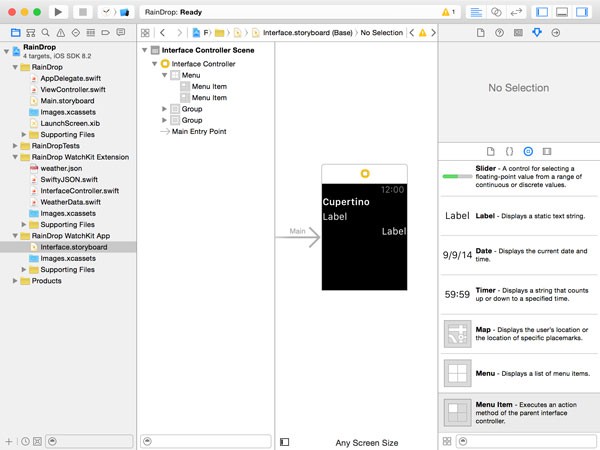
Note that the menu and its menu items aren't visible in the user interface. This isn't a problem since we can't configure the layout of the menu. What we can change are the text of a menu item and its image. You'll better understand what that means when we present the menu.
Select the top menu item, open the Attributes Inspector, set Title to Celcius, and Image to Accept. Select the bottom menu item and set Title to Fahrenheit and Image to Accept.
Next, open InterfaceController.swift in the Assistant Editor on the right. Control-Drag from the top menu item to InterfaceController.swift and create an action named toCelcius. Repeat this step for the bottom menu item, creating an action named toFahrenheit.
The implementation of these actions is short. In toCelcius, we check if the celcius property is set to false, and, if it is, we set the property to true. In toFahrenheit, we check if the celcius property is set to true, and, if it is, we set the property to false.
@IBAction func toCelcius() {
    if !self.celcius {
        self.celcius = true
    }
}

@IBAction func toFahrenheit() {
    if self.celcius {
        self.celcius = false
    }
}
If the value of celcius changes, we need to update the user interface. What better way to accomplish this by implementing a property observer on the celcius property. We only need to implement a didSet property observer.
var celcius: Bool = true {
    didSet {
        if celcius != oldValue {
            updateTemperatureLabel()
        }
    }
}
The only detail worth mentioning is that the user interface is only updated if the value of celcius did change. Updating the user interface is as simple as calling updateTemperatureLabel. Build and run the WatchKit application in the iOS Simulator to test the menu.
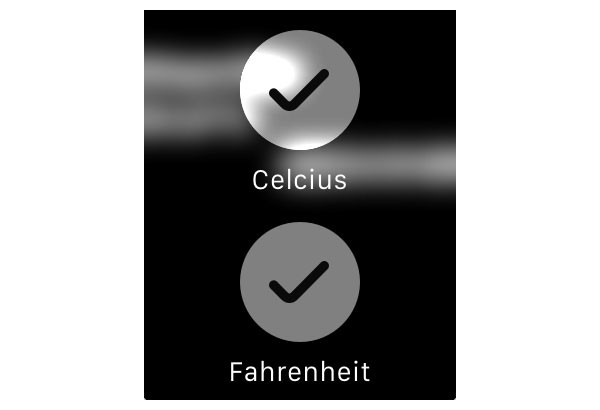
It's worth mentioning that the iOS Simulator mimics the responsiveness of a physical device. What does that mean? Remember that the WatchKit extension runs on an iPhone while the WatchKit application runs on an Apple Watch. When the user taps a menu item, the touch event is sent over a Bluetooth connection to the iPhone. The WatchKit extension processes the event and sends any updates back to the Apple Watch. This communication is pretty fast, but it isn't as fast as if both extension and application were to run on the same device. That short delay is mimicked by the iOS Simulator to help developers get an idea of performance.
Conclusion
Once you've wrapped your head around the architecture of a WatchKit application, it becomes much easier to understand the possibilities and limitations of the first generation of WatchKit applications. In this tutorial, we've only covered the essentials of WatchKit development. There is much more to discover and explore. Stay tuned.

Comments