This tutorial will teach you to combine UIKit views and the SKTransition class to create beautiful, custom transitions between different SKScenes. Read on!
Final Preview
1. Transitions Between Scenes
Scenes are interfaces that hold several view objects. Normally, you design several scenes for each part of your game, and then use transitions between the scenes as necessary. For example, you might create different scene classes to represent any or all of the following concepts:
- A main menu scene to choose the difficulty of a specific level the user wants to play.
- A scene to configure the details of the sound and music effects of a game.
- A scene that provides the game-play interface.
- A scene that provides the online leader board interface.
- A scene that provides current and overall game achievements.
As you can see, a scene can be anything that the programmer would like to create. Typically, you transition to a new scene based on game-play objectives or direct user input. For example, if the timer runs out, a new scene presenting a "game over" may be presented. Alternatively, if a user presses an options button, you might transition to a new scene to configure the game settings. Note that, at the transition step, the scene property is immediately updated to point to the new scene. After this, the transition occurs.
A transition can also have a transition object (an effect or an animation). That object will create a dynamic, beautiful presentation when the transition occurs. Several objects exist, and for a complete and official reference you should consult the SKTransition class reference.
2. Class Methods
The SKTransition class presents several methods and two properties (more about those later). The goal of all methods is to create a shiny and dynamic transition between scenes. The class methods can be divided into four main sections:
- With Duration: Transitions that will occur over a defined period of time.
-
With Color: Transitions that will use a
UIColorobject to color the inherent transition. - With Direction: Transitions that will be made from a specified direction.
- With CIFilter: Transitions that will use a custom filter to produce a visual effect in the transition.
Duration and Color are simple objects, but both Direction and CIFilter are not.
As the name suggestions, the direction property means that the transition will occur in a specific direction. The direction property can have one of four constants. These constants are declared as an NS_ENUM, like this:
typedef NS_ENUM(NSInteger,
   SKTransitionDirection) {
   SKTransitionDirectionUp,
   SKTransitionDirectionDown,
   SKTransitionDirectionRight,
   SKTransitionDirectionLeft,
};
CIFilter is even more robust than Direction since it is also a reference class with class methods, instance methods, and properties. This tutorial will not cover the CIFilter class in-depth, but it will present an example of how to use it to create a custom filter and the inherent SKTransition. An additional note regarding the CIFilter class: it supports dozens of effects, but not all are supported by the latest version of iOS. You should consult the Core Image Filter Reference to see the compatibility list.
Note that you can use several "grouped methods" in order to create an SKTransiton. But how do you know which ones can be combined? For this, you must look to the method signature and determine the properties accepted by each method.
For instance, let's analyze three methods to see what they can handle:
doorsOpenVerticalWithDuration:fadeWithColor:duration:revealWithDirection:duration:
As previously stated, the methods names allow you to quickly understand what each method can do. To elaborate, the doorsOpenVerticalWithDuration: method will only take into consideration a duration The fadeWithColor:duration: method uses both a color and a duration. You must first define a UIColor object and then a duration time. The revealWithDirection:duration: method will only use a direction, which, in turn, can be one of four properties. Note that you can also extend the SKTransition class to create custom transitions and join Duration, Color, Direction, and CIFilter.
3. Class Properties
The SKTransition class only has two properties: pausesIncomingScene and pausesOutgoingScene. Both configure whether animations play during the transition and both properties are Boolean values. The difference is as follows:
-
pausesIncomingScenedetermines whether the incoming scene is paused during the transition. -
pausesOutgoingScenedetermines whether the outgoing scene is paused during the transition.
Since both are Boolean values, the definition is easy and can be understood in the next snippet:
  // other code ...
  transitionCrossFade = [SKTransition crossFadeWithDuration:1];
  transitionCrossFade.pausesIncomingScene = TRUE;
  transitionDoorsCloseHorizontal = [SKTransition doorsCloseHorizontalWithDuration:2];
  transitionDoorsCloseHorizontal.pausesOutgoingScene = FALSE;
The pausesIncomingScene and pausesOutgoingScene properties on the transition object define which animations are played during the transition. By default, both scenes continue to process animation during the transition. However, you might want to pause one or both of the scenes until the transition completes.
4. The Tutorial Project
Now that you know the basics of the SKTransition class, you can now start the programming phase.
Step 1
The first step is to open Xcode and start a new SpriteKit project. Next, you should add another Objective-C class named TransitionResult and a super-class of SKScene.
The objective of this project is to have two classes that will be swapped between them. The first (MyScene already defined by the Xcode) will contain a UITableView that will hold the reference to each SKTransition. The second (TransitionResult) will be the destination scene after a transition.
When the user taps the screen after a transition it will once again be transferred to MyScene.
Step 2
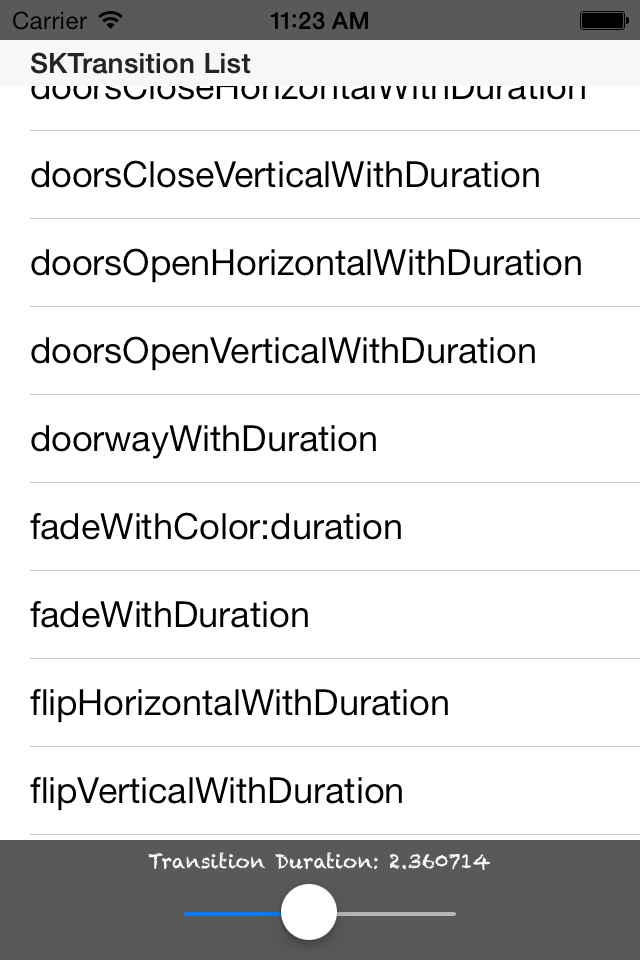
In MyScene.h, you will declare 3 objects: a UITableView, UISlider, and an NSArray. The UITableView will display the names of each transition, the UISlider will define the Duration of that transition, and the NSArray will contain the names of each SKTransition. The final MyScene.h code will be similar to this snippet:
@property (retain, nonatomic) IBOutlet UITableView *tableView;
@property (nonatomic, retain) IBOutlet UISlider *sliderTimer;
@property (strong, nonatomic) NSArray *transitionsArray;
Step 3
Now, focus your attention in the MyScene implementation file.
The first step is to use the -(id)initWithSize:(CGSize)size method to initialize the aforementioned objects. One possible configuration setup is the following:
  _tableView = [[UITableView alloc] initWithFrame:CGRectMake(CGRectGetMinX(self.frame), CGRectGetMinY(self.frame)+20, CGRectGetMaxX(self.frame), CGRectGetMaxY(self.frame)-80)];
  _tableView.dataSource = self;
  _tableView.delegate = self;

  _sliderTimer = [[UISlider alloc] initWithFrame:CGRectMake(CGRectGetMidX(self.frame)-70, CGRectGetMaxY(self.frame)-40, 140, 3)];
  [_sliderTimer addTarget:self action:@selector(sliderAction) forControlEvents:UIControlEventValueChanged];
  [_sliderTimer setBackgroundColor:[UIColor clearColor]];
  _sliderTimer.minimumValue = 1;
  _sliderTimer.maximumValue = 4;
  _sliderTimer.continuous = YES;
  _sliderTimer.value = 1;

  _transitionsArray = [[NSArray alloc] initWithObjects:
                             @"crossFadeWithDuration",
                             @"doorsCloseHorizontalWithDuration",
                             @"doorsCloseVerticalWithDuration",
                             @"doorsOpenHorizontalWithDuration",
                             @"doorsOpenVerticalWithDuration",
                             @"doorwayWithDuration",
                             @"fadeWithColor:duration",
                             @"fadeWithDuration",
                             @"flipHorizontalWithDuration",
                             @"flipVerticalWithDuration",
                             @"moveInWithDirectionDown:duration",
                             @"moveInWithDirectionUp:duration",
                             @"moveInWithDirectionLeft:duration",
                             @"moveInWithDirectionRight:duration",
                             @"pushWithDirection:duration",
                             @"revealWithDirection:duration",
                             @"transitionWithCIFilter:duration",
                             nil];
However, a warning is presented since the sliderAction is missing. The method will update in real time the transitionTimerText taking into account the UISlider value.
-(void)sliderAction{
    transitionTimerText.text = [[NSString alloc] initWithFormat:@"Transition Duration: %f", _sliderTimer.value];
}
Note that the views, location, configuration, and layout are completely configurable. If you want, you can tune this for your best interests. Additionally, you will add a SKLabelNode to store and display the UISlider value. That value will be representative of the SKTransition Duration effects. Add the SKLabelNode* transitionTimerText to your implementation file and the corresponding initialization will be:
  transitionTimerText = [SKLabelNode labelNodeWithFontNamed:@"Chalkduster"];
  transitionTimerText.text = [[NSString alloc] initWithFormat:@"Transition Duration: %f", _sliderTimer.value];
  transitionTimerText.fontSize = 10;
  transitionTimerText.color = [SKColor colorWithRed:0 green:0 blue:0 alpha:1];
  transitionTimerText.position = CGPointMake(CGRectGetMidX(self.frame), CGRectGetMinY(self.frame)+45);
Step 4
Now that you have the objects configured you just need to add them to the scene. For that, you will use the -(void) didMoveToView:(SKView *)view method. Add it to your file and inside add the aforementioned views to the main view:
-(void) didMoveToView:(SKView *)view{
    [self addChild:transitionTimerText];
    [self.scene.view addSubview:_sliderTimer];
    [self.scene.view addSubview:_tableView];
}
If you run the project now you will see two objects on the screen: a UISlider and a SKLabelNode.
Step 5
The next step is to display the SKTransition methods in the UITableView. For this, you need to modify your MyScene.h file and extend your class with the <UITableViewDataSource, UITableViewDelegate> protocols. The final MyScene.h should look like this:
@interface MyScene : SKScene <UITableViewDataSource, UITableViewDelegate>
Go back to the implementation file and you will be presented with a warning. That warning says that you need to implement additional methods inherent to the UITableView. The methods needed are: -(NSInteger)tableView:(UITableView *)tableView numberOfRowsInSection:(NSInteger)section and -(UITableViewCell *)tableView:(UITableView *)tableView cellForRowAtIndexPath:(NSIndexPath *)indexPath. The first will return the number of rows in the table, while the second will handle the logic for each cell inside the table. For additional notes regarding the UITableView class, you should consult the official reference class.
The first method is simple and is only a single line:
-(NSInteger)tableView:(UITableView *)tableView numberOfRowsInSection:(NSInteger)section
{
    return [_transitionsArray count];
}
The second method is more complex since we must define the table cell properties and configurations (cell contents). In this example, you will use a simple UITableViewCellStyleSubtitle. If you have problems writing the method, the full version is presented bellow:
-(UITableViewCell *)tableView:(UITableView *)tableView cellForRowAtIndexPath:(NSIndexPath *)indexPath {

    NSString *transitions = [_transitionsArray objectAtIndex:indexPath.row];
    UITableViewCell *cell = [tableView dequeueReusableCellWithIdentifier:@"Identifier"];

    if (cell == nil) {
        cell = [[UITableViewCell alloc] initWithStyle:UITableViewCellStyleSubtitle reuseIdentifier:@"Identifier"];
    }

    [cell.textLabel setText:transitions];
    return cell;
}
Run your code now and you should see each cell line with a unique name. Each name represents the inherent SKTransiton used if the user taps that cell. You will also note that the UITableView does not have a title. Let's fix that!
Step 6
Add the following method: - (NSString *)tableView:(UITableView *)tableView titleForHeaderInSection:(NSInteger)section. Within this method, add the following code:
NSString *sectionName;
    switch (section)
    {
        case 0:
            sectionName = NSLocalizedString(@"SKTransition List", @"SKTransition List");
            break;
        default:
            sectionName = @"";
            break;
    }
    return sectionName;
This method is permitted to have multiple titles for multiple UITableView sections. However, we will only have one section, so the title will be "SKTransition List" (or any other of your choice).
Step 7
At this point, you need to add user interaction to the cells. To do this, another additional method is needed. This time the -(void)tableView:(UITableView *)tableView didSelectRowAtIndexPath:(NSIndexPath *)indexPath method should be called. This method is long, but it is simple to understand. You will allocate the necessary resources for each SKTransition and, based on the cell tapped, you will present another SKScene.
The first step is to import the TransitionResult header file, then define a TransitionResult object for the resulting SKScene. Take a look at the following to see this in action:
  TransitionResult* transitionResult;

  SKTransition* transitionCrossFade;
  SKTransition* transitionDoorsCloseHorizontal;
  SKTransition* transitionDoorsCloseVertical;
  SKTransition* transitiondoorsOpenHorizontal;
  SKTransition* transitionDoorsOpenVertical;
  SKTransition* transitionDoorway;
  SKTransition* transitionFadeWithColor;
  SKTransition* transitionFadeWithDuration;
  SKTransition* transitionFlipHorizontal;
  SKTransition* transitionFlipVertical;
  SKTransition* transitionMoveInWithDirectionDown;
  SKTransition* transitionMoveInWithDirectionUp;
  SKTransition* transitionMoveInWithDirectionLeft;
  SKTransition* transitionMoveInWithDirectionRight;
  SKTransition* transitionPushWithDirection;
  SKTransition* transitionRevealWithDirectionUp;
  SKTransition* transitionWithCIFilter;
Now, in the -(void)tableView:(UITableView *)tableView didSelectRowAtIndexPath:(NSIndexPath *)indexPath method, it is time to allocate the necessary resources. The complete code is:
transitionCrossFade = [SKTransition crossFadeWithDuration:_sliderTimer.value];
    transitionCrossFade.pausesIncomingScene = TRUE;
    transitionDoorsCloseHorizontal = [SKTransition doorsCloseHorizontalWithDuration:_sliderTimer.value];
    transitionDoorsCloseHorizontal.pausesOutgoingScene = FALSE;
    transitionDoorsCloseVertical = [SKTransition doorsCloseVerticalWithDuration:_sliderTimer.value];
    transitiondoorsOpenHorizontal = [SKTransition doorsOpenHorizontalWithDuration:_sliderTimer.value];
    transitionDoorsOpenVertical = [SKTransition doorsOpenVerticalWithDuration:_sliderTimer.value];
    transitionDoorway = [SKTransition doorwayWithDuration:_sliderTimer.value];
    transitionFadeWithColor = [SKTransition fadeWithColor:[UIColor yellowColor] duration:_sliderTimer.value];
    transitionFadeWithDuration = [SKTransition fadeWithDuration:_sliderTimer.value];
    transitionFlipHorizontal = [SKTransition flipHorizontalWithDuration:_sliderTimer.value];
    transitionFlipVertical = [SKTransition flipVerticalWithDuration:_sliderTimer.value];
    transitionMoveInWithDirectionDown = [SKTransition moveInWithDirection:SKTransitionDirectionDown duration:_sliderTimer.value];
    transitionMoveInWithDirectionUp = [SKTransition moveInWithDirection:SKTransitionDirectionUp duration:_sliderTimer.value];
    transitionMoveInWithDirectionLeft = [SKTransition moveInWithDirection:SKTransitionDirectionLeft duration:_sliderTimer.value];
    transitionMoveInWithDirectionRight = [SKTransition moveInWithDirection:SKTransitionDirectionRight duration:_sliderTimer.value];
    transitionPushWithDirection = [SKTransition pushWithDirection:SKTransitionDirectionDown duration:_sliderTimer.value];
    transitionRevealWithDirectionUp = [SKTransition revealWithDirection:SKTransitionDirectionUp duration:_sliderTimer.value];

    CGRect screenRect = [[UIScreen mainScreen] bounds];
    CIVector  *extent = [CIVector vectorWithX:0  Y:0  Z:screenRect.size.width  W:screenRect.size.height];
    transitionWithCIFilter = [SKTransition transitionWithCIFilter:[CIFilter filterWithName: @"CIFlashTransition"
                                                                             keysAndValues: @"inputExtent", extent,
                                                                   @"inputCenter",[CIVector vectorWithX:0.3*screenRect.size.width Y:0.7*screenRect.size.height],
                                                                   @"inputColor", [CIColor colorWithRed:1.0 green:0.8 blue:0.6 alpha:1],
                                                                   @"inputMaxStriationRadius", @2.5,
                                                                   @"inputStriationStrength", @0.5,
                                                                   @"inputStriationContrast", @1.37,
                                                                   @"inputFadeThreshold", @0.85, nil] duration:_sliderTimer.value];

    transitionResult = [[TransitionResult alloc] initWithSize:CGSizeMake(CGRectGetMaxX(self.frame), CGRectGetMaxY(self.frame))];

    switch (indexPath.row) {
        case 0:
            [self.scene.view presentScene:transitionResult transition:transitionCrossFade];
            [self removeUIKitViews];
            break;
        case 1:
            [self.scene.view presentScene:transitionResult transition:transitionDoorsCloseHorizontal];
            [self removeUIKitViews];
            break;
        case 2:
            [self.scene.view presentScene:transitionResult transition:transitionDoorsCloseVertical];
            [self removeUIKitViews];
            break;
        case 3:
            [self.scene.view presentScene:transitionResult transition:transitiondoorsOpenHorizontal];
            [self removeUIKitViews];
            break;
        case 4:
            [self.scene.view presentScene:transitionResult transition:transitionDoorsOpenVertical];
            [self removeUIKitViews];
            break;
        case 5:
            [self.scene.view presentScene:transitionResult transition:transitionDoorway];
            [self removeUIKitViews];
            break;
        case 6:
            [self.scene.view presentScene:transitionResult transition:transitionFadeWithColor];
            [self removeUIKitViews];
            break;
        case 7:
            [self.scene.view presentScene:transitionResult transition:transitionFadeWithDuration];
            [self removeUIKitViews];
            break;
        case 8:
            [self.scene.view presentScene:transitionResult transition:transitionFlipHorizontal];
            [self removeUIKitViews];
            break;
        case 9:
            [self.scene.view presentScene:transitionResult transition:transitionFlipVertical];
            [self removeUIKitViews];
            break;
        case 10:
            [self.scene.view presentScene:transitionResult transition:transitionMoveInWithDirectionDown];
            [self removeUIKitViews];
            break;
        case 11:
            [self.scene.view presentScene:transitionResult transition:transitionMoveInWithDirectionUp];
            [self removeUIKitViews];
            break;
        case 12:
            [self.scene.view presentScene:transitionResult transition:transitionMoveInWithDirectionLeft];
            [self removeUIKitViews];
            break;
        case 13:
            [self.scene.view presentScene:transitionResult transition:transitionMoveInWithDirectionRight];
            [self removeUIKitViews];
            break;
        case 14:
            [self.scene.view presentScene:transitionResult transition:transitionPushWithDirection];
            [self removeUIKitViews];
            break;
        case 15:
            [self.scene.view presentScene:transitionResult transition:transitionRevealWithDirectionUp];
            [self removeUIKitViews];
            break;
        case 16:
            [self.scene.view presentScene:transitionResult transition:transitionWithCIFilter];
            [self removeUIKitViews];
            break;
        default:
            break;
    }
You will receive a warning that says that a method (removeUIKitViews) is missing. That method is a simple call to remove some views from the parent and super view. While simplistic, the necessary code is:
-(void) removeUIKitViews
{
    [transitionTimerText removeFromParent];
    [_tableView removeFromSuperview];
    [_sliderTimer removeFromSuperview];
}
Now for several notes regarding the -(void)tableView:(UITableView *)tableView didSelectRowAtIndexPath:(NSIndexPath *)indexPath method.
- The
SKTransitiontransition initialization is similar to all transitions. - The filter defined is a customized one. As stated above, you can re-configure it or define a totally new filter.
- The
Durationtime is defined by theUISlidervalue.
Step 8
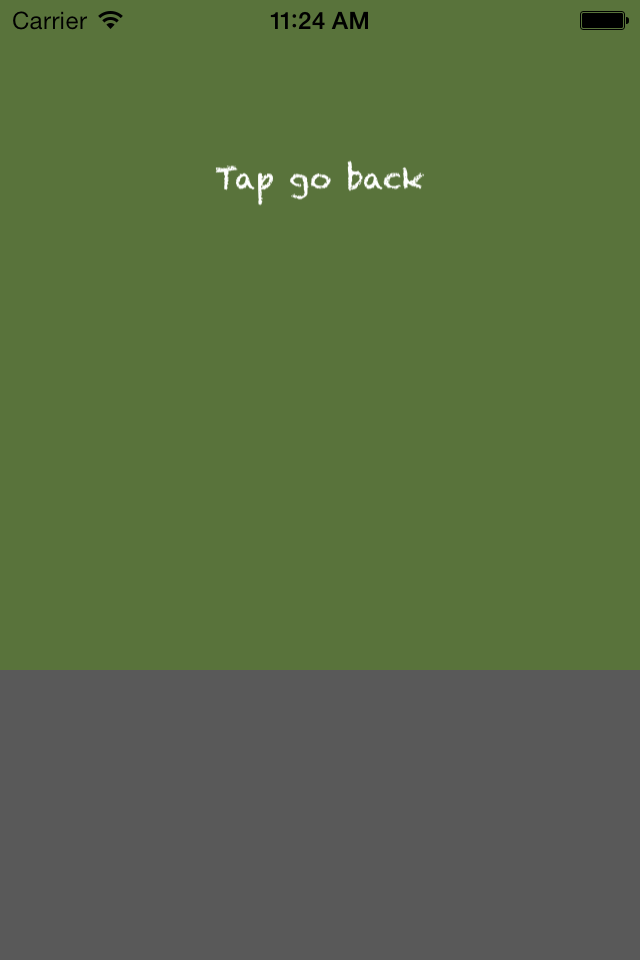
In order to run the code and test the transitions, you will need to populate the TransitionResult class. Move that class and add the -(id)initWithSize:(CGSize)size method. It is similar to the MyScene.m method. You can try to write it yourself. Copy-and-paste from the other class to make it look like the next method:
-(id)initWithSize:(CGSize)size {
    if (self = [super initWithSize:size]) {

        self.backgroundColor = [SKColor colorWithRed:0.35 green:0.45 blue:0.23 alpha:1.0];

        SKLabelNode *myLabel = [SKLabelNode labelNodeWithFontNamed:@"Chalkduster"];

        myLabel.text = @"Tap go back";
        myLabel.fontSize = 15;
        myLabel.position = CGPointMake(CGRectGetMidX(self.frame),CGRectGetMidY(self.frame));

        [self addChild:myLabel];
    }
    return self;
}
You can now run the code and test the transitions. Go ahead and try them!
Step 9
As you may have already noticed, every time you want to test a new transition you need to run the code again. So, let's modify the TransitionResult.m file that enables an infinite navigation. Every time the user taps the screen it will be moved to the initial scene.
You will need the -(void)touchesBegan:(NSSet *)touches withEvent:(UIEvent *)event method and you will need to import the MyScene.h class. So, the final step is to allocate and initiate a class object and swap the scenes. The next snippet will help you do just that:
-(void)touchesBegan:(NSSet *)touches withEvent:(UIEvent *)event {
        MyScene* home = [[MyScene alloc] initWithSize:CGSizeMake(CGRectGetMaxX(self.frame), CGRectGetMaxY(self.frame))];
        [self.scene.view presentScene:home];
}
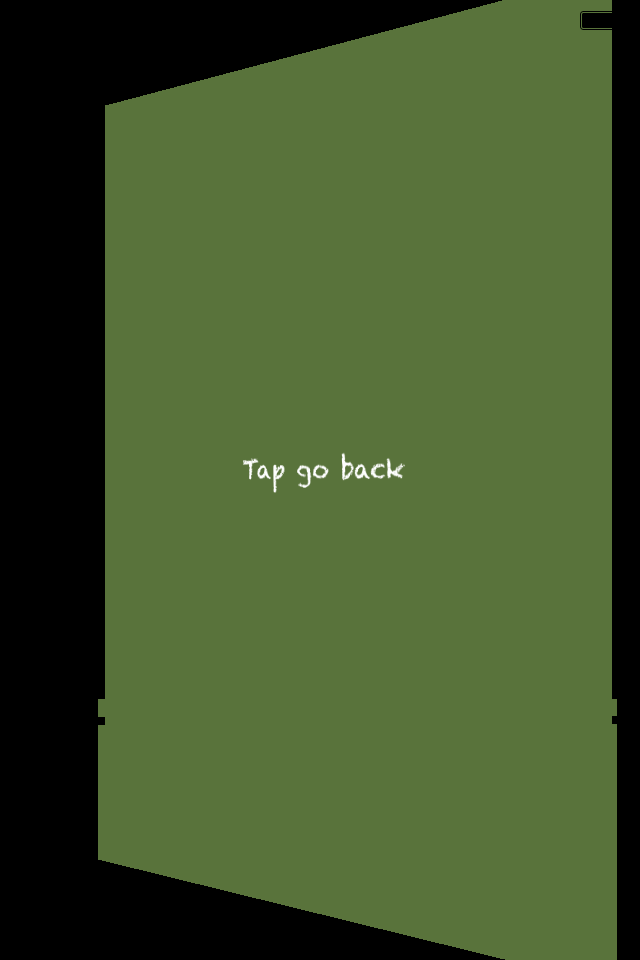
Finally, run your program and test all the SKTransitions. The next image represents one of the transitions:
Conclusion
Over the course of this SKTransition tutorial, we have covered the following:
- A complete overview of the
SKTransitionclass. - How to create and configure all of the
SKTransitionoptions. - Working with
SKTransitionproperties. - How to create and configure a
UITableViewandUISliderand use them in parallel with Sprite Kit.
If you have any questions or comments, please feel free to leave them below!

Comments