After a short break since our first post in this series, we're back to take things a little further. So far we've only just made our HTML template ready for activation as a theme, and made some minor changes to integrate a few WordPress functions which replace certain Hard Coded HTML contents. I hope you've been practicing your WP pedaling!
Notes From Day One
Before we dive into the subject of this lesson, there's 1 or 2 things I'd like to clear up. I've purposely chosen to stick to using the bloginfo(); function as an introductory function, because of it's simplicity. We've covered how to use the 'name','description', 'url', 'template_directory' & 'stylesheet_url' in Lesson 1. As one of our commenters rightly pointed out after the first tutorial, the arguments for 'template_directory' and 'stylesheet_url' have received a bit of an upgrade and may very well disappear in future versions of WordPress, though they still work as intended, and will probably work fine for at least a few versions.
With the increase in focus on child themes and frameworks, these simple bloginfo(); functions which deal with urls and directories have received an upgrade to deal with the more diverse usage needs. For our purposes let's focus on the replacements for the bloginfo(); url and directory functions.
Newer replacement functions
URL to link the stylesheet
<?php bloginfo('stylesheet_url'); ?>
stylesheet_url = http://www.example.com/home/wp/wp-content/themes/training-wheels/style.css
replace stylesheet_url with:
<?php echo get_stylesheet_uri(); ?>
This function is used to retrieve the stylesheet url like bloginfo('stylesheet_directory'); including the /style.css, which is essentially the theme's main style.css file.
Be aware that for this function to actually generate the desired code it must have the "echo" part in front of the function get_stylesheet_uri();
URL to the theme or parent theme's root folder
<?php bloginfo('template_directory'); ?>
template_directory = http://www.example.com/home/wp/wp-content/themes/training-wheels
Replace with:
<?php echo get_template_directory_uri(); ?>
The get_template_directory_uri(); function is used to retrieve the theme directory, or in the case of parent/child theme setup, the parent theme's directory, which is essentially the theme/parent theme's root folder. It performs the same function as the bloginfo('template_directory'); but is preferred especially in order to conform to the WordPress Theme directory's coding standards. This function is used when linking to images, scripts or other files that need to be linked in the HTML.
Generates - http://www.example.com/home/wp/wp-content/themes/training-wheels
URL to the theme or child theme's root folder
<?php bloginfo('stylesheet_directory'); ?>
stylesheet_directory = http://www.example.com/home/wp/wp-content/themes/training-wheels
Replace with:
<?php echo get_stylesheet_directory_uri(); ?>
This function is used to retrieve the style sheet directory, which is essentially the theme's root directory, but also works for the currently activated child theme, unlike template_directory(); and get_template_directory_uri(); which target the parent theme's root folder.
Generates - http://www.example.com/home/wp/wp-content/themes/training-wheels
Lastly, The Site's home URL
<?php bloginfo('url'); ?>
Replace with:
<?php echo home_url(); ?>
Both of these generate the home page URL of your site, but the replacement caters for https as well in case your site runs on https. If you're creating themes for Public release it's always best to cater for many uses.
Consider the first steps of lesson one as those first few pushes on the pedal to get the bicycle moving. Let's pick up the pace a little now.
So, what's on the Menu?
One of the core content types we'll find in just about any WordPress site is pages. Pages are generally used as static stand alone blocks of content like the pages of any other type of website, as opposed to posts which are more like regular news items. To access these page's we'll need a menu of course. First off we'll need to log into our development site, be it your localhost virtual server, or a live install you've created for learning.
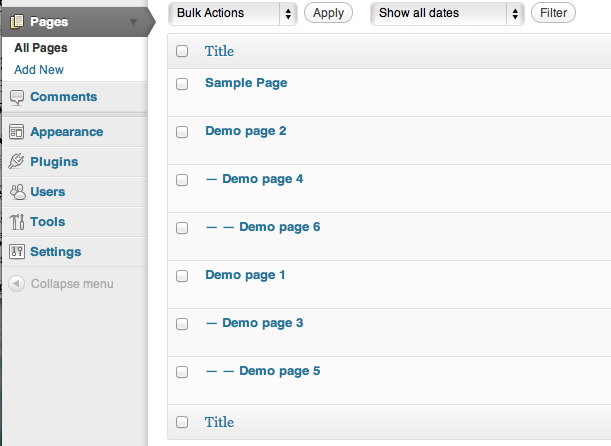
Step 1 - Add Some Pages and Sub Pages
We'll need a few WordPress pages, as well as some child pages added in the dashboard. You can manually add these if you prefer. I have the following pages created in my dashboard. You'll see I also have some child pages.
For some further guidance on creating pages, check out the WordPress 101 video here - http://wp.tutsplus.com/tutorials/wp-101-video-training-part-5-creating-and-editing-pages/
Adding Demo/Test Content
You can easily import some demo content into your theme to test the menu code. WPCandy has some useful demo content which can be imported via the import feature under tools in your dashboard menu - http://wpcandy.com/made/the-sample-post-collection
You could also install the following demo content plugin(I used it for my example pages) which populates your site with a configurable amount of posts, pages, categories etc - http://www.stillbreathing.co.uk/WordPress/demo-data-creator/
Our HTML menu in our theme is pretty standard at the moment, just a simple unordered list:
	<div id="menu">
		<ul>
			<li><a href="index.html">Home</a></li>
			<li><a href="#">About</a></li>
			<li><a href="#">More Info</a></li>
			<li><a href="#">Contact</a></li>
		</ul>
	</div>
What we need now, is to replace the hard coded links with our own list of WordPress pages from our database, however many there are at any point in time. Because we have the ability to add and remove pages from our menu from the dashboard, it makes sense that the menu would be built based on this dynamic list of pages.
There are 2 main methods of going about this which we'll be trying out in this lesson. I say main methods because as you'll learn with WordPress, there are many ways of approaching almost everything you'd like to achieve depending on your exact needs, so these 2 methods are by no means the only ones. We'll be tackling an additional much more dynamic menu building method in a future lesson. For now we'll focus on pure coding methods for the purposes of learning the coding principles WordPress is based on.
Step 2 - Replace hard coded list with function
The wp_list_pages(); function.
<?php wp_list_pages('arguments'); ?>
We replace the <li> items in the menu <ul> with this function
	<div id="menu">
		<ul>
			<?php wp_list_pages(); ?>
		</ul>
	</div>
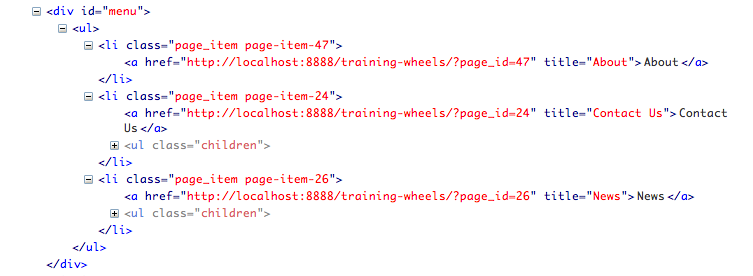
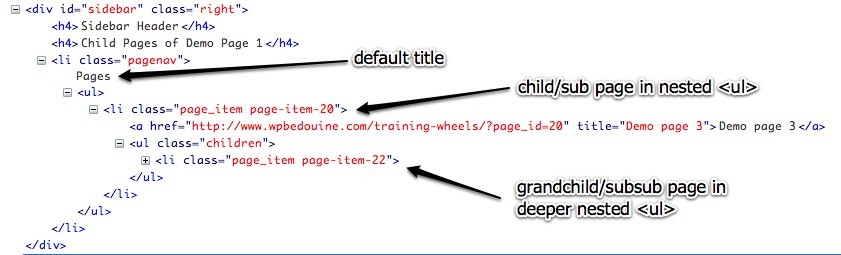
This function as with others allow for optional parameters or "arguments" to be placed into the rounded brackets to further specify what the function does. It works in a similar manner to the bloginfo(); function we started with. By default though, without any arguments, the function below will generate a list of all the pages you've published in your Dashboard, place them as links into <li> items and within a <ul> container and further wrap that unordered list with an additional outer <li> container. This outer container will have a title text which by default says "Pages".
Furthermore it adds both generic class names - "page_item", which can be used for styling general links, as well as custom class names for each page containing the page's unique ID number - "page-item-24", should you want to target a specific page link for special styling or manipulation in some other way.
wp_list_page(); generates the following HTML code:
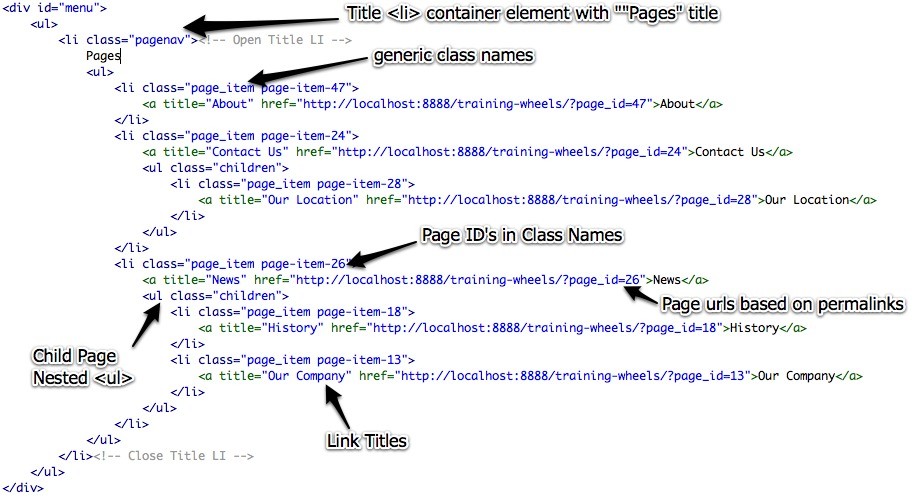
The sub pages are added as nested unordered lists of the parent
	<ul class="children">
		<li class="page_item page-item-28">
			<a title="Our Location" href="http://localhost:8888/training-wheels/?page_id=28">Our Location</a>
		</li>
	</ul>
Using the "children" class we can see how building drop down menus with CSS can be achieved by hiding the .children <ul> and then allow it to appear upon rollover of the parent. As CSS is beyond the scope of this tutorial series we won't delve into this right now, though I might include some simple example CSS later.
You will notice around the entire menu, there's an outer li item being added, with the Word Pages in it as a title to the entire menu. While this might work for a sidebar widget, telling the viewer that these links are pages, it's generally not something we want in the main page menu, especially not in a horizontal menu like the one we have in training wheels just below the header.
This is the default code generated by this function without any arguments in the rounded brackets. We'll now add various arguments to change the way the function generates code.
To re-iterate, the wp_list_pages(); function does the following:
- Get a list of all pages published
- Add them into an unordered list each within an <li> item
- Add links around the page name within the <li> item
- Add generic and custom class names to <li> items
- Add titles to the links based on Page name
- Add child or sub pages as nested lists within parent <li>
- Wrap the entire menu <ul> with an outer <li> with Pages title
As you can see it's not exactly what you'd expect at this point, we have a few modifications to do before the menu is looking pretty in the training wheels template. The reason things are broken currently is, our template is not styled to deal with a menu which has an outer title <li>. This is pushing the main menu items down out of the space they should inhabit and breaks the float layout. I could add some CSS to hide any overflow which would not break the layout, but I'm not going to do that seeing I want to create a simple dropdown menu with sub pages which will appear on rollover. We'll tighten a few nuts and bolts in a minute.
Step 3 - Arguments/Parameters to change/modify the function
How the Arguments Work
There is quite an extensive list of arguments or parameters, which can be used to specify what the wp_list_pages function generates. I will try to refer to these consistently as arguments, though many refer to them as parameters, and both are correct. Some of the more commonly used ones are:
- title_li
- child_of
- exclude
- include
- sort_column
- sort_order
Each of the arguments above have a range of values that can be paired with to control what the wp_list_pages spits out at us. These argument and value pairs take on the following structure:
'argument_name=value'
These are then added in the area between the rounded brackets. This formula gives us an idea of the structure of the arguments which many WordPress functions will follow. The examples we will be using are the more commonly used ones. A full list including descriptions and examples can be found on the WordPress Documentation or Codex at - http://codex.wordpress.org/Function_Reference/wp_list_pages
The title_li argument
The title_li argument controls the code generated for the outer <li> title. It can be used to change the wording or HTML structure of the title, or to completely remove the title if so desired.
The Default Title
<?php wp_list_pages('title_li=Pages'); ?>
By default the title <li> is set to contain the word "Pages". You could however change the word from the default "Pages" to "Menu" if you like as follows.
Your Own Title
<?php wp_list_pages('title_li=Menu'); ?>
Usage:
  <div id="menu">
	  <ul>
	  	<?php wp_list_pages('title_li=Menu'); ?>
	  </ul>
  </div>
Code Generated:
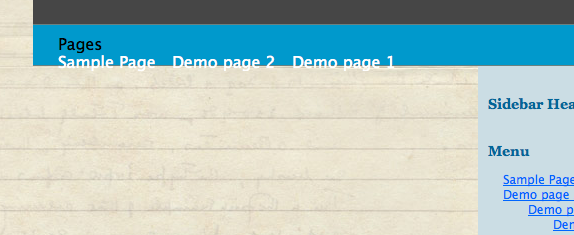
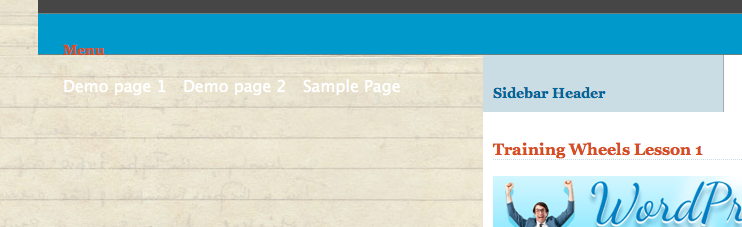
An example of what it looks like in our Theme.

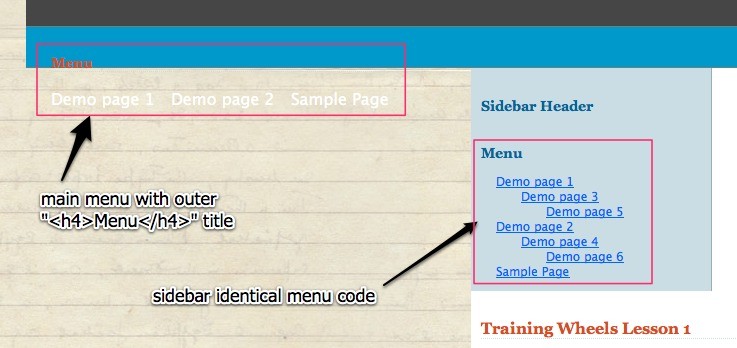
As you can see the menu has the Word "Menu" in it, positioned on the right due to the fact that all the <li> items as well as the <ul> which wraps the menu links are styled the float left, leaving the outer title Menu to be pushed to the right.
You could wrap that in an HTML container as well, for example with an H4 HTML tag, which is commonly used for widget titles in WordPress themes.
<?php wp_list_pages('title_li=<h4>Menu</h4>'); ?>
The additional <h4> outside the menu <ul> now pushes the rest of the menu down out of the overflow view of the main menu container and breaks the layout below. We could easily deal with this by adding {overflow:hidden;} to the CSS of the menu container, but ideally we want to completely remove this outer menu title.
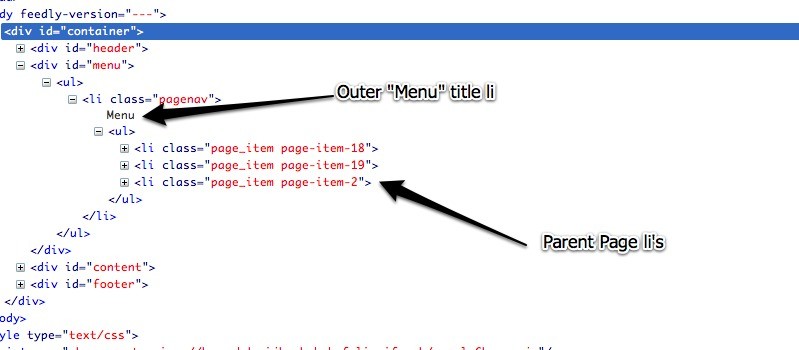
This structure we currently have would suite a sidebar menu widget, so we'll put this function in one of our sidebars instead to see what it looks like there.
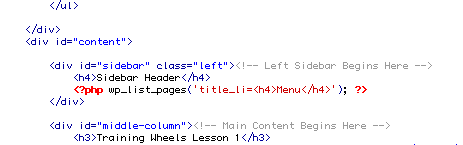
I've inserted the function with the additional Menu title argument into the left sidebar of the template. My CSS has been structured to display the same HTML structure in a different way.
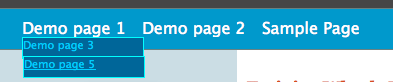
Remove Outer Title <li> completely
Firstly we want to get rid of that Outer title <li> item as this generally is not necessary for horizontal menus and interferes with the menu structure we're trying to achieve. To completely remove the title though, which is what we'd like to do at this stage, we leave the parameter Blank.
<?php wp_list_pages('title_li='); ?>
results in the following code
PS: I've added the following CSS to ensure that sub pages are not immediately visible but appear when parent is rolled over. You can see in my firebug code view that the child menus are greyed out, which means they're hidden.
	/* Hide Sub Menus by default */
    #menu ul li ul.children {
		display:none;
	}

    /* Display Sub Menus on rollover of parent */
	#menu ul li:hover ul.children {
		display:block;
		position:absolute;
		top:18px;
		margin: 0;
		width: auto;
		list-style: none;
	}

    /* Style sub menu items not to float like parent items */
	#menu ul li ul.children li {
		float:none;
		width:120px;
		height: 20px;
		border:1px solid #0FF;
		background-color:#069;
		font-size: 11px;
	}

	/* Sub Menu link color */
	#menu ul li ul.children li a {
		color:#0CF;
	}
This results in the following appearance.
Step 4 - Which Pages to list?
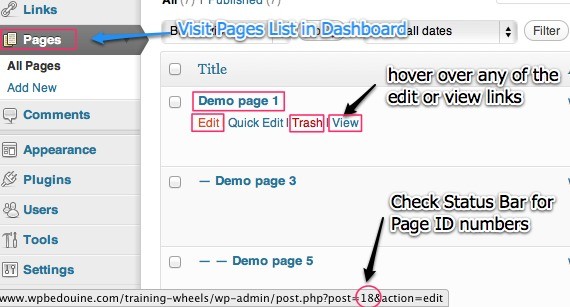
Because the following functions rely on knowing the page ID numbers, we'll need to know where to find these ID numbers. By default, when visiting a page or post for that matter in WordPress, the ID numbers reflect in the page or post URL. If your Permalinks have been changed to one which does not reflect ID numbers, we can go into the dashboard area and find ID numbers there. To do this we'll go to Pages, in the dashboard and hover over some of the view or edit links under the page we're interested in finding the ID number for.
child_of
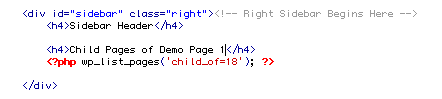
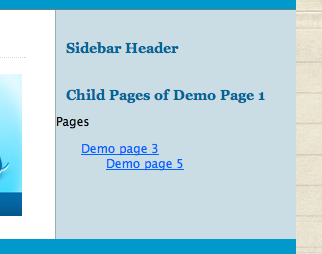
Displays child pages of page with ID number 18, which in the case of my test site is Demo Page 1. This argument could be used for example, on a custom page template for the Page with the ID number 18, to generate a list of it's child pages. This argument will only generate a list of pages if the current page has sub pages.
<?php wp_list_pages('child_of=18'); ?>
I am going to test this out by placing the code above in my right sidebar.
usage:
Code Generated:
Result:
There are more complicated usage examples which are beyond the scope of this lesson right now but can be found at - http://codex.wordpress.org/Function_Reference/wp_list_pages#List_Sub-Pages
For example the code below will place the sub pages if any exist, of the currently active page
	<?php
		$pages = get_pages('child_of='.$post->ID.'&sort_column=post_title');
		$count = 0;
		foreach($pages as $page)
		{ ?>
		<li><a href="<?php echo get_page_link($page->ID) ?>"><?php echo $page->post_title ?></a></li>
	<?php } ?>
exclude
The exclude argument allows us to list all pages in our menu with the exception of those pages who's ID number we exclude. This argument helps when you have a large amount of pages and would only like to exclude a few.
<?php wp_list_pages('exclude=2,7,20'); ?>
The Argument name, has an equal to sign, followed by a list of the page ID numbers separated by commas.
To find Page ID numbers, we have to go into the list of pages in the dashboard, hover over the link to the title of the page and check the browser status bar link which would include the page's ID number in the URL string.
include
The include argument allows us to exclude all pages in our menu with the exception of those pages who's ID number we include. This argument helps when you have a large amount of pages which you would like to exclude and only a few you'd like to include, so using include prevents us from having to type out long lists of ID numbers to exclude. Only those ID numbers listed will be shown in the menu.
<?php wp_list_pages('include=18,19,20'); ?>
Step 5 - The Order of the Page list
sort_column
Sort Column is used to sort the list of pages based on specific criteria. The default setting is sort alphabetically by Page title. Additionally we can change the sort criteria with some values as outlined below.
<?php wp_list_pages('sort_column=menu_order'); ?>
The Sort Column Values
- menu_order - sort by admin-specified order
<?php wp_list_pages('sort_column=menu_order'); ?>
- post_date - sort by time of page creation
<?php wp_list_pages('sort_column=post_date'); ?>
- post_name - sort by name of the page slug
<?php wp_list_pages('sort_column=post_name'); ?>
- id - using page ID numbers
<?php wp_list_pages('sort_column=id'); ?>
sort_order
Furthermore, we can choose to arrange the posts in either ascending or descending order depending on our requirement. Be sure to always make a clear distinction between sort_column, which specifies the criteria with which to sort, and sort_order, which merely specifies the order to sort by
The Sort Order Values
- asc - ascending order, Sort from lowest to highest (Default)
<?php wp_list_pages('sort_column=asc'); ?>
- desc - descending order, Sort from highest to lowest.
<?php wp_list_pages('sort_column=desc'); ?>
depth
This argument controls how many levels of pages to show, if subpages or sub sub pages exist. The default value is 0 (display all pages, including all sub-pages).
<?php wp_list_pages('depth=1'); ?>
- 0 (default) shows all levels and displays them in hierarchical nested list form
- -1 displays all pages but without any hierarchy or nesting
- 1 Only Top Level Parent pages
- 2, 3 … pages at each given level after the top level
Step 6 - Combining arguments/parameters
Lets say we wanted to create a menu, which only includes certain pages, displays only the top 2 levels, those being Parent and child, and are sorted according the admin specified menu order we choose for them. We also want to ensure there is no outer title for our menu. I'll be replacing my main menu with the code we'll be building below.
- Include only certain pages ('include=value')
- Display on top 2 levels ('depth=2')
- Sort according to admin specified order ('sort_column=value')
- Remove outer title li ('title_li=value')
The arguments we've listed above, as well as the additional ones we have not listed can all be combined, within reason of course into the same function to create a highly specified list of pages which behaves the way I want it to. Some arguments however would cancel the other out, so combining include and exclude, which are essentially opposites won't work. Also combining more than 1 sort criteria won't work either. You wouldn't be pedaling forward and backwards at the same time now would you :).
Step 1 - Include
Starts off quite simple with only the list of pages I want to include
<?php wp_list_pages('include=18,19 ?>
Step 2 - Remove title
To add in an additional argument we separate each argument with the Ampers And symbol &
<?php wp_list_pages('include=18,19&title_li='); ?>

Title <li> is now removed
Step 3 - Depth
The same principle now applies each time we add a new argument, end off the last one with an & before adding in the additional one. Depth=2 allows for displaying only Parents and children, nothing deeper.
<?php wp_list_pages('include=18,19&title_li=&depth=2'); ?>
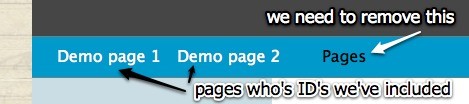
Unfortunately, our include argument prevents any additional pages from showing so child pages won't show irrespective of whether we have depth=2, so we need to choose a few child pages and add them to the include for them to show. Pages with ID 20 & 22 are the child and grandchild pages of page ID 18, so we'll add these to our include argument as well for testing purposes.
<?php wp_list_pages('include=18,19,20,22&title_li=&depth=2'); ?>
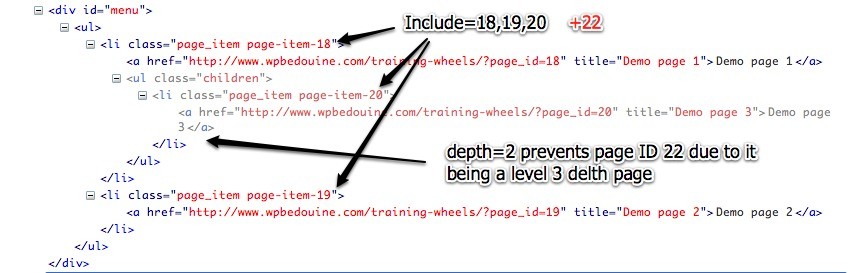
We now have a classic example of 2 arguments slightly conflicting with each other. Because we've added depth=2, no pages which have a deeper level will be shown even if they are included using the include argument. So having included the page with ID number 22, which is a level 3 depth page, being a grandchild or sub-sub page, there is a conflict. I could either increase the depth to 3, or remove the page which I will do for simplicity sake at this point.
Step 5 - Sort Column
lastly, in order to have control of the order in which the pages display in, we add the sort_column argument, with value menu_order so we can force the order via the page admin area. We'll then need to manually give each page it's order number via the individual page's admin area. All pages which will reflect in the menu need an order number, as pages have a default order number of 0, which means if you only give 2 pages an order number and 5 pages show in the menu, the unordered pages will appear first as they are numbered 0.
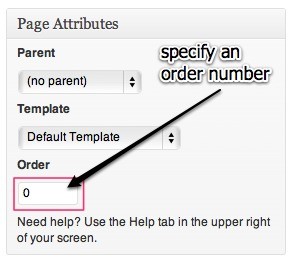
To make this process a little less manual, there are 2 plugins I recommend. Admin Management Xtended allows you to specify a page order number from the page list view without having to click into each page. My Page Order allows you to drag and drop page order. These are especially helpful if you have a large list of pages to order. For me 2 pages are fine to handle manually right now.
Now that we have our pages ordered, we can add the code to make this reflect in our menu. I've switched the order of my 2 parent pages to illustrate the point by giving them an order number of 1 and 2.
<?php wp_list_pages('include=18,19,20&title_li=&depth=2&sort_column=menu_order'); ?>

And there we have it, a menu which includes only specific pages, at a maximum depth of 2 levels, sorted according to the menu order specified in the admin and without the title li container.
To neaten up the structure and follow some more advanced PHP coding conventions, we can combine these arguments into an array which works like this.
- Breaking the contents within the rounded brackets out into separate arguments per link
- Which are all then wrapped in a further layer of rounded brackets preceded by the word array
<?php wp_list_pages(array(arguments go here)); ?>
We can now put each argument onto it's own line in the following manner
	<?php wp_list_pages(
			array(
					'argument_name' => 'value',
					'argument_name' => 'value',
					'argument_name' => 'value',
			)
	); ?>
So Applying this structure to our example we'll end up with
<?php wp_list_pages(
     array(
          'include'          =>     '18,19,20',
          'depth'            =>     '2',
          'sort_column'      =>     'menu_order',
          'title_li'         =>     '',
          )
); ?>
It may require a little bit of extra focus to setup initially for the newbie, but once you've tightened the nuts and bolts, and added some oil, those wheels are much easier to spin than this one liner which could get quite muddled up in a very short space of time.
Either way both of these approaches work so you can choose what suites you and what suites your coding needs at any given time. The array method is the preferred one though as it conforms to the WordPress coding standards as specified here - http://codex.wordpress.org/WordPress_Coding_Standards
The principles we've covered in the previous steps with wp_list_pages could be used to place a list of pages anywhere in the site layout, header, sidebar, footer or even below certain page contents if need be.
Step 7 - wp_page_menu
A simpler function, similar to wp_list_pages, but with a few extra tricks has been developed for specifically creating page menus, as opposed to lists of pages which could be used for other purposes.
<?php wp_page_menu(); ?>
A few things this function does which list pages does not do is:
- Puts your menu into a DIV tag
- Allows you to specify the class added to that div tag
- Allows you to add in a home link without need for an actual page
Why this has to be placed into a new function instead of integrated into the list pages function is beyond me, there are quite a few instances where this occurs and lack of nutty professor skills has kept the rest of us in the dark as to the reasoning. It appears that the WordPress developers wanted to make a clear distinction between lists of pages which could be used anywhere in the theme and actual page menus like the one's generally found in theme headers. No problem, a Bicycle is a Bicycle, we just need to know how to ride it.
Some of the arguments for wp_page_menu
- link_before - Sets the text or html that precedes the link text inside <a> tag.
- link_after - Sets the text or html that follows the link text inside <a> tag.
- menu_class - adds a custom class of your choice to the wrapper div
- show_home - allows for displaying a home link
- exclude_tree - excludes parent as well as all descendants of that parent
A more detailed list of arguments for the wp_page_menu function can be found on the Codex at - http://codex.wordpress.org/Template_Tags/wp_page_menu
Based on our array structure we've established above we could do the following:
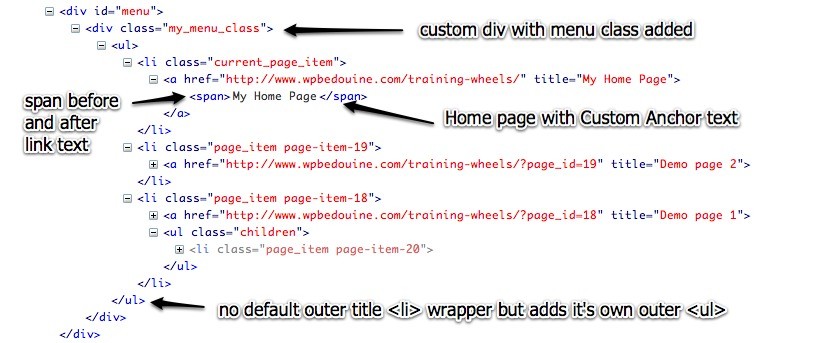
	<?php wp_page_menu(
			array(
                'include'		=>	'2,7,20',
                'show_home'	=>	'My Home Page',
                'link_before'	=>	'<span>',
                'link_after'	=>	'</span>',
                'sort_column'	=>	'menu_order',
                'menu_class'	=>	'my_menu_class'
				)
	); ?>
which would look like the following without the array structure
<?php wp_page_menu('include=2,7,20&show_home=My%20Home%20Page&link_before=<span>&link_after=</span>&sort_column=menu_order&menu_class=my_menu_class'); ?>
You'll notice than in order to specify spaces between the home page name, I've had to include the special characters %20 as blank spaces in this string will cause problems with the functioning of the code.
The Code Results in:
The function can likewise be cleaned up by using the array structure outlined at the end of the section on wp_list_pages
<?php wp_page_menu(
				array(
					'include'		=> '18,19,20',
					'show_home'		=> 'My Home Page',
					'link_before'	=> '<span>',
					'link_after'	=> '</span>',
					'sort_column'	=> 'menu_order',
					'menu_class'	=> 'my_menu_class'
				)
); ?>

Styling WordPress generated menu Code
We won't be focusing too much on HTML skills in these lessons, though to give you a good reference as to what to expect when applying CSS to the WordPress generated menus, take a look at the following CSS class structure provided by WordPress on the Codex - http://codex.wordpress.org/Function_Reference/wp_list_pages#Markup_and_styling_of_page_items
The title li is given the class .pagenav, each page item is give a generic .page_item & a specific .page-item-{id} class. Furthermore current pages are marked .current_page_item to help with highlighting of the currently active page. Parent pages and Ancestor or children pages are also clearly classed to help with complicated menu structures, be they drop downs, progressive reveals etc. The Code below can be taken as a guideline for setting up your menu style structures in CSS.
	.pagenav { … }						/* the outermost list item; contains whole list */
	.page-item-2 { … }					/* item for Page ID 2 */
	.page_item { … }					/* any Page item */
	.current_page_item { … }			/* the current Page */
	.current_page_parent { … }			/* parent of the current Page */
	.current_page_ancestor { … }		/* any ancestor of the current Page */.pagenav  ul ul,
   .pagenav .current_page_item ul ul,
	.pagenav .current_page_ancestor ul ul,
	.pagenav .current_page_ancestor .current_page_item ul ul,
	.pagenav .current_page_ancestor .current_page_ancestor ul ul {display: none;}
	.pagenav .current_page_item ul,
	.pagenav .current_page_ancestor ul,
	.pagenav .current_page_ancestor .current_page_item ul,
	.pagenav .current_page_ancestor .current_page_ancestor ul,
	.pagenav .current_page_ancestor .current_page_ancestor .current_page_item ul,
	.pagenav .current_page_ancestor .current_page_ancestor .current_page_ancestor ul {display: block;}
Coming Soon - Custom Page Menus & Dynamic Sidebars
I've purposely left Custom Drag & Drop menus out of this lesson as I want you to focus on learning the coding side of things first. We'll cover dynamic menus in the next lesson, along with dynamic sidebars as they follow similar principles which would be best explained together. I also don't want to overload you all at once and want to give you a chance to try out the methods outlined in this lesson before going any further.
Ready, set, pedal!

Comments