After having dealt with manually coding various types of menus, we'll wrap up menus in this lesson covering the Custom Menus functionality introduced in Version 3.0. Custom menus allow us to freely build menus from within the WordPress admin dashboard, by adding any combination of pages, category links and other custom links, whether they be internal site links or links to any other location on the web.
Step 1: Create a Functions File
In order to make use of the custom menu feature, we need to register a special PHP function, which enables the menus feature on the theme via the register_nav_menu function. The capability to insert custom menus does not exist as a default within the theme. We need to enable this functionality specifically, and create certain menu areas or "locations" via code where our custom menus will appear.
As we'll see later, registering special functions will become quite important during more advanced theme development. In order to register functions in WordPress, we need to add a functions.php file to our theme's files.
Create a Functions File
Create a blank file named functions.php in your theme's root folder

Before we actually do anything to the functions file we can see that the Appearance > Menus in the Dashboard is pretty standard. No Menu Link to be seen.

Step 2: Register the Menu Function
Now we'll register a custom menu using the following basic form of the register_nav_menu function.
<?php register_nav_menu( $location, $description ); ?>
The location will be the menu's identification name for use within the code, and the description will be a nice name used to display the menu's description in the Dashboard. This would look something like the following.
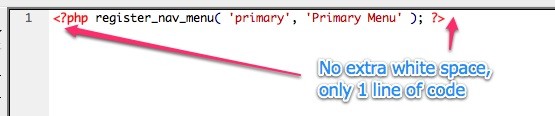
<?php register_nav_menu( 'primary', 'Primary Menu' ); ?>
"primary" would be used within the code which places the menu in the specific area of the template (location), and "Primary Menu" will be used to choose the menu location within the Appearance > Menus editing UI.
Once we've registered our menu, we can proceed to the Dashboard to create the menu via the menu editor.
The register_nav_menu function is placed within the functions.php file.
Take special care not to leave unnecessary whitespace after the functions code, as this can cause theme breakages.
Once this code is placed into your functions.php file, visit your dashboard again and refresh to see the new menu item under Appearance.

We can neaten up the registration code as we did with wp_list_pages and put the parameters into an array
<?php register_nav_menu(
  array(
	'theme_location' => 'bottom_header'
  ));
?>
Using arrays will be helpful when deciding to register more than one Custom Menu with additional parameters (coming up in a bit).
Step 3: Create a Menu via Dashboard
Now that we've registered a custom menu, we can go to Appearance > Menus to create our first Menu.

For a detailed guide on creating menus using the Menu Interface watching the following Video - WP 101 Video Training - Custom Menus
The Menu Creator interface has the following components:
- Create new menus panel top right, which allows for creation of many different named menus
- Custom links creator panel to add links to any URL into the menu
- Pages panel to select existing pages from your site to the menu
- Categories panel to add links to existing post categories to the menu
Should your site have any additional content types, for example custom post types, these will also have a panel to add to the menu.
Step 4: Placing the menu into the Theme
Placing custom menus into your theme templates requires using the wp_nav_menu() function. This function provides a location where menus built inside the dashboard can then be placed by default.
Below is the most basic form of the code needed for inserting a single menu from the menus which have been created.
<?php wp_nav_menu(); ?>
Default usage:

Which results in the following HTML
What's the Result?
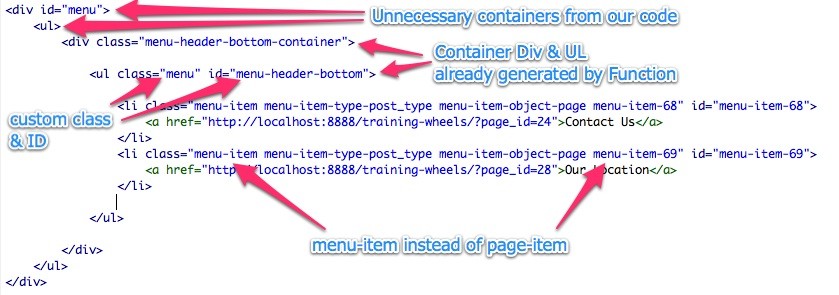
Firstly we notice that our original div & ul which wrapped the wp_nav_menu function are not entirely necessary as the function generates its own div and ul wrappers. What we do need to do is to specify the class and / or IDs which these will have. We will do this in a bit with some additional parameters.
The wp_nav_menu function we used does the following:
- fetches the first menu created in the menu editor
- adds a wrapper div, with custom class name based on the menu's name we created, with -container appended
- adds a ul container inside of the container which has a menu class by default and custom ID based on menu name
- creates a list of menu items with custom menu-item classes instead of page-item class
The visual result below is due to the additional wrappers which conflict with some of the CSS we have in the theme, so we'll need to edit the markup a bit and modify the placement function.

Firstly we add a 'container' parameter to the placement code to tell it to generate an outer div container. The container can also be configured to generate an HTML5 'nav' tag, or with the value 'false' can be told not to generate any containing element. These parameters effectively make the markup in our theme which currently wraps the menu placement code redundant, so we can now remove them. Here's the code.
<?php wp_nav_menu(
	array(
		'container'       => 'div'
	)
); ?>
The next parameter ('container_id'), is for specifying the ID attribute of the container div, so it conforms to our CSS we've already placed into the theme.
<?php wp_nav_menu(
	array(
		'container'       => 'div',
        'container_id'    => 'menu'
	)
); ?>
With the third parameter ('menu_class'), we'll change the default class on the ul wrapper from 'menu' to 'bottom-menu-list' as the .menu selector has already been used in our CSS for the fallback menu styles which we'll discuss a bit later on in the lesson.
<?php wp_nav_menu(
	array(
		'container'       => 'div',
		'container_id'    => 'menu',
		'menu_class'      => 'bottom-menu-list'
	)
); ?>
We can now place this code into the theme without the containing div and ul tags and the generated HTML should look exactly like the previous wp_list_pages and wp_page_menu functions in our previous lesson.

The difference here of course is that we can go in at any time and add, remove or modify any of the menu items on the fly without changing any code. And here's our result.

So Now that we've got the basics covered lets put this baby through its paces a bit.
Picking up the Pace!
What we want to do as an exercise is create two Custom Menus which we will place into different locations. One in the standard position, below the header, and another in the top right side of the header.
Step 5: Registering two New Custom Menus
Using the method we've just gone through, I'm going to register two menu locations. Arrays are your friends.
<?php register_nav_menus(
	array(
		'top_header_menu'			=> 'Top Header: Menu at the very top of the header',
		'bottom_header_menu'		=> 'Bottom Header: Menu Below header Banner' )
	);
?>
It's the same as using the following two lines of code:
<?php register_nav_menu('top_header_menu','Top Header: Menu at the very top of the header'); ?>

<?php register_nav_menu('bottom_header_menu','Bottom Header: Menu Below header Banner'); ?>
Just much neater and without repeating the register_nav_menu function, instead we use register_nav_menus.
Notice the "s" at the end of our function used to register more than one menu
I've registered two menus, 'top_header_menu' and 'bottom_header_menu'. We'll focus on just one of them for now, 'bottom_header_menu', which we'll be putting in place of our existing wp_page_menu code.
The code to register these menus contains:
- the name of the menu location as we will refer to it in code when calling it for placement in the theme
- the description of the menu which we will see reflected in the dashboard admin area where we assign menus we build to locations.
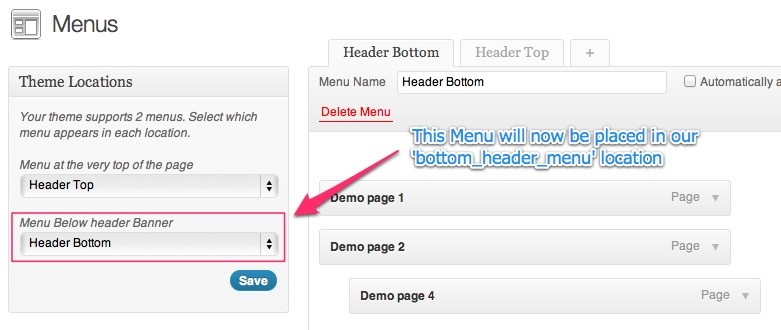
This will help us know where we're placing each menu. Now as we did earlier with our initial single primary menu which we created as a test, let's create, Header Bottom and Header Top via Appearance > Menus and add some pages, preferably different pages to each one. I've got some default ones from my demo content generator.

We've registered them, built them and added them to locations so now we can place them into our theme.
Step 6: Extending the Placement Code
Because we've created two custom menus, we're gonna need a little more than the default placement code to put into our theme so we can associate each location in the theme with a location registered via the menu registration function. We will need to add an additional parameter to the wp_nav_menu() function.
The Theme Location Parameter.
'theme_location' => '$menu_name'
The parameter 'theme_location', which should have a value of the name of the theme location we want to connect this area of our theme with. The theme's location name should not have spaces in it, as it will be used within the functions codes which require no spaces. The name should be exactly the same as the name specified when registering the menu location.
<?php wp_nav_menu(
	array(
		'theme_location'  => 'bottom_header_menu'
	));
?>
Alternatively we could use the 'menu' parameter which explicitly fetches an already built menu from the menu builder.
The value for this parameter should be either the built menu's Name, Slug or ID. Example below.
<?php wp_nav_menu(
	array(
		'menu'				=> 'Header Bottom'
	));
?>
These two options should not be used together as they will inevitably cancel each other out at some point considering the one pulls a menu based on it being assigned to a location, and the other pulls a menu based on the menu's name. Some thought needs to go into choosing one or the other.
With 'theme_location' parameter, it would be possible to reassign menus to different locations, whereas with the 'menu' parameter we are restricted to only that specific menu being pulled into the coded area in the theme.
Let's use the 'theme_location' parameter for now, seeing we will be registering two menus, which we might want to switch between the two locations. I'll add in the three parameters we dealt with earlier as well to keep it all consistent and ready to display correctly.
<?php wp_nav_menu(
	array(
		'theme_location'	=> 'bottom_header_menu'
		'container'       	=> 'div',
		'container_id'    	=> 'menu',
		'menu_class'      	=> 'bottom-menu-list'
	));
?>
Which then takes the following menu we've built
Which results in the following which looks identical to what our initial code generated.

Step 7: Placing the Second Menu
Now for that second menu which we registered and named 'top_header_menu'.
We're going to place a menu inside our header area, floating to the top right. We'll use the same type of code for placing the first menu but changing the theme location. This will facilitate us to manage two separate lists of links. For example the top header menu could contain some generic links like contact, site map and the like.
We'll use almost exactly the same code as we did with the first menu, changing the location name to reflect the name we used in registering the top menu. We'll also give it unique container ID and menu ul class. You'll notice an additional parameter at the end of this list. It's the parameter to configure what type of fallback menu we'd like to use.
A fallback menu is one which appears when no menu has been assigned to the location yet. The default fallback method is wp_list_pages(), which will create a menu from all of the pages which exist in the site currently. This is not always ideal, though it may help in cases where layout or styling depend on a menu being present in certain themes. In the case of our Top Right menu, we don't want anything to appear when no menu has been assigned, so that adding this menu is only optional, but not having it won't cause breakages. To do this we specify the value to be false.
<?php wp_nav_menu(
	array(
		'theme_location'		=> 'top_header_menu',
		'container'				=> 'div',
		'container_id'			=> 'top-menu',
		'menu_class'      		=> 'top-menu-list',
		'fallback_cb'			=> 'false'
	));
?>
This code will be placed within the Header div, below the site name and description.

CSS already exists in the theme to position it top right in the header. I've included the CSS for the menus at the end of this Lesson.

That's the final result
Step 8: Fixing the Code for older WP
What we've done so far with the code for registering the menu functionality is very basic and on its own could be problematic. In some cases where your theme might be used on older versions of WordPress which do not support custom menus, you'd end up with errors. We need to add a layer to make the registration code backward compatible in the event that our theme is installed on older versions of WordPress.
Starting with the menu registration code we used for the two menus
<?php register_nav_menus(
	array(
		'top_header' => 'Menu at the very top of the page',
		'bottom_header' => 'Menu Below header Banner' )
	);
?>
We'll wrap this with a conditional argument, which will first check if the current version of WordPress supports registration of menus. It's checking if a function called register_nav_menus exists. If it does, the register_nav_menus function will be executed, if not the conditional argument will end with an endif. We'll be going through conditional arguments in much more detail a little later in on in this series.
Take care to use a colon at the end of the first part of the if function, and a semi colon after the endif.
<?php  if(function_exists('register_nav_menus')) : ?>

    <?php register_nav_menus(
		array(
			'top_header' => 'Menu at the very top of the page',
			'bottom_header' => 'Menu Below header Banner' )
		);
	?>

<?php endif; ?>
For more detail on conditional or if statements in the mean time, view this tutorial - PHP for WordPress - Mastering Conditional Statements & Tags or the following page on the WordPress codex - codex.wordpress.org/Conditional_Tags
Much more solutions exist for Custom Menu registration, but this snippet will cover you in the vast majority of cases without turning your brain into mush. I hope.
Making Sure the Placement Code Degrades as well
We need to make sure that we still have a functional theme in cases where the custom menu functionality does not exist. We need to add an additional conditional statement to our placement code (wp_nav_menu). There are a few levels to this so pay close attention. If we don't add this extra level we'll end up with users of Pre 3.0 versions of WordPress getting nasty errors when loading this theme. You'll end up with users on old WordPress threatening to tar and feather you in the street, so best you get this part right.
1. Our placement code as it was previously
<?php wp_nav_menu(
	array(
		'theme_location'		=> 'top_header_menu',
		'container'				=> 'div',
		'container_id'			=> 'top-menu',
		'menu_class'      		=> 'top-menu-list',
		'fallback_cb'			=> 'false'
	));
?>
To which we will add a similar conditional argument
<?php  if(function_exists('wp_nav_menu')) : ?>

	<?php wp_nav_menu(
		array(
			'theme_location'		=> 'top_header_menu',
			'container'				=> 'div',
			'container_id'			=> 'top-menu',
			'menu_class'      		=> 'top-menu-list',
			'fallback_cb'			=> 'false'
		));
	?>

<?php endif; ?>
On its own this would mean that a site running older versions of WordPress would just display nothing. We therefore have to add an extra argument to this conditional statement so that when the answer to the if(function_exists('wp_nav_menu') comes back with a NO (meaning no the function does not exist), we can add in a fallback menu which works in WordPress pre 3.0. Here's an outline.
<?php  if(function_exists('wp_nav_menu')) : ?>

	// we'll place the custom menu code here if the function does exist

<?php else: ?>

	// we'll place the fallback menu code here if not

<?php endif; ?>
FYI, Text which follows // withiin PHP code will not get executed or echoed and acts like comments within the code!
And with all the code string together
<?php  if(function_exists('wp_nav_menu')) : ?>

	<?php wp_nav_menu(
		array(
			'theme_location'		=> 'top_header_menu',
			'container'				=> 'div',
			'container_id'			=> 'top-menu',
			'menu_class'      		=> 'top-menu-list',
			'fallback_cb'			=> 'false'
		));
	?>

<?php else: ?>

    <div class="menu">
	    <ul>
	    	<?php wp_list_pages('title_li=&depth=0'); ?>
	    </ul>
    </div>

<?php endif; ?>
This allows us to fall back to an older style menu should the version of WordPress we're using not support registration of custom menus.
Styling the Menus
In order to cater for all the variations which we've included for our menus, including the additional top right menu and the fallback menu which the placement code generates, I've included a mix of CSS selectors to cover all.
We've essentially got 3 main containers which will house the standard, top right and fallback menus.
- Standard - #menu
- Top Right - #top-menu
- Fallback - .menu
The styles below can be found between lines 100 and 184 of the style.css file
/* ========================================================== Menu Styles ======= */

#menu, .menu, #top-menu {
	height: 30px;
	background-color:  #0099CC;
	display: block;
	padding: 10px 0 0 25px;
	border-bottom: 1px #698181 solid;
	border-top: 1px #698181 solid;
	font-family: "Lucida Grande","Lucida Sans Unicode",Tahoma,Verdana,sans-serif;
}

#menu ul,
.menu ul,
#top-menu ul
 {
	float: left;
	display: block;
	margin: 0 25px 0 0;
	padding: 0;
}

#menu ul li,
.menu ul li,
#top-menu ul li
 {
	float: left;
	margin: 0 16px 0 0;
	width: auto;
	list-style: none;
	position:relative;
}

#menu ul li a,
.menu ul li a,
#top-menu ul li a
{
	color: #fff;
	text-decoration: none;
}

#menu li a:hover,
.menu li a:hover,
#top-menu ul li a:hover
{
	color: #9FF;
	text-decoration: underline;
}

#menu ul li ul.children,
#menu ul li ul.sub-menu,
.menu ul li ul.children,
#top-menu ul li ul.sub-menu
 {
	display:none;
}

#menu ul li ul.children li,
.menu ul li ul.children li,
#menu ul li ul.sub-menu li,
#top-menu ul li ul.sub-menu li
 {
	float:none;
}

#menu ul li:hover ul.children,
.menu ul li:hover ul.children,
#menu ul li:hover ul.sub-menu,
#top-menu ul li:hover ul.sub-menu
 {
	display:block;
	position:absolute;
	top:20px;
	margin: 0 16px 0 0;
	width: auto;
	list-style: none;
	background-color:#999;
}

#top-menu {
position:absolute;
	top: 0;
	right:0;
}
A Quick Wrapup
- Create a functions file to register Custom Menus
- Create Menus via Appearance > Menus
- Insert Menu Placement Code
- Ensure menus point to the desired locations or menu names
- Ensure HTML being generated coincides with your menu CSS
- Ensure Registration Code does not break older WP
- Ensure your placement code does not break older WP

Comments