WebGL is an in-browser 3D renderer based on OpenGL, which lets you display your 3D content directly into an HTML5 page. In this tutorial I will cover all the essentials you need to get started using this framework.
Introduction
There are a couple things you should know before we get started. WebGL is a JavaScript API that renders 3D content to an HTML5 canvas. It does this by using two scripts that are known in the "3D world" as Shaders. The two shaders are:
- The vertex shader
- The fragment shader
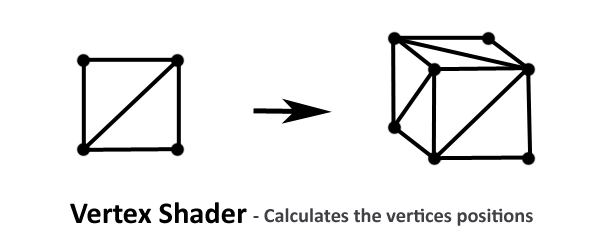
Now don't get too nervous when you hear these names; it's just a fancy way of saying, "position calculator" and "color chooser" respectively. The fragment shader is the easier one to understand; it simply tells WebGL what color a given point on your model should be. The vertex shader is a little more technical, but basically it converts the points in your 3D models into 2D coordinates. Because all computer monitors are flat 2D surfaces, and when you see 3D objects on your screen, they are merely an illusion of perspective.
If you want to know exactly how this calculation works, you'd need to ask a mathematician, because it uses advanced 4 x 4 matrix multiplications, which are a bit beyond the 'Essentials' tutorial. Luckily, you don't have to know how it works because WebGL will take care of most of it. So let's get started.
Step 1: Setting Up WebGL
WebGL has a lot of small settings that you have to setup nearly every time you draw something to the screen. In order to save time and make your code neat, I am going to make a JavaScript object that will contain all the 'behind the scene' things in a separate file. To get started, create a new file called 'WebGL.js' and place the following code inside it:
function WebGL(CID, FSID, VSID){
	var canvas = document.getElementById(CID);
	if(!canvas.getContext("webgl") && !canvas.getContext("experimental-webgl"))
		alert("Your Browser Doesn't Support WebGL");
	else
	{
		this.GL = (canvas.getContext("webgl")) ? canvas.getContext("webgl") : canvas.getContext("experimental-webgl");

		this.GL.clearColor(1.0, 1.0, 1.0, 1.0); // this is the color
		this.GL.enable(this.GL.DEPTH_TEST); //Enable Depth Testing
		this.GL.depthFunc(this.GL.LEQUAL); //Set Perspective View
		this.AspectRatio = canvas.width / canvas.height;

		//Load Shaders Here
	}
}
This constructor function takes in the IDs of the canvas and the two shader objects. First, we get the canvas element and make sure it supports WebGL. If it does, then we assign the WebGL context to a local variable called "GL". The clear color is simply the background color, and it is worth noting that in WebGL most of the parameters go from 0.0 to 1.0 so you would have to divide your rgb values by 255. So in our example 1.0, 1.0, 1.0, 1.0 means a white background with 100% visibility (no transparency). The next two lines tell WebGL to calculate depth and perspective so that an object closer to you will block objects behind it. Finally, we set the aspect ratio which is calculated by dividing the canvas's width by it's height.
Before we continue and load the two shaders, let's write them. I am going to write these in the HTML file where we are going to put the actual canvas element. Create an HTML file, and place the following two script elements just before the closing body tag:
<script id="VertexShader" type="x-shader/x-vertex">

	attribute highp vec3 VertexPosition;
	attribute highp vec2 TextureCoord;


	uniform highp mat4 TransformationMatrix;
	uniform highp mat4 PerspectiveMatrix;

	varying highp vec2 vTextureCoord;

	void main(void) {
		gl_Position = PerspectiveMatrix * TransformationMatrix * vec4(VertexPosition, 1.0);
		vTextureCoord = TextureCoord;
	}
</script>

<script id="FragmentShader" type="x-shader/x-fragment">
	varying highp vec2 vTextureCoord;

	uniform sampler2D uSampler;

	void main(void) {
		highp vec4 texelColor = texture2D(uSampler, vec2(vTextureCoord.s, vTextureCoord.t));
		gl_FragColor = texelColor;
	}
</script>
The vertex shader is created first, and we define two attributes:
- the vertex position, which is the location in x,y and z coordinates of the current vertex (Point in your Model)
- the texture coordinate; the location in the texture image that should be assigned to this point
Next, we create variables for the transformation and perspective matrices. These are used to convert the 3D model into a 2D image. The next line creates a shared variable to the fragment shader, and in the main function we calculate the gl_Position (the final 2D position). We then assign the 'current texture coordinate' to the shared variable.
In the fragment shader we just take the coordinates we defined in the vertex shader and we 'sample' the texture at that coordinate. Basically we are just getting the color in the texture that corresponds to the current point on our geometry.

Now that we have written the shaders, we can go back to loading them in our JS file. So replace the "//Load Shaders Here" with the following code:
var FShader = document.getElementById(FSID);
var VShader = document.getElementById(VSID);

if(!FShader || !VShader)
	alert("Error, Could Not Find Shaders");
else
{
	//Load and Compile Fragment Shader
	var Code = LoadShader(FShader);
	FShader = this.GL.createShader(this.GL.FRAGMENT_SHADER);
	this.GL.shaderSource(FShader, Code);
	this.GL.compileShader(FShader);

	//Load and Compile Vertex Shader
	Code = LoadShader(VShader);
	VShader = this.GL.createShader(this.GL.VERTEX_SHADER);
	this.GL.shaderSource(VShader, Code);
	this.GL.compileShader(VShader);

	//Create The Shader Program
	this.ShaderProgram = this.GL.createProgram();
	this.GL.attachShader(this.ShaderProgram, FShader);
	this.GL.attachShader(this.ShaderProgram, VShader);
	this.GL.linkProgram(this.ShaderProgram);
	this.GL.useProgram(this.ShaderProgram);

	//Link Vertex Position Attribute from Shader
	this.VertexPosition = this.GL.getAttribLocation(this.ShaderProgram, "VertexPosition");
	this.GL.enableVertexAttribArray(this.VertexPosition);

	//Link Texture Coordinate Attribute from Shader
	this.VertexTexture = this.GL.getAttribLocation(this.ShaderProgram, "TextureCoord");
	this.GL.enableVertexAttribArray(this.VertexTexture);
}
Your textures have to be in even byte sizes or you will get an error...like 2x2, 4x4, 16x16, 32x32...
We first make sure that the shaders exist, and then we move on to loading them one at a time. The process basically gets the shader's source code, compiles it, and attaches it to the central shader program. There is a function, called LoadShader, that gets the shader code from the HTML file; we will get to that in a second. We use the 'shader program' to link the two shaders together, and it give us access to their variables. We store the two attributes we defined in the shaders; so we can input our geometry into them later.
Now let's look at the LoadShader function, You should put this outside of the WebGL function:
function LoadShader(Script){
	var Code = "";
	var CurrentChild = Script.firstChild;
	while(CurrentChild)
	{
		if(CurrentChild.nodeType == CurrentChild.TEXT_NODE)
			Code += CurrentChild.textContent;
		CurrentChild = CurrentChild.nextSibling;
	}
	return Code;
}
It basically just cycles through the shader and collects the source code.
Step 2: The "Simple" Cube
In order to draw objects in WebGL you are going to need the following three arrays:
- vertices; the points that make up your objects
- triangles; tells WebGL how to connect the vertices into surfaces
- texture coordinates; defines how the vertices are mapped on the texture image
This is referred to as UV mapping. For our example let's create a basic cube. I will split the cube into 4 vertices per side which connect into two triangles. let's make a variable that will hold a cube's arrays.
var Cube = {
	Vertices : [ // X, Y, Z Coordinates

		//Front

		 1.0,  1.0,  -1.0,
		 1.0, -1.0,  -1.0,
		-1.0,  1.0,  -1.0,
		-1.0, -1.0,  -1.0,

		//Back

		 1.0,  1.0,  1.0,
		 1.0, -1.0,  1.0,
		-1.0,  1.0,  1.0,
		-1.0, -1.0,  1.0,

		//Right

		 1.0,  1.0,  1.0,
		 1.0, -1.0,  1.0,
		 1.0,  1.0, -1.0,
		 1.0, -1.0, -1.0,

		 //Left

		-1.0,  1.0,  1.0,
		-1.0, -1.0,  1.0,
		-1.0,  1.0, -1.0,
		-1.0, -1.0, -1.0,

		//Top

		 1.0,  1.0,  1.0,
		-1.0, -1.0,  1.0,
		 1.0, -1.0, -1.0,
		-1.0, -1.0, -1.0,

		//Bottom

		 1.0, -1.0,  1.0,
		-1.0, -1.0,  1.0,
		 1.0, -1.0, -1.0,
		-1.0, -1.0, -1.0

	],
	Triangles : [ // Also in groups of threes to define the three points of each triangle
		//The numbers here are the index numbers in the vertex array

		//Front

		0, 1, 2,
		1, 2, 3,

		//Back

		4, 5, 6,
		5, 6, 7,

		//Right

		8, 9, 10,
		9, 10, 11,

		//Left

		12, 13, 14,
		13, 14, 15,

		//Top

		16, 17, 18,
		17, 18, 19,

		//Bottom

		20, 21, 22,
		21, 22, 23

	],
	Texture : [ //This array is in groups of two, the x and y coordinates (a.k.a U,V) in the texture
		//The numbers go from 0.0 to 1.0, One pair for each vertex

		 //Front

		 1.0, 1.0,
		 1.0, 0.0,
		 0.0, 1.0,
		 0.0, 0.0,


		 //Back

		 0.0, 1.0,
		 0.0, 0.0,
		 1.0, 1.0,
		 1.0, 0.0,

		 //Right

		 1.0, 1.0,
		 1.0, 0.0,
		 0.0, 1.0,
		 0.0, 0.0,

		 //Left

		 0.0, 1.0,
		 0.0, 0.0,
		 1.0, 1.0,
		 1.0, 0.0,

		 //Top

		 1.0, 0.0,
		 1.0, 1.0,
		 0.0, 0.0,
		 0.0, 1.0,

		 //Bottom

		 0.0, 0.0,
		 0.0, 1.0,
		 1.0, 0.0,
		 1.0, 1.0
	]
};
It may seem like a lot of data for a simple cube, however, in in part two of this tutorial, I will make a script that will import your 3D models so you don't have to worry about calculating these.
You may also be wondering why I made 24 points (4 for each side), when there is really only eight total unique points on a cube? I did this because you can only assign one texture coordinate per vertex; so if we would only put in the 8 points, then the whole cube would have to look the same because it would wrap the texture around all the sides that the vertex touches. But this way, each side has it's own points so we can put a different part of the texture on each side.
We now have this cube variable and are ready to start drawing it. Let's go back to the WebGL method and add a Draw function.
Step 3: The Draw Function
The procedure for drawing objects in WebGL has a lot of steps; so, it's a good idea to make a function to simplify the process. The basic idea is to load the three arrays into WebGL buffers. We then connect these buffers to the attributes we defined in the shaders along with the transformation and perspective matrices. Next, we have to load the texture into memory, and, finally, we can call the draw command. So let's get started.
The following code goes inside the WebGL function:
this.Draw = function(Object, Texture)
{
    var VertexBuffer = this.GL.createBuffer(); //Create a New Buffer

    //Bind it as The Current Buffer
    this.GL.bindBuffer(this.GL.ARRAY_BUFFER, VertexBuffer);

    // Fill it With the Data
    this.GL.bufferData(this.GL.ARRAY_BUFFER, new Float32Array(Object.Vertices), this.GL.STATIC_DRAW);

    //Connect Buffer To Shader's attribute
    this.GL.vertexAttribPointer(this.VertexPosition, 3, this.GL.FLOAT, false, 0, 0);

    //Repeat For The next Two
    var TextureBuffer = this.GL.createBuffer();
    this.GL.bindBuffer(this.GL.ARRAY_BUFFER, TextureBuffer);
    this.GL.bufferData(this.GL.ARRAY_BUFFER, new Float32Array(Object.Texture), this.GL.STATIC_DRAW);
    this.GL.vertexAttribPointer(this.VertexTexture, 2, this.GL.FLOAT, false, 0, 0);
    var TriangleBuffer = this.GL.createBuffer();
    this.GL.bindBuffer(this.GL.ELEMENT_ARRAY_BUFFER, TriangleBuffer);
    //Generate The Perspective Matrix
    var PerspectiveMatrix = MakePerspective(45, this.AspectRatio, 1, 10000.0);

    var TransformMatrix = MakeTransform(Object);

    //Set slot 0 as the active Texture
    this.GL.activeTexture(this.GL.TEXTURE0);

    //Load in the Texture To Memory
    this.GL.bindTexture(this.GL.TEXTURE_2D, Texture);

    //Update The Texture Sampler in the fragment shader to use slot 0
    this.GL.uniform1i(this.GL.getUniformLocation(this.ShaderProgram, "uSampler"), 0);

    //Set The Perspective and Transformation Matrices
    var pmatrix = this.GL.getUniformLocation(this.ShaderProgram, "PerspectiveMatrix");
    this.GL.uniformMatrix4fv(pmatrix, false, new Float32Array(PerspectiveMatrix));

    var tmatrix = this.GL.getUniformLocation(this.ShaderProgram, "TransformationMatrix");
    this.GL.uniformMatrix4fv(tmatrix, false, new Float32Array(TransformMatrix));

    //Draw The Triangles
    this.GL.drawElements(this.GL.TRIANGLES, Object.Trinagles.length, this.GL.UNSIGNED_SHORT, 0);
};
The vertex shader positions, rotates, and scales your object based on the transformation and perspective matrices. We will go more in depth into transformations in the second part of this series.
I have added two functions: MakePerspective() and MakeTransform(). These just generate the necessary 4x4 Matrices for WebGL. The MakePerspective() function accepts the vertical field of view, the aspect ratio, and the nearest and farthest points as arguments. Anything that is closer than 1 unit and farther than 10000 units will not be displayed, but you can edit these values to get the effect you are looking for. Now let's take a look at these two functions:
function MakePerspective(FOV, AspectRatio, Closest, Farest){
	var YLimit = Closest * Math.tan(FOV * Math.PI / 360);
	var A = -( Farest + Closest ) / ( Farest - Closest );
	var B = -2 * Farest * Closest / ( Farest - Closest );
	var C = (2 * Closest) / ( (YLimit * AspectRatio) * 2 );
	var D =	(2 * Closest) / ( YLimit * 2 );
	return [
		C, 0, 0, 0,
		0, D, 0, 0,
		0, 0, A, -1,
		0, 0, B, 0
	];
}
function MakeTransform(Object){
	return [
		1, 0, 0, 0,
		0, 1, 0, 0,
		0, 0, 1, 0,
		0, 0, -6, 1
	];
}
Both these matrices effect the final look of your objects, but the perspective matrix edits your '3D world' like the field of view and the visible objects while the transformation matrix edits the individual objects like their rotation scale and position. With this done we are almost ready to draw, all that's left is a function to convert an image into a WebGL texture.
Step 4: Loading Textures
Loading a texture is a two step process. First we have to load an image like you would in a standard JavaScript application, and then we have to convert it to a WebGL texture. So let's start with the second part since we are already in the JS file. Add the following at the bottom of the WebGL function right after the Draw command:
this.LoadTexture = function(Img){
	//Create a new Texture and Assign it as the active one
	var TempTex = this.GL.createTexture();
	this.GL.bindTexture(this.GL.TEXTURE_2D, TempTex);

	//Flip Positive Y (Optional)
	this.GL.pixelStorei(this.GL.UNPACK_FLIP_Y_WEBGL, true);

	//Load in The Image
	this.GL.texImage2D(this.GL.TEXTURE_2D, 0, this.GL.RGBA, this.GL.RGBA, this.GL.UNSIGNED_BYTE, Img);

	//Setup Scaling properties
	this.GL.texParameteri(this.GL.TEXTURE_2D, this.GL.TEXTURE_MAG_FILTER, this.GL.LINEAR);
	this.GL.texParameteri(this.GL.TEXTURE_2D, this.GL.TEXTURE_MIN_FILTER, this.GL.LINEAR_MIPMAP_NEAREST);
	this.GL.generateMipmap(this.GL.TEXTURE_2D);

	//Unbind the texture and return it.
	this.GL.bindTexture(this.GL.TEXTURE_2D, null);
	return TempTex;
};
It's worth noting that your textures have to be in even byte sizes, or you will receive an error; so they have to be dimensions, like 2x2, 4x4, 16x16, 32x32, and so on. I added the line to flip the Y coordinates simply because my 3D application's Y coordinates were backward, but it will depend on what you are using. This is due to some programs making 0 in the Y axis the top left corner and some applications make it the bottom left corner. The scaling properties that I set just tell WebGL how the image should up-scale and down-scale. You can play around with different options to get different effects, but I thought these worked best.
Now that we are done with the JS file, let's return to the HTML file and implement all of this.
Step 5: Wrapping It Up
As I mentioned earlier, WebGL renders to a canvas element. That's all we need in the body section. After adding the canvas element, your html page should look like the following:
<html>
	<head>
		<!-- Include Our WebGL JS file -->
		<script src="WebGL.js" type="text/javascript"></script>
		<script>

		</script>
	</head>
	<body onload="Ready()">
	  <canvas id="GLCanvas" width="720" height="480">
	    	Your Browser Doesn't Support HTML5's Canvas.
	  </canvas>

	<!-- Your Vertex Shader -->

	<!-- Your Fragment Shader -->

	</body>
</html>
It's a pretty simple page. In the head area I have linked to our JS file. Now let's go implement our Ready function, which gets called when the page loads:
//This will hold our WebGL variable
var GL;

//Our finished texture
var Texture;

//This will hold the textures image
var TextureImage;

function Ready(){
	GL = new WebGL("GLCanvas", "FragmentShader", "VertexShader");
	TextureImage = new Image();
	TextureImage.onload = function(){
		Texture = GL.LoadTexture(TextureImage);
		GL.Draw(Cube, Texture);
	};
	TextureImage.src = "Texture.png";
}
So we create a new WebGL object and pass in the IDs for the canvas and shaders. Next, we load the texture image. Once loaded, we call the Draw() method with the Cube and the Texture. If you followed along, your screen should have a static cube with a texture on it.
Now even though I said we will cover transformations next time, I can't just leave you with a static square; it's not 3D enough. Let's go back and add a small rotation. In the HTML file, change the onload function to look like so:
TextureImage.onload = function(){
		Texture = GL.LoadTexture(TextureImage);
		setInterval(Update, 33);
};
This will call a function called Update() every 33 milliseconds which will give us a frame rate of about 30 fps. Here is the update function:
function Update(){
	GL.GL.clear(16384 | 256);
	GL.Draw(GL.Cube, Texture);
}
This is a fairly simple function; it clears the screen and then draws the updated Cube. Now, let's go to the JS file to add the rotation code.
Step 6: Adding Some Spin
I'm not going to fully implement transformations, because I'm saving that for next time, but let's add a rotation around the Y-axis. The first thing to do is add a Rotation variable to our Cube object. This will keep track of the current angle, and allow us to keep incrementing the rotation. So the top of your Cube variable should look like this:
var Cube = {
	Rotation : 0,
	//The Other Three Arrays
};
Now let's update the MakeTransform() function to incorporate the rotation:
function MakeTransform(Object){
	var y = Object.Rotation * (Math.PI / 180.0);
	var A = Math.cos(y);
	var B = -1 * Math.sin(y);
	var C = Math.sin(y);
	var D = Math.cos(y);
	Object.Rotation += .3;
	return [
		A, 0, B, 0,
		0, 1, 0, 0,
		C, 0, D, 0,
		0, 0, -6, 1
	];
}
Conclusion
And that's it! In the next tutorial, we will cover loading models and performing transformations. I hope you enjoyed this tutorial; feel free to leave any questions or comments that you might have below.

Comments