Today, we will look at the basics of WordPress MS - or for those users that have been using WordPress for a while - Multisite or WordPress MU. WordPress MS is a feature that many users are unaware of, and one that is often confusing to install and configure. But no more! In this tutorial, we will walk through installing WordPress MS, becoming familiar with the network admin, and integrating useful plugins for your Multisite network.
Introduction
WordPress Multisite is a feature that since WordPress version 3 has been included discreetly right into the install itself. It is a feature that packs a huge punch, allowing 1000s of blogs to exist virtually within one, single WordPress install. It is a great idea for large-scale sites that use multiple sub-domains, blog networks, social networks, or even internal networking for businesses or organizations. While this feature has been around for almost as long as WordPress itself, it is just now getting the attention it deserves - even from WordPress devs.
What We Will Do
In this tutorial we will:
- take an in-depth look at WordPress MS (aka Multisite or WordPress MU)
- install WordPress MS and learn about the different installation options
- create new sites with MS
- look at some useful plugins to combine with WordPress MS
- examine projects that could benefit from MS
By the end of this tutorial series, you should be extremely familiar with what WordPress MS is, how to install it, how to create new sites, and how to use it most effectively for your next project.
What Exactly is Wordpress MS?
In a nutshell, Multisite enables a single WordPress install to act like a network of sites centered around a single domain (http://yoursite.com). It allows for either new sub-domains (http://subdomain.yoursite.com) or sub-directories (http://yoursite.com/subdomain), and it does all this virtually, which means you do not need to create new folders. Instead, by just adding some code to wp-config.php and .htaccess, you have thousands of sites right at your fingertips.
Multisite also allows for easy network management through a single admin dashboard which a user with appropriate permissions can access via any network site's admin bar. Multisite is by no means "new". It has been around for almost as long as WordPress itself, although previously it was developed separately. Since WP 3.0 it has been included together with WordPress, and, as I mentioned above, it seems like it will only get more user-friendly as the WordPress devs seem to be paying some particular attention to it in 2012.
Next, let's look at installing Multisite on a typical WordPress install.
Installing WordPress Multisite
For many people, installing Multisite can be a nightmare. I hope to alleviate that by taking you step-by-step through both a sub-directory and sub-domain install. Let me say first, that it is by far easier to install Multisite on a new install, even though it is still possible to do it on an older install with pre-existing content. However, there could possibly be permalink issues.
With that said, the following steps assume that you have completed a standard install of WordPress. However, the steps can apply to a new or previous install.
Activating the Network Setup Menu Item
In order to even begin the process of installing Multisite, you need to open your wp-config.php file, and right above
/* That's all, stop editing! Happy blogging. */
add the following:
/** Allow Multisite **/

define('WP_ALLOW_MULTISITE', true);
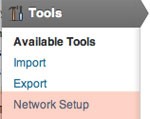
The first line simply is a comment that will help us keep our code tidy. Next, we tell our WordPress install to allow Multisite functionality. Once you have edited and saved the file, you should now see the following in your "Tools" submenu:
If you are using a previous WordPress install with active plugins, you will get a notice in Network Setup to deactivate all of your plugins before you continue.
Configuring the Network from the Dashboard
The first screen in "Network Setup" will look like this:
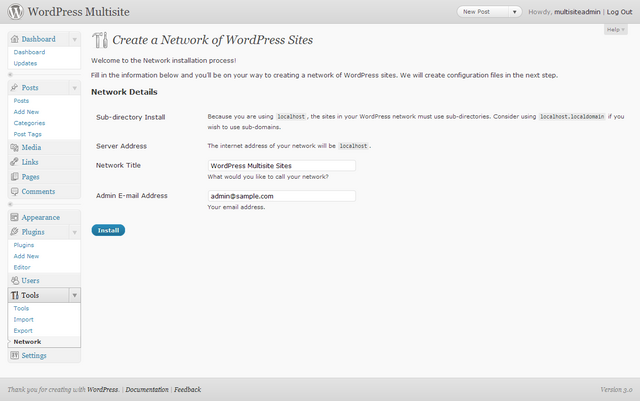
From this screen, you have the following items to configure:
- Site Addresses - From here you will select whether to use sub-domains or sub-directories. If you choose to work with sub-domains, you should verify with your host if it is possible.
- Network Title - The title for your network.
- Admin E-Mail Address - The admin contact for your new network.
The server address should already be filled in to display how your new permalinks will appear.
If this is a pre-existing install, you will receive a note saying that only sub-domains are possible due to possible permalink conflicts. If you are installing on a localhost, you will only be allowed to install via sub-directories.
After you have configured these settings, click install, and you should see the following screen:
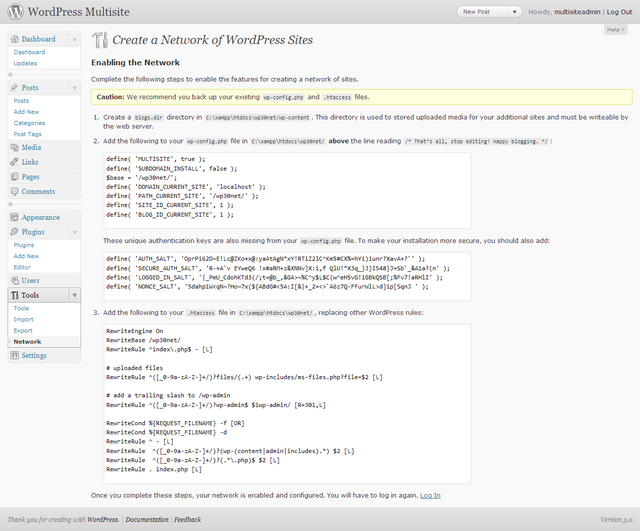
Finishing the Multisite Install
Now, let's look step-by-step at the instructions given on the "Enabling the Network" page. Before you dig into this, I would strongly suggest that you backup your wp-config.php and .htaccess files. This will save a lot of headache in the future.
- Create a new directory named blogs.dir, and place that in your root folder's wp-content folder. This folder must be writable by the web server, as it will be used to store all of our network's uploaded media.
-
Add the following code for a subdomain install:
	define( 'SUBDOMAIN_INSTALL', true );
	$base = '/';
	define( 'DOMAIN_CURRENT_SITE', 'yoursite.com' );
	define( 'PATH_CURRENT_SITE', '/' );
	define( 'SITE_ID_CURRENT_SITE', 1 );
	define( 'BLOG_ID_CURRENT_SITE', 1 );
and this for a sub-directory install
	define( 'MULTISITE', true );
	define( 'SUBDOMAIN_INSTALL', false );
	$base = '/';
	define( 'DOMAIN_CURRENT_SITE', 'yoursite.com' );
	define( 'PATH_CURRENT_SITE', '/' );
	define( 'SITE_ID_CURRENT_SITE', 1 );
	define( 'BLOG_ID_CURRENT_SITE', 1 );
to wp-config.php right above:
/* That's all, stop editing! Happy blogging. */
Make sure to change yoursite.com to the URL of your site - make sure it is without WWW. Broken down, this code identifies this as a sub-domain or sub-directory install, and sets your main site's ID as 1. Every site has an ID, and it is important to note these as you start to work with plugins and build custom queries.
- Add the authentication keys provided to wp-config.php. This will help secure your install.
-
Finally, you want to add the following code to your .htaccess file:
		RewriteEngine On
		RewriteBase /
		RewriteRule ^index\.php$ - [L]

		# uploaded files
		RewriteRule ^files/(.+) wp-includes/ms-files.php?file=$1 [L]

		RewriteCond %{REQUEST_FILENAME} -f [OR]
		RewriteCond %{REQUEST_FILENAME} -d
		RewriteRule ^ - [L]
		RewriteRule . index.php [L]
This code will replace any other WordPress code that you find in .htaccess.
For another reference on setting up a WordPress Multisite network, be sure to visit the "Create a Network of WordPress Sites" page in the Codex.
Things to Note with Multisite Installs
- Multisite is easiest to install on a fresh WordPress install with the sites as sub-directories. That isn't to say don't install it any other way, just to point out the easiest path.
- If you use Multisite, then you can not give WordPress it's own folder. It must be installed in the root folder of your site.
Editor's Note: This is not 100% correct, for further information and clarification, see Andrea_R's comment below. - Your web host may not allow for the creation of sub-domains. Be sure to check this out before attempting a sub-domain install.
- You must activate the network feature from the WordPress dashboard. Simply adding the code to wp-config.php and .htaccess is not enough.
Navigating the Network Admin
In order to access the Multisite admin dashboard in WordPress 3.0 and later, simply hover over My Sites in the admin bar at the top of the browser window, and click on Network Admin.

Once in the dashboard, the menu looks like this:
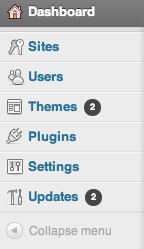
The Network Admin menu has the following submenus:
- Sites - From here you can create new network sites, visit admin dashboards, delete sites, and edit site settings.
- Users - This submenu allows you to manage users by creating, editing, and deleting them. You can also see which users have registered on specific sites.
- Themes - With Multisite, themes are managed from the network. Themes must be installed, activated, and edited from within the network admin dashboard. They can still be switched in the site dashboard.
- Plugins - Just like themes, plugins are installed and activated on the network from this dashboard. Plugins can still be activated and set up in the site dashboard.
- Settings - This submenu lets you set the network name, admin email, registration settings, welcome emails, initial site settings, and upload settings. This is a great submenu to configure if you are using Multisite as a blog engine or social network.
- Updates - From this submenu, you can do network-wide updates on WordPress core, plugins, and themes.
Next, I want to walk you through creating your first network site. If you are familiar with using WordPress, everything else should seem pretty normal, with the exception of having to go through a network dashboard to activate plugins and themes instead of a normal site dashboard.
Creating a New Site
- From the network dashboard, navigate to Sites --> Add New.
- Next, you will need to specify the site address, site title, and an admin email. The screen will look like this:

- Once added, you will see a message at the top verifying the site's creation. You can now visit the site's dashboard, or edit the site's settings from the network dashboard. Two emails will also be sent. Once will go to the network's overall admin notifying them of the new site, and one will go to the site's new admin, notifying them of their login credentials.
And that's how easy creating sites can be in WordPress MS! Now, let's look at some plugins.
Indispensable Plugins for WordPress MS
Here is a list of some plugins that I suggest using on MS installs, and, as always, if you have others to add throw them in!
-
Wordpress MU Sitewide Tags Pages
This plugin allows you to create a specific blog on the network where ALL recent posts on the network can be found. From within the plugin, you can also specify this to be on the main site that you set up in the initial Multisite install. The max number of posts to display can be set as well.
-
Multipost MU / ThreeWP Broadcast
This plugin allows users that create content on different blogs to "broadcast" their posts to other blogs on the network. In addition to post content, categories, tags, and custom fields can also be broadcasted. To ease publishing to multiple blogs, blog groups can be created.
-
More Privacy Options
This plugin allows you to set the privacy level of each blog from within the network dashboard site's settings panel. The options are:
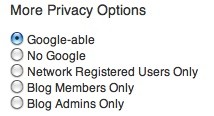
-
Domain Mapping
This plugin allows users to use their own domain names on your Multisite network. This plugin does require a knowledge of adding and editing plugin files and a basic understanding of how servers work and your specific server settings. A great tutorial for setting up this plugin can be found on Otto's blog, "WordPress 3.0 Multisite Domain Mapping Tutorial".
-
Multisite User Management
This plugin allows admins to set the default role of each, individual network blog. Once activated, a list of blogs appears on the network settings page. This plugin is different than the New Blog Defaults plugin, as it targets the individual sites as opposed to every new blog. For instance, if you want one site to allow all default users editor capabilities and another to have subscriber capabilities, then this is the plugin you are looking for.
-
New Blog Defaults
This plugin creates defaults for any new blog created on the network. Once activated, a new menu appears under the network Settings submenu. From here, you can edit any of the normal WordPress settings: general blog settings, reading settings, writing settings, permalink settings, discussion settings, privacy settings, and media settings. You can also choose a site's default theme, and set other options like categories, links, and initial user settings.
-
Extended Super Admins
This plugin allows for the creation of specific user classes with specific roles. The plugin, once activated, can be found under the main network Settings submenu. The capabilities list is extensive.
Projects that Could Benefit from WordPress MS
Now that I've outlined how to install Multisite, how to create new sites, and what plugins to use, I thought it would be great to put some ideas down about possible projects that could benefit from Multisite. As always, if you have other ideas or Multisite installs that you've worked with before, feel free to add them in the comments.
- Blog networks
- Social networks
- Internal networks for organizations or companies
- Educational sites
- Sites that span cities, customer groups, or other various groups
- Any other WP site that may need the option for multiple sites within one install
Conclusion
This year holds some exciting things for Multisite, and as more and more users discover how to implement it, this currently under-used feature could soon become one of the core features WordPress is known and used for. I hope that you have learned how to install Multisite, how to navigate the network admin, and how to find plugins that can improve the functionality of your networks. Overall, I hope that you feel more comfortable using Multisite in your projects, and that, if you've never used it, you'll take the plunge and play around with it.
Thanks for reading!

Comments