In this tutorial, we are going to explore how to use the accelerometer, one of the many hardware sensors of modern smartphones, in an Android application. I'll explain what an accelerometer is and why it may be something you want to take advantage of in your Android applications.
Introduction
Before the dawn of smartphones, one of the few hardware components applications could interact with was the keyboard. But times have changed and interacting with hardware components is becoming more and more common.
Using gestures often feels more natural than interacting with a user interface through mouse and keyboard. This is especially true for touch devices, such as smartphones and tablets. I find that using gestures can bring an Android application to life, making it more interesting and exciting for the user.
Quite a few apps are now making use of the accelerometer. For example, have a look at these app templates on Envato Market, which include a speed racing game and a random number shaker.
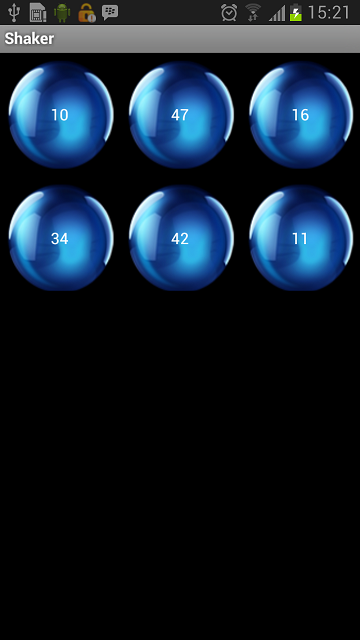
In this tutorial, we'll use a gesture that you find in quite a few mobile applications, the shake gesture. We'll use the shake gesture to randomly generate six Lottery numbers and display them on the screen using a pretty animation.
1. Getting Started
Step 1: Project Setup
Start a new Android project in your favorite IDE (Integrated Development Environment) for Android development. For this tutorial, I'll be using IntelliJ IDEA.
If your IDE supports Android development, it'll have created a Main class for you. The name of this class may vary depending on which IDE you're using. The Main class plays a key role when your application is launched. Your IDE should also have created a main layout file that the Main class uses to create the application's user interface.
Since we're going to make use of a shake gesture, it's a good idea to lock the device's orientation. This will ensure that the application's user interface isn't constantly switching between portrait and landscape. Open the project's manifest file and set the screenOrientation option to portrait.
<activity android:name="com.Lottery.Main"
          android:screenOrientation="portrait"
          android:label="@string/app_name">
          <intent-filter>
              <action android:name="android.intent.action.MAIN" />
              <category android:name="android.intent.category.LAUNCHER" />
          </intent-filter>
</activity>
Step 2: Setting Up the Sensor
With our project set up, it's time to get our hands dirty and write some code. At the moment, the main activity class has an onCreate method in which we set the main layout by invoking setContentView as shown below.
public class Main extends Activity {

    /** Called when the activity is first created. */
    @Override
    public void onCreate(Bundle savedInstanceState) {
        super.onCreate(savedInstanceState);
        setContentView(R.layout.main);
    }
}
Depending on the IDE that you're using, you may need to add a few import statements to Main.java, the file in which your Main class lives. Most IDEs will insert these import statements for you, but I want to make sure we're on the same page before we continue. The first import statement, import android.app.Activity, imports the Activity class while the second import statement, import android.os.Bundle, imports the Bundle class. The third import statement, com.example.R, contains the definitions for the resources of the application. This import statement will differ from the one you see below as it depends on the name of your package.
import android.app.Activity;
import android.os.Bundle;
import com.example.R;
In the next step, we'll leverage the SensorEventListener interface, which is declared in the Android SDK. To use the SensorEventListener interface, the Main activity class needs to implement it as shown in the code snippet below. If you take a look at the updated Main activity class, you'll find that I use the implements keyword to tell the compiler that the Main class implements the SensorEventListener interface.
public class Main extends Activity implements SensorEventListener {

    /** Called when the activity is first created. */
    @Override
    public void onCreate(Bundle savedInstanceState) {
        super.onCreate(savedInstanceState);
        setContentView(R.layout.main);
    }
}
To use the SensorEventListener interface, you need to add another import statement as shown below. Most IDEs will intelligently add the import statement for you so you probably won't have to worry about this.
import android.hardware.SensorEventListener;
From the moment, you update the Main class implementation as shown above, you'll see a few errors pop up. This isn't surprising since we need two implement two required methods of the SensorEventListener interface.
If you're using IntelliJ IDEA, you should be prompted to add these required methods when you click the error. If you're using a different IDE, this behavior may be different. Let's add the two required methods by hand as shown in the code snippet below. Make sure to add these methods in the Main class and outside of the onCreate method.
@Override
public void onSensorChanged(SensorEvent event) {

}

@Override
public void onAccuracyChanged(Sensor sensor, int accuracy) {

}
Let's take a look at the onSensorChanged method. We will be using this method to detect the shake gesture. The onSensorChanged method is invoked every time the built-in sensor detects a change. This method is invoked repeatedly whenever the device is in motion. To use the Sensor and SensorEvent classes, we add two additional import statements as shown below.
import android.hardware.Sensor;
import android.hardware.SensorEvent;
Before we implement onSensorChanged, we need to declare two private variables in the Main class, senSensorManager of type SensorManager and senAccelerometer of type Sensor.
private SensorManager senSensorManager;
private Sensor senAccelerometer;
The SensorManager class is declared in android.hardware.SensorManager. If you're seeing any errors pop up, double-check that the SensorManager class is imported as well.
import android.hardware.SensorManager;
In the onCreate method, we initialize the variables we've just declared and register a listener. Take a look at the updated implementation of the onCreate method.
@Override
protected void onCreate(Bundle savedInstanceState) {
    super.onCreate(savedInstanceState);
    setContentView(R.layout.activity_main);

    senSensorManager = (SensorManager) getSystemService(Context.SENSOR_SERVICE);
    senAccelerometer = senSensorManager.getDefaultSensor(Sensor.TYPE_ACCELEROMETER);
    senSensorManager.registerListener(this, senAccelerometer , SensorManager.SENSOR_DELAY_NORMAL);
}
To initialize the SensorManager instance, we invoke getSystemService to fetch the system's SensorManager instance, which we in turn use to access the system's sensors. The getSystemService method is used to get a reference to a service of the system by passing the name of the service. With the sensor manager at our disposal, we get a reference to the system's accelerometer by invoking getDefaultSensor on the sensor manager and passing the type of sensor we're interested in. We then register the sensor using one of the SensorManager's public methods, registerListener. This method accepts three arguments, the activity's context, a sensor, and the rate at which sensor events are delivered to us.
public class Main extends Activity implements SensorEventListener {
    private SensorManager senSensorManager;
    private Sensor senAccelerometer;

    /** Called when the activity is first created. */
    @Override
    public void onCreate(Bundle savedInstanceState) {
        super.onCreate(savedInstanceState);
        setContentView(R.layout.main);
        senSensorManager = (SensorManager) getSystemService(Context.SENSOR_SERVICE);
        senAccelerometer = senSensorManager.getDefaultSensor(Sensor.TYPE_ACCELEROMETER);
        senSensorManager.registerListener(this, senAccelerometer , SensorManager.SENSOR_DELAY_NORMAL);
    }

    @Override
    public void onSensorChanged(SensorEvent sensorEvent) {

    }

    @Override
    public void onAccuracyChanged(Sensor sensor, int accuracy) {

    }
}
There are two other methods that we need to override, onPause and onResume. These are methods of the Main class. It's good practice to unregister the sensor when the application hibernates and register the sensor again when the application resumes. Take a look at the code snippets below to get an idea of how this works in practice.
protected void onPause() {
    super.onPause();
    senSensorManager.unregisterListener(this);
}
protected void onResume() {
    super.onResume();
    senSensorManager.registerListener(this, senAccelerometer, SensorManager.SENSOR_DELAY_NORMAL);
}
Step 3: Detecting the Shake Gesture
We can now start to focus on the meat of the application. It will require a bit of math to figure out when a shake gesture takes place. Most of the logic will go into the onSensorChanged method. We start by declaring a few variables in our Main class. Take a look at the code snippet below.
private long lastUpdate = 0;
private float last_x, last_y, last_z;
private static final int SHAKE_THRESHOLD = 600;
Let's now zoom in on the implementation of the onSensorChanged method. We grab a reference to the Sensor instance using the SensorEvent instance that is passed to us. As you can see in the code snippet below, we double-check that we get a reference to the correct sensor type, the system's accelerometer.
public void onSensorChange(SensorEvent sensorEvent) {
    Sensor mySensor = sensorEvent.sensor;

    if (mySensor.getType() == Sensor.TYPE_ACCELEROMETER) {

    }
}
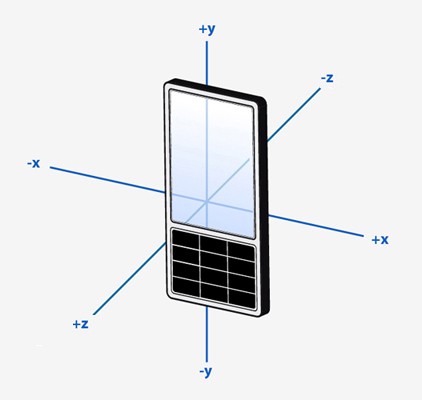
The next step is to extract the device's position in space, the x, y, and z axis. Take a look at the image below to better understand what I'm referring to. The x axis defines lateral movement, while the y axis defines vertical movement. The z axis is little trickier as it defines movement in and out of the plane defined by the x and y axes.
To get the values of each axis, we ask the sensor event for its values as shown below. The event's values attribute is an array of floats.
public void onSensorChange(SensorEvent sensorEvent) {
    Sensor mySensor = sensorEvent.sensor;

    if (mySensor.getType() == Sensor.TYPE_ACCELEROMETER) {
        float x = sensorEvent.values[0];
        float y = sensorEvent.values[1];
        float z = sensorEvent.values[2];
    }
}
The system's sensors are incredibly sensitive. When holding a device in your hand, it is constantly in motion, no matter how steady your hand is. The result is that the onSensorChanged method is invoked several times per second. We don't need all this data so we need to make sure we only sample a subset of the data we get from the device's accelerometer. We store the system's current time (in milliseconds) store it in curTime and check whether more than 100 milliseconds have passed since the last time onSensorChanged was invoked.
public void onSensorChange(SensorEvent sensorEvent) {
    Sensor mySensor = sensorEvent.sensor;

    if (mySensor.getType() == Sensor.TYPE_ACCELEROMETER) {
        float x = sensorEvent.values[0];
        float y = sensorEvent.values[1];
        float z = sensorEvent.values[2];

        long curTime = System.currentTimeMillis();

        if ((curTime - lastUpdate) > 100) {
            long diffTime = (curTime - lastUpdate);
            lastUpdate = curTime;
        }
    }
}
The final piece of the puzzle is detecting whether the device has been shaken or not. We use the Math class to calculate the device's speed as shown below. The statically declared SHAKE_THRESHOLD variable is used to see whether a shake gesture has been detected or not. Modifying SHAKE_THRESHOLD increases or decreases the sensitivity so feel free to play with its value.
public void onSensorChange(SensorEvent sensorEvent) {
    Sensor mySensor = sensorEvent.sensor;

    if (mySensor.getType() == Sensor.TYPE_ACCELEROMETER) {
        float x = sensorEvent.values[0];
        float y = sensorEvent.values[1];
        float z = sensorEvent.values[2];

        long curTime = System.currentTimeMillis();

        if ((curTime - lastUpdate) > 100) {
            long diffTime = (curTime - lastUpdate);
            lastUpdate = curTime;

            float speed = Math.abs(x + y + z - last_x - last_y - last_z)/ diffTime * 10000;

            if (speed > SHAKE_THRESHOLD) {

            }

            last_x = x;
            last_y = y;
            last_z = z;
        }
    }
}
2. Finishing the Lottery Application
We now have an application that can detect a shake gesture using the accelerometer. Let's finish this project by using the shake gesture to pick six random lottery numbers. I'll show you how to generate a random number between 1 and 49, but you are free to modify my implementation to make it work with how the lottery is played in your country.
Let's start by setting up the application's main layout file that we'll use for the user interface. As you can see below, I use six frame layouts with a background of an image of a ball.
<?xml version="1.0" encoding="utf-8"?>
<LinearLayout xmlns:android="http://schemas.android.com/apk/res/android"
    android:orientation="vertical"
    android:layout_width="fill_parent"
    android:layout_height="fill_parent">
    <LinearLayout
        android:layout_height="wrap_content"
        android:layout_width="fill_parent"
        android:weightSum="6"
        android:orientation="horizontal">
        <FrameLayout
            android:layout_height="wrap_content"
            android:layout_width="wrap_content"
            android:layout_margin="5dp"
            android:layout_weight="2"
            android:id="@+id/ball_1"
            android:background="@drawable/blue">
            <TextView
                android:layout_width="fill_parent"
                android:layout_height="fill_parent"
                android:id="@+id/number_1"
                android:gravity="center"
                android:layout_gravity="center_vertical"
                android:textColor="@android:color/white"/>
        </FrameLayout>
        <FrameLayout
            android:layout_height="wrap_content"
            android:layout_width="wrap_content"
            android:layout_margin="5dp"
            android:layout_weight="2"
            android:id="@+id/ball_2"
            android:background="@drawable/blue">
            <TextView
                android:layout_width="fill_parent"
                android:layout_height="fill_parent"
                android:id="@+id/number_2"
                android:gravity="center"
                android:layout_gravity="center_vertical"
                android:textColor="@android:color/white"/>
        </FrameLayout>
        <FrameLayout
            android:layout_height="wrap_content"
            android:layout_width="wrap_content"
            android:layout_margin="5dp"
            android:layout_weight="2"
            android:id="@+id/ball_3"
            android:background="@drawable/blue">
            <TextView
                android:layout_width="fill_parent"
                android:layout_height="fill_parent"
                android:id="@+id/number_3"
                android:gravity="center"
                android:layout_gravity="center_vertical"
                android:textColor="@android:color/white"/>
        </FrameLayout>
    </LinearLayout>

    <LinearLayout
        android:layout_height="wrap_content"
        android:layout_width="fill_parent"
        android:weightSum="6"
        android:orientation="horizontal">
        <FrameLayout
            android:layout_height="wrap_content"
            android:layout_width="wrap_content"
            android:layout_margin="5dp"
            android:layout_weight="2"
            android:id="@+id/ball_4"
            android:background="@drawable/blue">
            <TextView
                android:layout_width="fill_parent"
                android:layout_height="fill_parent"
                android:id="@+id/number_4"
                android:gravity="center"
                android:layout_gravity="center_vertical"
                android:textColor="@android:color/white"/>
        </FrameLayout>
        <FrameLayout
            android:layout_height="wrap_content"
            android:layout_width="wrap_content"
            android:layout_margin="5dp"
            android:id="@+id/ball_5"
            android:layout_weight="2"
            android:background="@drawable/blue">
            <TextView
                android:layout_width="fill_parent"
                android:layout_height="fill_parent"
                android:id="@+id/number_5"
                android:gravity="center"
                android:layout_gravity="center_vertical"
                android:textColor="@android:color/white"/>
        </FrameLayout>
        <FrameLayout
            android:layout_height="wrap_content"
            android:layout_width="wrap_content"
            android:layout_margin="5dp"
            android:id="@+id/ball_6"
            android:layout_weight="2"
            android:background="@drawable/blue">
            <TextView
                android:layout_width="fill_parent"
                android:layout_height="fill_parent"
                android:id="@+id/number_6"
                android:gravity="center"
                android:layout_gravity="center_vertical"
                android:textColor="@android:color/white"/>
        </FrameLayout>
    </LinearLayout>

</LinearLayout>
Each frame layout contains a text view that will display a randomly generated lottery number. Note that every frame layout and text view has an id to make sure that we can reference them later.
With the main layout ready to use, let's revisit the Main class. We start by creating getRandomNumber, a private method for generating six random numbers between 1 and 49.
private void getRandomNumber() {
        ArrayList numbersGenerated = new ArrayList();

        for (int i = 0; i < 6; i++) {
            Random randNumber = new Random();
            int iNumber = randNumber.nextInt(48) + 1;

            if(!numbersGenerated.contains(iNumber)) {
                numbersGenerated.add(iNumber);
            } else {
                i--;
            }
        }
}
We first create an ArrayList instance, which we use to store the six numbers in. In each loop of the for loop, we take advantage of Java's Random class to generate a random number. To make sure that we get a number between 1 and 49, we add 1 to the result. The next step is to check if the generated number is already in the array list, because we only want unique numbers in the array list.
Note that it may be necessary to add two more import statements to keep the compiler happy.
import java.util.ArrayList;
import java.util.Random;
The final step is to display the randomly generated number in the user interface. We get a reference to the text views we created earlier and populate each text view with a random number. We also add a neat animation to the frame layouts, but feel free to omit or modify the animation.
private void getRandomNumber() {
    ArrayList numbersGenerated = new ArrayList();

    for (int i = 0; i < 6; i++) {
        Random randNumber = new Random();
        int iNumber = randNumber.nextInt(48) + 1;

        if(!numbersGenerated.contains(iNumber)) {
            numbersGenerated.add(iNumber);
        } else {
            i--;
        }
    }

    TextView text = (TextView)findViewById(R.id.number_1);
    text.setText(""+numbersGenerated.get(0));

    text = (TextView)findViewById(R.id.number_2);
    text.setText(""+numbersGenerated.get(1));

    text = (TextView)findViewById(R.id.number_3);
    text.setText(""+numbersGenerated.get(2));

    text = (TextView)findViewById(R.id.number_4);
    text.setText(""+numbersGenerated.get(3));

    text = (TextView)findViewById(R.id.number_5);
    text.setText(""+numbersGenerated.get(4));

    text = (TextView)findViewById(R.id.number_6);
    text.setText(""+numbersGenerated.get(5));

    FrameLayout ball1 = (FrameLayout) findViewById(R.id.ball_1);
    ball1.setVisibility(View.INVISIBLE);

    FrameLayout ball2 = (FrameLayout) findViewById(R.id.ball_2);
    ball2.setVisibility(View.INVISIBLE);

    FrameLayout ball3 = (FrameLayout) findViewById(R.id.ball_3);
    ball3.setVisibility(View.INVISIBLE);

    FrameLayout ball4 = (FrameLayout) findViewById(R.id.ball_4);
    ball4.setVisibility(View.INVISIBLE);

    FrameLayout ball5 = (FrameLayout) findViewById(R.id.ball_5);
    ball5.setVisibility(View.INVISIBLE);

    FrameLayout ball6 = (FrameLayout) findViewById(R.id.ball_6);
    ball6.setVisibility(View.INVISIBLE);

    Animation a = AnimationUtils.loadAnimation(this, R.anim.move_down_ball_first);
    ball6.setVisibility(View.VISIBLE);
    ball6.clearAnimation();
    ball6.startAnimation(a);

    ball5.setVisibility(View.VISIBLE);
    ball5.clearAnimation();
    ball5.startAnimation(a);

    ball4.setVisibility(View.VISIBLE);
    ball4.clearAnimation();
    ball4.startAnimation(a);

    ball3.setVisibility(View.VISIBLE);
    ball3.clearAnimation();
    ball3.startAnimation(a);

    ball2.setVisibility(View.VISIBLE);
    ball2.clearAnimation();
    ball2.startAnimation(a);

    ball1.setVisibility(View.VISIBLE);
    ball1.clearAnimation();
    ball1.startAnimation(a);
}
We'll need to add a few more import statements to make all this work. Take a look at the code snippet below.
import android.view.View;
import android.view.animation.Animation;
import android.view.animation.AnimationUtils;
import android.widget.FrameLayout;
import android.widget.TextView;
As for the animations, take a look at the contents of the animation file below. Note that you need to create an anim folder in your project's resources directory and name it move_down_ball_first.xml. By adjusting the values of the scale element, you can modify the animation's duration and the position of each ball.
<?xml version="1.0" encoding="utf-8"?>
<set xmlns:android="http://schemas.android.com/apk/res/android"
     android:fillAfter="true"
     android:interpolator="@android:anim/bounce_interpolator">

    <scale
        android:duration="1500"
        android:fromXScale="1.0"
        android:fromYScale="-10.0"
        android:toXScale="1.0"
        android:toYScale="1.0" />
</set>
All that's left for us to do is call getRandomNumber in onSensorChanged in the Main class. Take a look at the complete implementation of onSensorChanged shown below.
public void onSensorChange(SensorEvent sensorEvent) {
    Sensor mySensor = sensorEvent.sensor;

    if (mySensor.getType() == Sensor.TYPE_ACCELEROMETER) {
        float x = sensorEvent.values[0];
        float y = sensorEvent.values[1];
        float z = sensorEvent.values[2];

        long curTime = System.currentTimeMillis();

        if ((curTime - lastUpdate) > 100) {
            long diffTime = (curTime - lastUpdate);
            lastUpdate = curTime;

            float speed = Math.abs(x + y + z - last_x - last_y - last_z)/ diffTime * 10000;

            if (speed > SHAKE_THRESHOLD) {
                getRandomNumber();
            }

            last_x = x;
            last_y = y;
            last_z = z;
        }
    }
}
Conclusion
In this tutorial, I've shown you how the accelerometer works and how you can use it to detect a shake gesture. Of course, there are many other use cases for the accelerometer. With a basic understanding of detecting gestures using the accelerometer, I encourage you to experiment with the accelerometer to see what else you can do with it.
If you work with Android development a lot, you'll probably run across situations in which you need help with a particular aspect that's not your speciality. If so, try hiring one of the expert app developers on Envato Studio to complete the work quickly and reliably.

Comments