Introduction
One of the key features of Android Studio is the integration of Gradle as an Android build system. While the overall purpose of a build system is to take source code and construct an installable file for your users, an APK in the case of Android, Gradle provides a lot more functionality.
Gradle handles dependency management, such as local JAR files, native .so files and libraries hosted on Maven. It also allows for easy configuration of project properties and it enables developers to create different versions of their applications in a fairly simple way. The last item, known as build variants, is what you will learn about in this article.
1. What Are Build Variants?
Build variants are specific builds that you can produce from Gradle, based around shared core source code. While a standard app may have a debug and release build type, you can expand on this by adding flavor dimensions.
Flavor dimensions allow you to use the folder structure of your project to change how individual builds look and act for your users. This enables developers to easily produce multiple similar apps with different styles and configuration.
2. Setting Up Build Variants in Gradle
You can get started by going into your project's build.gradle file and adding a flavorDimensions item inside of the android build node.
flavorDimensions "number", "color"
This defines what dimensions your build variants can use. Each build that you produce needs to have a product flavor from each of the dimensions. This means that if you only need one dimension for your apps, which is a common scenario, then you can change your flavorDimensions line to only define one dimension.
Below the flavorDimensions definition, you can define the productFlavors. For this example, we will keep things simple and define two flavors per dimension.
productFlavors {
    blue {
        applicationId "com.tutsplus.bluevariant"
        flavorDimension "color"
    }
    green {
        applicationId "com.tutsplus.greenvariant"
        flavorDimension "color"
    }

    one {
        flavorDimension "number"
    }

    two {
        flavorDimension "number"
    }
}
Each build that you create will need a unique applicationId in order to differentiate it from the other builds. Since any application that you build will have at least one flavor from each dimension, you only need to define the applicationId in each node for one dimension.
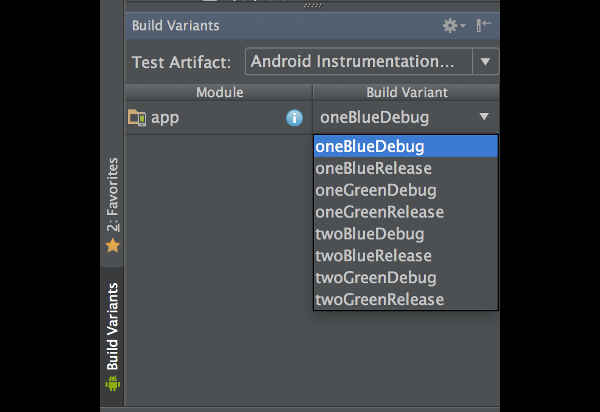
Now that you have defined everything for your build variants in build.gradle, you can open the Build Variants panel in the lower left corner of Android Studio to see what variants are available to build.
You'll notice that each flavor you add grows the number of variants exponentially. Also note that buildTypes of debug and release are thrown into the matrix of dimensions.
3. Using the Project Structure
While you can now install different versions of your app, there's nothing distinguishing them from one another. This is where you really get to use the Gradle build system to your advantage.
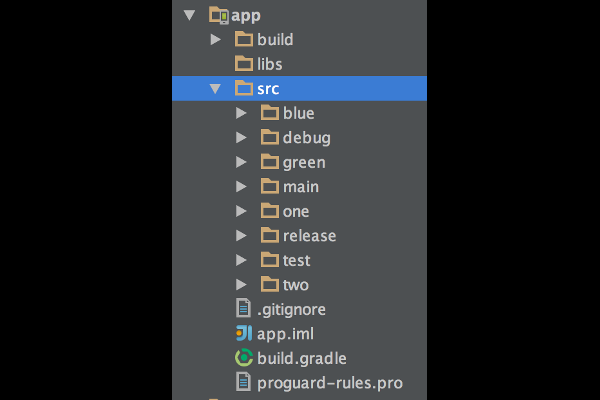
Gradle uses the folder structure of a project to determine what files will be used for compiling an app. In your project structure under app/src/, you'll see the main directory. This is where all of your Java source and core resources live. You can add additional directories alongside main to reflect the product flavors of your apps in order to add customized resources for each build variant.
Any resource that exist in a product flavor that is also defined in main will automatically take precedence.
We can view that in action by looking at main/res/values/colors.xml. If your project doesn't already have a colorPrimary value defined, go ahead and define it. If you started with a new empty project to follow along with this article, then you should see a predefined value of #3F51B5. Running the application should show the colorPrimary value as the color for the Toolbar in the app.

If you create a new colors.xml file under green/src/values/, you can override the colorPrimary attribute with a different value. In this case, let's use #00FF00.
<?xml version="1.0" encoding="utf-8"?>
<resources>
    <color name="colorPrimary">#00FF00</color>
</resources>
When your file is created and the color is set, go back into the Build Variants panel in Android Studio and select the oneGreenDebug build variant. You can then compile and run that variant of the app.

Even though the green variant has colored the toolbar green, the other properties from main aren't overridden. This allows you to set up your common properties in main and only change what should be different.
Not only does this work for colors, but you can change anything that exists within the resources folders, such as strings, styles, dimensions, and integers. When combined with annotated resource folders, such as values-xhdpi for higher pixel density devices, you'll be able to finely control what the user sees from your app in order to ensure they have the best experience possible.
As an added bonus, since you have different applicationId values set for each of the color dimensions, you can install multiple versions of the same app on a device.
Conclusion
Gradle is a powerful tool that not only constructs APKs, but allows you to have fine-grained control over customizing your builds. In this article you have learned how to create build variants of your application with different resources so that you can easily produce multiple similar apps in a fraction of the time it would take to build each individually.
While Gradle is still a fairly new build system, it has already demonstrated that it is an incredibly useful build system that every Android developer should be comfortable with.

Comments