I think it's safe to say that if you're a blogger, you want to highlight the most recent content on your blog so that people will spot it and read it. There are a few ways you could do this, including using different styling for the first post on your blog page to highlight it or displaying it prominently in your sidebar.
In this tutorial I'll show you how to go a bit further than you can using CSS: instead of simply styling your first blog post differently, you'll output different content for it. Specifically, the first post will have a title, featured image and content, while other posts will just have the title, featured image and excerpt.
You can adapt this technique: if you don't want quite so much detail you can amend the loop in each of the queries we'll be working with so that (for example) the first post has a title, image and excerpt while others have just the title and image. Or you could leave out the featured image for subsequent posts. It's up to you.
The technique we'll use to do this involves using the WP_Query class to write an extra query before the main query in the home.php template file, which drives the main blog page. We'll then use pre_get_posts() to amend the main query so that the most recent post isn't output twice. I'll create a child theme of the default Twenty Fifteen theme and create a home.php file for it, plus a stylesheet to set up the child theme.
What You'll Need
To follow this tutorial, you'll need:
- a development installation of WordPress
- a copy of the Twenty Fifteen theme installed (or you can work with your own theme if you prefer)
- posts added to your site—I've added most of mine by importing the theme unit test data
- a code editor
Setting Up the Child Theme
If you're working with the Twenty Fifteen theme, the first step is to set up your child theme. Create a new folder in your wp-content/themes directory and give it a name—I'm calling mine tutsplus-blog-page-two-loops. Now create an empty style.css file in that folder and add the following to it:
/*
Theme Name:     Tuts+ Use Two Loops on Your Main Blog Page
Theme URI:      http://rachelmccollin.co.uk/wptutsplus-taxonomy-archive-list-by-second-taxonomy/
Description:    Theme to support WPTutsPlus tutorial on creating a custom taxonomy archive. Child theme for the Twenty Fifteen theme.
Author:         Rachel McCollin
Author URI:     http://rachelmccollin.co.uk/
Template:       twentyfifteen
Version:        1.0
*/

@import url("../twentyfifteen/style.css");
This tells WordPress that your theme is a child of the Twenty Fifteen theme and imports the stylesheet from that theme. You'll probably want to edit some of the details to reflect the fact that this is your theme.
Creating a Template File for the Blog Page
As it's the main blog page you want to amend, you'll need to create a template file for that in your child theme. The template file you need to create is home.php, which powers the main blog page whether or not it's the front page of your site.
Create a file called home.php in your theme folder.
Now open the index.php file in Twenty Fifteen and copy the code at the beginning and end of that file (i.e. not the loop). Your file will look something like this:
<?php

get_header(); ?>

    <div id="primary" class="content-area">
		<main id="main" class="site-main" role="main">

			<header>
				<h1 class="page-title screen-reader-text"><?php single_post_title(); ?></h1>
			</header>


            <?php // Previous/next page navigation.
    		the_posts_pagination( array(
			    'prev_text'          => __( 'Previous page', 'twentyfifteen' ),
			    'next_text'          => __( 'Next page', 'twentyfifteen' ),
			    'before_page_number' => '<span class="meta-nav screen-reader-text">' . __( 'Page', 'twentyfifteen' ) . ' </span>',
			) ); ?>

		</main><!-- .site-main -->
	</div><!-- .content-area -->

<?php get_footer(); ?>
If you're using your own theme, copy the equivalent code from your theme's index.php file instead, so that you have the containing elements for your page but no loop.
Adding the First Loop
The next step is to create the first loop, which will display the most recent post in full.
Underneath the closing </header> tag in your home.php file, add the arguments for the query:
$args = array(
'posts_per_page' => '1',
);
This will just query for the most recent post. Note that you don't have to include the post type, and this defaults to 'post'.
Now add the loop beneath your arguments:
$query = new WP_query ( $args );
if ( $query->have_posts() ) { ?>

<?php while ( $query->have_posts() ) : $query->the_post(); /* start the loop */ ?>

<article id="post-<?php the_ID(); ?>" <?php post_class( 'first-post' ); ?>>
    <?php the_title( sprintf( '<h2 class="entry-title"><a href="%s" rel="bookmark">', esc_url( get_permalink() ) ), '</a></h2>' ); ?>

	<?php if ( has_post_thumbnail() ) { ?>
		<a href="<?php the_permalink(); ?>">
			<?php the_post_thumbnail( 'medium', array(
				'class' => 'left',
				'alt'	=> trim(strip_tags( $wp_postmeta->_wp_attachment_image_alt ))
			) ); ?>
		</a>
	<?php } ?>

	<section class="entry-content">
		<?php the_content(); ?>
	</section><!-- .entry-content -->

	<footer class="entry-footer">
		<?php twentyfifteen_entry_meta(); ?>
		<?php edit_post_link( __( 'Edit', 'twentyfifteen' ), '<span class="edit-link">', '</span>' ); ?>
	</footer><!-- .entry-footer -->

</article><!-- #post-## -->

<?php // End the loop.
endwhile;

rewind_posts();

} ?>
This loop outputs the post title, the thumbnail if there is one, and the content.
Note that I've added an extra class, .first-post, in the post_class() template tag. If you want to highlight your first post using CSS, this extra class gives you an easy way to do so.
It's very important that you add rewind_posts() after the loop, as otherwise the next loop won't work.
Adding the Second Loop
The second loop is very similar, but instead of using WP_Query, it just accesses the main query.
Below the loop you've just added, add the second loop:
<?php while ( have_posts() ) : the_post(); ?>

<article id="post-<?php the_ID(); ?>" <?php post_class(); ?>>
    <?php the_title( sprintf( '<h2 class="entry-title"><a href="%s" rel="bookmark">', esc_url( get_permalink() ) ), '</a></h2>' ); ?>

	<?php if ( has_post_thumbnail() ) { ?>
		<a href="<?php the_permalink(); ?>">
			<?php the_post_thumbnail( 'medium', array(
				'class' => 'left',
				'alt'	=> trim(strip_tags( $wp_postmeta->_wp_attachment_image_alt ))
			) ); ?>
		</a>
	<?php } ?>

	<section class="entry-summary">
		<?php the_excerpt(); ?><a href="<?php the_permalink(); ?>">Further information</a>.
	</section><!-- .entry-summary -->

	<footer class="entry-footer">
		<?php twentyfifteen_entry_meta(); ?>
		<?php edit_post_link( __( 'Edit', 'twentyfifteen' ), '<span class="edit-link">', '</span>' ); ?>
	</footer><!-- .entry-footer -->

</article><!-- #post-## -->

<?php // End the loop.
endwhile; ?>
This loop is very similar to the first one, but with two differences:
- It outputs the excerpt instead of the content.
- It doesn't include the
.first-postclass.
Now save your file.
Offsetting the Main Query Using pre_get_posts
At the moment, if you check your main blog page you'll see that your most recent post is displayed twice. We'll fix that by offsetting the main query using the pre_get_posts hook.
Create a new file in your theme called functions.php. Alternatively if you're working with your own theme and it already has a functions file, open that.
Add this code to your functions file:
<?php
// offset the main query on the home page
function tutsplus_offset_main_query ( $query ) {
     if ( $query->is_home() && $query->is_main_query() ) {
		 $query->set( 'offset', '1' );
	}
 }
add_action( 'pre_get_posts', 'tutsplus_offset_main_query' );
This filters the main query but only on the home page, adding an offset of 1.
Now save your file and take a look at your main blog page:
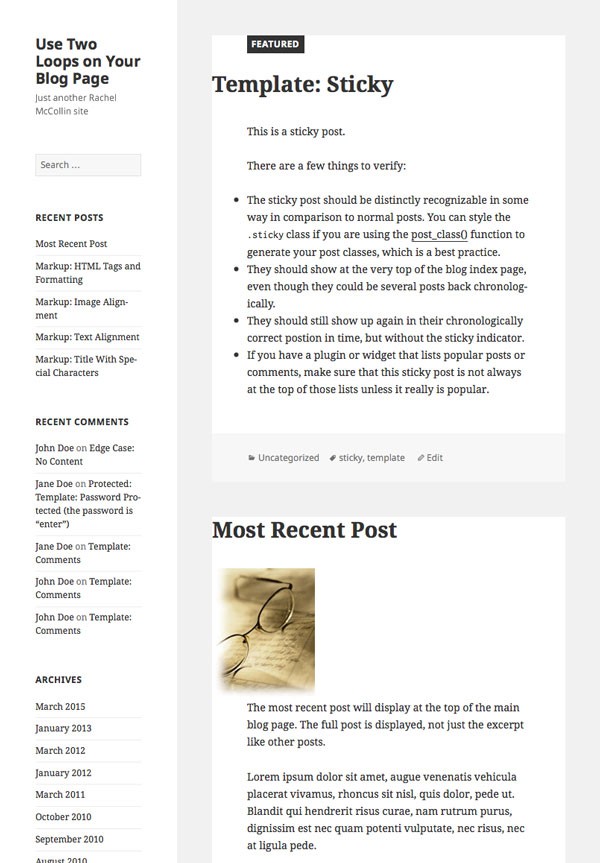
There's a problem. Because my blog has a sticky post, this is being displayed above the most recent post, which isn't what I want. It's also displaying the full content of both the most recent post and the sticky post.
Fixing Sticky Posts
This is easily corrected. Open your home.php file again and add another argument to the arguments for your first query:
'ignore_sticky_posts' => true
This will ensure that WordPress ignores sticky posts when running the first loop. Your first set of query arguments will now look like this:
$args = array(
    'posts_per_page' => '1',
    'ignore_sticky_posts' => true
);
Now save the file again and check your blog page:
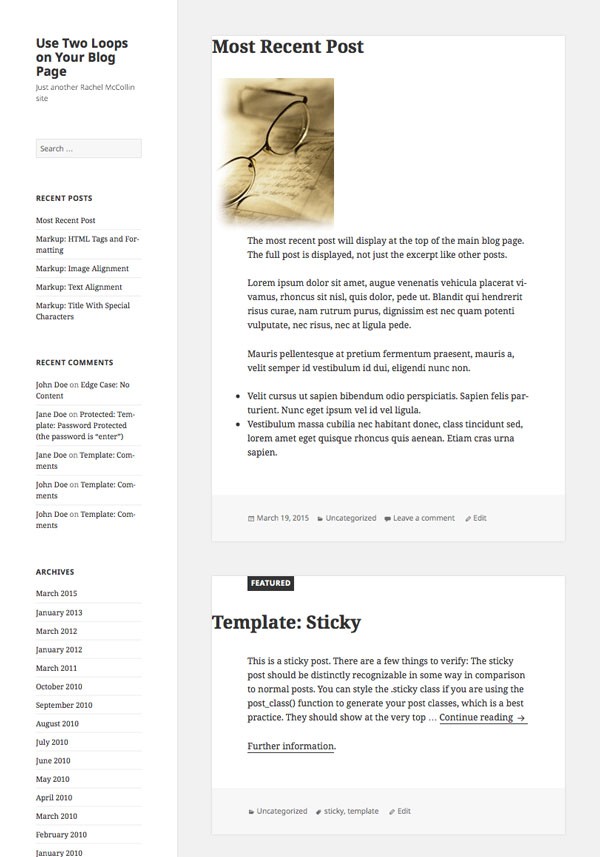
That's better! The most recent post is at the top in full and the sticky post is below it, with just its excerpt output. If you scroll down further you'll see that the other posts are also just showing an excerpt:

If you wanted to ignore sticky posts in your second loop, you could do this by adding the ignore_sticky_posts argument to your second query. I want sticky posts to work as they should for all but my most recent post, however, so I won't.
Fixing Pagination
You'll notice that if you navigate to the second and subsequent pages of posts (i.e. the paginated pages) in your blog, the same posts are displayed as on the first page, meaning that only your ten most recent posts are displayed! This is because offsetting the main query has broken pagination.
Luckily this is easily fixed by amending the function you added to the pre_get_posts hook.
Open your functions.php file again and edit the function so it reads like the below:
function tutsplus_offset_main_query ( $query ) {
     if ( $query->is_home() && $query->is_main_query() && !$query->is_paged() ) {
		 $query->set( 'offset', '1' );
	}
 }
What we've done here is added the is_paged() conditional tag. This checks for paginated pages other than the very first one, so returns true if the visitor is looking at the second or subsequent page of posts. By using !$query->is_paged(), we're ensuring that the query will only be offset if the page is not paginated.
Now save your file and check again. Pagination will now be working fine.
You'll notice that the same recent post is still displayed at the top of the page. This is because the page is using the same template and the same two loops.
In my site I'm happy to leave this as it is because I want the most recent post to be highly prominent. However if you wanted to change this, you would add an extra argument to your first query, namely 'paged' => false.
Summary
Amending the way your blog's main page outputs posts is easily done using the WP_Query class with the pre_get_posts hook. In this tutorial you've learned how to:
- add an extra loop to your blog page using
WP_Queryto output the first post in full - amend the main query so that the first post isn't output twice
- fix errors with sticky posts and pagination
You could adapt this technique to display the latest post from a given category, to use different content in your loop, and more.

Comments