In this tutorial, you will learn how to allow users of your application to log in using their Twitter account. Doing this has been made easy with tools such as OAuth.
You will make use of OmniAuth-Twitter, which contains the Twitter strategy for OmniAuth.
Let's dive in!
Getting Started
Start by generating your Rails application. From your terminal, run the command to do so:
rails new Tuts-Social -T
Open up your Gemfile and add the bootstrap gem.
#Gemfile
...

gem 'bootstrap-sass'
Install the gem by running the command:
bundle install
Rename app/assets/stylesheets/application.css to app/assets/stylesheets/application.scs.
When done, add the following lines of code to import bootstrap.
#app/assets/stylesheets/application.scss
...
@import 'bootstrap-sprockets';
@import 'bootstrap';
Create a partial named _navigation.html.erb to hold your navigation code; the partial should be located in the app/views/layouts directory.
Enter the code below into an IDE. It uses Bootstrap to create a navigation bar for your application.
#app/views/layouts/_navigation.html.erb

<nav class="navbar navbar-inverse">
  <div class="container">
    <div class="navbar-header">
      <%= link_to 'Tuts Social', root_path, class: 'navbar-brand' %>
    </div>
    <div id="navbar">

    <ul class="nav navbar-nav pull-right">
      <li><%= link_to 'Home', root_path %></li>
  </ul>
    </div>
  </div>
</nav>
For the navigation to be used, you need to render it in your application layout. Tweak your application layout to look like what I have below.
#app/views/layouts/application.html.erb

<!DOCTYPE html>
<html>
  <head>
    <title>Tuts Social</title>
    <%= csrf_meta_tags %>

    <%= stylesheet_link_tag    'application', media: 'all', 'data-turbolinks-track': 'reload' %>
    <%= javascript_include_tag 'application', 'data-turbolinks-track': 'reload' %>
  </head>

  <body>
    <%= render "layouts/navigation" %>
    <div id="flash">
      <% flash.each do |key, value| %>
        <div class="flash <%= key %>"><%= value %></div>
      <% end %>
    </div>
    <div class="container-fluid">
      <%= yield %>
    </div>
  </body>
</html>
Generate a PagesController with an index action by entering the command below into your terminal.
rails generated controller Pages index
In the index views generated, edit it to look like this.
#app/views/pages/index.html.erb

<div class="jumbotron">
  <h1>Welcome to Tuts Social!</h1>
  <p>Thanks for checking us out!</p>
</div>
In the above code, we make use of a class called jumbotron—this is a Bootstrap component that allows us extend the viewport to showcase a marketing message. You can find more about it from the Bootstrap documentation.
Open your routes file to add your root_path.
#config/routes.rb

Rails.application.routes.draw do
  # For details on the DSL available within this file, see http://guides.rubyonrails.org/routing.html

  root to: "pages#index"
end
Setting Up OmniAuth-Twitter
You need to create a new Twitter application. Go to this page in the Twitter Developer pages to create one. Enter all the necessary details, similar to what I have in the screenshot below.
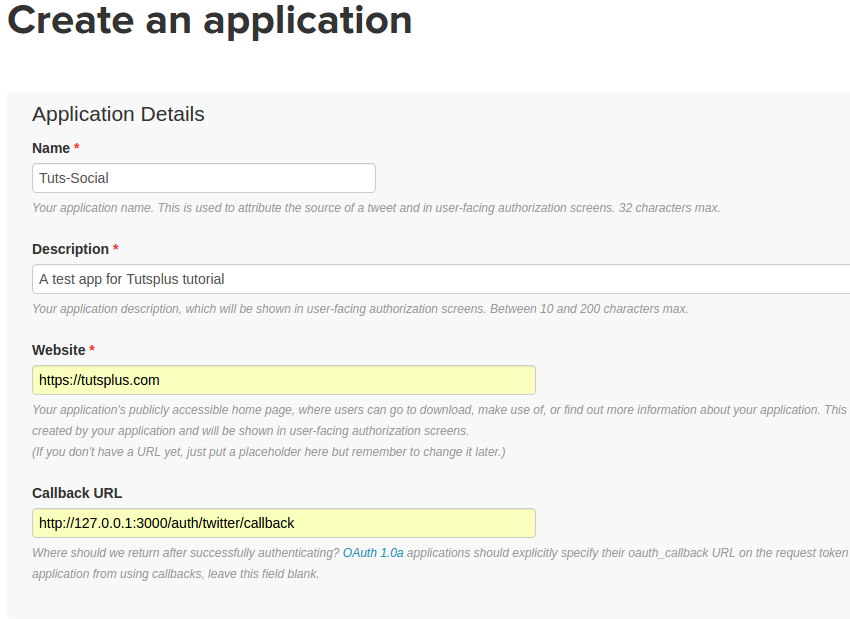
For the callback URL, enter your website's address plus "auth/twitter/callback". If you happen to be on a local machine, your callback URL should be this: http://127.0.0.1:3000/auth/twitter/callback.
You will be redirected to the app’s information page on Twitter. Navigate to the Keys and Access Tokens tab to get your keys. Copy the Consumer Key and Consumer Secret and paste them in a safe place—we will make use of them shortly.
The callback URL is the URL where a user will be redirected to inside the app after successful authentication and approved authorization (the request will also contain the user’s data and token). All OmniAuth strategies expect the callback URL to equal “/auth/:provider/callback”. :provider takes the name of the strategy. In this case, the strategy will be "twitter" as you will list in the initializer.
Open up your Gemfile to add the omniauth-twiiter gem.
#Gemfile
...

gem 'omniauth-twitter'
Now create an initializer for OmniAuth in your config/initializers directory. This will hold the configuration for OmniAuth. Make it look like what I have below.
#config/initializers/omniauth.rb

Rails.application.config.middleware.use OmniAuth::Builder do
  provider :twitter, ENV['TWITTER_KEY'], ENV['TWITTER_SECRET']
end
At this point you'll need to make use of the keys and access tokens you stored safely. You need to keep these safe as you do not want to push them to a public repository when you commit your code.
You will make use of a gem for this. Open your Gemfile again and add the gem below. Add it to your Gemfile like so:
#Gemfile

...
group :development, :test do
  ...
  gem 'dotenv-rails'
...
To install the gem, run.
bundle install
In the home directory of your application, create a file called .env.
Open it and add your keys and tokens like so:
#.env

TWITTER_KEY=xxxxxxxxxxxxxx
TWITTER_SECRET=xxxxxxxxxxxxxx
Open .gitignore and add the file you just created.
#.gitignore

...
# Ignore .env used for storing keys and access tokens
.env
With this done, your keys and access tokens are safe! To learn more on how to use dotenv-rails, refer to the GitHub page.
Time to work on your route. Open up your routes file and add the route below.
#config/routes.rb

...
  get '/auth/:provider/callback', to: 'sessions#create'
You need to add the link for Twitter sign-in to your navigation. Open your navigation file and tweak it to look like this.
<nav class="navbar navbar-default">
    <div class="container-fluid">
    <!-- Brand and toggle get grouped for better mobile display -->
    <div class="navbar-header">
      <button type="button" class="navbar-toggle collapsed" data-toggle="collapse" data-target="#navbar-collapse" aria-expanded="false">
        <span class="sr-only">Toggle navigation</span>
        <span class="icon-bar"></span>
        <span class="icon-bar"></span>
        <span class="icon-bar"></span>
      </button>
      <a class="navbar-brand" href="#">Tuts Social</a>
    </div>
    <div class="collapse navbar-collapse" id="navbar-collapse">
    	<ul class="nav navbar-nav navbar-right">
        <li><%= link_to 'Home', root_path %></li>
        <% if current_user %>
          <li>Signed in as <%= current_user.name %></li>
        <% else %>
          <li><%= link_to "Sign in with Twitter", "/auth/twitter" %></li>
        <% end %>
    	</ul>
    </div>
  </div>
</nav>
From the above, you want to show the link to log in with Twitter only when the user is not signed in.
Creating Sessions
You'll need a session controller to handle the logging in of users. Create a file for that in your controllers directory; this is how it should look.
The create action helps create a session for users so they can be logged into your application. Without this, users have no means of logging in.
#app/controllers/sessions_controller.rb

class SessionsController < ApplicationController
  def create
    @user = User.find_or_create_from_auth_hash(auth_hash)
    session[:user_id] = @user.id
    redirect_to root_path
  end

  protected

  def auth_hash
    request.env['omniauth.auth']
  end
end
You'll need a current_user method at this point. This will help you check if a user is logged in or out.
Open app/controllers/application_controller.rb and add the following.
#app/controllers/application_controller.rb

...
  def current_user
    @current_user ||= User.find(session[:user_id]) if session[:user_id]
  end
  helper_method :current_user
...
User Model
Now generate a model for your Users. Run the command to do so.
rails generated modoel User provider:string uid:string name:string token:string secret:string profile_image:string
That should generate a migration file that looks like this.
#xxxxxx_create_users.rb

class CreateUsers < ActiveRecord::Migration[5.0]
  def change
    create_table :users do |t|
      t.string :provider
      t.string :uid
      t.string :name
      t.string :token
      t.string :secret
      t.string :profile_image

      t.timestamps
    end
  end
end
Now migrate your database by running:
rake db:migrate
Open up your User model and make it look like this:
#app/models/user.rb

class User < ApplicationRecord
  def self.find_or_create_from_auth_hash(auth_hash)
    user = where(provider: auth_hash.provider, uid: auth_hash.uid).first_or_create
    user.update(
      name: auth_hash.info.nickname,
      profile_image: auth_hash.info.image,
      token: auth_hash.credentials.token,
      secret: auth_hash.credentials.secret
    )
    user
  end
end
The code above stores some information belonging to the user. This includes the name, profile_image, token, and secret of the user. If your application requires more than this, you can check out the OmniAuth-Twitter page.
Deleting Sessions
In your application, you want to provide users the ability to log out. You will need a destroy action in your SessionsController for this to work. Then a link will be added to your navigation.
Add the destroy action to your SessionsController.
#app/controllers/sessions_controller.rb

...
  def destroy
    if current_user
      session.delete(:user_id)
      flash[:success] = "Sucessfully logged out!"
    end
    redirect_to root_path
  end
...
Then add this link for logging out to your navigation, so your navigation looks like this.
#app/views/layouts/_navigation.html.erb

<nav class="navbar navbar-default">
    <div class="container-fluid">
    <!-- Brand and toggle get grouped for better mobile display -->
    <div class="navbar-header">
      <button type="button" class="navbar-toggle collapsed" data-toggle="collapse" data-target="#navbar-collapse" aria-expanded="false">
        <span class="sr-only">Toggle navigation</span>
        <span class="icon-bar"></span>
        <span class="icon-bar"></span>
        <span class="icon-bar"></span>
      </button>
      <a class="navbar-brand" href="#">Tuts Social</a>
    </div>
    <div class="collapse navbar-collapse" id="navbar-collapse">
    	<ul class="nav navbar-nav navbar-right">
        <li><%= link_to 'Home', root_path %></li>
        <% if current_user %>
          <li>Signed in as <%= current_user.name %></li>
          <li><%= link_to 'Log Out', logout_path, method: :delete %></li>
        <% else %>
          <li><%= link_to "Sign in with Twitter", "/auth/twitter" %></li>
        <% end %>
    	</ul>
    </div>
  </div>
</nav>
Open up your config/routes.rb to update your routes with the action you just created.
#config/routes.rb

...
  delete '/logout', to: 'sessions#destroy'
...
Start up your rails server and point your browser to http://localhost:3000 to see what you have.
Conclusion
In this tutorial you have learned how to enable OmniAuth-Twitter in your Rails application. You saw how to get the data of users using OmniAuth-Twitter, which you did in your User model. You were able to create SessionControllers to handle the logging in and out of users from your application.
I hope you enjoyed it. In the future, you will see how to do the same for Facebook, Google, and LinkedIn.

Comments