.png)
Authentication is one of the most important parts of any web application. In this tutorial, we'll be discussing token-based authentication systems and how they differ from traditional login systems. At the end of this tutorial, you'll see a fully working demo written in AngularJS and NodeJS.
You can also find a wide selection of ready-made authentication scripts and apps on Envato Market, such as:
- EasyLogin Pro - User Membership System
-
PHP Key Generation and Authentication Class
-
Member Role Admin Tool
-
Angry Frog PHP Login Script
-
CakePHP Authentication & ACL Management Plugin
Or, if you're struggling with a bug in your AngularJS code, you can submit it to araneux on Envato Studio to have it fixed.

Traditional Authentication Systems
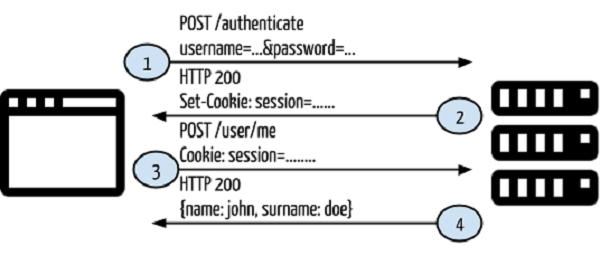
Before proceeding with a token-based authentication system, let's have a look at a traditional authentication system first.
- The user provides a username and password in the login form and clicks Log In.
- After the request is made, validate the user on the backend by querying in the database. If the request is valid, create a session by using the user information fetched from the database, and then return the session information in the response header in order to store the session ID in the browser.
- Provide the session information for accessing restricted endpoints in the application.
- If the session information is valid, let the user access specified end points, and respond with the rendered HTML content.
Everything is fine until this point. The web application works well, and it is able to authenticate users so that they may access restricted endpoints; however, what happens when you want to develop another client, say for Android, for your application? Will you be able to use the current application to authenticate mobile clients and to serve restricted content? As it currently stands, no. There are two main reasons for this:
- Sessions and cookies do not make sense for mobile applications. You cannot share sessions or cookies created on the server-side with mobile clients.
- In the current application, the rendered HTML is returned. In a mobile client, you need something like JSON or XML to be included as the response.
In this case, you need a client-independent application.
Token-Based Authentication
In token-based authentication, cookies and sessions will not be used. A token will be used for authenticating a user for each request to the server. Let's redesign the first scenario with token-based authentication.
It will use the following flow of control:
- The user provides a username and password in the login form and clicks Log In.
- After a request is made, validate the user on the backend by querying in the database. If the request is valid, create a token by using the user information fetched from the database, and then return that information in the response header so that we can store the token browser in local storage.
- Provide token information in every request header for accessing restricted endpoints in the application.
- If the token fetched from the request header information is valid, let the user access the specified end point, and respond with JSON or XML.
In this case, we have no returned session or cookie, and we have not returned any HTML content. That means that we can use this architecture for any client for a specific application. You can see the architecture schema below:

So, what is this JWT?
JWT
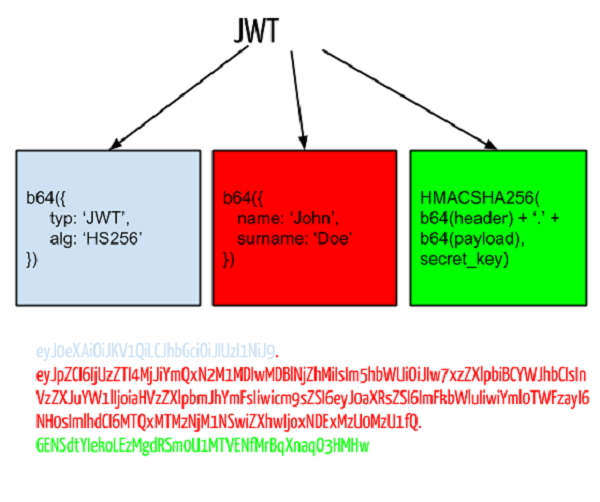
JWT stands for JSON Web Token and is a token format used in authorization headers. This token helps you to design communication between two systems in a secure way. Let's rephrase JWT as the "bearer token" for the purposes of this tutorial. A bearer token consists of three parts: header, payload, and signature.
- The header is the part of the token that keeps the token type and encryption method, which is also encrypted with base-64.
- The payload includes the information. You can put any kind of data like user info, product info and so on, all of which is stored with base-64 encryption.
- The signature consists of combinations of the header, payload, and secret key. The secret key must be kept securely on the server-side.
You can see the JWT schema and an example token below;
You do not need to implement the bearer token generator as you can find versions that already exist in several languages. You can see some of them below:
A Practical Example
After covering some basic information about token-based authentication, we can now proceed with a practical example. Take a look at the following schema, after which we'll analyze it in more detail:
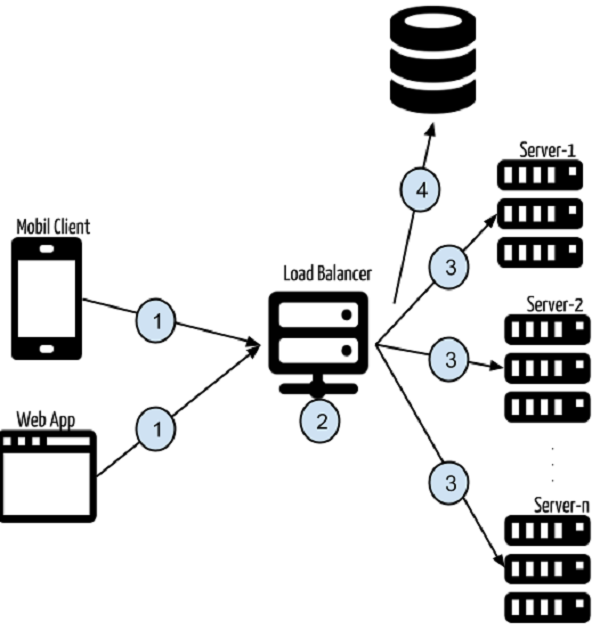
- The requests are made by several clients such as a web application, a mobile client, etc., to the API for a specific purpose.
- The requests are made to a service like
https://api.yourexampleapp.com. If lots of people use the application, multiple servers may be required to serve the requested operation.
- Here, the load balancer is used for balancing requests to best suit the application servers at the back-end. When you make a request to
https://api.yourexampleapp.com, first the load balancer will handle a request, and then it will redirect the client to a specific server.
- There is one application, and this application is deployed to several servers (server-1, server-2, ..., server-n). Whenever a request is made to
https://api.yourexampleapp.com, the back-end application will intercept the request header and extract token information from the authorization header. A database query will be made by using this token. If this token is valid and has the required permission to access the requested endpoint, it will continue. If not, it will return a 403 response code (which indicates a forbidden status).
Advantages
Token-based authentication comes with several advantages that solve serious problems. Some of them are as follows:
- Client Independent Services. In token-based authentication, a token is transferred via request headers, instead of keeping the authentication information in sessions or cookies. This means there is no state. You can send a request to the server from any type of client that can make HTTP requests.
-
CDN. In most current web applications, views are rendered on the back-end and HTML content is returned to the browser. Front-end logic depends on back-end code. There is no need to make such a dependency. This comes with several problems. For example, if you are working with a design agency that implements your front-end HTML, CSS, and JavaScript, you need to take that front-end code and migrate it into your back-end code in order to do some rendering or populating operations. After some time, your rendered HTML content will differ greatly from what the code agency implemented. In token-based authentication, you can develop a front-end project separately from the back-end code. Your back-end code will return a JSON response instead of rendered HTML, and you can put the minified, gzipped version of the front-end code into the CDN. When you go to your web page, HTML content will be served from the CDN, and page content will be populated by API services using the token in the authorization headers
-
No Cookie-Session (or No CSRF). CSRF is a major problem in modern web security because it doesn't check whether a request source is trusted or not. To solve this problem, a token pool is used for sending that token on every form post. In token-based authentication, a token is used in authorization headers, and CSRF does not include that information.
-
Persistent Token Store. When a session read, write, or delete operation is made in the application, it will make a file operation in the operating system's
tempfolder, at least for the first time. Let's say that you have multiple servers and a session is created on the first server. When you make another request and your request drops in another server, session information will not exist and will get an "unauthorized" response. I know, you can solve that with a sticky session. However, in token-based authentication, this case is solved naturally. There is no sticky session problem, because the request token is intercepted on every request on any server.
Those are the most common advantages of token-based authentication and communication. That's the end of the theoretical and architectural talk about token-based authentication. Time for a practical example.
An Example Application
You will see two applications to demonstrate token-based authentication:
- token-based-auth-backend
- token-based-auth-frontend
In the back-end project, there will be service implementations, and service results will be in JSON format. There is no view returned in services. In the front-end project, there will be an AngularJS project for front-end HTML and then the front-end app will be populated by AngularJS services to make requests to the back-end services.
token-based-auth-backend
In the back-end project, there are three main files:
-
package.jsonis for dependency management. -
models\User.jscontains a User model that will be used for making database operations about users.
-
server.jsis for project bootstrapping and request handling.
That's it! This project is very simple, so that you can understand the main concept easily without doing a deep dive.
{
    "name": "angular-restful-auth",
	"version": "0.0.1",
	"dependencies": {
		"express": "4.x",
		"body-parser": "~1.0.0",
		"morgan": "latest",
		"mongoose": "3.8.8",
		"jsonwebtoken": "0.4.0"
	},
	"engines": {
		"node": ">=0.10.0"
	}
}
package.json contains dependencies for the project: express for MVC, body-parser for simulating post request handling in NodeJS, morgan for request logging, mongoose for our ORM framework to connect to MongoDB, and jsonwebtoken for creating JWT tokens by using our User model. There is also an attribute called engines that says that this project is made by using NodeJS version >= 0.10.0. This is useful for PaaS services like Heroku. We will also cover that topic in another section.
var mongoose     = require('mongoose');
var Schema       = mongoose.Scema;

var UserSchema   = new Schema({
    email: String,
    password: String,
    token: String
});

module.exports = mongoose.model('User', UserSchema);
We said that we would generate a token by using the user model payload. This model helps us to make user operations on MongoDB. In User.js, the user-schema is defined and the User model is created by using a mongoose model. This model is ready for database operations.
Our dependencies are defined, and our user model is defined, so now let's combine all those to construct a service for handling specific requests.
// Required Modules
var express    = require("express");
var morgan     = require("morgan");
var bodyParser = require("body-parser");
var jwt        = require("jsonwebtoken");
var mongoose   = require("mongoose");
var app        = express();
In NodeJS, you can include a module in your project by using require. First, we need to import the necessary modules into the project:
var port = process.env.PORT || 3001;
var User     = require('./models/User');

// Connect to DB
mongoose.connect(process.env.MONGO_URL);
Our service will serve through a specific port. If any port variable is defined in the system environment variables, you can use that, or we have defined port 3001. After that, the User model is included, and the database connection is established in order to do some user operations. Do not forget to define an environment variable—MONGO_URL—for the database connection URL.
app.use(bodyParser.urlencoded({ extended: true }));
app.use(bodyParser.json());
app.use(morgan("dev"));
app.use(function(req, res, next) {
    res.setHeader('Access-Control-Allow-Origin', '*');
    res.setHeader('Access-Control-Allow-Methods', 'GET, POST');
    res.setHeader('Access-Control-Allow-Headers', 'X-Requested-With,content-type, Authorization');
    next();
});
In the above section, we've made some configurations for simulating an HTTP request handling in NodeJS by using Express. We are allowing requests to come from different domains in order to develop a client-independent system. If you do not allow this, you will trigger a CORS (Cross Origin Request Sharing) error in the web browser.
-
Access-Control-Allow-Originallowed for all domains. - You can send
POSTandGETrequests to this service.
-
X-Requested-Withandcontent-typeheaders are allowed.
app.post('/authenticate', function(req, res) {
    User.findOne({email: req.body.email, password: req.body.password}, function(err, user) {
        if (err) {
            res.json({
                type: false,
                data: "Error occured: " + err
            });
        } else {
            if (user) {
               res.json({
                    type: true,
                    data: user,
                    token: user.token
                });
            } else {
                res.json({
                    type: false,
                    data: "Incorrect email/password"
                });
            }
        }
    });
});
We have imported all of the required modules and defined our configuration, so now it's time to define request handlers. In the above code, whenever you make a POST request to /authenticate with username and password, you will get a JWT token. First, the database query is processed by using a username and password. If a user exists, the user data will be returned with its token. But, what if there is no such user matching the username and/or password?
app.post('/signin', function(req, res) {
    User.findOne({email: req.body.email, password: req.body.password}, function(err, user) {
        if (err) {
            res.json({
                type: false,
                data: "Error occured: " + err
            });
        } else {
            if (user) {
                res.json({
                    type: false,
                    data: "User already exists!"
                });
            } else {
                var userModel = new User();
                userModel.email = req.body.email;
                userModel.password = req.body.password;
                userModel.save(function(err, user) {
                    user.token = jwt.sign(user, process.env.JWT_SECRET);
                    user.save(function(err, user1) {
                        res.json({
                            type: true,
                            data: user1,
                            token: user1.token
                        });
                    });
                })
            }
        }
    });
});
When you make a POST request to /signin with username and password, a new user will be created by using posted user information. On the 19th line, you can see that a new JSON token is generated by using the jsonwebtoken module, which has been assigned to the jwt variable. The authentication part is OK. What if we try to access a restricted endpoint? How can we manage to access that endpoint?
app.get('/me', ensureAuthorized, function(req, res) {
    User.findOne({token: req.token}, function(err, user) {
        if (err) {
            res.json({
                type: false,
                data: "Error occured: " + err
            });
        } else {
            res.json({
                type: true,
                data: user
            });
        }
    });
});
When you make a GET request to /me, you will get the current user info, but in order to continue with the requested endpoint, the ensureAuthorized function will be executed.
function ensureAuthorized(req, res, next) {
    var bearerToken;
    var bearerHeader = req.headers["authorization"];
    if (typeof bearerHeader !== 'undefined') {
        var bearer = bearerHeader.split(" ");
        bearerToken = bearer[1];
        req.token = bearerToken;
        next();
    } else {
        res.send(403);
    }
}
In this function, request headers are intercepted and the authorization header is extracted. If a bearer token exists in this header, that token is assigned to req.token in order to be used throughout the request, and the request can be continued by using next(). If a token does not exist, you will get a 403 (Forbidden) response. Let's go back to the handler /me, and use req.token to fetch user data with this token. Whenever you create a new user, a token is generated and saved in the user model in DB. Those tokens are unique.
We have only three handlers for this simple project. After that, you will see;
process.on('uncaughtException', function(err) {
    console.log(err);
});
The NodeJS app may crash if an error occurs. With the above code, that crash is prevented and an error log is printed in the console. And finally, we can start the server by using the following code snippet.
// Start Server
app.listen(port, function () {
    console.log( "Express server listening on port " + port);
});
To sum up:
- Modules are imported.
- Configurations are made.
- Request handlers are defined.
- A middleware is defined in order to intercept restricted endpoints.
- The server is started.
We are done with the back-end service. So that it can be used by multiple clients, you can deploy this simple server application to your servers, or maybe you can deploy in Heroku. There is a file called Procfile in the project's root folder. Let's deploy our service in Heroku.
Heroku Deployment
You can clone the back-end project from this GitHub repository.
I will not be discussing how to create an app in Heroku; you can refer to this article for creating a Heroku app if you have not done this before. After you create your Heroku app, you can add a destination to your current project by using the following command:
git remote add heroku <your_heroku_git_url>
Now you have cloned a project and added a destination. After git add and git commit, you can push your code to Heroku by performing git push heroku master. When you successfully push a project, Heroku will perform the npm install command to download dependencies into the temp folder on Heroku. After that, it will start your application and you can access your service by using the HTTP protocol.
token-based-auth-frontend
In the front-end project, you will see an AngularJS project. Here, I'll only mention the main sections in the front-end project, because AngularJS is not something that can be covered within a single tutorial.
You can clone the project from this GitHub repository. In this project, you will see the following folder structure:
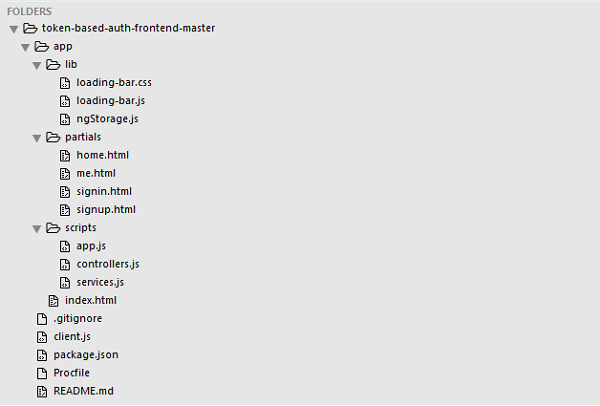
ngStorage.js is a library for AngularJS to manipulate local storage operations. Also, there is a main layout index.html and partials that extend the main layout under the partials folder. controllers.js is for defining our controller actions in the front-end. services.js is for making service requests to our service that I mentioned in the previous project. We have a bootstrap-like file called app.js and in this file, configurations and module imports are applied. Finally, client.js is for serving static HTML files (or just index.html, in this case); this helps us to serve static HTML files when you deploy to a server without using Apache or any other web servers.
...
<script src="//cdnjs.cloudflare.com/ajax/libs/jquery/2.1.1/jquery.min.js"></script>
<script src="//maxcdn.bootstrapcdn.com/bootstrap/3.2.0/js/bootstrap.min.js"></script>
<script src="//cdnjs.cloudflare.com/ajax/libs/angular.js/1.2.20/angular.min.js"></script>
<script src="//cdnjs.cloudflare.com/ajax/libs/angular.js/1.2.20/angular-route.min.js"></script>
<script src="/lib/ngStorage.js"></script>
<script src="/lib/loading-bar.js"></script>
<script src="/scripts/app.js"></script>
<script src="/scripts/controllers.js"></script>
<script src="/scripts/services.js"></script>
</body>
In the main layout HTML file, all of the required JavaScript files are included for AngularJS-related libraries, as well as our custom controller, service, and app file.
'use strict';

/* Controllers */

angular.module('angularRestfulAuth')
    .controller('HomeCtrl', ['$rootScope', '$scope', '$location', '$localStorage', 'Main', function($rootScope, $scope, $location, $localStorage, Main) {

        $scope.signin = function() {
            var formData = {
                email: $scope.email,
                password: $scope.password
            }

            Main.signin(formData, function(res) {
                if (res.type == false) {
                    alert(res.data)
                } else {
                    $localStorage.token = res.data.token;
                    window.location = "/";
                }
            }, function() {
                $rootScope.error = 'Failed to signin';
            })
        };

        $scope.signup = function() {
            var formData = {
                email: $scope.email,
                password: $scope.password
            }

            Main.save(formData, function(res) {
                if (res.type == false) {
                    alert(res.data)
                } else {
                    $localStorage.token = res.data.token;
                    window.location = "/"
                }
            }, function() {
                $rootScope.error = 'Failed to signup';
            })
        };

        $scope.me = function() {
            Main.me(function(res) {
                $scope.myDetails = res;
            }, function() {
                $rootScope.error = 'Failed to fetch details';
            })
        };

        $scope.logout = function() {
            Main.logout(function() {
                window.location = "/"
            }, function() {
                alert("Failed to logout!");
            });
        };
        $scope.token = $localStorage.token;
    }])
In the above code, the HomeCtrl controller is defined and some required modules are injected like $rootScope and $scope. Dependency injection is one of the strongest properties of AngularJS. $scope is the bridge variable between controllers and views in AngularJS that means you can use test in view if you defined it in a specified controller like $scope.test=....
In this controller, some utility functions are defined, such as:
-
signinto set up a sign-in button on the sign-in form -
signupfor sign-up form handling -
mefor assigning the Me button in the layout
In the main layout, in the main menu list, you can see the data-ng-controller attribute with a value HomeCtrl. That means that this menu dom element can share scope with HomeCtrl. When you click the sign-up button in the form, the sign-up function in the controller file will be executed, and in this function, the sign-up service is used from the Main service that is already injected in this controller.
The main structure is view -> controller -> service. This service makes simple Ajax requests to the back-end in order to get specific data.
'use strict';

angular.module('angularRestfulAuth')
    .factory('Main', ['$http', '$localStorage', function($http, $localStorage){
        var baseUrl = "your_service_url";
        function changeUser(user) {
            angular.extend(currentUser, user);
        }

        function urlBase64Decode(str) {
            var output = str.replace('-', '+').replace('_', '/');
            switch (output.length % 4) {
                case 0:
                    break;
                case 2:
                    output += '==';
                    break;
                case 3:
                    output += '=';
                    break;
                default:
                    throw 'Illegal base64url string!';
            }
            return window.atob(output);
        }

        function getUserFromToken() {
            var token = $localStorage.token;
            var user = {};
            if (typeof token !== 'undefined') {
                var encoded = token.split('.')[1];
                user = JSON.parse(urlBase64Decode(encoded));
            }
            return user;
        }

        var currentUser = getUserFromToken();

        return {
            save: function(data, success, error) {
                $http.post(baseUrl + '/signin', data).success(success).error(error)
            },
            signin: function(data, success, error) {
                $http.post(baseUrl + '/authenticate', data).success(success).error(error)
            },
            me: function(success, error) {
                $http.get(baseUrl + '/me').success(success).error(error)
            },
            logout: function(success) {
                changeUser({});
                delete $localStorage.token;
                success();
            }
        };
    }
]);
In the above code, you can see service functions like making requests for authenticating. In controller.js, you may have already realised that there are functions like Main.me. This Main service has been injected in the controller, and in the controller, the services belonging to this service are called directly.
These functions are simply Ajax requests to our service which we deployed together. Do not forget to put the service URL in baseUrl in the above code. When you deploy your service to Heroku, you will get a service URL like appname.herokuapp.com. In the above code, you will set var baseUrl = "appname.herokuapp.com".
In the sign-up or sign-in part of the application, the bearer token responds to the request and this token is saved to local storage. Whenever you make a request to a service in the back-end, you need to put this token in the headers. You can do this by using AngularJS interceptors.
$httpProvider.interceptors.push(['$q', '$location', '$localStorage', function($q, $location, $localStorage) {
            return {
                'request': function (config) {
                    config.headers = config.headers || {};
                    if ($localStorage.token) {
                        config.headers.Authorization = 'Bearer ' + $localStorage.token;
                    }
                    return config;
                },
                'responseError': function(response) {
                    if(response.status === 401 || response.status === 403) {
                        $location.path('/signin');
                    }
                    return $q.reject(response);
                }
            };
        }]);
In the above code, every request is intercepted and an authorization header and value are put in the headers.
In the front-end project, we have some partial pages like signin, signup, profile details, and vb. These partial pages are related with specific controllers. You can see that relation in app.js:
angular.module('angularRestfulAuth', [
    'ngStorage',
    'ngRoute'
])
.config(['$routeProvider', '$httpProvider', function ($routeProvider, $httpProvider) {

    $routeProvider.
        when('/', {
            templateUrl: 'partials/home.html',
            controller: 'HomeCtrl'
        }).
        when('/signin', {
            templateUrl: 'partials/signin.html',
            controller: 'HomeCtrl'
        }).
        when('/signup', {
            templateUrl: 'partials/signup.html',
            controller: 'HomeCtrl'
        }).
        when('/me', {
            templateUrl: 'partials/me.html',
            controller: 'HomeCtrl'
        }).
        otherwise({
            redirectTo: '/'
        });
As you can easily understand in the above code, when you go to /, the home.html page will be rendered. Another example: if you go to /signup, signup.html will be rendered. This rendering operation will be done in the browser, not on the server-side.
Conclusion
You can see how everything we discussed in this tutorial works into practice by checking out this working demo.
Token-based authentication systems help you to construct an authentication/authorization system while you are developing client-independent services. By using this technology, you will just focus on your services (or APIs).
The authentication/authorization part will be handled by the token-based authentication system as a layer in front of your services. You can access and use services from any client like web browsers, Android, iOS, or a desktop client.
And if you're looking for ready-made solutions, check out the authentication scripts and apps on Envato Market.

Comments