This tutorial will demonstrate how to build a custom progress bar by creating an image uploader with Titanium Mobile. Specifically, the demo project will allow you to select an image from the device photo gallery and upload it to a remote server for storage. Both the Titanium Mobile code and the server-side code will be explained. Now, let's get started!
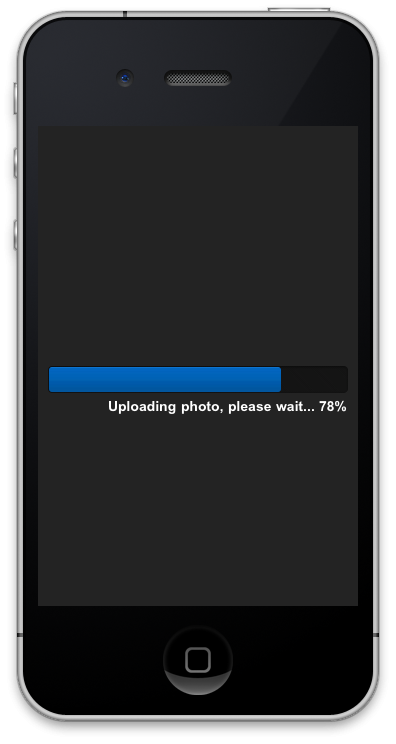
Project Preview
The following is a preview of the cross-platform application that we will be building in this series:
Prerequisites...
This tutorial assumes that you are running Titanium Studio and have the latest SDK updates installed, which was 1.7.5 at the time of this writing. As this is tutorial is focused on the iOS platform, the reader would also benefit from having all the requirements for development on the iOS platform.
Step 1: Creating a New Project
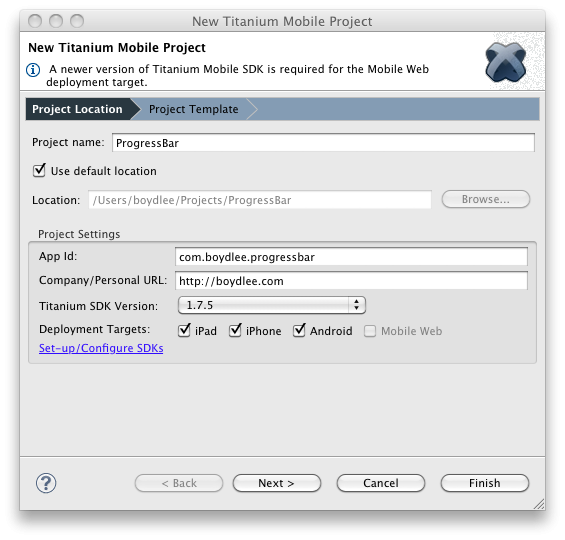
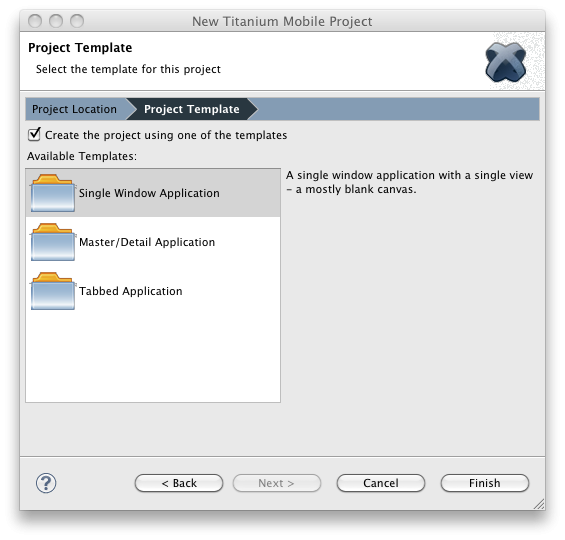
Open Titanium Studio and create a new project, selecting the Android, iPhone, and iPad device targets only. You can name your new project whatever you like, however, we're going to call ours "ProgressBar". Give your new project an App ID and URL, then select the latest Titanium SDK Version. When you are done, click "Next", and then select the Single Window Application template before clicking "Finish".
If the "Single Window Application" template option is not available in your version of Titanium, you can import the project source code attached to this tutorial instead. Download the project files, and unzip them to the directory that you wish to work from. Then follow these steps:
- From the File menu, select "Import" to open the Import Project pop-up window.
- From the import source list, select "Titanium" and then "Import Existing Titanium Project".
- In the Directory text field, browse to the folder that contains the project files you downloaded and unzipped.
- Click the Finish button, and a new project called "ProgressBar" will be created and made available in your Project Explorer pane.
If you haven't already done so, now is a good time to download the project files and unzip all the images in the "Resources/assets/images" directory to your own "Resources/assets/images" directory under the new project you just created. By default, Titanium also includes two icon files in the root of your “Resources” directory called KS_nav_ui.png and KS_nav_views.png – we don’t need either, so go ahead and move both of these to the trash. You can skip this step if you have already imported the entire project using the "Import" feature.
Step 2: Creating the Interface
As the Single Window Application template follows the CommonJS structure, it may be a bit different to what you're used to. Here, the app.js file pulls in the ApplicationWindow.js file using 'require', which in turn instantiates and returns our default Window object for the application. The ApplicationWindow file instantiates a new view called FirstView, which is coded within the FirstView.js file under the 'Resources/ui' folder. This FirstView view object is where we will be coding almost all of this tutorial. Delete any pre-generated code within the exports.FirstView = function() constructor and replace it with the following:
//FirstView Component Constructor
exports.FirstView = function() {
// Let's hide the status bar on the iphone/ipad for neatness
if(Ti.Platform.osname == 'iphone' || Ti.Platform.osname == 'ipad'){
Titanium.UI.iPhone.statusBarHidden = true;
}
// Create object instance, a parasitic subclass of Observable
var self = Ti.UI.createView({
backgroundColor: '#232323'
});
// The view below is the background of the slider
var progressBackgroundView = Ti.UI.createView({
width: 300,
height: 27,
left: ((Ti.Platform.displayCaps.platformWidth - 300) / 2),
top: (Ti.Platform.displayCaps.platformHeight / 2),
visible: false,
backgroundImage: 'assets/images/track-complete.png'
});
self.add(progressBackgroundView);
//the slider will show a graphical representation of the upload progress
//backgroundImage will reduce flicker as it doesn't redraw every width change like 'image' will
var progressView = Ti.UI.createImageView({
width: 0,
height: 25,
left: 1,
top: 1,
backgroundImage: 'assets/images/bar.jpg',
borderRadius: 3
});
progressBackgroundView.add(progressView);
//this label will show the upload progress as a percentage (i.e. 25%)
var lblSending = Ti.UI.createLabel({
width: 'auto',
right: ((Ti.Platform.displayCaps.platformWidth - 300) / 2),
top: ((Ti.Platform.displayCaps.platformHeight / 2) + 30),
text: '',
height: 20,
font: {fontFamily: 'Arial', fontSize: 14, fontWeight: 'bold'},
color: '#fff',
textAlign: 'right',
visible: false
});
self.add(lblSending);
//this button will appear initially and allow the
//user to choose a photo from their gallery
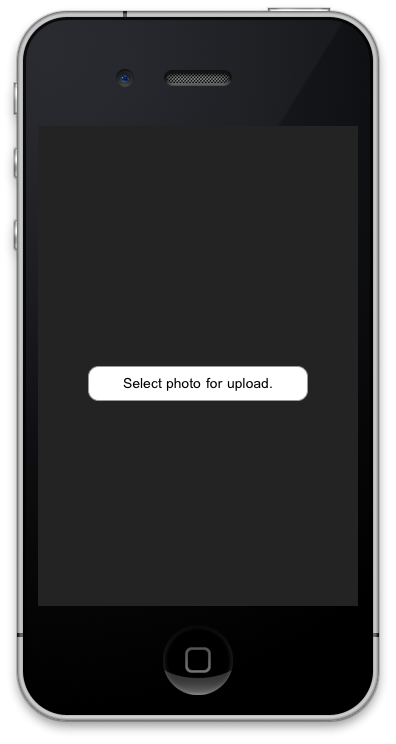
var btnChoosePhoto = Ti.UI.createButton({
width: 220,
height: 35,
title: 'Select photo for upload.',
font: {fontFamily: 'Arial'},
color: '#000000',
top: (Ti.Platform.displayCaps.platformHeight / 2),
visible: true
});
self.add(btnChoosePhoto);
return self;
};
Above we have created the basic structure of our progress bar, and a button that will allow the user to open the Photo Gallery on their device and select an image that they wish to upload. Run the application in the simulator now, and you should see a single button in the middle of the screen that looks something like this:
Step 3: Choosing an Image From the Gallery
Now that we have our basic interface setup, let's add an event listener and handler to btnChoosePhoto that will allow our user to choose a photo from their gallery. Type in the following code directly before the line 'self.add(btnChoosePhoto);'.
 btnChoosePhoto.addEventListener('click', function(e){
		Titanium.Media.openPhotoGallery({
	        success:function(event)
	        {
	            Ti.API.debug('Our type was: '+event.mediaType);
	            if(event.mediaType == Ti.Media.MEDIA_TYPE_PHOTO)
	            {
	            	UploadPhotoToServer(event.media);
	            }
	        },
	        cancel:function()
	        {
	        },
	        error:function(err)
	        {
	        	Ti.API.error(err);
	        },
	        mediaTypes:[Ti.Media.MEDIA_TYPE_PHOTO]
	    });
	});
In this "click" event handler, we are opening the Gallery and checking within the success section of the code to see whether the media type chosen was a photo by comparing the object to the constant value Ti.Media.MEDIA_TYPE_PHOTO. If this check passes, we next pass our event.media object into a new function called UploadPhotoToServer. It is here that we will perform both the file upload and show the user our progress bar as that upload occurs.
Step 4: Creating the PHP Server Code to Accept and Save our Uploaded Photo
We're going to create our server code to remotely save our photo and return its URL using PHP. PHP is a common, well known web language supported by many common web hosting services. Create a new file called upload.php and type into that file the following code:
<?php
    //this function returns a random 5-char filename with the jpg extension
    function randomFileName()
    {
       $length = 5;
       $characters = 'abcdefghijklmnopqrstuvwxyz';
       $string = '';
       for ($p = 0; $p < $length; $p++) {
          $string .= $characters[mt_rand(0, strlen($characters))];
       }
       return $string . '.jpg';
    }

    //create the random filename string and uploads target variables
    $randomString = randomFileName();
    $target = 'uploads/';
    $target = $target . $randomString;

    if(move_uploaded_file($_FILES['media']['tmp_name'], $target))
    {
        //output the location to our image
        echo 'http://mobiletuts.example.com/progressbar/uploads/' . $randomString;
    }
    else
    {
        echo "false";
    }
?>
This basic PHP script simply takes in a POSTED file called 'media' and then saves it with a random, five character filename of the JPG extension, which is generated by the randomFileName() function. If we manage to save the photo successfully, the script will then echo out the remote URL location of our new photo, otherwise it will echo out 'false' if it fails.
Now you must save and transfer the upload.php file to your server. Additionally, you will also need to create a new folder in the same directory as your upload.php file called 'uploads'. This is the folder where our images will be saved. Make sure the image folder has the proper write permissions (usually CHMOD 770) or our PHP script will not work.
Note that if you don't have access to a PHP server you can always write a script in the language of your choice (.NET, Ruby, etc) that performs the same task.
Step 5: Uploading a Photo and Showing the Progress via our Custom ProgressBar
Before we create our function, there's a couple of small things we need to do. The first is to create a variable called androidUploadProgress at the top of our exports.FirstView declaration. This will track the approximate upload progress of our file upload on Android devices. Unfortunately, at the time of writing Titanium Mobile for Android doesn't support the progress variable during the onsendstream event, meaning we can't calculate exactly how far through the upload we are on Android devices and must therefore use a best guess approach.
//this variable is for android to calculate the approx upload progress
var androidUploadProgress = 0;
Additionally, we need to create a new string variable in the "i18n/en/strings.xml" file which is going to hold the location of our server upload script. Add in the following string element after the existing 'welcome' one, replacing the URL with the location of your own PHP script.
<string name="server">http://mobiletuts.example.com/progressbar/upload.php</string>
Let's create our UploadPhotoToServer function now, by typing in the following code in your FirstView.js file. The best place for this function is underneath the section near the top that hides the statusBar on iOS devices. This starts with if(Ti.Platform.osname == 'iphone'. This function is going to check whether our user is online, and, if so, create a new HTTPClient that will send the media data to our PHP server where it will be saved and the full URL of the uploaded image returned.
This is a lengthy function and forms the "meat" of our Titanium application, so let's step through it piece by piece. First of all, let's create the function itself, along with the initial code which is going to hide the "Choose Photo" button and instead show the user our progress bar:
        //this function will take in a 'media' object (a photo from the gallery in this case)
	//and will upload it to our server via the PHP script. On a successful upload, our
	//server will return the new HTTP path of the image we uploaded, which we can then load
	//in the Safari/web browser so the user can view it.
	function UploadPhotoToServer(media){
		 if (Titanium.Network.online == true)
                 {
	           self.children[0].show(); //show the uploading slider progress bar
	           self.children[0].children[0].width = 0; //make sure the default value is zero
	           self.children[1].show(); //show the uploading label
	           self.children[1].text = 'Uploading photo, please wait...'; //set the label to default value
	           self.children[2].hide(); //hide the select photo button
		}
		else
		{
			alert('You must have a valid Internet connection in order to upload this photo.');
		}
        }
You will notice that we are accessing our display components by referring to their index within the FirstView's children object. We could have also simply declared our display components at the top of our FirstView.js file and then instantiated them, however, we've chosen to do things this way so that you understand how to access the child of a parent view. Next, we need to instantiate our XHR HttpClient object and create all of the event handlers necessary in order to track when our HttpClient upload is running and if it fails or has succeeded. Add the following code below what you previously typed. Note how we are accessing the "server" string property set earlier in the tutorial from our strings.xml file using L("server"), and how the parameter object our HttpClient post is sending is called "media", which exactly matches the "media" FILE object expected by our PHP script.
var xhr = Titanium.Network.createHTTPClient();

xhr.onerror = function(e){
	Ti.API.info('IN ERROR ' + e.error);
	alert('Sorry, we could not upload your photo! Please try again.');
  };

 xhr.onload = function(){
	Ti.API.info('IN ONLOAD ' + this.status + ' readyState ' + this.readyState);
 };

xhr.onsendstream = function(e){
	Ti.API.info('ONSENDSTREAM - PROGRESS: ' + e.progress);
};

// open the client
xhr.open('POST', L('server')); //the server location comes from the 'strings.xml' file

// send the data
xhr.send({
	media: media,
});
Now let's edit the onsendstream event handler function. In this function we are going to calculate the current upload progress of our file, and extend the width of the progress bar accordingly. Note that we do this slightly different for Android than we do for iOS, as the onsendstream property "progress" is currently not implemented for Android.
xhr.onsendstream = function(e){
	Ti.API.info('ONSENDSTREAM - PROGRESS: ' + e.progress);
	if(Ti.Platform.osname == 'android')
	{
	     //android doesn't support the "progress" variable during onsendstream yet :(
	     //we're going to dummy up a progress value for this based on each packet being about 2.5% of the total upload progress
	     //it won't be totally accurate, but it will give the user a good indicator that the upload is working
	    if(androidUploadProgress < 1) {
	         androidUploadProgress += 0.025;
		 self.children[1].text = 'Uploading photo, please wait... ' + (Math.round(androidUploadProgress * 100)).toString().replace(".","") + '%';
	         self.children[0].children[0].width = Math.round(298 * androidUploadProgress);
	   }
	 }
	 else
	  {
	      //else on ios devices, calculate the progress of the upload using e.progress
	      if(Math.round(e.progress * 100) <= 100) {
		     self.children[1].text = 'Uploading photo, please wait... ' + (Math.round(e.progress * 100)).toString().replace(".","") + '%';
		     self.children[0].children[0].width = Math.round(298 * e.progress); //set the slider value to the nearest whole integer (ie 25%, not 24.95%)
	      }
	   }
};
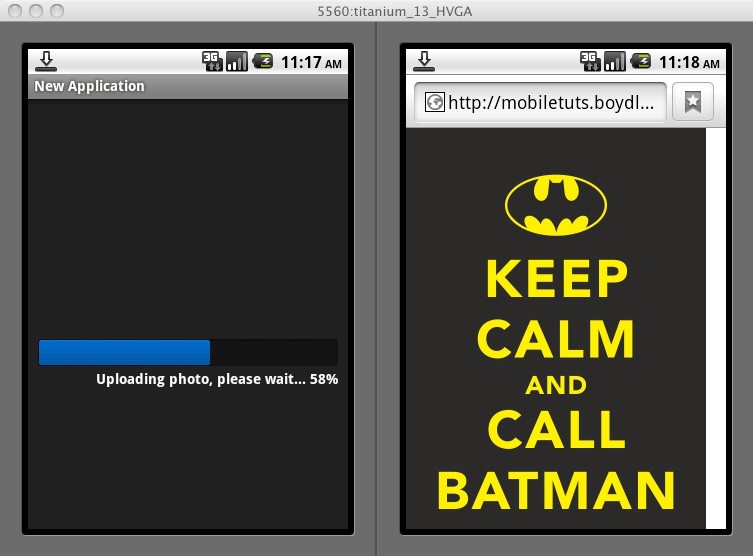
Try running your application in the simulator now, and after choosing a Gallery photo your progress bar should appear and should increase in size as the file uploads. It should look just like the one below:
Step 6: Finishing Up
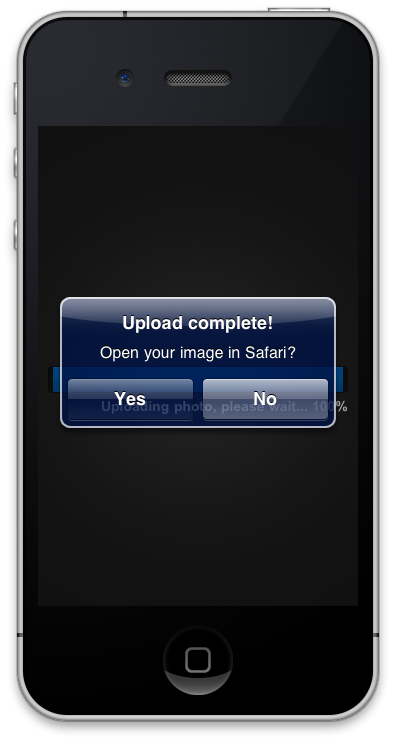
Finally, we need to extend the unload event handler function. In it, we need to ensure that the progress bar shows 100% (especially for Android), and we need to determine whether the file successfully uploaded to the server or not by checking whether the responseText property is set to "false". If it's not, we can then assume that everything worked A-OK and present our users with a confirmation alert dialog where they can choose to open their newly uploaded image in the web browser. We'll then reset our layout and all our object properties when ready for the next photo upload.
 xhr.onload = function(){
	Ti.API.info('IN ONLOAD ' + this.status + ' readyState ' + this.readyState);

	if(this.responseText != 'false')
  {
	  var url = this.responseText; //set our url variable to the response
	  self.children[0].children[0].width = 298;  //set the progress to 100% (298px based on our design)

	  //if we successfully uploaded, then ask the user if they want to view the photo
	   var confirm = Titanium.UI.createAlertDialog({
	        title: 'Upload complete!',
	        message: 'Open your image in the browser?',
	         buttonNames: ['Yes', 'No']
	  });

         confirm.addEventListener('click', function(conEvt) {
		//if the index selected was 0 (yes) then open in safari
		 Ti.API.info(conEvt.index);
		 if(conEvt.index === 0){
		    //open our uploaded image in safari
		     Ti.Platform.openURL(url);
	      }

		//reset the upload button
		 self.children[0].hide(); //hide the status bar
	         self.children[1].hide(); //hide the status label
	         self.children[2].show(); //show the upload button again
	         androidUploadProgress = 0; //reset the android progress value
	   });

	   confirm.show();
	}
	else {
		alert('Whoops, something failed in your upload script.');
	        self.children[0].hide(); //hide the status bar
	        self.children[1].hide(); //hide the status label
	        self.children[2].show(); //show the upload button again
	        androidUploadProgress = 0; //reset the android progress value
	}
};
That's it! Run the application now either in the simulator (Android or iPhone) or on your device. You should still see the file upload progress meter animate from 0-100%, and when completed an alert dialog should appear like the one below, giving you the option to view the newly uploaded photo in the browser.


Comments