If you haven't had the chance to use the WordPress Gallery Shortcode in the past, this is going to be a great starting out point for you. For others who have used it, we are going to be covering some features of the shortcode that you might not have considered yet. In this tutorial we will be covering a specific WordPress shortcode, [gallery] and the different ways to use it.
Introduction
WordPress has little code snippets, called shortcodes, that can be used in Posts, Pages, and Post Types. WordPress has many shortcodes, which can be added to using the shortcode API, covered here. These shortcodes, placed in the content editor area or placed in a theme file, are connected to functions that run when the content or post is loaded. WordPress shortcodes are flexible, often allowing you to specify options that customize the way the shortcode works.
Today we'll be going over the [gallery] shortcode specifically, but you can also read up on our other intro posts to shortcode usage in WordPress:
- Getting Started With WordPress Shortcodes
- Quick Tip: Using Shortcodes in Theme Development
- Quick Tip: Improving Shortcodes with the has_shortcode() Function
- Using Shortcodes to Speed Up Posting with Popular Services
Basic Usage
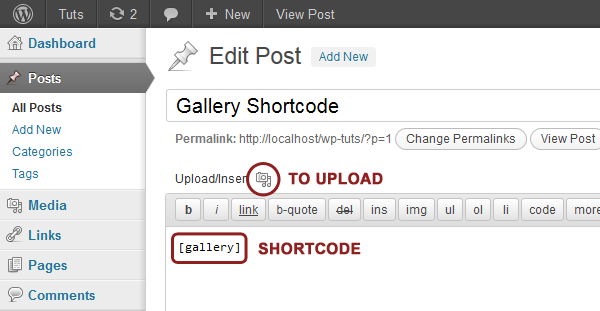
To get started with the [gallery] shortcode go to Posts section and add a New Post which we will call "Gallery Post". In the editor area place the shortcode [gallery] (in either the Visual/HTML View). After that press Publish/Update.
The page will be refreshed and if you tab to the Visual editor you will now see a dashed box with a photo icon in the middle. If you click on the box, in the top left corner you will see another picture icon. Click on that icon and a dialog window will popup. This dialog window will allow you to upload and attach images to the post. Go ahead and either drag and drop your pictures into the drop region or press Select Files and choose the photos you want to upload.
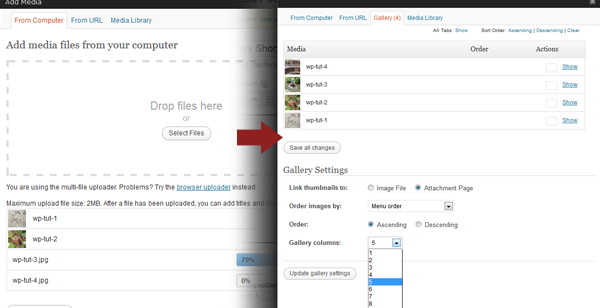
After you upload the images you will want to press "Save all changes". That will bring you to the "Gallery" tab in that same dialog window. You will see thumbnails of all the images you just uploaded as well as some settings. Look around, change some settings to see the different options. Now adjust the Gallery columns to 5 and then press "Update gallery settings".
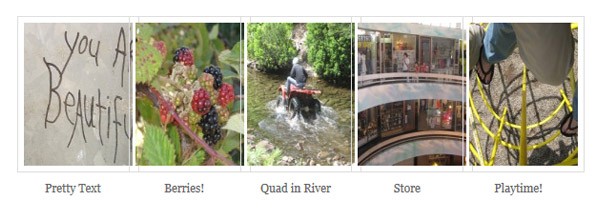
Now go ahead and press View Post. You will see the post with a gallery grid of images, with 5 columns. If you click on an image, it will take you to the image attachment post.
Gallery Shortcode Output
Now that we see the [gallery] shortcode is working, let's go ahead and check out the source code and see what is being outputted.
<style type='text/css'>
 #gallery-1 {
      margin: auto;
 }
 #gallery-1 .gallery-item {
      float: left;
      margin-top: 10px;
      text-align: center;
      width: 20%;
 }
 #gallery-1 img {
      border: 2px solid #CFCFCF;
 }
 #gallery-1 .gallery-caption {
      margin-left: 0;
  }
</style>
What you see above is the first part of the code WordPress automatically generates per [gallery] shortcode.The CSS is automatically outputted for each [gallery] shortcode that is used. There are default elements and classes for each gallery and each element wrapping an image. If you had a second gallery on the page it would ouput #gallery-2 ..
Below is the rest of the code, the HTML generated by the gallery. You can see the gallery is wrapped in a div and each image and caption is wrapped in elements as well.
<div id='gallery-1' class='gallery galleryid-1 gallery-columns-5 gallery-size-thumbnail'>
	<dl class='gallery-item'>
			<dt class='gallery-icon'>
				<a href='http://localhost/wp-tuts/2011/12/10/hello-world/wp-tut-1/' title='Pretty Text'><img width="150" height="150" src="http://localhost/wp-tuts/wp-content/uploads/2011/12/wp-tut-1-150x150.jpg" class="attachment-thumbnail" alt="Pretty Text" title="Pretty Text" /></a>
			</dt>
				<dd class='wp-caption-text gallery-caption'>
				Pretty Text
				</dd></dl><dl class='gallery-item'>
			<dt class='gallery-icon'>
				<a href='http://localhost/wp-tuts/2011/12/10/hello-world/wp-tut-2/' title='Berries!'><img width="150" height="150" src="http://localhost/wp-tuts/wp-content/uploads/2011/12/wp-tut-2-150x150.jpg" class="attachment-thumbnail" alt="Berries!" title="Berries!" /></a>
			</dt>
				<dd class='wp-caption-text gallery-caption'>
				Berries!
				</dd></dl><dl class='gallery-item'>
			<dt class='gallery-icon'>
				<a href='http://localhost/wp-tuts/2011/12/10/hello-world/wp-tut-3/' title='Quad in River'><img width="150" height="150" src="http://localhost/wp-tuts/wp-content/uploads/2011/12/wp-tut-3-150x150.jpg" class="attachment-thumbnail" alt="Quad in River" title="Quad in River" /></a>
			</dt>
				<dd class='wp-caption-text gallery-caption'>
				Quad in River
				</dd></dl><dl class='gallery-item'>
			<dt class='gallery-icon'>
				<a href='http://localhost/wp-tuts/2011/12/10/hello-world/wp-tut-4/' title='wp-tut-4'><img width="150" height="150" src="http://localhost/wp-tuts/wp-content/uploads/2011/12/wp-tut-4-150x150.jpg" class="attachment-thumbnail" alt="Store" title="wp-tut-4" /></a>
			</dt>
				<dd class='wp-caption-text gallery-caption'>
				Store
				</dd>
		</dl>
			<br style='clear: both;' />
		</div>
Shortcode Options
Now that we got a taste of the basic usage of the gallery shortcode, let's check out all the different options for customizing the [gallery] output. The [gallery] shortcode options include columns, id, size, link, include, exclude, orderby, order, itemtag, icontag, and captiontag.
columns
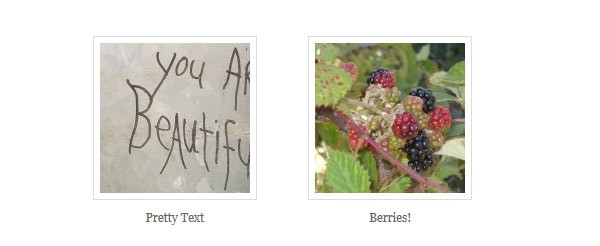
[gallery columns="2"]
If you go back to the HTML tab in the post editor you will see the shortcode says [gallery columns="5"]. When we adjusted the column settings in the gallery interface, it passed those settings into the shortcode. Now instead of using the graphic interface, let’s manually specify the settings through the shortcode. Let’s change the colums=”5” to colums=”2”. Now go View Post - you can see that there is a grid of the gallery pictures, and instead of 5 images per column, there is 2. Let’s view the source again on the "Gallery Post" and see what WordPress outputs. Right before the gallery in the source we can see the CSS - notice the difference from the previous CSS output? This CSS is automatically generated by the [gallery] shortcode. If you change the columns you will notice how the CSS changes.
#gallery-1 .gallery-item {
	float: left;
	margin-top: 10px;
	text-align: center;
	width: 50%;
}
The CSS essentially adjusts the width to 100 / $columns, $columns being either 3 by default or a number we specify in the shortcode .
id
[gallery id="4"]
By default, the gallery shortcode pulls the gallery associated with the current post id. However if you specify ID, you can pull images from another post. To test this lets add a new post and call it Other Page. Go ahead and upload some different pictures to Other page and press Publish. Then up in the browser URL address, look for post=.
Remember that number and then go back to Gallery Shortcode post and then add the gallery shortcode [gallery id="99"] (use the number id from the other post in place of 99). Update the Gallery Shortcode post and then go View Post. Notice how there are now two galleries, one with images from the "Gallery Shortcode" post and the other images are from the "Other Page". You can also adjust the options on the shortcode, changing columns, order etc.
size
[gallery size="large"]
The default size for the gallery images is thumbnail. Other options include "thumbnail", "medium", "large" and "full". "thumbnail", "medium", "large sizes are specified under WordPress Settings > Media. Full size is simply the full size of the image. If we change the settign to size="large" then WordPress will output the image and crop/scale it to the associated dimensions. The default "large" size for WordPress is Max Width 1024 & Max Height 1024 , so images will be scaled and cropped to fit that size. (side note, images can be custom cropped in WordPress the way you want.)

*Side note, your images will be skewed if they are much larger than the specified size.
orderby
[gallery orderby="menu_order"]
By default, the images are ordered by 'menu_order' (which I highly recommend you leave) other options include 'ID' ,'title' - order by title. ,'date' - order by date image was uploaded, 'modified' - order by last date image was updated or changed & 'RAND' - order items randomly.
order
[gallery order="ASC"]
After you set the 'orderby' you can set 'ASC' or 'DESC' (don't use if 'orderby' is not set or set is set to 'menu_order'). So for example, if you want the images to be listed alphabetically backwards (Z-A) by image title you make sure orderby="title" and then also specify order="DESC" (default is ASC). [gallery orderby="title" order="DESC"]
link
[gallery link="file"]
By default the gallery images each link to the attachment page of each image. So in other words, each image goes to essentially a single post, with the image. If you want to link to the source of the image (my-image-name.jpg) you can pass in [gallery link="file"].
include
[gallery include="23,39,45"]
Sometimes you may want to include only very specific images. You can do that by using the include option, [gallery include="23,39,45"] (23,39,45 are an example, use ID's that match up with your images) You pass in the ID of each image you want associated. To find the ID's of the images go to Media > Library and then click on each of the images you want.
In the browser URL bar look for wp-admin/media.php?attachment_id= and then write down and use that number in the gallery shortcode following the format shown above.
exclude
[gallery exclude="21,32,43"]
This option is pretty much exactly what it sounds. If you follow the instructions for include, find the ID's of the images you DON'T want in the gallery. After you find the images you don't want included (only look for images you don't want that are attached to the post) [gallery exclude="21,32,43"]. Please note, if you use include and exclude the internet will break! Okay not really, but it won't work! It will ignore the exclude and use only the include.
itemtag, icontag , captiontag
[gallery itemtag="section" icontag="div" captiontag="figure"]
These options can actually change the HTML elements that WordPress outputs with the gallery shortcode. The default option tags are as follows: itemtag=""dl", icontag="dt", captiontag="dd". In essence the default gallery shortcode for these options is [gallery itemtag="dl" icontag="dt" captiontag="dd"]. Say we wanted to change the HTML tags, we could easily pass in the element we would prefer used, so we could use something like [gallery itemtag="section" icontag="div" captiontag="figure"]. Try those options out and you can see the difference in output.
<div id='gallery-1' class='gallery galleryid-1 gallery-columns-2 gallery-size-thumbnail'><section class='gallery-item'>
		<div class='gallery-icon'>
			<a href='http://localhost/wp-tuts/2011/12/10/hello-world/wp-tut-1/' title='Pretty Text'><img width="150" height="150" src="http://localhost/wp-tuts/wp-content/uploads/2011/12/wp-tut-1-150x150.jpg" class="attachment-thumbnail" alt="Pretty Text" title="Pretty Text" /></a>

		</div>
			<figure class='wp-caption-text gallery-caption'>
			Pretty Text
			</figure></section><section class='gallery-item'>
		<div class='gallery-icon'>
			<a href='http://localhost/wp-tuts/2011/12/10/hello-world/wp-tut-2/' title='Berries!'><img width="150" height="150" src="http://localhost/wp-tuts/wp-content/uploads/2011/12/wp-tut-2-150x150.jpg" class="attachment-thumbnail" alt="Berries!" title="Berries!" /></a>
		</div>
			<figure class='wp-caption-text gallery-caption'>
			Berries!
			</figure></section><br style="clear: both" /><section class='gallery-item'>

		<div class='gallery-icon'>
			<a href='http://localhost/wp-tuts/2011/12/10/hello-world/wp-tut-3/' title='Quad in River'><img width="150" height="150" src="http://localhost/wp-tuts/wp-content/uploads/2011/12/wp-tut-3-150x150.jpg" class="attachment-thumbnail" alt="Quad in River" title="Quad in River" /></a>
		</div>
			<figure class='wp-caption-text gallery-caption'>
			Quad in River
			</figure></section><section class='gallery-item'>
		<div class='gallery-icon'>
			<a href='http://localhost/wp-tuts/2011/12/10/hello-world/wp-tut-4/' title='wp-tut-4'><img width="150" height="150" src="http://localhost/wp-tuts/wp-content/uploads/2011/12/wp-tut-4-150x150.jpg" class="attachment-thumbnail" alt="Store" title="wp-tut-4" /></a>
		</div>

			<figure class='wp-caption-text gallery-caption'>
			Store
			</figure></section><br style="clear: both" />
		<br style='clear: both;' />
	</div>
Theming the Gallery
If you are creating or customizing a theme there are some primary classes you want to look out for. These are classes that the gallery outputs in the HTML, every time a [gallery] shortcode is used.
Gallery Wrap
The "Gallery Wrap" wraps every instance of the [gallery] shortcode. That means if you use the [gallery] shortcode three times, this wrap will exist in the source code three times. Each time the [gallery] is used in a post, the output id is incremented.
<div class="gallery galleryid-1 gallery-columns-3 gallery-size-large" id="gallery-1"><div>
-
.gallery- wraps every gallery included in a post -
.galleryid-{$id}- increments, if second [gallery] then the {$id} would be 2 -
.gallery-columns-{$columns}- changes depending on column option -
.gallery-columns-{$size}- changes depending size option
Other Elements
-
.gallery-item- wraps each gallery image and caption -
.gallery-icon- inside of.gallery-item, wraps anchor to image (file or link) and image -
.gallery-caption- inside of.gallery-item, wraps image caption text
Enhancing Our Gallery CSS
So now that we understand the basics of the [gallery] shortcode, the different options and it's available CSS/classes let's check out how we can enhance the CSS that is already there. (For this section and the next, we are assuming you understand the basics of CSS.) In the TwentyEleven theme, the default gallery looks like the gallery from the screenshots in the previous sections.
WordPress already outputs the basic CSS for the layout, but we can add some more styling to give the gallery extra pizzaz. In the theme that we are working with (for TwentyEleven /wp-content/themes/twentyeleven/style.css or other themes /wp-content/themes/*themename/style.css) open the style.css in an editor add this code to the end of the stylesheet.
.gallery .gallery-item{
	position:relative;
}

.gallery .gallery-caption{
	position:absolute;
	bottom:4px;
	text-align:center;
	width:100%;
}

.gallery .gallery-icon img{
	border-radius:2px;
	background:#eee;
	box-shadow:0px 0px 3px #333;
	padding:5px 5px 40px 5px;
	border:solid 1px #000;
}
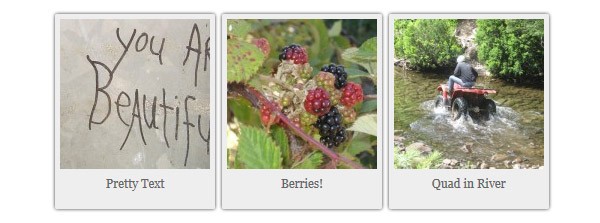
Knowing the classes of the element we are able to target the specific parts of the gallery. With this styling we are able to target each of the images and give them a Polaroid'ish look
Overriding Gallery CSS
In some cases you may want to override the existing CSS for the [gallery] shortcode. Since we know the elements and the CSS the [gallery] outputs, if we wanted to, we could easily override the CSS - we could do this by using CSS specificity. Since there is only one layer of specificity and the only id being specified is #gallery-1 (1 for the first gallery, and numbering continues for each gallery in post) you could override the CSS simply by finding a parent id (for TwentyEleven #content works) and then also specify .gallery, since it's a class attached to each gallery.
#content .gallery {
	/* This style would override the default #gallery-1 styling */
	margin:0px;
	display:none;
}
Obviously above is a basic example of overriding the CSS, but you get the gist!
Conclusion
The builtin [gallery] shortcode for WordPress is pretty handy with all sorts of options to set up a custom gallery. It's not perfect, as we saw in a screen earlier, but it works very well. Stay tuned, and in the upcoming weeks learn how to retool the gallery shortcode with lightbox and slider options!

Comments