The success of any open-source framework depends on certain factors, and extensibility is one of the important factors amongst them. It allows the community to add new features and enrich its core functionality, resulting in a very powerful end product. Of course, it's a must-have feature when it comes to the development of custom extensions as well.
In this article, we'll see how you could alter the core files of the OpenCart framework by implementing an XML-based OCMOD extension. Much of its functionality is borrowed from its predecessor, the vQmod system. In fact, it's a much simpler system, providing fewer features compared to vQmod. Having said that, it has covered all the important replacement patterns.
The OCMOD system is an XML-based search and replace system. You define the XML file as per the conventions of OCMOD, and it'll do the rest. So, we could say that you could alter any file in the core framework!
Let's list a couple of examples to understand what it's capable of:
- Insert a certain piece of code before any particular line in the file.
- Replace a block of code with your custom code block.
- Find a string in the file using regexp and replace it with another string.
- Alter the schema of the OpenCart database.
- Many more...
As you can see, it's a quite a list of things you could do with OCMOD. In addition, it's a good practice to use it instead of directly modifying the core files, which is strongly discouraged.
In the next section, we'll go ahead and create a simple OCMOD module for demonstration purposes. I assume that you're using the latest version of OpenCart.
How OCMOD Works
You could create and install an OCMOD extension in two different ways. Either you need to build a zip file with the ".ocmod.zip" extension, or the other way is to create just a single XML file having the ".ocmod.xml" extension.
The Zip File Option
The option of the zip file allows you to include a couple of other files as well, so that you could also do other operations like altering the database schema, uploading new files/directories to the OpenCart installation, etc. Let's see which options are available when using the zip version of the OCMOD extension.
- upload: The contents under this directory will be copied as they are to the OpenCart root.
- install.sql: In this file, you could include SQL queries to alter the database.
- install.php: In this file, you could include custom PHP code which is required by the modification code.
- install.xml: It's the most important file, which contains the XML modification code.
Of course, it's not mandatory to create each and every file/directory listed above, but you must create an install.xml file to make sure that your OCMOD extension can be installed.
The XML File Option
This is a much easier way to create an OCMOD extension—you just need to create an XML file with the ".ocmod.xml" extension. We could say that it's identical to the install.xml file and contains the XML modification code which we've discussed in the previous section.
To keep things simple, we'll go with the later option and create an OCMOD extension in the next section.
Create the OCMOD Module Files
As a developer, more often than not you'll be placed in a situation where you'll be tempted to alter the core files. So, we'll take a real world example of how to tackle this issue using an OCMOD extension.
Let's assume that you want to alter the way the title is displayed on the product detail page. The following code is responsible for assigning the proper title to the product detail page. You could find it in the file located at catalog/controller/product/product.php.
$data['heading_title'] = $product_info['name'];
And you want something like this:
$data['heading_title'] = strtoupper($product_info['name']);
Let's see how we could achieve that using an OCMOD extension. Create a product_title.ocmod.xml file with the following contents.
<?xml version="1.0" encoding="utf-8"?>
<modification>
    <name>Product Title Modification</name>
    <code>Code_Tutsplus_Product_Title</code>
    <version>1.0</version>
    <author>Code Tutsplus</author>
    <link>http://code.tutsplus.com</link>
    <file path="catalog/controller/product/product.php">
        <operation>
            <search><![CDATA[
            $data['heading_title'] = $product_info['name'];
            ]]></search>
            <add position="replace"><![CDATA[
            $data['heading_title'] = strtoupper($product_info['name']);
            ]]></add>
        </operation>
    </file>
</modification>
As
you can see, most of the tags are self-explanatory. The most
important tag is <file>, which defines the file name on
which the operation will be performed. The <search> tag is used
to search the code which we're looking for, and finally we've used the <add>
tag to inject our code.
Install the Module From the Back-End
Now that we've finished with our modification file, let's see how to install it from the back-end of OpenCart. Head over to the back-end and navigate to Extensions > Extension Installer. Click on the upload button and select the file which we created in the previous section. If everything goes fine, you should see a success message.
Navigate to Extensions > Modifications, and you should see your OCMOD extension listed on that page.
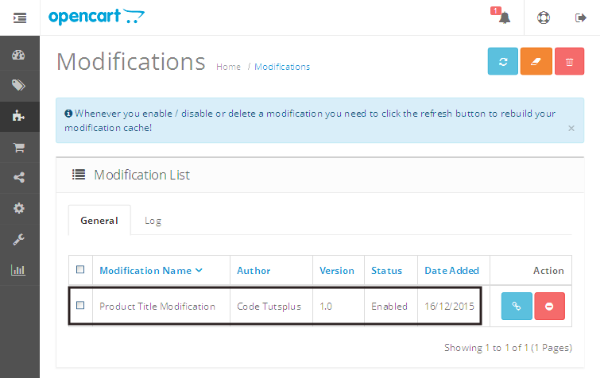
This means that you've installed the extension successfully! Now, just click on the refresh icon in the top right section so that it's detected by OpenCart and ready to be applied to the front-end.
In the next section, we'll go through the front-end to see if it's applied to the product detail page appropriately.
Testing in the Front-End
Head over to the front-end, and navigate to any product detail page. You should be able to see that the product title is now capitalized.

Although this was a very simple example to demonstrate the power of OCMOD, you could do a lot more stuff with this utility and alter the core files if needed.
Conclusion
Today, we've discussed the new modification system in OpenCart 2, and we went through the whole process to demonstrate how you could use it to alter the core files of OpenCart. Feel free to post your queries!

Comments