As the first IDE (Integrated Development Environment) dedicated entirely to Android, the Google-backed Android Studio is an exciting prospect for Android developers. But it also means getting to grips with some new technology, most notably the Gradle build system.
This article gets you up and running with Android's new build system, from the basics of what Gradle is and what it does, to an in-depth look at some of the most important Gradle files, to learning how to execute and monitor Gradle tasks.
You'll also take a closer look at the various Gradle tool windows in Android Studio, and learn how to add dependencies to a project, all with no previous Gradle experience necessary.
The first step in getting to grips with Android's new build system is understanding exactly what Gradle is and why its inclusion in Android Studio is such good news for Android developers.
1. What is Gradle?
Gradle is an automated build toolkit that can integrate into lots of different environments, via plugins. In Android Studio, Gradle integration is achieved via the aptly-named Android Gradle plugin.
If you've never used Gradle before, it may seem like a frustrating barrier to entry when you're considering making the move to Android Studio. However, Gradle has lots to offer to Android developers, so it's well worth investing some time into learning the ins and outs of Gradle. Here's just a few of the things you can do with Gradle.
Minimize Configuration Required for New Projects
Gradle has a set of default configuration settings that are automatically applied to every project you create in Android Studio. If you're developing a project that doesn't adhere to these default configuration rules, Gradle is easy to customize.
Declare Project Dependencies
Dependencies can be modules, JAR files or libraries, and they can be located either on the local file system or a remote server.
Test Your Project
Gradle automatically generates a test directory and a test APK from your project's test sources and can run your tests during the build process.
Generate Signed APKs
If you add all the necessary information, such as keyPassword and keyAlias, to your Gradle build file, you can use Gradle to generate signed APKs.
Generate Multiple APKs from a Single Module
Gradle can generate multiple APKs with different package and build configurations from a single module. This feature is particularly handy for Android developers, for several reasons:
1. Support a Wide Range of Devices
A big part of developing for the Android platform is supporting as many different Android devices and versions of the Android operating system as possible. The Google Play store even has multi APK support, so you can create multiple versions of your app, where each version targets a different device configuration, offering them as a single Play store listing.
This is where Gradle comes in. You can use Android's new build system to generate multiple APK variants from the same module. Just give these variants the same package name and you can upload them to the same Google Play listing.
2. Offer Different Versions of an App
Sometimes, you’ll want to list multiple versions of your app in the Play store, for example, if you're offering a free and a "Pro" version of your app. Again, you can use Gradle to generate multiple APKs from the same module and give each APK a different package name. You can then upload each APK to the Play store separately.
2. Exploring the Gradle Files
Whenever you create a project in Android Studio, the build system automatically generates all the necessary Gradle build files.
Since you'll encounter the same set of Gradle files every time you create an Android Studio project, we'll create a basic sample project and then take a closer look at these automatically generated files.
The first step is creating your sample project:
- Launch Android Studio.
- Click Start a new Android Studio project.
- Give your project a name, enter a domain, and choose where your sample project should be stored. Click Next.
- Ensure only Phone and tablet is selected, and accept the default Minimum SDK settings. Click Next.
- Select Blank Activity and click Next.
- Stick with the default settings, and click Finish.
Gradle Build Files
Gradle build files use a Domain Specific Language or DSL to define custom build logic and to interact with the Android-specific elements of the Android plugin for Gradle.
Android Studio projects consist of one or more modules, which are components that you can build, test, and debug independently. Each module has its own build file, so every Android Studio project contains two kinds of Gradle build files:
- Top-Level Build File: This is where you'll find the configuration options that are common to all the modules that make up your project.
- Module-Level Build File: Each module has its own Gradle build file that contains module-specific build settings. You'll spend most of your time editing module-level build file(s) rather than your project's top-level build file.
To take a look at these build.gradle files, open Android Studio's Project panel (by selecting the Project tab) and expand the Gradle Scripts folder. In our sample project, the first two items in the list are your project's top-level and module-level build files.
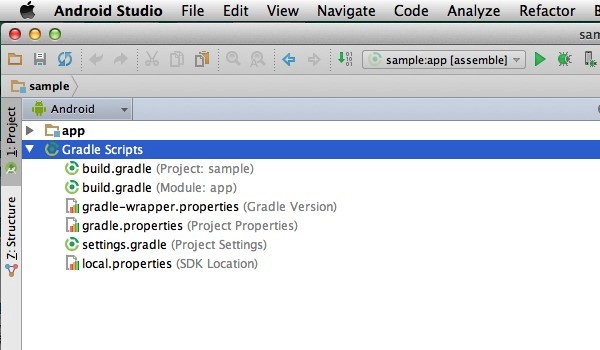
Our sample project only has a single module-level build file, but the screenshot below gives you an idea of how the Gradle Scripts folder might look for a project with multiple modules.

Top-Level Gradle Build File
Every Android Studio project contains a single, top-level Gradle build file. This build.gradle file is the first item that appears in the Gradle Scripts folder and is clearly marked Project.
Most of the time, you won't need to make any changes to this file, but it's still useful to understand its contents and the role it plays within your project. Below is an annotated version of a typical top-level build file.
buildscript {

//Project-level Gradle build files use buildscript to define dependencies.//

    repositories {

        jcenter()
    }

//This file relies on the jJCenter repository.//

    dependencies {

   classpath 'com.android.tools.build:gradle:1.0.0'

//Project is dependent on version 1.0.0 of the Android plugin for Gradle.//

    }
}

allprojects {

//Defines the dependencies required by your application.//

    repositories {
        jcenter()
    }
}

//Application depends on the jCenter repository.//
Module-Level Gradle Build Files
In addition to the project-level Gradle build file, each module has a Gradle build file of its own. Below is an annotated version of a basic, module-level Gradle build file.
apply plugin: 'com.android.application'

//Since this project is an Android app, the build.gradle file utilises the Android plugin.//

android {

//The following section configures all your project’s Android-specific parameters, and tells Gradle which version of Android it should build your project with. If you’ve developed Android applications before, the following should all be familiar.//

    compileSdkVersion 21

//The API your project is targeting.//

    buildToolsVersion "21.1.1"

////The version of the build tools you want to use.//

    defaultConfig {

        applicationId "com.example.jessica.myapplication"

//Defines your application’s ID. Note, earlier versions of the Android plugin used ‘packageName’ instead of ‘applicationID.’//

        minSdkVersion 16

//The minimum API required by your project.//

        targetSdkVersion 21

//The version of Android you’re developing your application for.//

versionCode 1

        versionName "1.0"
    }

    buildTypes {
        release {

//‘BuildTypes’ controls how your app is built and packaged. If you want to create your own build variants, you’ll need to add them to this section.//

            minifyEnabled true

//Gradle runs ProGuard during the build process.//

            proguardFiles getDefaultProguardFile('proguard-android.txt'), 'proguard-rules.pro'

//Applies the default ProGuard settings from the Android SDK.//

        }
    }
}

dependencies {

//Declares the dependencies for the current module.//

   compile fileTree(dir: 'libs', include: ['*.jar'])

//Although you can add JAR files by compiling them individually, this can be time-consuming if you have lots of JARs. In this example, we’re telling Gradle to add all the JAR files in the app/libs folder.//

  compile 'com.android.support:appcompat-v7:21.0.3'

//To create more dependencies, add them to the depencies closure.//

}
Other Gradle Files
In addition to the build.gradle files, your Gradle Scripts folder contains some other Gradle files. Most of the time you won't have to manually edit these files as they'll update automatically when you make any relevant changes to your project. However, it's a good idea to understand the role these files play within your project.
gradle-wrapper.properties (Gradle Version)
This file allows other people to build your code, even if they don't have Gradle installed on their machine. This file checks whether the correct version of Gradle is installed and downloads the necessary version if necessary. In our sample app, gradle-wrapper.properties contains the following:
distributionBase=GRADLE_USER_HOME

//Determines whether the unpacked wrapper distribution should be stored in the project, or in the Gradle user home directory.//

distributionPath=wrapper/dists

//The path where the Gradle distributions required by the wrapper are unzipped.//

zipStoreBase=GRADLE_USER_HOME

zipStorePath=wrapper/dists

distributionUrl=https\://services.gradle.org/distributions/gradle-2.2.1-all.zip

//The URL where the correct version of Gradle should be downloaded from.//
settings.gradle
This file references all the modules that make up your project. Since our sample project has a single module, this file is very straightforward as you can see below.
include ':app'
gradle.properties (Project Properties)
This file contains configuration information for your entire project. It's empty by default, but you can apply a wide range of properties to your project by adding them to this file.
local.properties (SDK Location)
This file tells the Android Gradle plugin where it can find your Android SDK installation. For example:
sdk.dir=/Users/jessica/Library/Android/sdk
Note that local.properties contains information that's specific to the local installation of the Android SDK. This means that you shouldn't keep this file under source control.
3. Android Studio User Interface
Now that you're familiar with all the automatically generated Gradle files, it's time to move onto interacting with the Gradle build system. The good news is that you can interact with Gradle directly from the Android Studio user interface.
Around the vertical and horizontal edges of Andorid Studio are tabs that open various tool windows. In the next few sections, I'll introduce you to some of Android Studio's Gradle-specific tool windows and show how to interact with the Gradle build system via these windows.
Gradle Tasks Window
You can use the Gradle tasks window to browse and execute the various tasks involved in compiling your project into an executable application.
To open the Gradle tasks window, click the Gradle tab along the right-hand side of your Android Studio installation. If you've customized your Android Studio user interface and can no longer find the Gradle tab, then you can select View > Tool Windows > Gradle instead.
In the Gradle tasks tab, double-click your project, followed by your module. You'll see a list of all the Gradle tasks related to this module.
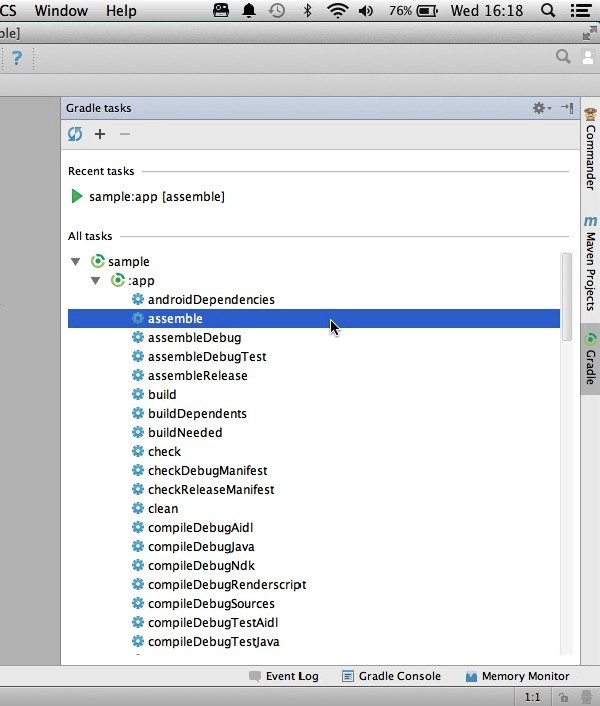
When you double-click a task in the Gradle tasks window, it starts executing and the output appears in another Gradle-specific window, the Gradle Console.
Gradle Console
The Gradle Console displays the output of Gradle tasks as they execute, alongside any error messages or warnings.
To open the Gradle Console, select the Gradle Console tab towards the bottom-right of your IDE. If you've customized Android Studio's user interface and can no longer find this tab, you can always select View > Tool Windows > Gradle Console instead.
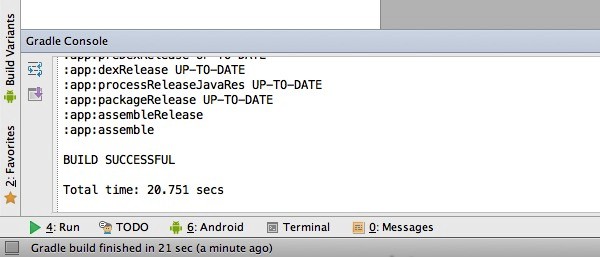
Let's take the Gradle Console for a spin. In the Gradle tasks window, find the assemble task, which builds a release version of your application ready for distribution, and double-click it. As the assemble task executes, the task's output appears in the Gradle Console.
The Gradle Console will then either notify you that your project has built successfully or it will display a "build failed" message alongside information about why your build has failed.
Terminal
You can also run Gradle tasks from Android Studio's integrated Terminal. If you know exactly what Gradle task you want to execute, the Terminal is usually much quicker and more convenient than browsing the lists of tasks in the Gradle Console.
To open the Terminal, click the Terminal tab towards the bottom-left of Android Studio, or select View > Tool Windows > Gradle Console. The Terminal will then open with the current directory already selected. You can then execute Gradle tasks by typing them into the Terminal and pressing either the Return or the Enter key on your keyboard.
4. Adding Dependencies
In this section, we'll explore how you can use Gradle to manage your project's module dependencies, local binary dependencies, and remote binary dependencies.
When it comes to adding dependencies to your project, Gradle gives you several options.
Option 1: Drop Files Into Project's libs/directory
The relevant build.gradle file will then update automatically.
Option 2: Modify build.gradle File Manually
Open your build.gradle file and add a new build rule to the dependencies closure. For example, if you wanted to add Google Play Services, your project's dependencies section would look something like this:
dependencies {

       compile fileTree(dir: 'libs', include: ['*.jar'])

     compile 'com.google.android.gms:play-services:6.5.+'

   }
Option 3: Use Android Studio's User Interface
In the Project panel, Control+Click the module you want to add the dependency to and select Open Module Settings.
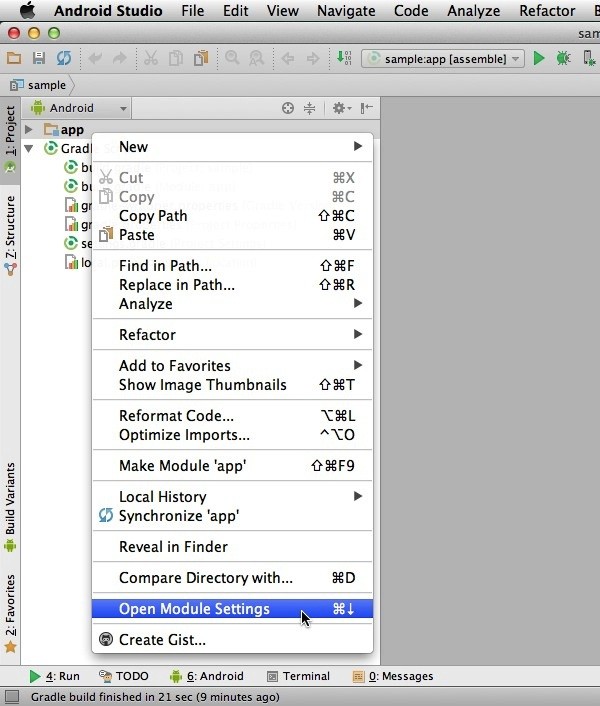
Select the Dependencies tab, followed by the + button in the bottom-left corner. You can choose from the following list of options:
- Library Dependency
- File Dependency
- Module Dependency
You can then enter more information about the dependency you want to add to your project. For example, if you choose Library Dependency, Android Studio displays a list of libraries for you to choose from.
Once you've added your dependency, check your module-level build.gradle file. It should have automatically updated to include the new dependency.
Conclusion
This article has introduced you to all the automatically generated Gradle build files you'll find in your typical Android Studio project, particularly the top-level and module-level Gradle build files. You've also learned how to interact directly with the Gradle build system from the Android Studio user interface.
If you're interested in learning more about Gradle, then you'll find lots of additional information on the Android developer website and on the Gradle website.

Comments