Throughout this series, we've been taking a look at WordPress taxonomies: what they are, how they work, how to differentiate them between the different types that exist, and how they're stored in the underlying database.
The only thing we've yet to do is actually put together a plugin that demonstrates how to use the API to implement our own custom taxonomies. So in this post, we're going to do exactly that.
Recall from the first post in this series:
Taxonomy is one of those words that most people never hear or use. Basically, a taxonomy is a way to group things together.
And throughout this series, we've been using photography and videography as our examples of classifications. So for the plugin that we're going to build, we'll include both hierarchical and non-hierarchical taxonomies relevant to both of these classifications.
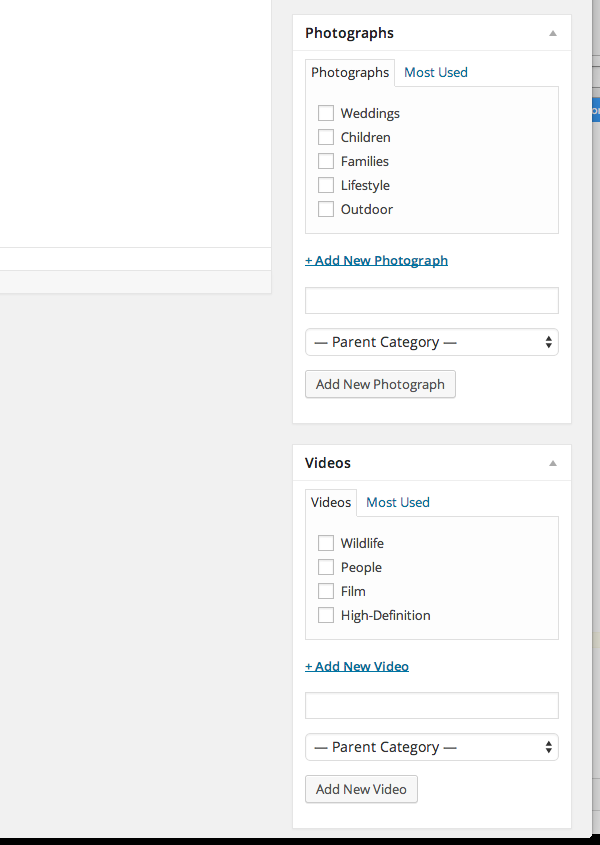
- The hierarchical taxonomies will include base taxonomies of Photographs and Videos.
- The non-hierarchical taxonomy will be for specifying the type of film that was used. This may be Black and White, Color, Sepia, or whatever color you would like to specify.
Finally, the plugin is going to work with the existing standard post type that ships with WordPress. This should give the most flexibility as it relates to building a plugin, demonstrating the concepts, and using it in your own installation.
My Custom Taxonomies
For the purposes of the example plugin, we're going to be calling it My Custom Taxonomies and we'll be building it in the following stages:
- We'll prepare the core plugin file that has the proper header text necessary to display the plugin in the WordPress dashboard.
- We'll setup the code necessary for executing the core plugin.
- We'll write code that will introduce both the Photographs and Videos taxonomy.
- We'll write code that will introduce the Film Type taxonomy.
- We'll then test the full plugin.
1. The Plugin Header
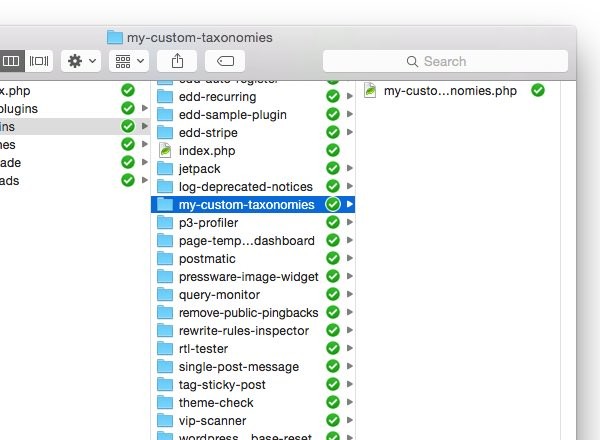
Before doing anything else, go ahead and create a directory in wp-content/plugins called my-custom-taxonomies and introduce a file called my-custom-taxonomies.php.
Within the file, add the following code comment block:
<?php
/**
 * My Custom Taxonomies
 *
 * Demonstrates how to create custom taxonomies using the WordPress API.
 * Showcases both hierarchical and non-hierarchical taxonomies.
 *
 * @link              http://code.tutsplus.com/series/the-beginners-guide-to-wordpress-taxonomies--cms-706
 * @since             1.0.0
 * @package           Custom_Taxonomies
 *
 * @wordpress-plugin
 * Plugin Name:       My Custom Taxonomies
 * Plugin URI:        http://example.com/plugin-name-uri/
 * Description:       Demonstrates how to create custom taxonomies using the WordPress API.
 * Version:           1.0.0
 * Author:            Tom McFarlin
 * Author URI:        http://tommcfarlin.com/
 * License:           GPL-2.0+
 * License URI:       http://www.gnu.org/licenses/gpl-2.0.txt
 */
At this point, you should be able to login to the WordPress dashboard, see the name of the plugin, and activate it. Of course, nothing will actually happen since we haven't done anything with the source code yet.
Next, we need to create another file that will be used to actually power the plugin. This will be based on object-oriented programming principles so we'll create a file called class-my-custom-taxonomies.php.
Don't worry about populating it with any source code just yet. Let's return back to my-custom-taxonomies.php and add a conditional to make sure that the core plugin file can't be run outside of the WordPress environment.
<?php

// If this file is called directly, abort.
if ( ! defined( 'WPINC' ) ) {
    die;
}
Place this directly under the code comment that we provided above.
2. Executing The Core Plugin
At this point, we're ready to write code that will actually drive the plugin. So let's define the class and a basic function for initialization:
<?php

/**
 * The core plugin class file
 *
 * Defines the functions necessary to register our custom taxonomies with
 * WordPress.
 *
 * @link       http://code.tutsplus.com/series/the-beginners-guide-to-wordpress-taxonomies--cms-706
 * @since      1.0.0
 *
 * @package    Custom_Taxonomies
 * @author     Tom McFarlin <[email protected]>
 */
class My_Custom_Taxonomies {

    /**
	 * Initializes the plugin by registering the hooks necessary
	 * for creating our custom taxonomies within WordPress.
	 *
	 * @since    1.0.0
	 */
	public function init() {

	}

}
After that, let's return to my-custom-taxonomies.php and add a code to include the file as well as a method that will create an instance of the class and execute it:
<?php

/** Loads the custom taxonomy class file. */
require_once( dirname( __FILE__ ) . '/class-my-custom-taxonomies.php' );

/**
 * Creates an instance of the My_Custom_Taxonomies class
 * and calls its initialization method.
 *
 * @since    1.0.0
 */
function custom_taxonomies_run() {

    $custom_tax = new My_Custom_Taxonomies();
	$custom_tax->init();

}
custom_taxonomies_run();
Now we have everything we need to begin actually setting up our hooks and callbacks to create our custom taxonomies.
3. Introduce Photographs and Videos
At this point, we're ready to begin introducing our taxonomies. We'll first focus on our two hierarchical taxonomies - Photographs and Videos.
In the body of the class of class-my-custom-taxonomies.php file, add the following function:
<?php

/**
 * Creates the Photographs taxonomy that appears on all Post dashboard
 * pages.
 *
 * @since    1.0.0
 */
public function init_photographs() {

    $labels = array(
		'name'          => 'Photographs',
		'singular_name' => 'Photograph',
		'edit_item'     => 'Edit Photograph',
		'update_item'   => 'Update Photograph',
		'add_new_item'  => 'Add New Photograph',
		'menu_name'     => 'Photographs'
	);

	$args = array(
		'hierarchical'      => true,
		'labels'            => $labels,
		'show_ui'           => true,
		'show_admin_column' => true,
		'rewrite'           => array( 'slug' => 'photograph' )
	);

	register_taxonomy( 'photograph', 'post', $args );

}
This function is responsible for creating the Photographs taxonomy and will be called from within the init function when the time is right.
Now, let's do the same thing for Videos:
<?php

/**
 * Creates the Videos taxonomy that appears on all Post dashboard
 * pages.
 *
 * @since    1.0.0
 */
public function init_videos() {

    $labels = array(
		'name'          => 'Videos',
		'singular_name' => 'Video',
		'edit_item'     => 'Edit Video',
		'update_item'   => 'Update Video',
		'add_new_item'  => 'Add New Video',
		'menu_name'     => 'Videos'
	);

	$args = array(
		'hierarchical'      => false,
		'labels'            => $labels,
		'show_ui'           => true,
		'show_admin_column' => true,
		'rewrite'           => array( 'slug' => 'video' )
	);

	register_taxonomy( 'video', 'post', $args );

}
Let's call these two from within the init function. We do this by registering these functions with the init hook as provided by WordPress:
<?php

public function init() {

    add_action( 'init', array( $this, 'init_photographs' ) );
    add_action( 'init', array( $this, 'init_videos' ) );

}
Here, we should be able to head over to Add New Post and see our new taxonomy options visible in the dashboard. If not, double-check your code against that which is shared above.
Now that we've introduced our hierarchical taxonomies, let's move on to introducing our Film Type - or our non-hierarchical - taxonomy.
4. Introduce Film Type
This really isn't that much different from the code we've written up to this point. Really, the main difference is that instead of specifying hierarchical as true, we'll set it as false.
<?php

/**
 * Creates the Film Type taxonomy that appears on all Post dashboard
 * pages.
 *
 * @since    1.0.0
 */
public function init_film_type() {

    $labels = array(
		'name'          => 'Film Type',
		'singular_name' => 'Film Type',
		'edit_item'     => 'Edit Film Type',
		'update_item'   => 'Update Film Type',
		'add_new_item'  => 'Add New Film Type',
		'menu_name'     => 'Film Type'
	);

	$args = array(
		'hierarchical'      => false,
		'labels'            => $labels,
		'show_ui'           => true,
		'show_admin_column' => true,
		'rewrite'           => array( 'slug' => 'film-type' )
	);

	register_taxonomy( 'film-type', 'post', $args );

}
This will result in a different type of user interface element that looks more like tags rather than the category options that you see above.
Finally, add the following line to the init method along with the rest of the hooks:
<?php
add_action( 'init', array( $this, 'init_film_type' ) );
Notice that is functions more like tags that categories. Again, to reiterate, that's one of the main differences in hierarchical and non-hierarchical taxonomies.
5. Testing The Full Plugin
Now we're ready to give the plugin a spin. Assuming you've followed everything correctly throughout this tutorial, then you should be able to create a new post, stamp it with a type of Photograph or a type of Video as well as a type of Film and have it persist the changes after saving or updating your post.
If not, double-check your code with what's referenced here and with what's referenced in the associated GitHub repository.
Conclusion
That wraps up The Beginner's Guide to WordPress Taxonomies. Throughout the series, we've taken a broad look at a definition of what taxonomies are, the role they play in WordPress, and we've even implemented a few of our own.
At this point, you should have a solid understanding of the concept and how to proceed with including them in your next project.
If not, don't hesitate to leave questions, comments, or general feedback in the field below.

Comments