We discussed very basic configuration of the WordPress SEO plugin by Yoast in part one of this tutorial series. Today, we're going to continue the series, and I intend to demonstrate how to configure the following:
- Social configuration of Yoast SEO
- Facebook - Open Graph tags
- Twitter - Twitter cards
- Google Plus - Google+ author and Google+ publisher
Let's dive deeper into this great plugin, but before doing that let me mention something here, I will try to keep things simple for beginner level users and for the advanced users I will just put in some pointers to follow.
Social Configuration
Social signals have a great deal of impact on the SEO of your site. Google simply prefers an article/post which is shared more over different social networks compared with a post which is not.
Now-a-days some of the most known social networks allow you to customize the stuff you share to an extreme level. Taking advantage of this fact, my friend Joost - Developer of SEO by Yoast - did a great job allowing everyone to configure and customize the content sharing for three big platforms i.e. Facebook, Twitter, and Google+.
Note: Google prefers an article/post that has a lot of shares on different social networks, but this doesn't mean for you to set up a black hat set of 10 profiles over 50 networks to share your own posts. Doing things that way, Google will penalize your site, as it recognises that isn't natural. So, for getting a lot of social shares, work over your content, make it good enough for your readers, so that they can't resist sharing it with their friends.
Let's start with Facebook social settings. When you click SEO > Social you will get a three tab interface in front of you, named Facebook | Twitter | Google+, the first one will be Facebook.
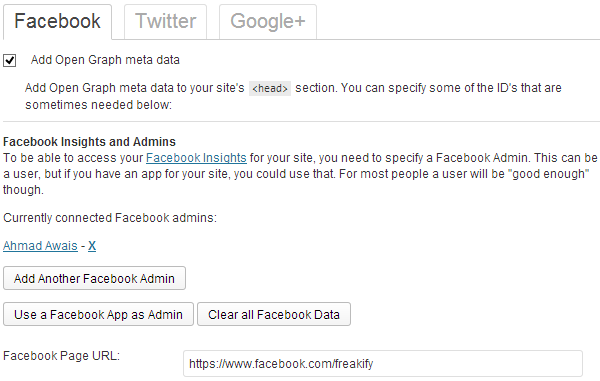
Add Open Graph Data
Click to check this one, so that the WordPress SEO plugin can add Open Graph Meta Data to the header of your site. You might be thinking what is that?
The easiest explanation of this is as follows: whenever Google sends its bots to your website, they read your code and analyze what it is all about. So, these meta tags are particularly used to talk to those bots, and guide them what to do and what not to do.
Add Facebook Admin
Now you can add an admin to your site, it can be your profile or an application you built for your brand (For pro users, building an app for your site helps in taking your social sharing to the next level).
Enough talk!
Login to Facebook, come back to this page and just click the Add Facebook Admin button, it will add you as an admin and will notify you. In my case it said "Successfully added Ahmad Awais as a Facebook Admin!"
After that, just press Save.

Finally you will see your name added as an admin like this:
A Step Further
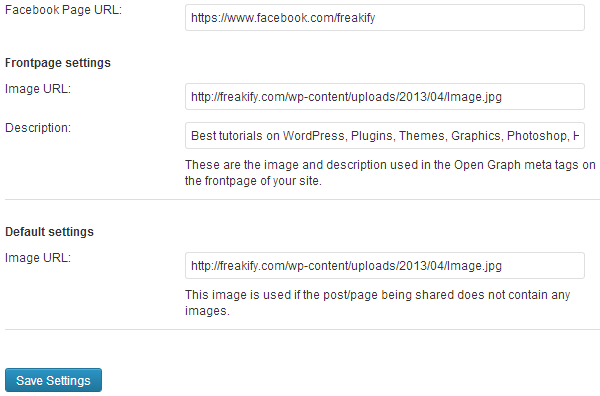
Now add details relevant to your site in the boxes below and press Save Settings. First of all, add your Facebook Page URL, then comes the Front Page Settings.
Front Page Settings mean when you share your exact domain on Facebook then a particular image and description is shown alongside, you can add a nice branded image and a Homepage description in the boxes below.
Whereas, if any page in your site has no image then Default Settings come into play, adding the URL of an image will make your site links, when shared on Facebook, look better. I have added the same image in both these boxes.
Pro User?
So, you are a pro user looking for some pro tips? Thinking this article is too basic? I have something for gurus, as well.
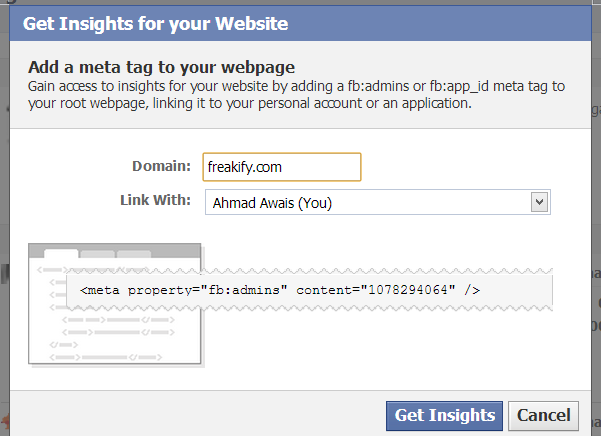
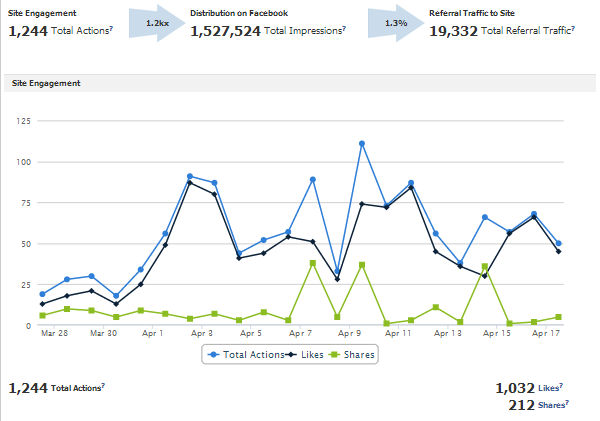
Adding this meta data and Facebook Admin to your site will allow you to see the insights of Facebook for your site. How to see those insights? Visit Facebook Insights, then click Insights for your Website (in the top right corner).
After that fill the popup with your domain name, select the same admin as you chose for your app, now copy the meta tag given inside the popup. Add that meta tag to your site's header.php and you will be able to see the Facebook insights for your site.
Twitter cards make your tweets much more visible to your followers and other public tweeters get attracted by their big size. One can easily measure an increase in CTR (Click Through Rate) of tweets after activating Twitter cards.
I am not able to find one reason why you shouldn't be using Twitter cards. Twitter cards help you to funnel more traffic from Twitter than you ever have. Look at an example Twitter card below.
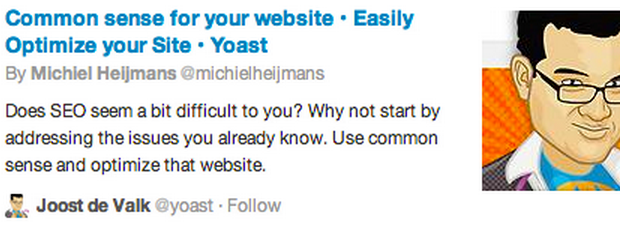
You might have figured it out by now, that a Twitter card has a large image in it, some HTML content from your blog, like the title of your blog and it even goes beyond the 140 character limit to have your article's description inside it.
If you are a blogger, marketer, social entrepreneur, data analyst, web developer or an SEO enthusiast, you need Twitter cards to market your content in a better way.
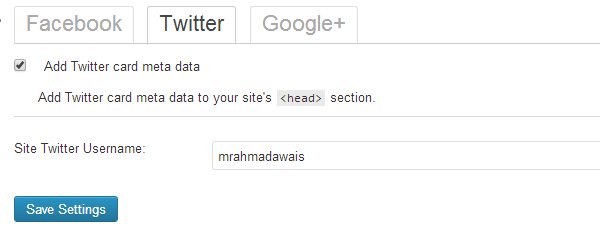
Configuring Twitter Cards
Twitter configurations are really simple ones, there is one checkbox for you to check and a text box to add your Titter username. The first checkbox will add meta data to your site for Twitter cards.
Google+
In the case of Google+, Yoast SEO offers two settings: one for the Google+ author of the site, and the second being the publisher. So, being a beginner if you somehow heard about these two things for the first time then let me draw a clear line of difference between them.
Google+ Author
It is a person who writes at the blog, and owns a Google+ profile.
There are two things you need to learn at this point. How to configure? Why should you do it?
Let's talk about the 'Why' part first. Now what I am gonna tell you all, is merely something you must call more of my personal opinion. Google may depreciate Page Rank technology sooner rather than later. Some of you might have questions like "What?" / "Why?" but what rumors state is something you all should know, it's called Google's Author Rank.
Simple definition of Author's Rank is Google will rank the posts according to the Rank of the author who wrote them. You should start building a good Author Rank right from this very moment. Create a nice Google+ profile and attach it to your site, and build a brand, build authority in your community / niche through it.
That is all I am going to say, but if you are feeling like "I need to understand this thing more and a deeper look will be helpful" then head over to a nice article at Moz titled "How to Prepare for Author Rank and Get the Jump on Google" by Mike Arnesen.
See how I have my Google+ profile appearing right next to my blog posts in Google search? Do remember to add your site in your Google+ profile's Contributor to section.

Google+ Publisher
When I said build a brand in the previous paragraph, I meant build a brand. Is that weird to use the same words for two times? You might want to consider why I said it two times.
This is it, the right time is right now, even if you are doing a very little tiny thing online, my advice to you is "go and build a brand". Brand is important, it helps in growing your image, if you are doing something be sure about it 100%. When you are 100% sure you need to invest yourself into your brand, invest your time into it, take care of design, as well as the user experience - two of the most crucial things, I consider it a lot while working with gigantic clients, your brand is not about you, it is about your niche, your clientele.
Be one of them and think like them. You will end up deciding that your own profile is not enough to promote your blog. You need to have a Google+ Page for it. This page is the Google+ Publisher for your blog. I won't bore you with details here, I know everyone can make a Google+ page.
How Do You Configure Yoast SEO for Google+?
Now comes the 'How' part, how to configure Google+ in Yoast SEO. Before doing this, make sure you have added your Google+ Profile link in your WordPress profile by going to your profile page. It must have a link like the one in the image below.

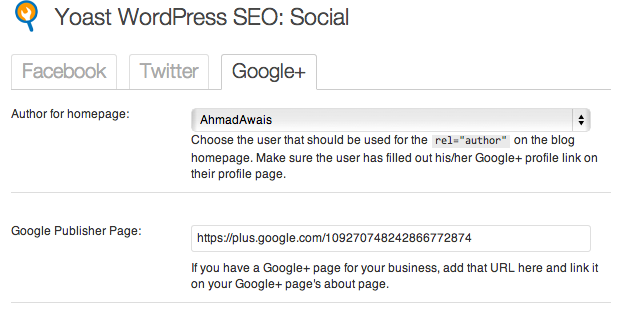
Go to the 'Social' menu of the Yoast plugin and click on the Google+ tab. Select your profile from the 'Author for Homepage' drop down. After that put the link of your Google+ page in the 'Google Publisher Page' text input area.
Just like the image below:
Conclusion
That's all. By now you have put your blog/site to a next level of SEO, you have the latest Open Graph meta tags in your site's header, telling Google more about your site, not only this but you have taken the first step towards building a better author rank.
Now you will have an image of your Google+ profile alongside your blog's results in Google sooner rather than later. The next tutorial will be about the Sitemap, Permalinks, RSS, and importing / exporting SEO data between different SEO plugins.
Do you have any questions regarding this tutorial? Let us know.

Comments