Depending on your background, you may or may not have heard of unit testing, test-driven development, behavior-driven development, or some other type of testing methodology. Often times, these methodologies are applied in the context of larger software systems or applications and less in the context of WordPress-based projects (though it is getting better!)
Frankly, the development community is a bit divided on automated software testing – you have some people who think you should have tests for 100% of all of your code, some believe that 80% is sufficient, some 50%, and some are content with 20% or so. Whatever the case may be, this article is not about arguing a case for the level of tests you should have in your project nor is it taking a position on general software testing.
Instead, we're going to take a look at what's required to get up and running with unit testing your WordPress development projects. We're going to be approaching this series from the perspective of an absolute beginner so that we can understand the benefits of unit testing and how to configure our environment to support unit testing libraries so that we can begin to do this in our future work. Finally, all of this will be done by building and testing a simple, testable plugin from the ground up.
What Is Unit Testing?
Before we get started setting up our environment and writing any code, let's define exactly what unit testing is, why it's worth doing, and how to get started in incorporating it in our projects.
At a high-level, unit testing refers to the practice of testing certain functions and areas – or units – of our code. This gives us the ability to verify that our functions work as expected. That is to say that for any function and given a set of inputs, we can determine if the function is returning the proper values and will gracefully handle failures during the course of execution should invalid input be provided.
Ultimately, this helps us to identify failures in our algorithms and/or logic to help improve the quality of the code that composes a certain function. As you begin to write more and more tests, you end up creating a suite of tests that you can run at any time during development to continually verify the quality of your work.
A second advantage to approaching development from a unit testing perspective is that you'll likely be writing code that is easy to test. Since unit testing requires that your code be easily testable, it means that your code must support this particular type of evaluation. As such, you're more likely to have a higher number of smaller, more focused functions that provide a single operation on a set of data rather than large functions performing a number of different operations.
A third advantage for writing solid unit tests and well-tested code is that you can prevent future changes from breaking functionality. Since you're testing your code as you introduce your functionality, you're going to begin developing a suite of test cases that can be run each time you work on your logic. When a failure happens, you know that you have something to address.
Of course, this comes at the expense of investing time to write a suite of tests early in development, but as the project grows you can simply run the tests that you've developed to ensure that existing functionality isn't broken when new functionality is introduced.
Planning Our Plugin
One of the best ways to get started with unit testing is to do so in the context of a practical application. Throughout this two-part series we're going to be building a simple plugin and writing tests to cover all of the functionality.
First, let's plan the project: We're going to be writing a small plugin that will add a simple message at the top of a single post that welcomes the user based on how they've found a specific blog post. The idea is very similar to Welcome Reader but it won't include near as much functionality – we're simply building a demo to learn the ins and outs of testing.
Anyway, here's how the plugin will work:
- If the user navigates to the site from Google, we'll give a unique message
- If the user navigates to the site from Twitter, we'll give a unique message
- Otherwise, we won't display anything
Straightforward enough, right? This will also provide a foundation on which to add custom messages for other services and further extend our unit testing abilities should you want to do so.
Preparing the Environment
In order to unit test our code, we're going to need a third-party library that we include into our project that will actually execute the tests we write. In this series, we're going to be using PHPUnit. You can grab a copy of it here.
Next, we need to prepare our development environment, stub out our plugin, and include the necessary libraries for testing our code. This article is assuming that you already have a functional WordPress installation up and running.
So, first, let's prepare the plugin directory:
- In /wp-content/plugins create a directory called Hello-Reader
- In the Hello-Reader directory, create a file called plugin.php and a directory called tests
- We'll stub out the plugin to make sure that WordPress is properly seeing our project
- We'll import the unit testing libraries so that we can begin to write our tests
Here's the skeleton for the plugin that we'll be creating:
/*
Plugin Name: Hello Reader
Plugin URI: http://github.com/tommcfarlin/Hello-Reader
Description: A simple plugin used to help demonstrate unit testing in the context of WordPress.
Version: 1.0
Author: Tom McFarlin
Author URI: http://tom.mcfarl.in
Author Email: [email protected]
License:

  Copyright 2012 Tom McFarlin ([email protected])

  This program is free software; you can redistribute it and/or modify
  it under the terms of the GNU General Public License, version 2, as
  published by the Free Software Foundation.

  This program is distributed in the hope that it will be useful,
  but WITHOUT ANY WARRANTY; without even the implied warranty of
  MERCHANTABILITY or FITNESS FOR A PARTICULAR PURPOSE.  See the
  GNU General Public License for more details.

  You should have received a copy of the GNU General Public License
  along with this program; if not, write to the Free Software
  Foundation, Inc., 51 Franklin St, Fifth Floor, Boston, MA  02110-1301  USA

*/
// Only create an instance of the plugin if it doesn't already exists in GLOBALS
if( ! array_key_exists( 'hello-reader', $GLOBALS ) ) {

	class Hello_Reader {

		function __construct() {

		} // end constructor

	} // end class

	// Store a reference to the plugin in GLOBALS so that our unit tests can access it
	$GLOBALS['hello-reader'] = new Hello_Reader();

} // end if
At this point, you should be able to navigate to the "Plugins" in your WordPress Dashboard and see an entry for "Hello Reader." Obviously, this plugin doesn't do anything just yet – we'll be focusing on that (as well as why we're leveraging the $GLOBALS array) in the next article.
Finally, let's setup the testing framework so that we'll be able to write our tests. First, we're going to need to install PHPUnit and then we'll need to install the WordPress Tests.
Note: The next section will require doing some work with the terminal and will likely require that you issue a few commands to create symbolic links. I've attempted to make this as straightforward and easy as possible, but every operating system and configuration will be different. Please follow carefully and I invite you to share your instructions for your operating systems in the comments.
Installing PHPUnit
PHPUnit is a unit test framework package specifically for PHP. The WordPress Tests and the framework that we're going to be using for writing our WordPress tests depend on this. Unfortunately, installation varies based on your platform. I'm currently running Mac OS X Lion with MAMP Pro and PHP 5.3.6. If you're running a different platform, be sure to refer to the documentation and/or feel free to share your steps in the comments.
First open a terminal and update pear (this is the facility that we'll use to install PHPUnit):
$ cd /Applications/MAMP/bin/php/php5.3.6/bin$ sudo ./pear upgrade pear
Next, instruct Pear to use repositories that we'll specify in terminal:
$ sudo /Applications/MAMP/bin/php/php5.3.6/bin/pear config-set auto_discover 1
After that, install Pear by issuing the following command:
$ sudo /Applications/MAMP/bin/php/php5.3.6/bin/pear install pear.phpunit.de/PHPUnit
This will install PHPUnit within the context of your MAMP installation. To test it out, run the following command in your terminal session:
$ /Applications/MAMP/bin/php/php5.3.6/bin/phpunit --version
After which the following message should be displayed:
PHPUnit 3.6.11 by Sebastian Bergmann.
Note: If you happen to get a terminal error that mentions "unserialize()", then there is a discrepancy between the pear configuration and your version of pear. To resolve, issue the following command (this simply renames the file should you want to restore it later):
$ /Applications/MAMP/bin/php/php5.3.6/conf/pear.conf /Applications/MAMP/bin/php/php5.3.6/conf/pear.conf.old
Installing the WordPress Tests
Now that we've got PHPUnit installed and working, it's time to setup the WordPress Testing Framework. You can grab the package from GitHub. If you're comfortable cloning the repository, then feel free to do that; otherwise, simply download an archive of the project and extract it into the test directory that we created earlier in this article.
Before actually running the tests, we'll need to create a config file for running WordPress tests. This is exactly like editing the wp-config.php file with a new WordPress installation, but we're doing it for a test database instead. Below, I've pasted my configuration file and have added comments. I'll be sure to commit this to this article's GitHub repository, too.
/* Path to the WordPress codebase in relation to the location of these tests. Since they are included with our plugin, we refer to a few directories above. */
define( 'ABSPATH', '../../../../../' );

/* The name of the database for running the tests. Make sure this is a database just for testing as it's created and trashed during tests. */
define( 'DB_NAME', 'throwaway' );

/* The usual credentials for a local database. */
define( 'DB_USER', 'root' );
define( 'DB_PASSWORD', '' );
define( 'DB_HOST', 'localhost' );
define( 'DB_CHARSET', 'utf8' );
define( 'DB_COLLATE', '' );

define( 'WPLANG', '' );
define( 'WP_DEBUG', true );
define( 'WP_DEBUG_DISPLAY', true );

define( 'WP_TESTS_DOMAIN', 'localhost' );
define( 'WP_TESTS_EMAIL', '[email protected]' );
define( 'WP_TESTS_TITLE', 'Test Blog' );

/* Not worried about testing networks or subdomains, so setting to false. */
define( 'WP_TESTS_NETWORK_TITLE', 'Test Network' );
define( 'WP_TESTS_SUBDOMAIN_INSTALL', false );
$base = '/';

/* Cron tries to make an HTTP request to the blog, which always fails, because tests are run in CLI mode only */
define( 'DISABLE_WP_CRON', true );

/* Also not interested in testing multisite for this project, so setting to false. */
define( 'WP_ALLOW_MULTISITE', false );
if ( WP_ALLOW_MULTISITE ) {
	define( 'WP_TESTS_BLOGS', 'first,second,third,fourth' );
}
if ( WP_ALLOW_MULTISITE && !defined('WP_INSTALLING') ) {
	define( 'SUBDOMAIN_INSTALL', WP_TESTS_SUBDOMAIN_INSTALL );
	define( 'MULTISITE', true );
	define( 'DOMAIN_CURRENT_SITE', WP_TESTS_DOMAIN );
	define( 'PATH_CURRENT_SITE', '/' );
	define( 'SITE_ID_CURRENT_SITE', 1);
	define( 'BLOG_ID_CURRENT_SITE', 1);
}

$table_prefix  = 'wp_';
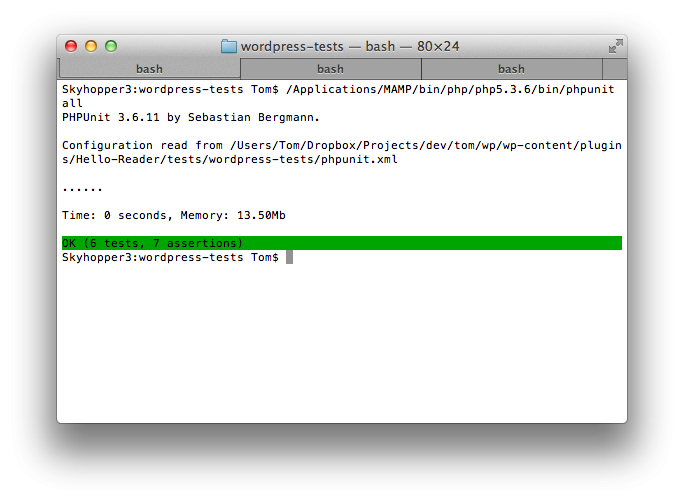
To verify that you've installed the tests properly, you can run the following command in your Terminal:
$ /Applications/MAMP/bin/php/php5.3.6/bin/phpunit all
If you happen to get an error, it's because the WordPress tests are trying to use a socket to the MySQL database rather than the one that's used by MAMP. To fix this, we need to create a symbolic link from MAMP's socket to the location on disk that the unit tests are using. Issue the following commands in your terminal session:
$ sudo mkdir /var/mysql
$ sudo ln -s /Applications/MAMP/tmp/mysql/mysql.sock /var/mysql/mysql.sock
$ sudo ln -s /Applications/MAMP/tmp/mysql/mysql.sock /var/mysql/mysql.sock
Now, attempt to run the tests again and you should see something like the following screenshot.
Again, your mileage may vary based on the platform that your using so feel free to share your experience in the comments or even commit to the README file on GitHub as well so that others can have a point of reference.
At this point, we're ready to begin building our plugin and writing our unit tests. The above code has been added to GitHub and I'll be building it out as we work through the next article in the series. In the meantime, make sure that you get your environment setup and that you're ready to begin development. In the next article, we'll actually beginning writing tests, building our plugin, and seeing the entire project come together from start to finish.

Comments