For those unfamiliar, TextExpander is a fantastic productivity app for Mac that has the potential to save you hundreds of hours over the course of a year, and, with the latest release of Version 4, it's now better than ever. The basic idea is simple: allow the user to assign abbreviations, which will be expanded to larger strings of text. But, once you really dig into the app, you'll discover just how powerful it can be for web developers.
1 - Basic Usage
Before we dig into some of the more fun techniques, let's first review basic usage for the app.
Let's say that you want to save yourself a bit of time, when creating HTML. Rather than manually typing:
<blockquote>
  <p></p>
</blockquote>
…you instead want to simply enter blockquote, and have that text expand to the HTML snippet above. In TextExpander, that's a cinch.
We begin by creating a new snippet.
Next, within the "Content" window, we can paste in the full text, and specify an abbreviation.
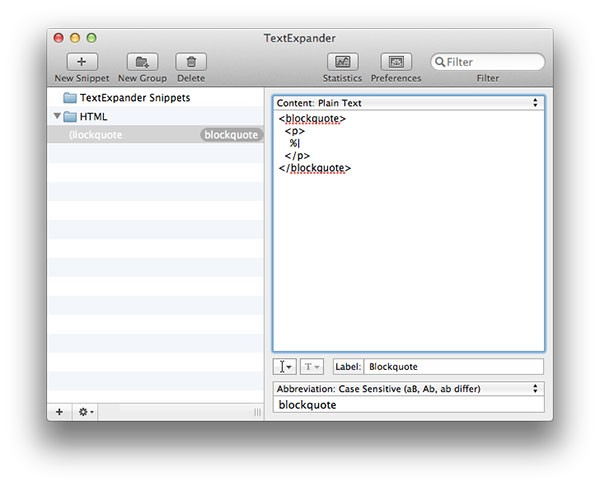
Notice how, in the image above, we also specified, via the %|, where the cursor should be placed after expansion.
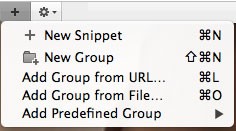
We've now created a direct link between the string, "blockquote," and the HTML snippet above. The next step is to determine when we want the expansion to occur. There are a couple of choices:
- Expand immediately after the abbreviation is entered
- Expand after a specific delimiter, such as the "Tab" key
Personally, I prefer the latter; otherwise, occasionally, accidental expansions may occur when you least expect it. If you do choose the first method, I encourage you to think wisely about how you name your abbreviations; perhaps a special naming convention will help.
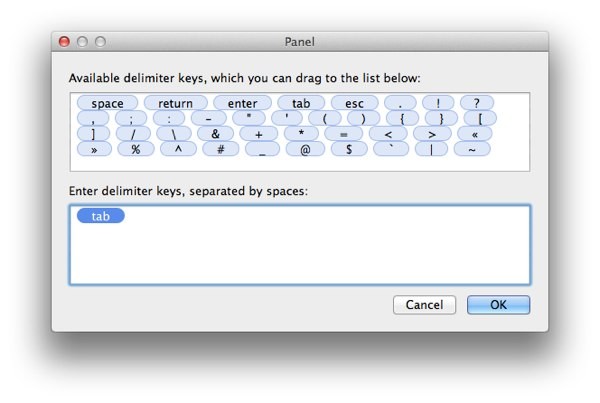
To set a delimiter, choose "Preferences -> Expand Abbreviations," and choose the option that best fits your needs.
Now, try it out! Open a text or code editor, type "blockquote," followed by your specified delimiter (if any), and watch it instantly expand to the HTML fragment, while placing the cursor in the correct location.
Excellent! Very helpful - but we can do more.
2 - The Clipboard
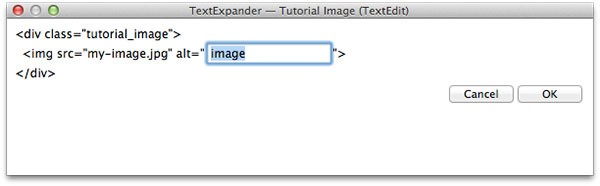
For our next trick, let's imagine that your blog requires specific formatting, when adding images. Perhaps there needs to be a caption, or maybe it should be surrounded by a div - much like we do on Nettuts+.
<div class="tutorial_image">
  <img src="path/to/image.jpg" alt="image">
</div>
The only problem is that this is a pain to write manually each time. TextExpander to the rescue!
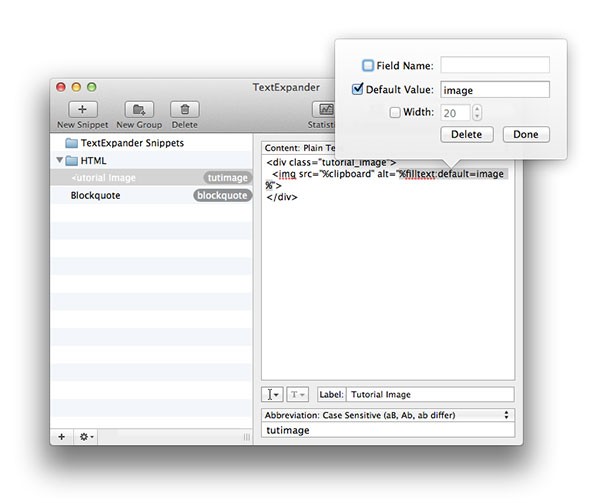
Create a new snippet, give it an abbreviation of "tutimage," and paste in:
<div class="tutorial_image">
  <img src="%clipboard" alt="%filltext:default=image%">
</div>
This looks a bit scary, but TextExpander will help you with the specifics. First, the expansion will assume that you have the source of the image pasted into your clipboard. Then, when you type "tutimage," it'll paste the contents of your clipboard as the value of the src attribute. Notice where we added %clipboard? You'll use this feature often!
But what about that confusing alt attribute section? We can separate this logic into three parts.
- %% - Represents the beginning and end of the TextExpander logic
- filltext - The desired command
- default - The default text that should be applied ("image")
However, if you worry that this will be difficult to remember, TextExpander can auto-populate the data for you.
Now, when creating a new blog post, simply copy the source of the image into your clipboard, and then type, "tutimage." Because we chose for the alt text to be filled in, a pop-up dialog will be displayed.
Either stick with the default, and hit Enter, or set a custom value for the attribute. Once you press Enter, the following snippet will be added to your editor:
<div class="tutorial_image">
  <img src="my-path.jpg" alt="some image">
</div>
Nifty! This trick is especially useful, when, for example, copying an image's source from Amazon S3.
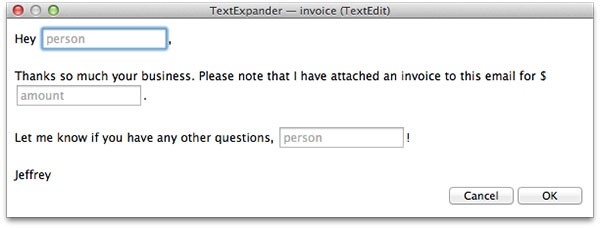
3 - Personalized Messages
It's not that we enjoy form emails (in fact, we hate them), but there are only so many hours in a day. Sometimes, it's easiest to paste in a template and click, "Send." Let's get the best of both worlds instead. We'll use a template, but personalize it for each person.
Create a new snippet, give it an abbreviation of "invoice," and add:
Hey, %filltext:name=person%,

Thanks so much your business. Please note that I have attached an invoice to this email for $%filltext:name=amount%.

Let me know if you have any other questions, %filltext:name=person%!

Thanks again!
YOUR NAME
First, note how we've added two `filltext` commands that have the same identifier: "person." Because the value for each should be identical, when we apply a name for the first fill-in, it will automatically be added to the second occurrence as well.
We've also set a fill-in for the amount of the invoice.
Now, when we type "invoice," along with the delimiter, we'll see:
These are simple conveniences, but quickly add up to huge time savings over the course of a year.
4 - Vi Fan
Maybe you're a faithful Vim user, and would like to take advantage of some of those helpful keyboard commands in the browser - perhaps, when creating a new blog post.
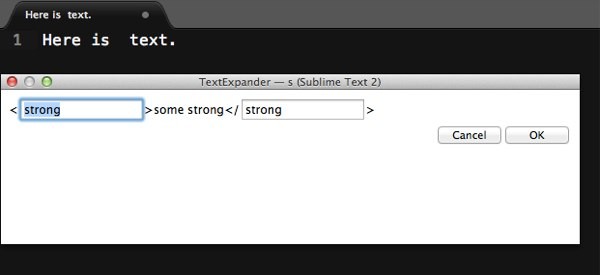
Our goal is: when we copy a bit of text and type "s" (for "surround"), that text will then be surrounded with an HTML tag. Let's make it happen!
Create a new snippet, set the abbreviation to "s", and add:
<%filltext:name=Tag Name:default=strong%>%clipboard</%filltext:name=Tag Name:default=strong%>
Important: for this to work correctly, make sure that you choose "Abandon Delimiter" within Preferences. Otherwise, the expansion will retain the
Tab.
Again, what we have here is really very simple. We let the user specify what the tag name will be (a default of strong), and then we set the contents of the clipboard within the tags.
To try it out, select some text in your code editor, copy it with Control/Command + C, and then type s + Tab.
Once you specify a tag name, hit Enter, and the selected text will now be surrounded with the designated HTML tag.
Okay, okay - it's a bit of a gimmick; but it works!
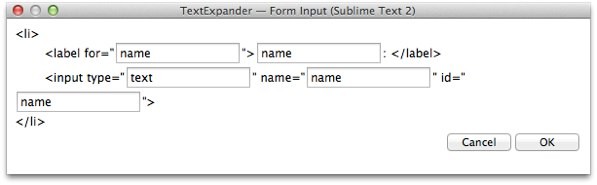
5 - Those Dang Form Inputs
You hate them as much as I do; create a label, set the for attribute, set the text, create the form input, set the value, name, and id fields. It's all very time consuming. Let's fix that, using an abbreviation of "forminput."
<li>
    <label for="%filltext:name=Input ID:default=name%">%filltext:name=Input ID:default=name%: </label>
    <input type="%filltext:name=Input Type:default=text%" name="%filltext:name=Input ID:default=name%" id="%filltext:name=Input ID:default=name%">
</li>
Remember: you don't have to enter this verbatim; TextExpander will provide the necessary menus to make the process as easy as possible.
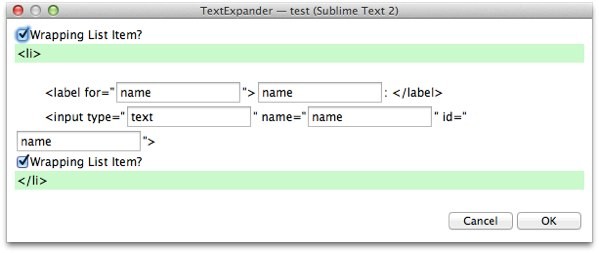
Now, when we type, "forminput," we get:
If you think about it, there's a lot of duplicated text, when creating labels and form inputs. That's why this technique can be so useful. Set the first for attribute value, and that text will automatically be applied as the label's text, and the input's name and id value.
Now, we end up with:
<li>
    <label for="name">name: </label>
    <input type="text" name="name" id="name">
</li>
So much easier!
6 - Optional Items
Going back to that previous trick, there might be times when we don't need a wrapping list item for the label and input. Let's update the snippet to make those optional, using an "Optional Section."
Delete the wrapping list item, and choose "Fill-Ins -> Optional Section."
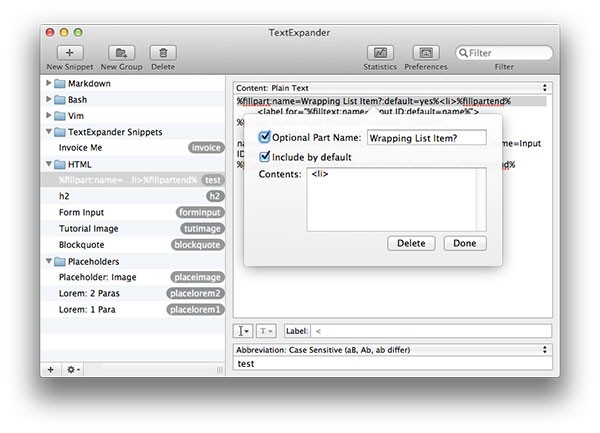
The key is to make both the <li> and </li> parts optional, but give them both the same name, so that the toggle checkmark affects both.
Here's the generated output:
%fillpart:name=Wrapping List Item?:default=yes%<li>%fillpartend%
    <label for="%filltext:name=Input ID:default=name%">%filltext:name=Input ID:default=name%: </label>
    <input type="%filltext:name=Input Type:default=text%" name="%filltext:name=Input ID:default=name%" id="%filltext:name=Input ID:default=name%">
%fillpart:name=Wrapping List Item?:default=yes%</li>%fillpartend%
This time, when you trigger "forminput," you'll have the option to exclude the wrapping list item.
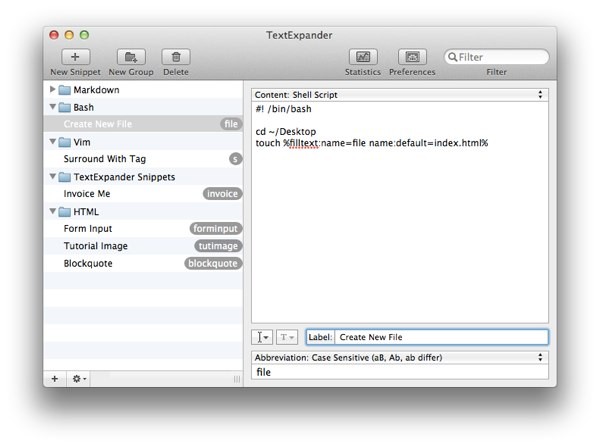
7 - New File
Mac users: we are all irritated by the fact that there's no easy way to create an empty new file. Well, here's a little trick. Even if you're not typing into a text editor, TextExpander is still listening.
Even better: we can also execute Shell scripts and AppleScripts in TextExpander!
Get where I'm going here? Let's assign a shortcut of "file," which will create a new file on the Desktop when triggered.
This time, within the content window, at the top, choose "Shell Script," and paste in the following:
#! /bin/bash

cd ~/Desktop
touch %filltext:name=file name:default=index.html%
The first line is standard for shell scripts, and points to Bash. Next, as you would do in the Terminal, cd to the Desktop, and create a new file, by using the touch command.
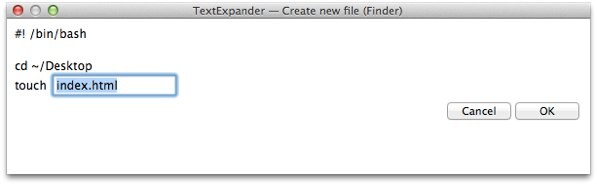
That's it; try it out! Anywhere on your Desktop (even outside of a text editor), type "file" along with the delimiter that you specified. A dialog will popup, with a default of index.html; once you hit enter, the new file has been created!
8 - Markdown
The problem with languages, like Markdown, is that we become dependent upon them. When I'm forced to write regular HTML, whether it be in a browser or Word processor, I silently think mean thoughts. What if we could stick with the same conveniences that Markdown offers, while still immediately outputting HTML? We can - with a bit of trickery.
Let's consider the use of Github-style code.
```php
echo 'some code';
```
Let's create an abbreviation, ```, which will expand to whatever HTML is required to display syntax highlighting for your code. For Nettuts+, we use [language]CODE[/language], but your platform might use pre tags. Let's take care of the latter method.
Paste in:
<pre name="code" class="%filltext:name=language:default=css%">
%|
</pre>
And that's it! Now, type ```, fill in your desired language, and the necessary HTML will be output. Rinse and repeat for all of the other Markdown features you use.
9 - Placeholders
A big part in the initial stages of creating websites is setting placeholders, whether that be the generic "lorem ipsum" text, or image placeholders.
The "lorem ipsum" part will be a cinch. Let's knock that out right now.
Before we do, though, it's important that you adopt a system, so that you can remember these shortcuts. For my projects, all placeholder snippets follow a naming convention: the word, "place," and the name of the snippet.
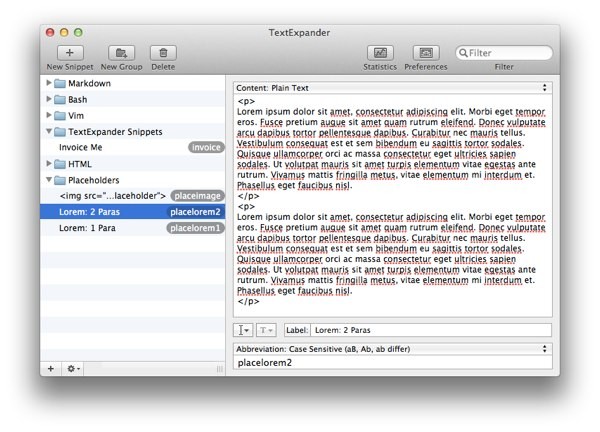
So, to place a single paragraph of "lorem ipsum" text, I would use an abbreviation of "placelorem1." And, for two paragraphs, "placelorem2." If I instead add a placeholder image, then the correct abbreviation would be "placeimage."
Well that was easy. Rinse and repeat for as many paragraphs as you need.
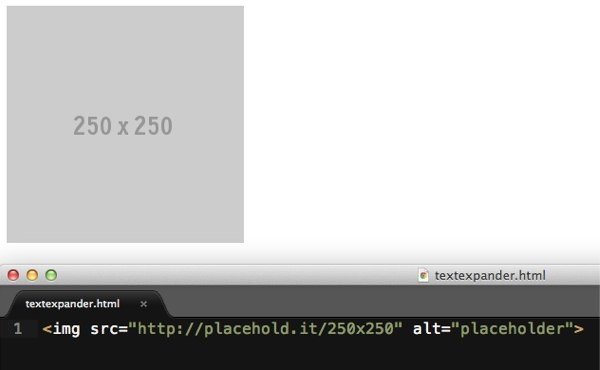
For placeholder images, we'll take advantage of the excellent Placehold.it service. The only problem is that I often forget what the correct URL is. If we instead use TextExpander, that becomes a non-issue.
<img src="http://placehold.it/%filltext:name=dimensions:default=350x150%" alt="placeholder">
While we've set a default image size of 350x150, the popup menu will allow you to override that setting, if necessary. Now, we can add placeholder images to our projects in seconds.
10 - More Options
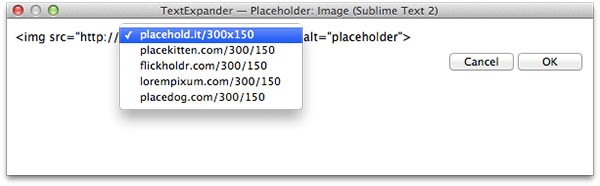
If you think about the previous placeholder tip, when it comes to image services, there's a lot of them! Why don't we modify "placeimage" so that the user can instead select from a variety of choices. As of TextExpander v4, this is now possible.
In addition to single-line fill-ins, TextExpander offers a few others as well, including a Popup menu.
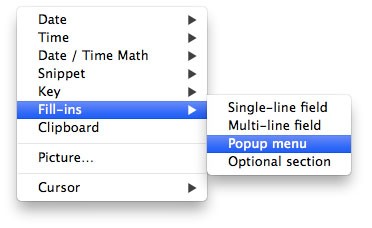
This allows us to provide a drop-down list of potential fill-ins.
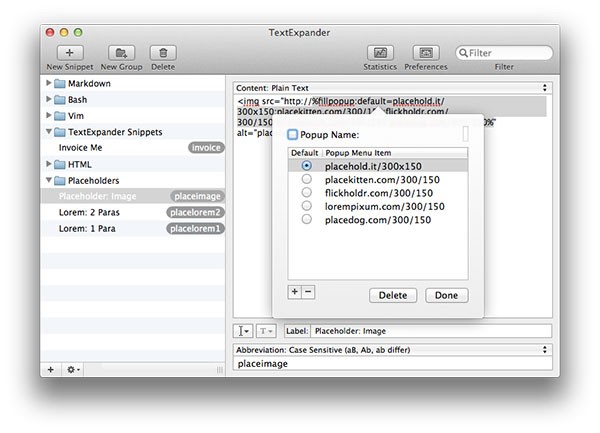
Above, I simply pasted in the correct URLs for several different placeholder services.
<img src="http://%fillpopup:default=placehold.it/300x150:placekitten.com/300/150:flickholdr.com/300/150:lorempixum.com/300/150:placedog.com/300/150%" alt="placeholder">
And, now, when we trigger "placeimage," we get:
So cool! Anything that allows me to think less, and work faster is a good thing.
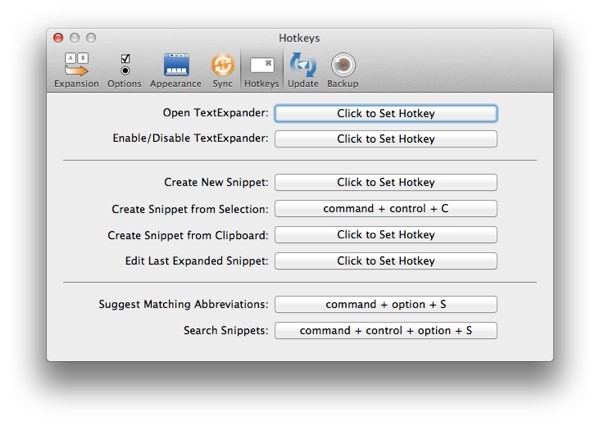
11 - Can't Remember?
If you're like me, even with a naming system in place, sometimes our brains leak, and we can't figure out what we named a particular snippet. TextExpander offers some helpful hotkeys for suggesting snippets, creating new ones, and more.
Here's what I have set for the two that I use most frequently.
Now, if I can't remember what I called a particular snippet, I press Option + Command + s ("s" for suggest), and now I can search for it. If you're working along, type "place," and then see what suggestions it presents.
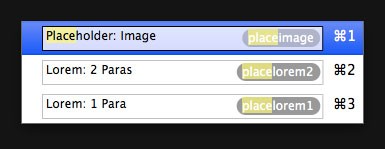
Once you find the correct snippet, press Command along with the correct number, and your snippet will be pasted in.
Closing Thoughts
I consider TextExpander to be one of the power-house apps in my development toolkit. It only takes a quick peak at the TextExpander Stats to show that I've saved an insane amount of time as a result. Give it a try if you haven't; Nettuts+ gives it a big thumbs up!
Editor's note: this tutorial was sponsored by Smile Software.

Comments