Table views are among the most used components of the UIKit framework and are an integral part of the user experience on the iOS platform. Table views do one thing and they do it very well: present an ordered list of items. The UITableView class is a good place to continue our journey through the UIKit framework as it combines several key concepts of Cocoa Touch and UIKit, including views, protocols, and reusability.
Introduction
The UITableView class, one of the key components of the UIKit framework, is highly optimized for displaying an ordered list of items, both small and large. Table views can be customized and adapted to a wide range of use cases, but the fundamental idea remains unaltered, presenting an ordered list of items.
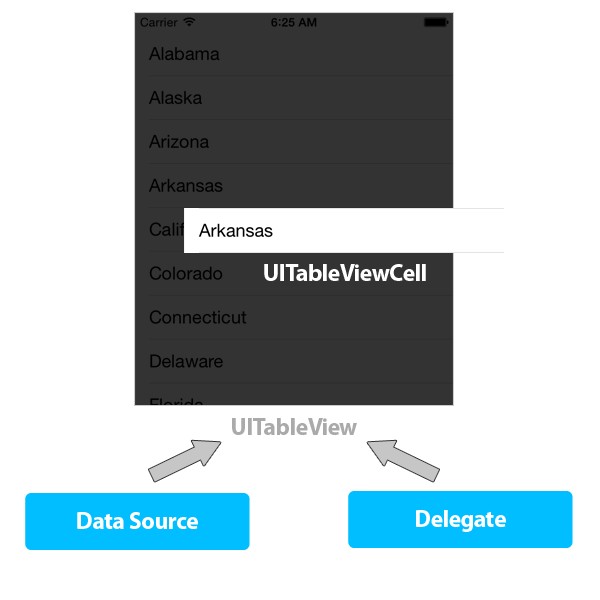
The UITableView class is only responsible for presenting data as a list of rows. The data that is being displayed is managed by the table view's dataSource object. The dataSource object can be any object that conforms to the UITableViewDataSource protocol. The table view's data source object is often the view controller that manages the view the table view is a subview of as we'll see later in this article.
Similarly, the table view is only responsible for detecting touches in the table view. It is not responsible for responding to the touches. In addition to the table view's dataSource object, the table view has a delegate object. Whenever the table view detects a touch event, it notifies its delegate object of the touch event. It's the responsibility of the table view's delegate object to respond to the touch event.
By having a data source object managing its data and a delegate object handling user interaction, the table view can focus on data presentation. The result is a highly reusable and performant UIKit component that's in perfect alignment with the MVC (Model-View-Controller) pattern we discussed in the previous article.
The UITableView class inherits from UIView and is therefore only responsible for displaying application data.
A data source object is similar but not identical to a delegate object. A delegate object is delegated control of the user interface by the delegating object. A data source object, however, is delegated control of data.
The table view asks the data source object for the data that it should display. This implies that the data source object is also responsible for managing the data it feeds the table view.
Table View Components
The UITableView class inherits from UIScrollView, a UIView subclass that provides support for displaying content that is larger than the size of the application's window.
A UITableView instance is composed of rows with each row containing one cell, an instance of UITableViewCell or a subclass thereof. In contrast to UITableView's counterpart on OS X, NSTableView, instances of UITableView are one column wide. Nested data sets and hierarchies can be displayed by using a combination of table views and navigation controllers (UINavigationController) as we'll see in the next article of this series.
I already mentioned that table views are only in charge of displaying data, delivered by the data source object, and detecting touch events, which are routed to the delegate object. A table view is nothing more than a view managing a number of subviews, the table view cells to be precise.
A New Project
Instead of overloading you with theory, it's better to create a new iOS project and show you how to set up a table view, populate it with data, and have it respond to touch events.
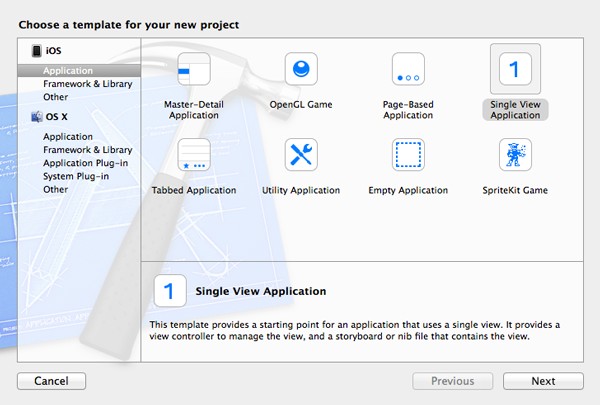
Open Xcode, create a new project (File > New > Project...), and select the Single View Application template.
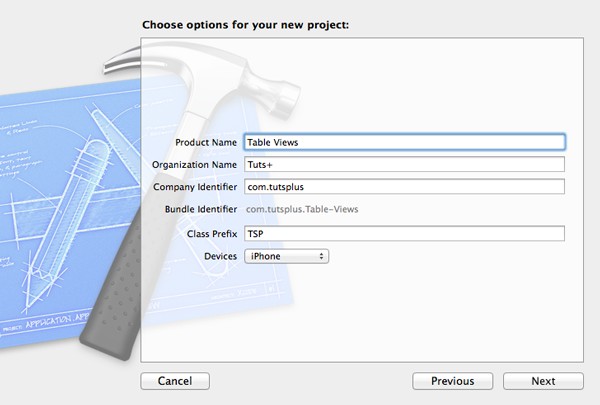
Name the project Table Views, assign an organization name and company identifier, and set Devices to iPhone. Tell Xcode where you want to save the project and hit Create.
The new project should look familiar, because we chose the same project template in the previous article. Xcode has already created an application delegate class for us (TSPAppDelegate) and it also gave us a view controller class to start with (TSPViewController).
Adding a Table View
Build and run the project to see what we're starting with. The white screen that you see when running the application in the iOS Simulator is the view of the view controller (TSPViewController) that Xcode instantiated for us in the storyboard. Take a look at the previous article if you need to refresh your memory.
The easiest way to add a table view to the view controller's view is in the project's main storyboard. Open the storyboard, Main.storyboard, and locate the Object Library on the right as we saw in the previous article. Browse the Object Library and drag a UITableView instance to the view controller's view.
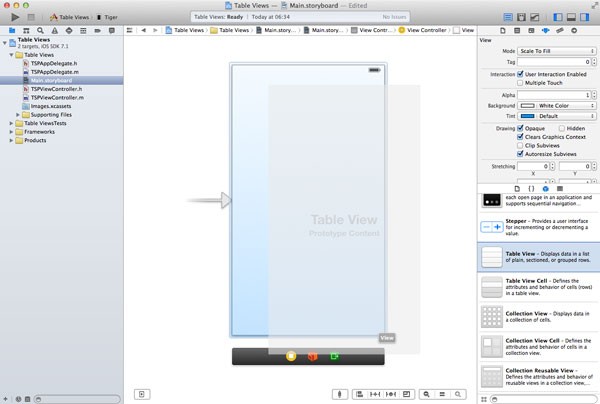
The dimensions of the table view should automatically adjust to fit the bounds of the view controller's view. You can manually adjust the dimensions of the table view by dragging the white squares at the edges of the table view. Remember that the white squares are only visible when the table view is selected.
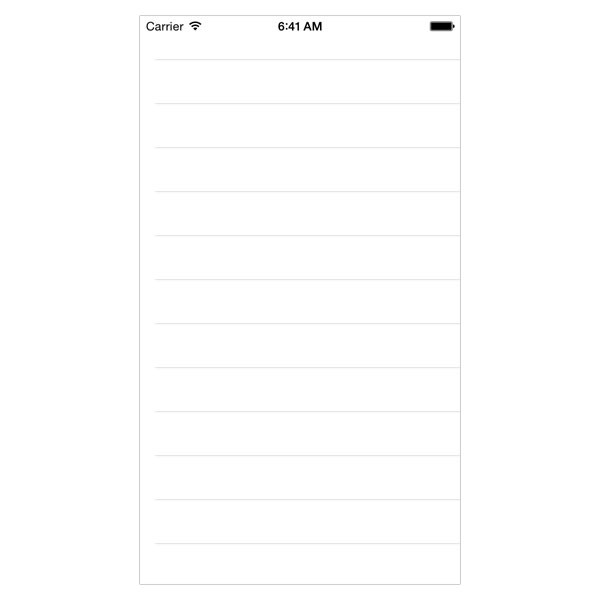
This is pretty much all that we need to do to add a table view to our view controller's view. Build and run the project to see the result in the iOS Simulator. You should see a table view with no data.
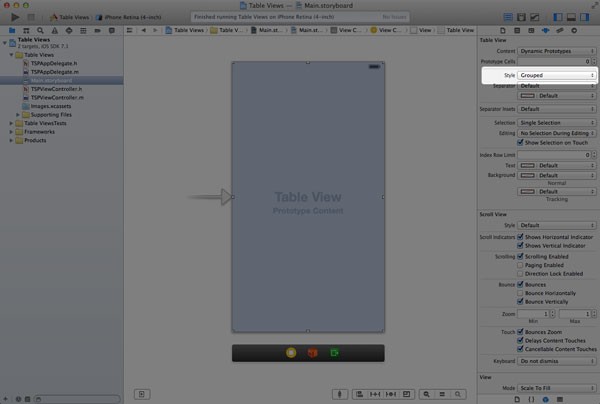
A table view has two default styles, plain and grouped. To change the current style of the table view (Plain), select the table view in the storyboard, open the Attributes Inspector and change the style attribute to Grouped. For this project, though, we'll work with a plain table view so make sure to switch the table view's style back to plain.
Connecting Data Source and Delegate
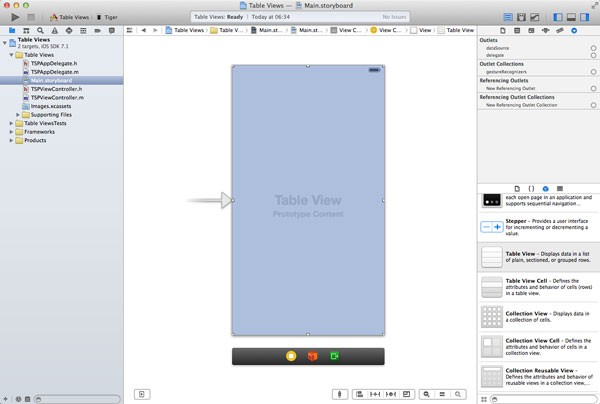
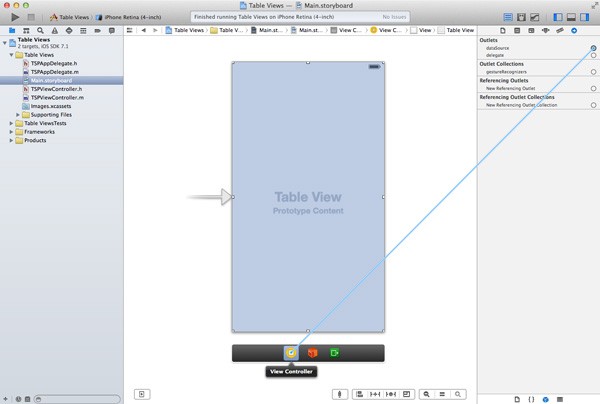
You already know that a table view is supposed to have a data source and a delegate object. However, our table view doesn't have a data source or a delegate just yet. We need to connect the dataSource and delegate outlets of the table view to an object that conforms to the UITableViewDataSource and UITableViewDelegate protocols.
In most cases, that object is the view controller that manages the view which the table view is a subview of. Select the table view in the storyboard, open the Connections Inspector on the right, and drag from the dataSource outlet (the empty circle on its right) to the View Controller as shown below. Do the same for the delegate outlet. Our view controller is now set as the data source and delegate of the table view.
If you were to build and run the project now, it would crash almost instantly. The reason for this will become clear in a few moments. Before taking a closer look at the UITableViewDataSource protocol, we need to update the header file of the view controller class, TSPViewController.
The data source and delegate objects of the table view need to conform to the UITableViewDataSource and UITableViewDelegate protocol respectively. As we saw earlier in this series, protocols are specified between angle brackets after the superclass in the header file. Multiple protocols are separated by commas.
#import <UIKit/UIKit.h>

@interface TSPViewController : UIViewController <UITableViewDataSource, UITableViewDelegate>

@end
Creating the Data Source
Before we start implementing the methods of the data source protocol, we need some data to display in the table view. The data will be stored in an instance of NSArray so we first need to add a new property to our view controller class.
Select the view controller's header file, TSPViewController.h, and add a property named fruits. The property should be of type NSArray.
#import <UIKit/UIKit.h>

@interface TSPViewController : UIViewController <UITableViewDataSource, UITableViewDelegate>

@property NSArray *fruits;

@end
In the view controller's viewDidLoad method, we populate the fruits property with a list of fruit names, which we'll display in the table view a bit later. The viewDidLoad method is automatically invoked after the view controller's view and its subviews are loaded into memory hence the name. It's therefore a good place to initialize the fruits array.
- (void)viewDidLoad {
    [super viewDidLoad];

    self.fruits = @[@"Apple", @"Pineapple", @"Orange", @"Banana", @"Pear", @"Kiwi", @"Strawberry", @"Mango", @"Walnut", @"Apricot", @"Tomato", @"Almond", @"Date", @"Melon", @"Water Melon", @"Lemon", @"Blackberry", @"Coconut", @"Fig", @"Passionfruit", @"Star Fruit"];
}
In viewDidLoad, we assign an array literal to the view controller's fruits property. This should look familiar if you've read the previous article. The fruits array contains the data that we'll display in the table view.
The UIViewController class, the superclass of the TSPViewController class, also defines a viewDidLoad method. The TSPViewController class overrides the viewDidLoad method defined by the UIViewController class.
Overriding a method of a superclass is never without risk. What if the UIViewController class does some important things in the viewDidLoad method? How do we make sure that we don't break anything when we override the viewDidLoad method?
In situations like this, it's key to invoke the viewDidLoad method of the superclass first before doing anything else in the viewDidLoad method. The keyword super refers to the superclass and we send it a message of viewDidLoad, which will invoke the viewDidLoad method of the superclass. This is an important concept to grasp so make sure that you understand this properly before proceeding.
Data Source Protocol
Because we assigned the view controller as the data source object of the table view, the table view will ask the view controller what it should display. The first piece of information the table view wants from its dataSource object is the number of sections it should display. The table view does this by invoking the numberOfSectionsInTableView: method on its dataSource object. This is an optional method of the UITableViewDataSource protocol. If the table view's dataSource object doesn't implement this method, the table view will assume that it needs to display only one section. We implement this method anyway since we're going to need it later in this article.
You may be wondering "What is a table view section?" A table view section is a group of rows. The Contacts application on iOS, for example, groups contacts based on the first letter of the first or last name. Each group of contacts forms a section, which is preceded with a section header at the top of the section and/or a section footer at the bottom of the section.
The numberOfSectionsInTableView: method accepts one argument, tableView, which is the table view that sent the message to the data source object. This is important as it allows the data source object to be the data source of multiple table views if necessary. As you can see , the implementation of numberOfSectionsInTableView: is quite easy.
- (NSInteger)numberOfSectionsInTableView:(UITableView *)tableView {
    return 1;
}
You might be thrown off by the use of NSInteger as the return type of numberOfSectionsInTableView:. NSInteger is a data type defined in the Foundation framework. NSInteger and its unsigned variant, NSUInteger, have a dynamic definition to enhance portability.
Now that the table view knows how many sections it will need to display, it will ask its dataSource object how many rows each section contains. For each section in the table view, the table view will send the dataSource object a message of tableView:numberOfRowsInSection:. The method accepts two arguments, the table view sending the message and the section of which the table view wants to know the number of rows.
The implementation of this method is pretty simple as you can see below. We start by declaring an integer named numberOfRows and assign it the number of items in the fruits array by calling count on the array. We return numberOfRows as the method expects.
- (NSInteger)tableView:(UITableView *)tableView numberOfRowsInSection:(NSInteger)section {
    NSInteger numberOfRows = [self.fruits count];
    return numberOfRows;
}
The implementation of this method is so easy that we might as well make it a bit more concise. Take a look at the implementation below to make sure that you understand what has changed.
- (NSInteger)tableView:(UITableView *)tableView numberOfRowsInSection:(NSInteger)section {
    return [self.fruits count];
}
If you were to build and run the project now, the application would still crash. The table view expects the data source, our view controller, to return a table view cell for each row of each section. The message displayed in the console after the crash is clear about what we need to do next.
UITableView dataSource must return a cell from tableView:cellForRowAtIndexPath:
To remedy this, we need to implement tableView:cellForRowAtIndexPath:, another method of the UITableViewDataSource protocol. Like most Objective-C method names, the name of the method is very descriptive. By sending this message to the table view's dataSource object, the table view asks its data source for the table view cell of the row specified by indexPath.
Before continuing, I'd like to take a minute to talk about the NSIndexPath class. As the documentation explains, "The NSIndexPath class represents the path to a specific node in a tree of nested array collections." An instance of this class can hold one or more indices. In the case of our table view, it holds an index for the section an item is in and the row of that item in the section.
A table view is never more than two levels deep, the first level being the section and the second level being the row in the section. Even though NSIndexPath is a Foundation class, the UIKit framework adds a handful of extra methods to the class, which make working with table views easier. Let's inspect the implementation of the tableView:cellForRowAtIndexPath: method.
- (UITableViewCell *)tableView:(UITableView *)tableView cellForRowAtIndexPath:(NSIndexPath *)indexPath {
    static NSString *CellIdentifier = @"Cell Identifier";

    [tableView registerClass:[UITableViewCell class] forCellReuseIdentifier:CellIdentifier];

    UITableViewCell *cell = [tableView dequeueReusableCellWithIdentifier:CellIdentifier forIndexPath:indexPath];

    // Fetch Fruit
    NSString *fruit = [self.fruits objectAtIndex:[indexPath row]];

    [cell.textLabel setText:fruit];

    return cell;
}
In the first line of tableView:cellForRowAtIndexPath:, we declare a static string. The advantage of declaring the string as static is that the compiler will use only one copy of this string instead of creating a new string every time the tableView:cellForRowAtIndexPath: method is called. This helps to keep down the memory usage of the table view.
static NSString *CellIdentifier = @"Cell Identifier";
Reusing Table View Cells
In the previous article, I told you that views are an important component of an iOS application. However, views are expensive in terms of the memory and processing power they consume. When working with table views, it's therefore important to reuse table view cells as much as possible. By reusing table view cells, the table view doesn't have to initialize a new table view cell from scratch every time a new row needs to be drawn to the screen.
Table view cells that move off-screen are not thrown into the trash. Table view cells can be marked for reuse by specifying a reuse identifier during initialization. When a table view cell that's marked for reuse moves off-screen, the table view puts it into a reuse queue for later reuse.
When the table view's dataSource object asks the table view for a new cell and specifies a reuse identifier, the table view will first inspect the reuse queue to check if a table view cell with the specified reuse identifier is available. If no table view cell is available, the table view will instantiate a new one and hand it over to the dataSource object. That is what happens in the next line of code.
UITableViewCell *cell = [tableView dequeueReusableCellWithIdentifier:CellIdentifier forIndexPath:indexPath];
The table view's dataSource object asks the table view for a table view cell by sending it a message of dequeueReusableCellWithIdentifier:forIndexPath:. The method accepts the reuse identifier I mentioned earlier as well as the index path of the table view cell.
How does the table view know how to create a new table view cell? In other words, how does the table view know what class to use to instantiate a new table view cell? The answer is simple. Before sending the table view the message dequeueReusableCellWithIdentifier:forIndexPath:, the table view needs to know what class to use with a particular reuse identifier, which is accomplished by sending the table view a message of registerClass:forCellReuseIdentifier: and specifying the class to use and a reuse identifier. Take a look at the example below.
[tableView registerClass:[UITableViewCell class] forCellReuseIdentifier:CellIdentifier];

UITableViewCell *cell = [tableView dequeueReusableCellWithIdentifier:CellIdentifier forIndexPath:indexPath];
Configuring the Table View Cell
The next step involves populating the table view cell with the data stored in the fruits array. This means that we need to know what element to use from the fruits array, which in turn means that we need to somehow know the row index of the table view cell.
The indexPath argument of the tableView:cellForRowAtIndexPath: method has this information. As I mentioned earlier, it has a few extra methods for making working with table views easier. One of these methods is row, which returns the row for the cell. We fetch the correct fruit by sending the fruits array a message of objectAtIndex: and passing the correct row as shown below.
// Fetch Fruit
NSString *fruit = [self.fruits objectAtIndex:[indexPath row]];
Finally, we set the text of the textLabel property of the table view cell to the fruit name we fetched from the fruits array. The UITableViewCell class is a UIView subclass and it has a number of subviews. One of these subviews is an instance of UILabel and we use this label to display the name of the fruit in the table view cell.
[cell.textLabel setText:fruit];
The tableView:cellForRowAtIndexPath: method expects us to return an instance of the UITableViewCell class and that is what we do at the end of the method.
return cell;
Build and run the project once more. You should now have a fully functional table view populated with the array of fruit names stored in the view controller's fruits property.
A Better Way
There are two things that I don't like about the implementation of tableView:cellForRowAtIndexPath:. We start by declaring a static string that we use as a cell reuse identifier. It isn't good practice to do this in tableView:cellForRowAtIndexPath:. Move this snippet to the top of the @implementation block in TSPViewController.h. That's a much better place. There's no need to execute this line of code every time the table view asks for a cell.
@implementation TSPViewController

static NSString *CellIdentifier = @"Cell Identifier";
We shouldn't be invoking registerClass:forCellReuseIdentifier: in tableView:cellForRowAtIndexPath:. This method should only be invoked once for each cell reuse identifier, which means that it doesn't belong in tableView:cellForRowAtIndexPath:. Move this line of code to the view controller's viewDidLoad method.
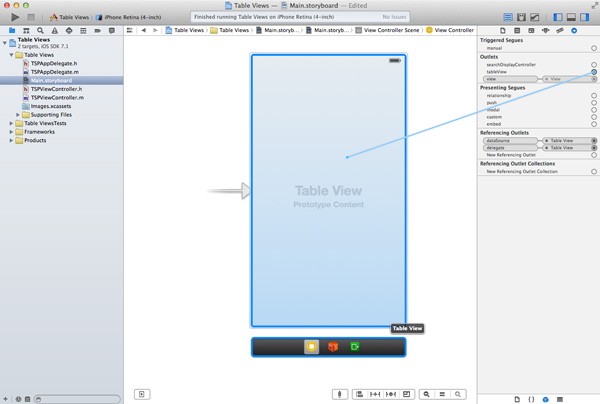
There is one problem. We don't have access to the view controller's table view in viewDidLoad. This is easily fixed. Visit TSPViewController.h, create an outlet for the table view we added to the storyboard, and connect the outlet in the storyboard with the table view.
#import <UIKit/UIKit.h>

@interface TSPViewController : UIViewController <UITableViewDataSource, UITableViewDelegate>

@property IBOutlet UITableView *tableView;

@property NSArray *fruits;

@end
This allows us to reference the table view in the viewDidLoad method as self.tableView. The updated implementation of viewDidLoad is shown below.
- (void)viewDidLoad {
    [super viewDidLoad];

    self.fruits = @[@"Apple", ..., @"Star Fruit"];

    [self.tableView registerClass:[UITableViewCell class] forCellReuseIdentifier:CellIdentifier];
}
Sections
Before we take a look at the UITableViewDelegate protocol, I want to modify the current implementation of the data source protocol by adding sections to the table view. If the list of fruits were to grow over time, it would be better and more user friendly to sort the fruits alphabetically and group them into sections based on the fruit's first letter.
If we want to add sections to the table view, the current array of fruit names won't suffice. Instead, the data needs to be divided into sections and the fruits in each section need to be sorted alphabetically. A dictionary (NSDictionary) is the ideal candidate for this purpose. Add a new property named alphabetizedFruits to the view controller's header file and head back to the viewDidLoad method in the view controller's implementation file.
#import <UIKit/UIKit.h>

@interface TSPViewController : UIViewController <UITableViewDataSource, UITableViewDelegate>

@property IBOutlet UITableView *tableView;

@property NSArray *fruits;
@property NSDictionary *alphabetizedFruits;

@end
In viewDidLoad, we use the fruits array to create a dictionary of fruits. The dictionary should contain an array of fruits for each letter of the alphabet.
- (void)viewDidLoad {
    [super viewDidLoad];

    self.fruits = @[@"Apple", @"Pineapple", @"Orange", @"Banana", @"Pear", @"Kiwi", @"Strawberry", @"Mango", @"Walnut", @"Apricot", @"Tomato", @"Almond", @"Date", @"Melon", @"Water Melon", @"Lemon", @"Blackberry", @"Coconut", @"Fig", @"Passionfruit", @"Star Fruit"];

    self.alphabetizedFruits = [self alphabetizeFruits:self.fruits];

    [self.tableView registerClass:[UITableViewCell class] forCellReuseIdentifier:CellIdentifier];
}
The dictionary is created in a helper method, alphabetizeFruits:, which accepts the fruits array as an argument. The alphabetizeFruits: method might be a bit overwhelming at first sight, but its implementation is actually pretty straightforward.
- (NSDictionary *)alphabetizeFruits:(NSArray *)fruits {
    NSMutableDictionary *buffer = [[NSMutableDictionary alloc] init];

    // Put Fruits in Sections
    for (int i = 0; i < [fruits count]; i++) {
        NSString *fruit = [fruits objectAtIndex:i];
        NSString *firstLetter = [[fruit substringToIndex:1] uppercaseString];

        if ([buffer objectForKey:firstLetter]) {
            [(NSMutableArray *)[buffer objectForKey:firstLetter] addObject:fruit];

        } else {
            NSMutableArray *mutableArray = [[NSMutableArray alloc] initWithObjects:fruit, nil];
            [buffer setObject:mutableArray forKey:firstLetter];
        }
    }

    // Sort Fruits
    NSArray *keys = [buffer allKeys];
    for (int j = 0; j < [keys count]; j++) {
        NSString *key = [keys objectAtIndex:j];
        [(NSMutableArray *)[buffer objectForKey:key] sortUsingSelector:@selector(localizedCaseInsensitiveCompare:)];
    }

    NSDictionary *result = [NSDictionary dictionaryWithDictionary:buffer];
    return result;
}
We first create a mutable dictionary (NSMutableDictionary) to temporarily store the sections in and we then loop over the fruits in the fruits array, grab the first letter of each fruit, and, based on the first letter, add it to the corresponding array in the temporary mutable array. Each section is represented by a mutable array (NSMutableArray).
In a second for loop, we iterate through the temporary dictionary and sort each array of fruits alphabetically. We then create a new dictionary from the temporary mutable dictionary and return that dictionary at the end of the method. Don't worry if the implementation of alphabetizeFruits: isn't entirely clear. The focus of this article is on table views and not on creating an alphabetized list of fruits.
Number of Sections
With the new data source into place, the first thing we need to do is update the numberOfSectionsInTableView: method of the UITableViewDataSource protocol.
The updated implementation is quite easy as you can see below. We start by asking the dictionary, alphabetizedFruits, for all its keys by sending it a message of allKeys. This will pull out all the keys of the dictionary and put them in an array. The number of keys in the returned array equals the number of sections in the table view.
- (NSInteger)numberOfSectionsInTableView:(UITableView *)tableView {
    NSArray *keys = [self.alphabetizedFruits allKeys];
    return [keys count];
}
Next, we need to update tableView:numberOfRowsInSection:. As in numberOfSectionsInTableView:, we start by asking alphabetizedFruits for its keys and we then sort the array of keys. Sorting the array of keys is important, because the key-value pairs of a dictionary are not ordered. This is one key differences with arrays and something that often trips up developers who are new to Objective-C.
- (NSInteger)tableView:(UITableView *)tableView numberOfRowsInSection:(NSInteger)section {
    NSArray *unsortedKeys = [self.alphabetizedFruits allKeys];
    NSArray *sortedKeys = [unsortedKeys sortedArrayUsingSelector:@selector(localizedCaseInsensitiveCompare:)];
    NSString *key = [sortedKeys objectAtIndex:section];
    NSArray *fruitsForSection = [self.alphabetizedFruits objectForKey:key];
    return [fruitsForSection count];
}
In the next step, we fetch the correct key for the section and we can then askalphabetizedFruits for the array associated with that key. We then return the number of items in the array.
The changes that we need to make to tableView:cellForRowAtIndexPath: are very similar. Everything remains the same except for the way we fetch the fruit name that the table view cell will display.
- (UITableViewCell *)tableView:(UITableView *)tableView cellForRowAtIndexPath:(NSIndexPath *)indexPath {
    UITableViewCell *cell = [tableView dequeueReusableCellWithIdentifier:CellIdentifier forIndexPath:indexPath];

    // Fetch Fruit
    NSArray *unsortedKeys = [self.alphabetizedFruits allKeys];
    NSArray *sortedKeys = [unsortedKeys sortedArrayUsingSelector:@selector(localizedCaseInsensitiveCompare:)];
    NSString *key = [sortedKeys objectAtIndex:[indexPath section]];
    NSArray *fruitsForSection = [self.alphabetizedFruits objectForKey:key];
    NSString *fruit = [fruitsForSection objectAtIndex:[indexPath row]];

    [cell.textLabel setText:fruit];

    return cell;
}
If you were to build and run the project, you would not see any section headers like in the Contacts application. This is because we need to tell the table view what it should display in each section header.
The most obvious choice is to display the name of each section, that is, a letter of the alphabet. The easiest way to do this is by implementing tableView:titleForHeaderInSection:, which is another method defined in the UITableViewDataSource protocol. Take a look at its implementation below. It's similar to the implementation of tableView:numberOfRowsInSection:.
- (NSString *)tableView:(UITableView *)tableView titleForHeaderInSection:(NSInteger)section {
    NSArray *keys = [[self.alphabetizedFruits allKeys] sortedArrayUsingSelector:@selector(localizedCaseInsensitiveCompare:)];
    NSString *key = [keys objectAtIndex:section];
    return key;
}
Build and run your application and see how the table view is now a list of sections with each section containing an alphabetized list of fruits.
Delegation
In addition to the UITableViewDataSource protocol, the UIKit framework also defines the UITableViewDelegate protocol to which the table view's delegate object needs to conform.
In the storyboard, we already set our view controller as the delegate of the table view. Even though we haven't implemented any of the delegate methods defined in the UITableViewDelegate protocol, our application works just fine. This is because every method of the UITableViewDelegate protocol is optional.
It would be nice, however, to be able to respond to touch events. Whenever a user touches a row, we should be able to log the name of the corresponding fruit to Xcode's console. Even though this isn't very useful, it'll show you how the delegate pattern works.
Implementing this behavior is easy. All we have to do is implement the tableView:didSelectRowAtIndexPath: method of the UITableViewDelegate protocol.
- (void)tableView:(UITableView *)tableView didSelectRowAtIndexPath:(NSIndexPath *)indexPath {
    // Fetch Fruit
    NSArray *unsortedKeys = [self.alphabetizedFruits allKeys];
    NSArray *sortedKeys = [unsortedKeys sortedArrayUsingSelector:@selector(localizedCaseInsensitiveCompare:)];
    NSString *key = [sortedKeys objectAtIndex:[indexPath section]];
    NSArray *fruitsForSection = [self.alphabetizedFruits objectForKey:key];
    NSString *fruit = [fruitsForSection objectAtIndex:[indexPath row]];

    NSLog(@"Fruit Selected > %@", fruit);
}
Fetching the name of the fruit that corresponds to the selected row should be familiar by now. The only difference is that we log the fruit's name to Xcode's console.
It might surprise you that we use the alphabetizedFruits dictionary to look up the corresponding fruit. Why don't we ask the table view or the table view cell for the name of the fruit? A table view cell is a view and its sole purpose is displaying information to the user. It doesn't know what it's displaying other than how to display it. The table view itself doesn't have the responsibility to know about its data source, it only knows how to display the sections and rows that it contains and manages.
This example is another good illustration of the separation of concerns of the Model-View-Controller (MVC) pattern that we saw earlier in this series. Views don't know anything about application data apart from how to display it. If you want to write reliable and robust iOS applications, it's very important to know about and respect this separation of responsibilities.
Conclusion
Table views are not that complicated once you understand how they behave and know about the components involved, such as the data source and delegate objects of the table view.
However, we only saw a glimpse of what a table view is capable of. In the rest of this series, we will revisit the table view and explore a few more pieces of the puzzle. In the next installment of this series, we'll take a look at navigation controllers.

Comments