In 2014, Apple took the developer community by surprise with the introduction of Swift, a brand new programming language. Swift has come a long way, and it is hard to believe that the language is celebrating its third anniversary this year. A few months ago, Apple released Swift 3, a major milestone for the language. In this series, I'll teach you the fundamentals of Swift 3.
Swift feels familiar if you have used Objective-C to develop iOS or macOS applications, but there are a number of important differences. I'll kick this series off by showing you in what ways Swift differs from Objective-C and why those differences are a good thing. Let's get started.
1. Prerequisites
Programming
Throughout this series, I make references to Objective-C and compare the Swift programming language with Objective-C. However, to follow along, there is no need to be familiar with Objective-C.
That said, it is important that you have experience with a programming language. While this series focuses on Swift, it doesn't cover the basics of programming. I expect you to be familiar with variables, constants, functions, control flow, and object-oriented programming.
If you are familiar with Objective-C, Java, Ruby, PHP, or JavaScript, then you won't have problems understanding the concepts explained in this series. As a matter of fact, you will notice that Swift shares similarities with a number of popular programming languages, including Objective-C.
Xcode
Swift 3 is only supported by Xcode 8, and you need to install the latest version of Apple's IDE (Integrated Development Environment) to follow along. You can download Xcode either from the App Store or Apple's Developer Center.
2. Swift
Compared to Objective-C or Java, Swift is an expressive, succinct language that often reminds me of Ruby and JavaScript. Even though the creator of Swift, Chris Lattner, took inspiration from other languages, Swift is very much a language that stands on its own feet.
As you may know, Objective-C is a strict superset of C. Swift, however, is not. While Swift uses curly braces and shares several keywords with the C programming language, it is not compatible with C.
Swift is a modern programming language that feels intuitive, especially if you are used to Java or C-based programming languages like Objective-C. During the development and design of Swift, Chris Lattner focused on a number of key characteristics that ended up defining the language.
Safety
Safety is one of Swift's foundations. In this series, you quickly learn that Swift is very different from Objective-C in terms of safety, and this directly affects the code you write. If you have worked with Objective-C, this takes some getting used to.
LLVM
Chris Lattner also designed the LLVM (Low Level Virtual Machine) compiler, and it shouldn't be a surprise that Swift is built with the LLVM compiler. The result is speed, power, and reliability. Swift is significantly faster than Objective-C in most scenarios. Read this article by Jesse Squires if you are interested in the nitty-gritty details.
Type Inference
Type safety is one of Swift's key features. Swift inspects your code at compile time and warns you about type mismatches. This means that you can catch errors early, avoiding a range of common bugs.
Luckily, Swift helps you with this. Swift is often smart enough to infer the type of variables and constants, which means that you don't have to explicitly declare the type of each variable or constant. In the following code snippet, we declare a variable a and assign it the value "this is a string". Swift is smart enough to infer that a is of type String.
var a = "this is a string"
This is a trivial example, but you'll find out that Swift can also handle more complex scenarios.
Variables and Constants
Constants are useful in C and Objective-C, but most developers use them sparingly. In Swift, constants are just as important and common as variables. If the value of a variable doesn't change, then that variable should be a constant. Variables are declared using the var keyword. Constants are declared using the let keyword.
var a = 1 // variable
let b = 1 // constant
Not only does this improve the intent, it also improves safety by ensuring that the variable's value is not accidentally changed. We take a closer look at variables and constants later in this tutorial.
Semicolons
In Swift, semicolons are not required. You can use semicolons, for example, to write multiple statements on the same line, but they are optional. Take a look at the following example to better understand the use of semicolons in Swift.
var a = 1
var b = 2

var c = 1; var d = 2;
We are only scratching the surface. You'll learn about many more features and concepts throughout this series. Instead of overloading you with more theory, I suggest you get your feet wet by writing some code. This brings us to one of the best features of Swift and Xcode: playgrounds.
3. Playgrounds
Apple introduced playgrounds in Xcode 6. Playgrounds are the perfect tool for learning Swift. A playground is an interactive environment in which you can write Swift and immediately see the result. Not only does it make learning Swift more fun, it is much faster and more intuitive than setting up a project in Xcode.
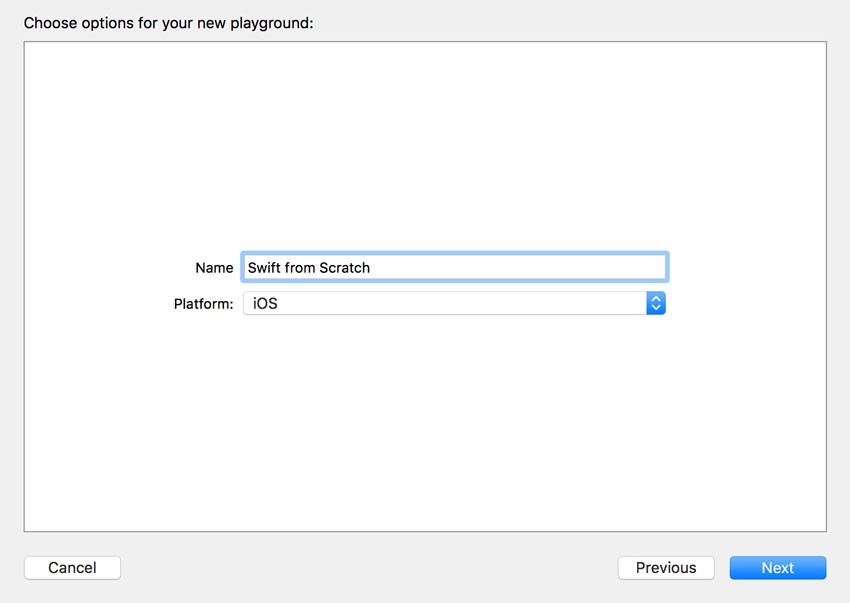
As a matter of fact, it is so easy that you might as well jump in and create your first playground. Open Xcode 8 and select New > Playground... from the File menu. Name the playground and set Platform to iOS.
Tell Xcode where you would like to save the playground and click Create. Instead of creating a project with a bunch of files and folders, a playground is nothing more than a file with a .playground extension. A playground is more than a file under the hood, but that isn't something we need to worry about for now.
The user interface you are presented with couldn't be simpler. On the left, you see a code editor with a comment at the top, an import statement for importing the UIKit framework, and one line of code that shouldn't be too difficult to understand. On the right, you see the output or results generated by the code on the left.
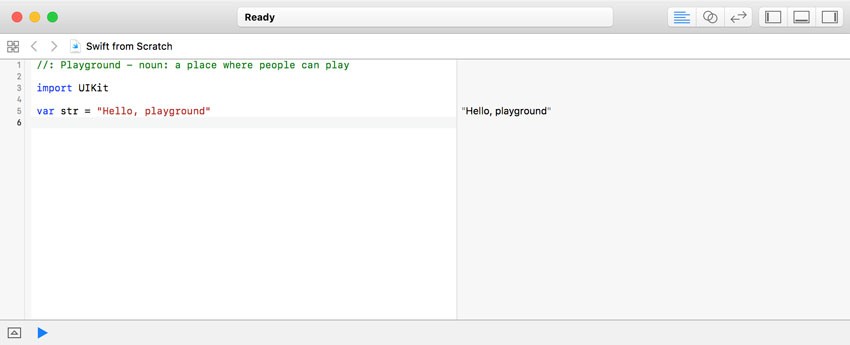
Let's take a moment to understand the code in your new playground. The first line should look familiar if you have worked with Objective-C, PHP, or JavaScript. Comments in Swift start with two forward slashes or, in the case of multiline comments, start with /* and end with */.
Because we selected iOS as the platform when we created the playground, Xcode added an import statement for the UIKit framework. This gives us access to every symbol defined in the UIKit framework.
The third line looks familiar, but there are a few details that need clarifying. We declare a variable str and assign it a string. This line of code is easy to understand, but note that the variable's name is preceded by the var keyword instead of the variable's type as you would expect in Objective-C. The same statement in Objective-C would look something like this.
NSString *str = @"Hello, playground";
In Objective-C, we would replace the var keyword with the variable's type, prefix the string with an @ symbol, and end the statement with a semicolon. It is important to understand that the var keyword doesn't replace the type specifier in Objective-C. It is nothing more than a keyword to indicate that str is a variable, not a constant.
Let me explain this in more detail. Add the following line of code to the playground.
let hello = "Hello, playground"
The let keyword tells the compiler that hello is a constant, not a variable. Both str and hello are of type String, but str is a variable and hello is a constant. The difference is simple to understand if we add two more lines of code.
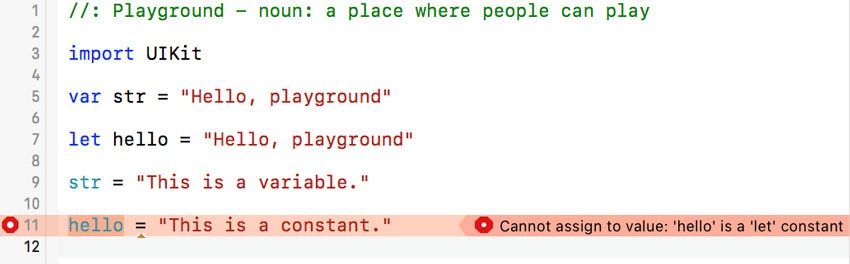
str = "This is a variable."
hello = "This is a constant."
Assigning a new value to str doesn't pose a problem. Assigning a new value to hello, however, results in an error. Xcode tells us that it cannot assign a new value to hello, because hello is a constant, not a variable. This is another key feature of Swift, which will take some getting used to.
The idea is simple. If the value of a variable is not going to change, then it should be a constant instead of a variable. While this may seem like a semantic detail, I guarantee that it makes your code safer and less prone to errors. Be prepared, because you are going to see the let keyword a lot in this series.
We use playgrounds extensively throughout this series because it is a great way to learn the language. There are a few other powerful playground features that we haven't covered yet, but we first need to understand the basics of the Swift language before we can benefit from those.
Conclusion
I still have to meet a developer who doesn't like Swift, and that's saying something. Swift has a number of concepts that require some getting used to, but I am confident that you too will end up enjoying Swift and appreciating its power, elegance, and concision. In the next installment of this series, we'll start exploring the basics of Swift.
If you want to get up and running with the Swift language quickly, check out our course on creating iOS apps with Swift.

Or check out some of our other tutorials and courses on Swift and iOS development!


Comments