If you've read the previous lessons of this series, you should have a good grasp of the fundamentals of the Swift programming language by now. We talked about variables, constants, and functions, and in the previous lesson we covered the basics of object-oriented programming in Swift.
While playgrounds are a great tool to play with Swift and learn the language, it's time to move on and create our first Swift project in Xcode. In this lesson, we're going to create the foundation of a simple to-do application using Xcode and Swift. Along the way, we'll learn more about object-oriented programming and we'll also take a closer look at the integration of Swift and Objective-C.
Prerequisites
If you'd like to follow along with me, then make sure that you have Xcode 8.3.2 or higher installed on your machine. Xcode 8.3.2 is available from Apple's App Store.
1. Project Setup
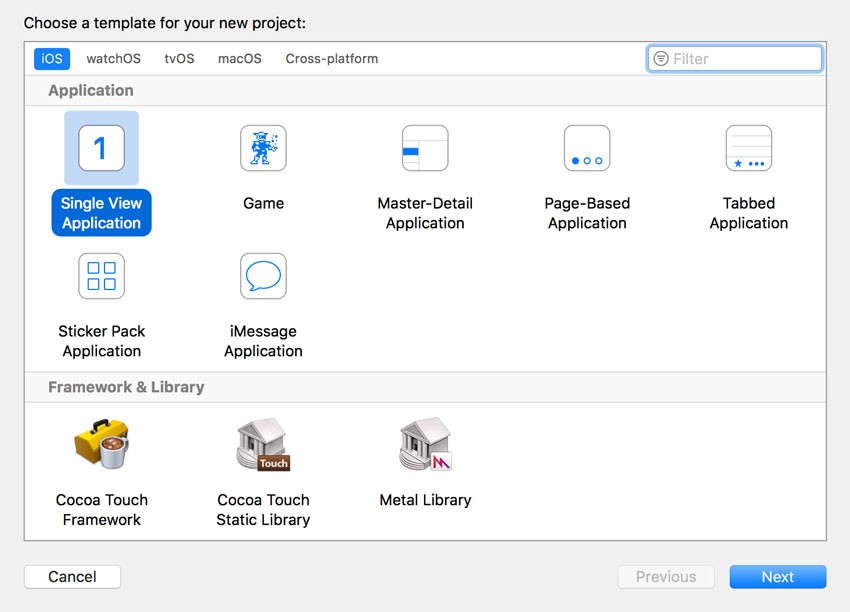
Step 1: Choose a Template
Launch Xcode 8.3.2 or higher and select New > Project... from the File menu. From the iOS section, choose the Single View Application template and click Next.
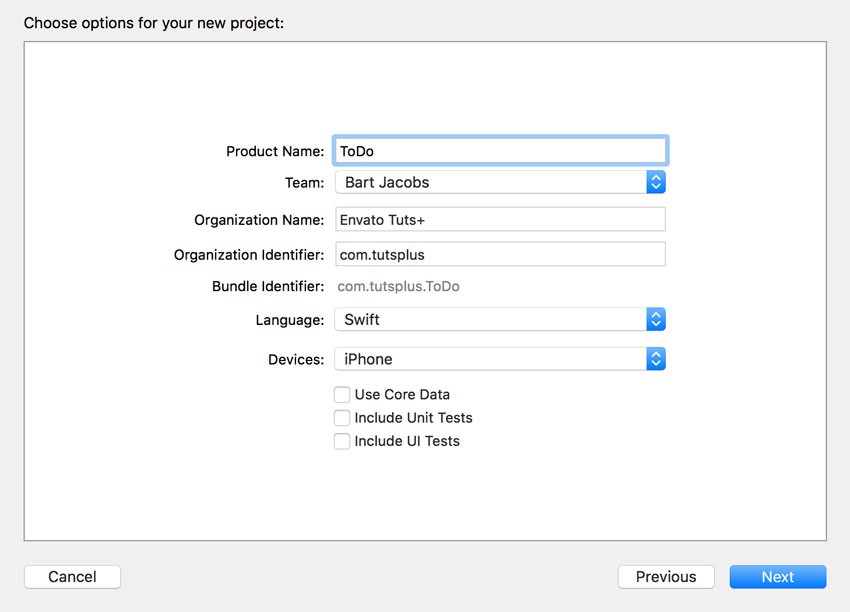
Step 2: Configure the Project
Name the project ToDo and set Language to Swift. Make sure Devices is set to iPhone and the checkboxes at the bottom are unchecked. Click Next to continue.
Tell Xcode where you'd like to store your project and click Create in the bottom right to create your first Swift project.
2. Project Anatomy
Before we continue our journey into Swift, let's take a moment to see what Xcode has created for us. If you're new to Xcode and iOS development, then most of this will be new to you. By working with a Swift project, however, you will get a better feeling of what classes and structures look like and how they behave in Swift.
The project template doesn't differ much from a project created with Objective-C as the programming language. The most important differences are related to the AppDelegate and ViewController classes.
If you've worked with Objective-C in the past, then you'll notice that the project template contains fewer files. There are no header (.h) or implementation (.m) files to be found in our project. In Swift, classes have no separate header file in which the interface is declared. Instead, a class is declared and implemented in a single .swift file.
Our project currently contains two Swift files, one for the AppDelegate class, AppDelegate.swift, and another one for the ViewController class, ViewController.swift. The project also includes two storyboards, Main.storyboard and LaunchScreen.storyboard. We'll work with the main storyboard a bit later in this lesson. It currently only contains the scene for the ViewController class.
There are a few other files and folders included in the project, but we're going to ignore those for now. They play no important role in the scope of this lesson.
3. Inheritance
The first thing we'll touch upon in this lesson is inheritance, a common paradigm in object-oriented programming. In Swift, only classes can inherit from another class. In other words, structures and enumerations don't support inheritance. This is one of the key differences between classes and structures.
Open ViewController.swift to see inheritance in action. The interface and implementation of the ViewController class is pretty bare-bones, which makes it easier for us to focus on the essentials.
UIKit
At the top of ViewController.swift, you should see an import statement for the UIKit framework. Remember that the UIKit framework provides the infrastructure for creating a functional iOS application. The import statement at the top makes this infrastructure available to us in ViewController.swift.
import UIKit
Superclass
Below the import statement, we define a new class named ViewController. The colon after the class name doesn't translate to is of type as we saw earlier in this series. Instead, the class after the colon is the superclass of the ViewController class. In other words, the following snippet could be read as we define a class named ViewController that inherits from UIViewController.
class ViewController: UIViewController {

}
This also explains the presence of the import statement at the top of ViewController.swift since the UIViewController class is defined in the UIKit framework.
Overrides
The ViewController class currently includes two methods, but notice that each method is prefixed with the override keyword. This indicates that the methods are defined in the class's superclass—or higher up the inheritance tree—and are overridden by the ViewController class.
class ViewController: UIViewController {

    override func viewDidLoad() {
        super.viewDidLoad()
    }

    override func didReceiveMemoryWarning() {
        super.didReceiveMemoryWarning()
    }

}
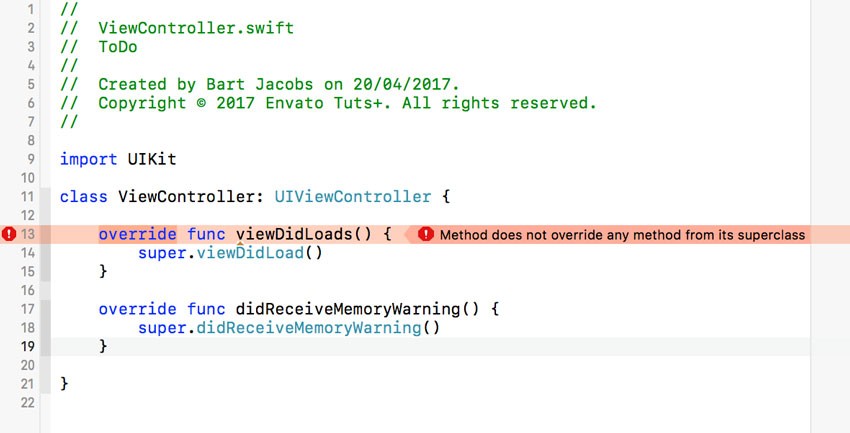
The override construct doesn't exist in Objective-C. In Objective-C, you implement an overridden method in a subclass without explicitly indicating that it overrides a method higher up the inheritance tree. The Objective-C runtime takes care of the rest.
While the same is true in Swift, the override keywords adds safety to method overriding. Because we've prefixed the viewDidLoad() method with the override keyword, Swift expects this method in the class's superclass or higher up the inheritance tree. Simply put, if you override a method that doesn't exist in the inheritance tree, the compiler will throw an error. You can test this by misspelling the viewDidLoad() method as shown below.
4. User Interface
Declaring Outlets
Let's add a table view to the view controller to display a list of to-do items. Before we do that, we need to create an outlet for the table view. An outlet is nothing more than a property that's visible to and can be set in Interface Builder. To declare an outlet in the ViewController class, we prefix the property, a variable, with the @IBOutlet attribute.
class ViewController: UIViewController {

    @IBOutlet var tableView: UITableView!

    override func viewDidLoad() {
        super.viewDidLoad()
    }

    override func didReceiveMemoryWarning() {
        super.didReceiveMemoryWarning()
    }

}
Note that the outlet is an implicitly unwrapped optional. A what? Let me start by saying that an outlet always needs to be an optional type. The reason is simple. Every property of the ViewController class needs to have a value after initialization. An outlet, however, is only connected to the user interface at runtime after the ViewController instance has been initialized hence the optional type.
Wait a minute. The tableView outlet is declared as an implicitly unwrapped optional, not an optional. No problem. We can declare the tableView outlet as an optional by replacing the exclamation mark in the above snippet with a question mark. That would compile just fine. However, this would also mean that we would need to explicitly unwrap the property every time we want to access the value stored in the optional. This would quickly become cumbersome and verbose.
Instead, we declare the tableView outlet as an implicitly unwrapped optional, which means that we don't need to explicitly unwrap the optional if we need to access its value. In short, an implicitly unwrapped optional is an optional, but we can access the value stored in the optional like a regular variable. The important thing to keep in mind is that your application will crash if you try to access its value if no value has been set. That's the gotcha. If the outlet is properly connected, however, we can be sure that the outlet is set when we first try to access it.
Connecting Outlets
With the outlet declared, it's time to connect it in Interface Builder. Open Main.storyboard, and select the view controller. Choose Embed In > Navigation Controller from the Editor menu. This sets the view controller as the root view controller of a navigation controller. Don't worry about this for now.
Drag a UITableView instance from the Object Library to the view controller's view, and add the necessary layout constraints. With the table view selected, open the Connections Inspector and set the table view's dataSource and delegate outlets to the view controller.
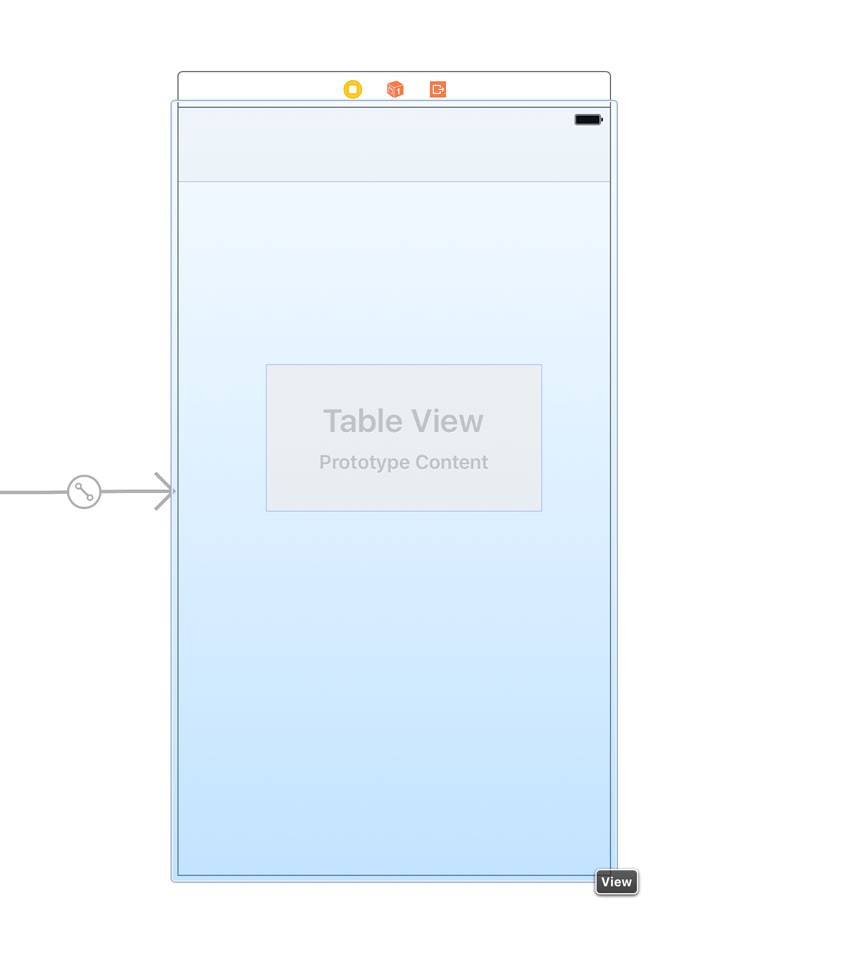
With the Connections Inspector still open, select the view controller and connect the tableView outlet to the table view we just added. This connects the tableView outlet of the ViewController class to the table view.
5. Protocols
Before we can build and run the application, we need to implement the UITableViewDataSource and UITableViewDelegate protocols in the ViewController class. This involves several things.
Step 1: Conforming to Protocols
We need to tell the compiler that the ViewController class conforms to the UITableViewDataSource and UITableViewDelegate protocols. The syntax looks similar to that in Objective-C.
class ViewController: UIViewController, UITableViewDataSource, UITableViewDelegate {
    ...
}
The protocols the class conforms to are listed after the superclass, UIViewController in the above example. If a class doesn't have a superclass, which isn't uncommon in Swift, then the protocols are listed immediately after the class name and colon.
Step 2: Implementing the UITableViewDataSource Protocol
Because the UITableViewDelegate protocol doesn't define required methods, we're only going to implement the UITableViewDataSource protocol for now. Before we do, let's create a variable property to store the to-do items we're going to list in the table view.
class ViewController: UIViewController, UITableViewDataSource, UITableViewDelegate {
    @IBOutlet var tableView: UITableView!

    var items: [String] = []

    ...
}
We declare a variable property items of type [String] and set an empty array, [], as the initial value. This should look familiar by now. Next, let's implement the two required methods of the UITableViewDataSource protocol.
The first required method, numberOfRows(inSection:), is easy. We simply return the number of items stored in the items property.
func tableView(_ tableView: UITableView, numberOfRowsInSection section: Int) -> Int {
    return items.count
}
The second required method, cellForRow(at:), needs an explanation. Using subscript syntax, we ask items for the item that corresponds with the current row.
func tableView(_ tableView: UITableView, cellForRowAt indexPath: IndexPath) -> UITableViewCell {
    // Fetch Item
    let item = items[indexPath.row]

    // Dequeue Cell
    let cell = tableView.dequeueReusableCell(withIdentifier: "TableViewCell", for: indexPath)

    // Configure Cell
    cell.textLabel?.text = item

    return cell
}
We then ask the table view for a cell with identifier "TableViewCell", passing in the index path for the current row. Note that we store the cell in a constant, cell. There's no need to declare cell as a variable.
In the next line of code, we configure the table view cell, setting the text label's text with the value of item. Note that in Swift the textLabel property of UITableViewCell is declared as an optional type hence the question mark. This line of code could be read as set the text label's text property to item if textLabel is not equal to nil. In other words, the text label's text property is only set if textLabel isn't nil. This is a very convenient safety construct in Swift known as optional chaining.
Step 3: Cell Reuse
There are two things we need to sort out before building the application. First, we need to tell the table view that it needs to use the UITableViewCell class to create new table view cells. We do this by invoking registerClass(_:forCellReuseIdentifier:), passing in the UITableViewCell class and the reuse identifier we used earlier, "TableViewCell". Update the viewDidLoad() method as shown below.
override func viewDidLoad() {
    super.viewDidLoad()

    // Register Class for Cell Reuse
    tableView.register(UITableViewCell.self, forCellReuseIdentifier: "TableViewCell")
}
Step 4: Adding Items
We currently don't have any items to show in the table view. This is easily solved by populating the items property with a few to-do items. There are several ways to accomplish this. I've chosen to populate the items property in the viewDidLoad() method as shown below.
override func viewDidLoad() {
    super.viewDidLoad()

    // Populate Items
    items = ["Buy Milk", "Finish Tutorial", "Play Minecraft"]

    // Register Class for Cell Reuse
    tableView.register(UITableViewCell.self, forCellReuseIdentifier: "TableViewCell")
}
6. Build and Run
It's time to take our application for a spin. Select Run from Xcode's Product menu or hit Command-R. If you've followed along, you should end up with the following result.
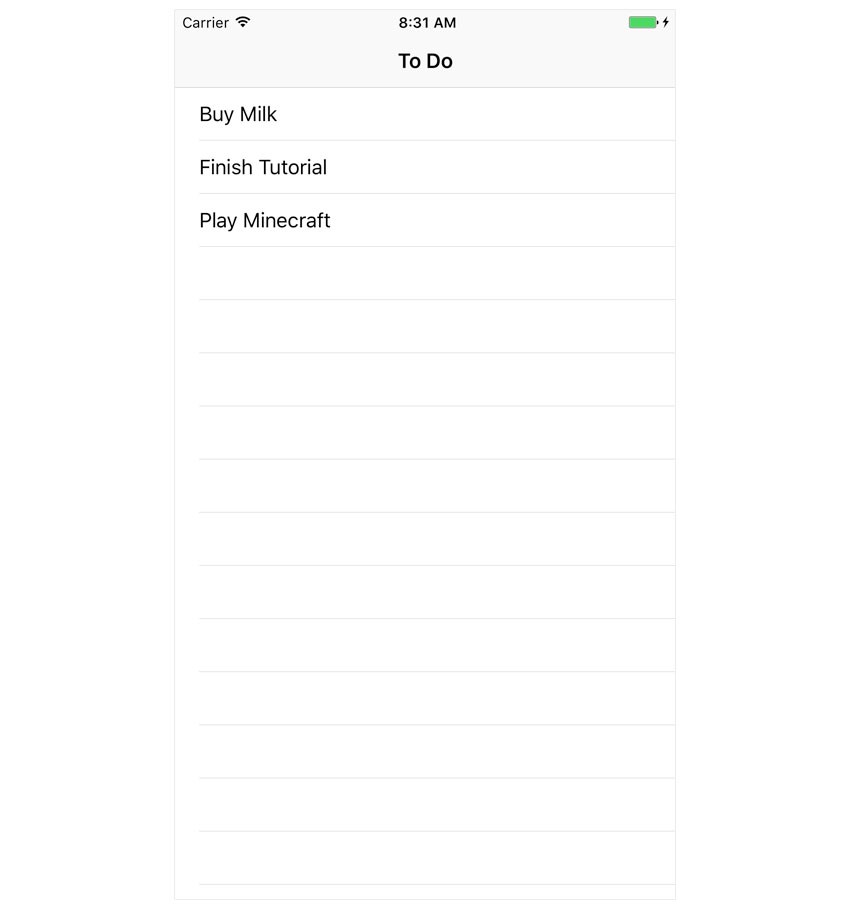
Note that I've added a title, To Do, at the top of the view in the navigation bar. You can do the same by setting the title property of the ViewController instance in the viewDidLoad() method.
override func viewDidLoad() {
    super.viewDidLoad()

    // Set Title
    title = "To Do"

    // Populate Items
    items = ["Buy Milk", "Finish Tutorial", "Play Minecraft"]

    // Register Class for Cell Reuse
    tableView.register(UITableViewCell.self, forCellReuseIdentifier: "TableViewCell")
}
Conclusion
Even though we've just created a simple application, you've learned quite a few new things. We've explored inheritance and overriding methods. We also covered protocols and how to adopt the UITableViewDataSource protocol in the ViewController class. The most important thing you've learned, however, is how to interact with Objective-C APIs.
It's important to understand that the APIs of the iOS SDK are written in Objective-C. Swift was designed to be compatible with these APIs. Based on past failures, Apple understood that Swift needed to be able to hook into the iOS SDK without having to rewrite every single API in Swift.
Combining Objective-C and Swift is possible, but there are some caveats that we'll explore in more detail as we move forward. Because of Swift's relentless focus on safety, we need to take a few hurdles from time to time. However, none of these hurdles are too great as we'll find out in the next lesson in which we continue working on our to-do application.
In the meantime, check out some of our other courses and tutorials about Swift language iOS development!


Comments