In the previous tutorial, you created your first Swift project in Xcode, a simple to-do application. In this installment of Swift from Scratch, we're going to add the ability to create to-do items. Along the way, you will learn about actions, delegation, and properties.
Prerequisites
If you'd like to follow along with me, then make sure that you have Xcode 6.3 or higher installed on your machine. At the time of writing, Xcode 6.3 is in beta and available from Apple's iOS Dev Center to registered iOS developers.
The reason for requiring Xcode 6.3 or higher is to be able to take advantage of Swift 1.2, which Apple introduced a few days ago. Swift 1.2 introduces a number of great additions that we'll take advantage of in the rest of this series.
1. Adding Items
At the end of this tutorial, the user will be able to add new to-do items by tapping a button in the navigation bar, presenting a view with a text field and a button. Let's start by creating the view controller that will handle adding new to-do items, the AddItemViewController class.
Step 1: Create AddItemViewController
Choose New > File... from Xcode's File menu and select the Cocoa Class template from the list of iOS > Source templates.
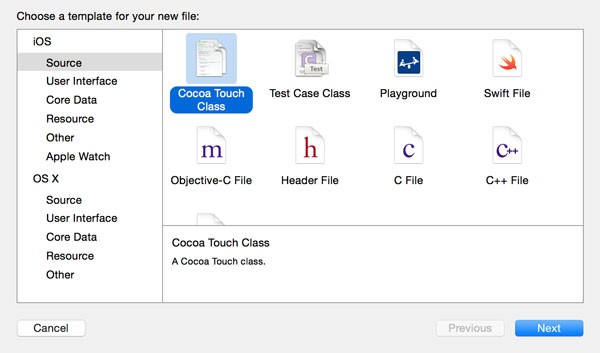
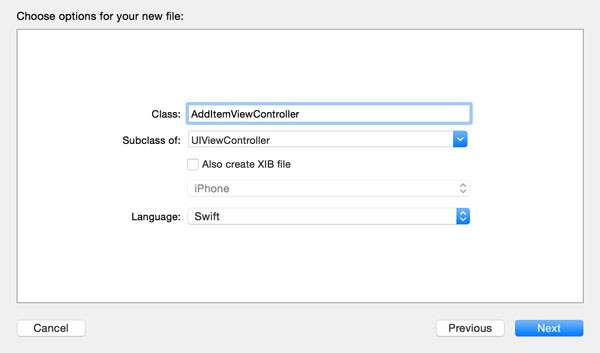
Name the class AddItemViewController and make sure it inherits from UIViewController. Double-check that Language is set to Swift and Also create XIB file is unchecked.
Tell Xcode where you'd like to save the file for the AddItemViewController class and click Create.
Step 2: Adding Outlets and Actions
Before we create the user interface of the AddItemViewController class, we need to create an outlet for the text field and two actions, one for a cancel button in the navigation bar and another one for the create button below the text field.
Adding an outlet should be familiar by now. Create an outlet in the AddItemViewController class and name it textField as shown below.
class AddItemViewController: UIViewController {
    @IBOutlet var textField: UITextField!

    override func viewDidLoad() {
        super.viewDidLoad()
    }

    override func didReceiveMemoryWarning() {
        super.didReceiveMemoryWarning()
    }
}
Creating an action is very similar to creating an instance method. In fact, the @IBAction attribute is nothing more than a hint for Interface Builder. By prefixing a method with the @IBAction attribute, Interface Builder is aware of the method, which enables us to connect it in the storyboard. We'll leave the bodies of both actions empty for now.
class AddItemViewController: UIViewController {
    @IBOutlet var textField: UITextField!

    override func viewDidLoad() {
        super.viewDidLoad()
    }

    override func didReceiveMemoryWarning() {
        super.didReceiveMemoryWarning()
    }

    @IBAction func cancel(sender: AnyObject) {

    }

    @IBAction func create(sender: AnyObject) {

    }
}
Step 3: Create User Interface
Open Main.storyboard in the Project Navigator and drag a View Controller from the Object Library on the right. With the view controller selected, open the Identity Inspector on the right and set Custome Class > Class to AddItemViewController.
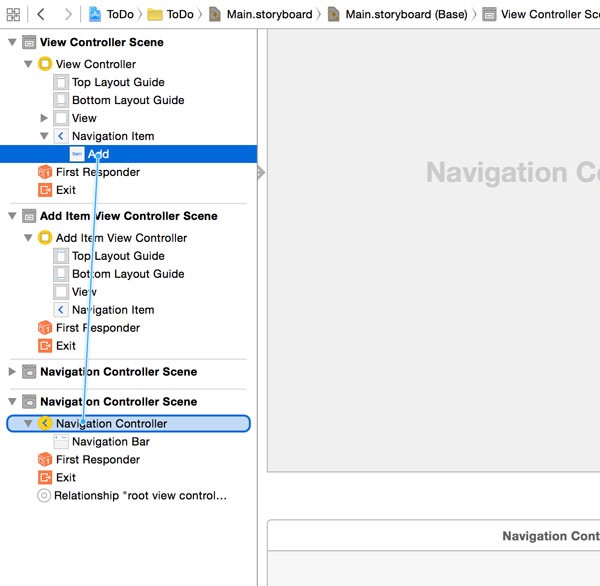
To add a navigation bar to the add item view, select the Add Item View Controller and choose Embed In > Navigation Controller from the Editor menu. This will make the Add Item View Controller the root view controller of a navigation controller.
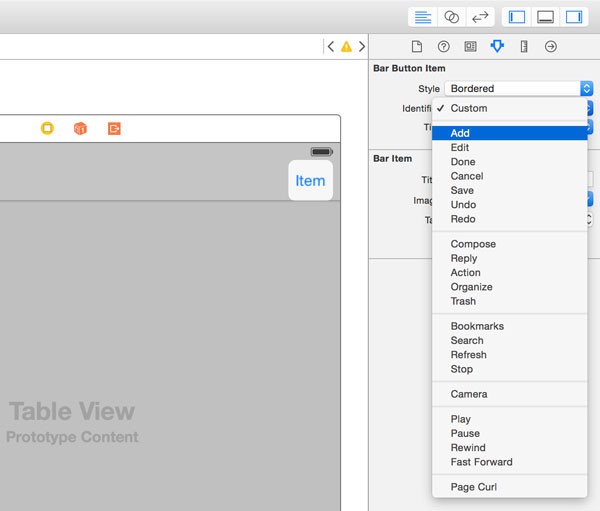
The next step is to add a bar button item to the navigation bar of the View Controller—not the Add Item View Controller—and set its Identifier to Add in the Attributes Inspector.
When the user taps the Add button, the Add Item View Controller should be presented modally. To accomplish this, Control-Drag from the Add button to the Navigation Controller, selecting present modally from the menu that pops up. This will create a segue from the Add Item View Controller to the new Navigation Controller.
Drag a text field and a button from the Object Library and add them to the Add Item View Controller scene. Select the Add Item View Controller and connect the textField outlet with the text field and the create: action with the button. The create: action should be triggered when the Touch Up Inside event is fired. Change the title of the button to Change and add the necessary layout constraints to the text field and button.
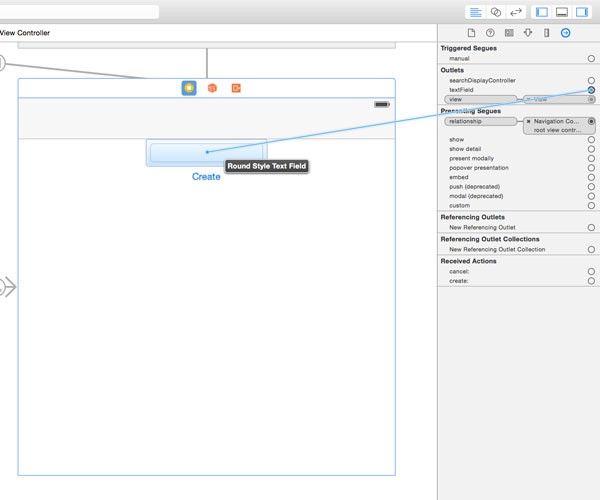
To finish the user interface, add a bar button item to the top left of the navigation bar of the Add Item View Controller and set its Identifier to Cancel. With the Add Item View Controller selected, open the Connections Inspector and connect the cancel: action to the Cancel button.
Build and run the application by pressing Command-R to verify that everything is hooked up correctly.
2. Implement Delegate Protocol
When the user taps the Create button to add a to-do item, the add item view controller needs to notify the view controller. Delegation is a perfect solution for this scenario. The process is pretty simple.
We create a delegate protocol the ViewController class conforms to. When the AddItemViewController instance is created—when the user taps the Add button—the ViewController object is set as the delegate of the AddItemViewController instance, enabling the latter to notify the ViewController instance when a new to-do item is created. Let's break it down to better understand this process.
Step 1: Declare AddItemViewControllerDelegate Protocol
Open AddItemViewController.swift and declare the AddItemViewControllerDelegate protocol below the import statement at the top. The protocol declaration looks similar to a class declaration. The protocol keyword is followed by the name of the protocol.
import UIKit

protocol AddItemViewControllerDelegate {
    func controller(controller: AddItemViewController, didAddItem: String)
}
The concept is very similar to protocols in Objective-C. The name of the protocol is AddItemViewControllerDelegate and it defines one method, controller(controller:didAddItem:).
Step 2: Declare delegate Property
The object that needs to implement the delegate protocol is the delegate of AddItemViewController. We first need to create a property for the delegate as shown in the snippet below.
class AddItemViewController: UIViewController {
    @IBOutlet var textField: UITextField!

    var delegate: AddItemViewControllerDelegate?

    ...
}
The delegate property is of type AddItemViewControllerDelegate?, an optional type, since we cannot be certain that the delegate property is not nil. Note that the name of the protocol isn't wrapped in angle brackets as in Objective-C.
Step 3: Implement Actions
The delegate method, controller(controller:didAddItem:), will be invoked in the create: action as shown below. To keep the example simple, we don't do any validation on the user's input. We safely unwrap the value stored in the delegate property, which means that the delegate method is only invoked if the delegate property is set. The value of the text field is temporarily stored in a constant named item.
@IBAction func create(sender: AnyObject) {
    let item = self.textField.text

    if let delegate = self.delegate {
        delegate.controller(self, didAddItem: item)
    }
}
The implementation of the cancel: action is easy. All we do is dismissing the AddItemViewController instance.
@IBAction func cancel(sender: AnyObject) {
    self.dismissViewControllerAnimated(true, completion: nil)
}
Step 4: Setting the Delegate
There's one piece of the puzzle missing though. The delegate property of the AddItemViewController instance is not being set at the moment. We can resolve this by implementing the prepareForSegue(_:sender:) method in the ViewController class. First, however, we need to revisit the storyboard.
Open Main.storyboard and select the segue connecting the Add button with the Navigation Controller. Open the Attributes Inspector and set the segue's Identifier to AddItemViewController.
Next, implement the prepareForSegue(_:sender:) method in the ViewController class as shown below. Note the override keyword prefixing the method. This should be familiar by now.
override func prepareForSegue(segue: UIStoryboardSegue, sender: AnyObject?) {
    if segue.identifier == "AddItemViewController" {
        let navigationController = segue.destinationViewController as? UINavigationController
        let addItemViewController = navigationController?.topViewController as? AddItemViewController

        if let viewController = addItemViewController {
            viewController.delegate = self
        }
    }
}
We start by checking the identifier of the segue, making sure we're preparing for the correct segue. We then ask the segue for its destination view controller. You may expect this to be the AddItemViewController instance, but remember that we made the view controller the root view controller of a navigation controller. This means that we need to ask the navigation controller, the segue's destination view controller, for its top view controller.
The addItemViewController constant is of type AddItemViewController? because of the use of the as? keyword. In other words, by using as? we downcast the value of the topViewController property to an optional type.
In the if statement, we unwrap the optional and set the delegate property to the ViewController instance.
I'm sure you've noticed the use of several optionals in the implementation of the prepareForSegue(_:sender:) method. When interacting with Objective-C APIs, it's always better to play it safe. While sending messages to nil is perfectly fine in Objective-C, it isn't in Swift. Because of this key difference, you always need to be careful when interacting with Objective-C APIs in Swift. The above example illustrates this well.
Step 5: Implementing the AddItemViewControllerDelegate Protocol
Implementing the AddItemViewControllerDelegate protocol is similar to the implementation of the UITableViewDataSource protocol. We start by conforming the ViewController class to the protocol as shown below.
class ViewController: UIViewController, UITableViewDataSource, UITableViewDelegate, AddItemViewControllerDelegate {
    ...
}
Next, we implement the methods of the AddItemViewControllerDelegate protocol, which boils down to implementing the controller(controller:didAddItem:) method. We add the new item to the view controller's items property, reload the table view, and dismiss the add item view controller.
// MARK: Add Item View Controller Delegate Methods
func controller(controller: AddItemViewController, didAddItem: String) {
    // Update Data Source
    self.items.append(didAddItem)

    // Reload Table View
    self.tableView.reloadData()

    // Dismiss Add Item View Controller
    self.dismissViewControllerAnimated(true, completion: nil)
}
Step 6: Build and Run
Build and run the application to test if you can add new items to the to-do list. We currently don't validate the user's input. As an exercise, show an alert view to the user if they tap the Create button and the text field is empty. Adding a blanc to-do isn't very useful. Right?
Learn More in Our Swift Programming Course
If you're interested in taking your Swift education to the next level, you can take a look at our full course on Swift development.
Conclusion
In this tutorial, you learned how to declare and implement a custom protocol. You also learned how to create actions and hook them up in Interface Builder. In next week's installment, we're going to complete our to-do application by adding the ability to delete to-do items and we'll also improve the application's user experience.

Comments