In the previous tutorial, we added the ability to create to-do items. While this addition has made the application a bit more useful, it would also be convenient to add the ability to mark items as done and delete items. That's what we'll focus on in this tutorial.
Prerequisites
If you'd like to follow along with me, then make sure that you have Xcode 6.3 or higher installed on your machine. At the time of writing, Xcode 6.3 is in beta and available from Apple's iOS Dev Center to registered iOS developers.
The reason for requiring Xcode 6.3 or higher is to be able to take advantage of Swift 1.2, which Apple introduced in February. Swift 1.2 introduces a number of great additions that we'll take advantage of in the rest of this series.
1. Deleting Items
To delete items, we need to implement two additional methods of the UITableViewDataSource protocol. We first need to tell the table view which rows can be edited by implementing the tableView(_:canEditRowAtIndexPath:) method. As you can see in the below code snippet, the implementation is straightforward. We tell the table view that every row is editable by returning true.
func tableView(tableView: UITableView, canEditRowAtIndexPath indexPath: NSIndexPath) -> Bool {
    return true
}
The second method we're interested in is tableView(_:commitEditingStyle:forRowAtIndexPath:). The implementation is a bit more complex but easy enough to grasp.
func tableView(tableView: UITableView, commitEditingStyle editingStyle: UITableViewCellEditingStyle, forRowAtIndexPath indexPath: NSIndexPath) {
    if editingStyle == .Delete {
        // Fetch Item
        let item = self.items[indexPath.row]

        // Update Items
        self.items.removeAtIndex(indexPath.row)

        // Update Table View
        tableView.deleteRowsAtIndexPaths([indexPath], withRowAnimation: .Right)
    }
}
We start by checking the value of editingStyle, an enumeration of type UITableViewCellEditingStyle. We only delete an item if the value of editingStyle is equal to UITableViewCellEditingStyle.Delete.
Swift is smarter than that though. Because it knows that editingStyle is of type UITableViewCellEditingStyle, we can omit UITableViewCellEditingStyle, the name of the enumeration, and write .Delete, the member value of the enumeration that we're interested in. If you're new to enumerations in Swift, then I recommend you read this quick-tip about enumerations in Swift.
Next, we fetch the corresponding item from the items property and temporarily store its value in a constant named item. We update the table view's data source, items, by invoking removeAtIndex(index: Int) on the items property, passing in the correct index.
Finally, we update the table view by invoking deleteRowsAtIndexPaths(_:withRowAnimation:) on tableView, passing in an array with indexPath and .Right to specify the animation type. As we saw earlier, we can omit the name of the enumeration, UITableViewRowAnimation, since Swift knows the type of the second argument is UITableViewRowAnimation.
The user should now be able to delete items from the list. Build and run the application to test this.
2. Checking Off Items
To mark an item as done, we're going to add a checkmark to the corresponding row. This implies that we need to keep track of the items the user has marked as done. For that purpose, we'll declare a new property that manages this for us. Declare a variable property, checkedItems, of type [String] and initialize it with an empty array.
var checkedItems: [String] = []
In tableView(_:cellForRowAtIndexPath:), we check whether checkedItems contains the respective item by using the contains function, a global function defined in the Swift Standard Library. We pass in checkedItems as the first argument and item as the second argument. The function returns true if checkedItems contains item.
func tableView(tableView: UITableView, cellForRowAtIndexPath indexPath: NSIndexPath) -> UITableViewCell {
    // Fetch Item
    let item = self.items[indexPath.row]

    // Dequeue Table View Cell
    let tableViewCell = tableView.dequeueReusableCellWithIdentifier("TableViewCell", forIndexPath: indexPath) as! UITableViewCell

    // Configure Table View Cell
    tableViewCell.textLabel?.text = item

    if contains(self.checkedItems, item) {
        tableViewCell.accessoryType = .Checkmark
    } else {
        tableViewCell.accessoryType = .None
    }

    return tableViewCell
}
If item is found in checkedItems, we set the cell's accessoryType property to .Checkmark, a member value of the UITableViewCellAccessoryType enumeration. If item isn't found, we fall back to .None as the cell's accessory type.
The next step is to add the ability to mark an item as done by implementing a method of the UITableViewDelegate protocol, tableView(_:didSelectRowAtIndexPath:). In this delegate method, we first call deselectRowAtIndexPath(_:animated:) on tableView to deselect the row the user tapped.
// MARK: Table View Delegate Methods
func tableView(tableView: UITableView, didSelectRowAtIndexPath indexPath: NSIndexPath) {
    tableView.deselectRowAtIndexPath(indexPath, animated: true)

    // Fetch Item
    let item = self.items[indexPath.row]

    // Fetch Table View Cell
    let tableViewCell = tableView.cellForRowAtIndexPath(indexPath)

    // Find Index of Item
    let index = find(self.checkedItems, item)

    if let index = index {
        self.checkedItems.removeAtIndex(index)
        tableViewCell?.accessoryType = UITableViewCellAccessoryType.None

    } else {
        self.checkedItems.append(item)
        tableViewCell?.accessoryType = UITableViewCellAccessoryType.Checkmark
    }
}
We then fetch the corresponding item from items and a reference to the cell that corresponds with the tapped row. We use the find function, defined in the Swift Standard Library, to obtain the index of item in checkedItems. The find function returns an optional Int. If checkedItems contains item, we remove it from checkedItems and set the cell's accessory type to .None. If checkedItems doesn't contain item, we add it to checkedItems and set the cell's accessory type to .Checkmark.
With these additions, the user is now able to mark items as done. Build and run the application to make sure that everything is working as expected.
3. Saving State
The application currently doesn't save state between launches. To solve this, we're going to store the items and checkedItems arrays in the application's user defaults database.
Step 1: Loading State
Start by creating two helper methods loadItems and loadCheckedItems. Note the private keyword prefixing each helper method. The private keyword tells Swift that these methods are only accessible from within this source file.
// MARK: Private Helpers
private func loadItems() {
    let userDefaults = NSUserDefaults.standardUserDefaults()

    if let items = userDefaults.objectForKey("items") as? [String] {
        self.items = items
    }
}

private func loadCheckedItems() {
    let userDefaults = NSUserDefaults.standardUserDefaults()

    if let checkedItems = userDefaults.objectForKey("checkedItems") as? [String] {
        self.checkedItems = checkedItems
    }
}
The private keyword is part of Swift's access control. As the name implies, access control defines which code has access to which code. Access levels apply to methods, functions, types, etc. Apple simply refers to entities. There are three access levels, public, internal, and private.
- Public: Entities marked as public are accessible by entities defined in the same module as well as other modules. This access level is ideal for exposing the interface of a framework.
- Internal: This is the default access level. In other words, if no access level is specified, this access level applies. An entity with an access level of internal is only accessible by entities defined in the same module.
-
Private: An entity declared as private is only accessible by entities defined in the same source file. For example, the private helper methods defined in the
ViewControllerclass are only accessible by theViewControllerclass.
The implementation of the helper methods is simple if you're familiar with the NSUserDefaults class. For ease of use, we store a reference to the standard user defaults object in a constant named userDefaults. In the case of loadItems, we ask userDefaults for the object associated with the key "items" and downcast it to an optional array of strings. We safely unwrap the optional, which means that we store the value in the constant items if the optional is not nil, and assign the value to the items property.
If the if statement looks confusing, then have a look at a simpler version of the loadItems method in the following example. The result is identical, the only difference is conciseness.
private func loadItems() {
    let userDefaults = NSUserDefaults.standardUserDefaults()
    let storedItems = userDefaults.objectForKey("items") as? [String]

    if let items = storedItems {
        self.items = items
    }
}
The implementation of loadCheckedItems is identical except for the key used to load the object stored in the user defaults database. Let's put loadItems and loadCheckedItems to use by updating the viewDidLoad method.
override func viewDidLoad() {
    super.viewDidLoad()

    // Set Title
    self.title = "To Do"

    // Load State
    self.loadItems()
    self.loadCheckedItems()

    // Register Class for Cell Reuse
    self.tableView.registerClass(UITableViewCell.self, forCellReuseIdentifier: "TableViewCell")
}
Step 2: Saving State
To save state, we implement two more private helper methods, saveItems and saveCheckedItems. The logic is similar to that of loadItems and loadCheckedItems. The difference is that we store data in the user defaults database. Make sure that the keys used in the setObject(_:forKey:) calls match those used in loadItems and loadCheckedItems.
private func saveItems() {
    let userDefaults = NSUserDefaults.standardUserDefaults()

    // Update User Defaults
    userDefaults.setObject(self.items, forKey: "items")
    userDefaults.synchronize()
}

private func saveCheckedItems() {
    let userDefaults = NSUserDefaults.standardUserDefaults()

    // Update User Defaults
    userDefaults.setObject(self.checkedItems, forKey: "checkedItems")
    userDefaults.synchronize()
}
The synchronize call isn't strictly necessary. The operating system will make sure that the data you store in the user defaults database is written to disk at some point. By invoking synchronize, however, you explicitly tell the operating system to write any pending changes to disk. This is useful during development, because the operating system won't write your changes to disk if you kill the application. It may then seem as if something is not working properly.
We need to invoke saveItems and saveCheckedItems in a number of places. To start, call saveItems when a new item is added to the list. We do this in the delegate method of the AddItemViewControllerDelegate protocol.
// MARK: Add Item View Controller Delegate Methods
func controller(controller: AddItemViewController, didAddItem: String) {
    // Update Data Source
    self.items.append(didAddItem)

    // Save State
    self.saveItems()

    // Reload Table View
    self.tableView.reloadData()

    // Dismiss Add Item View Controller
    self.dismissViewControllerAnimated(true, completion: nil)
}
When the state of an item changes in the tableView(_:didSelectRowAtIndexPath:), we update checkedItems. It's a good idea to also invoke saveCheckedItems at that point.
// MARK: Table View Delegate Methods
func tableView(tableView: UITableView, didSelectRowAtIndexPath indexPath: NSIndexPath) {
    tableView.deselectRowAtIndexPath(indexPath, animated: true)

    // Fetch Item
    let item = self.items[indexPath.row]

    // Fetch Table View Cell
    let tableViewCell = tableView.cellForRowAtIndexPath(indexPath)

    // Find Index of Item
    let index = find(self.checkedItems, item)

    if let index = index {
        self.checkedItems.removeAtIndex(index)
        tableViewCell?.accessoryType = UITableViewCellAccessoryType.None

    } else {
        self.checkedItems.append(item)
        tableViewCell?.accessoryType = UITableViewCellAccessoryType.Checkmark
    }

    // Save State
    self.saveCheckedItems()
}
When an item is deleted, both items and checkedItems are updated. To save this change, we call both saveItems and saveCheckedItems.
func tableView(tableView: UITableView, commitEditingStyle editingStyle: UITableViewCellEditingStyle, forRowAtIndexPath indexPath: NSIndexPath) {
    if editingStyle == .Delete {
        // Fetch Item
        let item = self.items[indexPath.row]

        // Update Items
        self.items.removeAtIndex(indexPath.row)

        if contains(self.checkedItems, item) {
            self.checkedItems.removeAtIndex(indexPath.row)
        }

        // Save State
        self.saveItems()
        self.saveCheckedItems()

        // Update Table View
        tableView.deleteRowsAtIndexPaths([indexPath], withRowAnimation: UITableViewRowAnimation.Right)
    }
}
That's it. Build and run the application to test your work. Play with the application and force quit it. When you launch the application again, the last known state should be loaded and visible.
4. Property Observers
The application's user experience is a bit lacking at the moment. When every item is deleted or when the application is launched for the first time, the user sees an empty table view. This isn't great. We can solve this by showing a message when there are no items. This will also give me the opportunity to show you another feature of Swift, property observers.
Step 1: Adding a Label
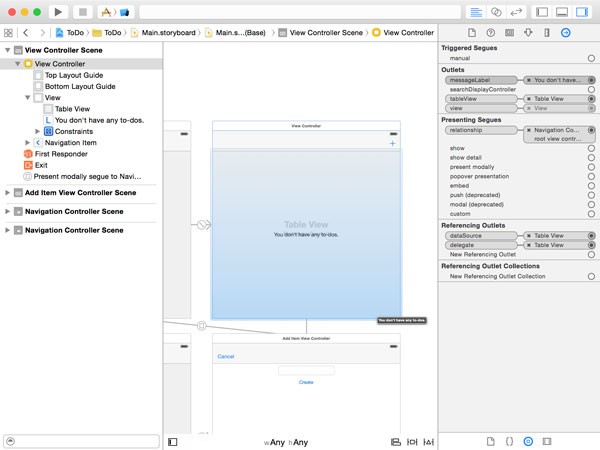
Let's start by adding a label to the user interface for showing the message. Declare an outlet named messageLabel of type UILabel in the ViewController class, open Main.storyboard, and add a label to the view controller's view.
@IBOutlet var messageLabel: UILabel!
Add the necessary layout constraints to the label and connect it with the view controller's messageLabel outlet in the Connections Inspector. Set the label's text to You don't have any to-dos. and center the label's text in the Attributes Inspector.
Step 2: Implementing a Property Observer
The message label should only be visible if items contains no elements. When that happens, we should also hide the table view. We could solve this problem by adding various checks in the ViewController class, but a more convenient and elegant approach is to use a property observer.
As the name implies, property observers observe a property. A property observer is invoked whenever a property changes, even when the new value is the same as the old value. There are two types of property observers.
-
willSet: invoked before the value has changed -
didSet: invoked after the value has changed
For our purpose, we will implement the didSet observer for the items property. Take a look at the syntax in the following code snippet.
var items: [String] = [] {
    didSet {
        let hasItems = items.count > 0
        self.tableView.hidden = !hasItems
        self.messageLabel.hidden = hasItems
    }
}
The construct may look a bit odd at first so let me explain what's happening. When the didSet observer is invoked, after the items property has changed, we check if the items property contains any elements. Based on the value of the hasItems constant, we update the user interface. It's as simple as that.
The didSet observer is passed a constant parameter that contains the value of the old value of the property. It is omitted in the above example, because we don't need it in our implementation. The following example shows how it could be used.
var items: [String] = [] {
    didSet(oldValue) {
        if oldValue != items {
            let hasItems = items.count > 0
            self.tableView.hidden = !hasItems
            self.messageLabel.hidden = hasItems
        }
    }
}
The oldValue parameter in the example doesn't have an explicit type, because Swift knows the type of the items property. In the example, we only update the user interface if the old value differs from the new value.
A willSet observer works in a similar fashion. The main difference is that the parameter passed to the willSet observer is a constant holding the new value of the property. When using property observers, keep in mind that they are not invoked when the instance is initialized.
Build and run the application to make sure everything is hooked up correctly. Even though the application isn't perfect and could use a few more features, you have created your first iOS application using Swift.
Conclusion
Over the course of the last three lessons of this series, you created a functional iOS application using Swift's object-oriented features. If you have some experience programming and developing applications, then you must have noticed that the current data model has a few shortcomings, to put it lightly. Storing items as strings and creating a separate array to store an item's state is not a good idea if you're building a proper application. A better approach would be to create a separate ToDo class for modeling items and store them in the application's sandbox. That will be our goal for the next installment of this series.

Comments