Statamic is a modern PHP CMS which really makes an effort to be easy and intuitive to use. From its flat-file design to its use of technologies like Markdown and YAML, you can accomplish an outstanding amount of work without writing any code at all.
In this article we will take a look at the process from installation to setting up a basic portfolio.
Having a flat-file design, setup is as simple as extracting the zip file you download from the Statamic website. There is no database involved, all the content and settings are stored locally in a host of different files, which also means you have automatic backups and versioning on all of your content if you use something like Git.
With the contents extracted, let's take a look at Statamic's structure.
The File Structure
There are more or less five different folders you will most likely be interacting with, and they are:
- _config is where all your settings are held
- _content is where you will put your Markdown files
- _add-ons is for Statamic add-ons
- _themes is where you build your theme
- assets is where you can stick resources for your site
Besides these, you have the following four folders that you probably won't touch directly:
- _app is home to Statamic's own source code
- _cache is where Statamic caches all your content
- _logs is where Statamic will store your logs
- admin is the Statamic admin panel
The first step in every Statamic site is to configure its options.
Configuration
All the configuration files are inside the _config folder as described above. The main file you should take a look at is the settings.yaml.
If you are new to YAML, then all you really need to know is that it's a data format similar to JSON except that it's meant to be a more human-readable format. It accomplishes this by not requiring any separating characters like semi-colons or quotation marks, instead it gets its structure from placement and indentation.
The settings.yaml file is really well documented so you shouldn't have a problem filling it out. Some of the options you will probably want to look at are the following:
_license_key: Enter your License Key
_site_name: My Portfolio
_site_url: http://localhost:7000
_theme: portfolio
_taxonomy:
   - language
_log_enabled: true
_cookies.secret_key: Some Random Key
Most of these are pretty straightforward, like setting the license key, your site's name and URL. The theme option sets which theme folder to load. We will get into this in a moment, but a theme is essentially the place where you specify how the different pages on your site will work. We will be creating our own theme so you can name it whatever you want. I chose 'portfolio'.
The next option is an array called taxonomy. If you have ever used something like WordPress, then you should know what this is for. Basically, it allows you to add a setting or 'type' to each post, and you can then use these taxonomies to filter your content and create custom pages for these groupings.
I am only adding one taxonomy; the language taxonomy, because in our example portfolio we are going to specify each work's programming languages. You don't need to create a taxonomy for each custom property. We are going to want other things in our portfolio, like links and descriptions. A taxonomy is for fields that multiple entries have in common, and for fields that you may want to create a custom page for.
The log_enabled setting turns on logging, so you can view problems which come up from the admin panel. They will be stored in the _logs folder we saw earlier. Finally the last option I mentioned is the secret key used to encrypt the cookie.
This file can now be saved out, but before we move onto content, let's take a moment to set up the portfolio template so we can see what we are doing.
Theme Basics
Like most modern frameworks, when you load a page, you can build it up from multiple reusable components. A page in Statamic is made up of a layout, a template, and a content file. Both the layout files and templates can optionally also be made of even more pieces called partials.
The layout is the outer shell in which your template will be placed. This is usually used to hold the boilerplate HTML code like the head section, as well as the basic body that all the pages using this layout will need, like adding common libraries at the bottom of your file.
The template is a specific view for a single page. You can have a home page template, a contact page template, and so on. You don't need to create one per page, but I would recommend one per type of page.
In these templates you have the ability to use variables stored in the actual content files. For example, say you need a page which displays an index of books you are reading, and then another page to display a list of shows you are watching. Instead of replicating most of the code for each page, you can create one template for displaying a list of objects, and then pull in the specifics of which list to retrieve from the content file itself.
The content file—like its name suggests—is the actual resource being displayed. This can range from things like an actual unique web page, to a single blog entry. We will get to these in more details in a moment.
Now instead of manually creating all these different components, Statamic provides a sort of starter template, giving you a basic structure to get started. You can download the theme folder from Github.
Just place the entire folder into the _themes directory, and rename the folder to 'portfolio' (as that's the theme name we declared in the settings file). You also need to rename the kindling.js file from the js folder and the kindling.css file from the css directory, to portfolio.js and portfolio.css respectively, as there is a special tag to pull these in automatically.
That's all the setup we need now, but to get a better idea of what I was talking about regarding the layout and template, let's take a look at those files. To begin with, open up the file named default.html from the layouts folder. This corresponds to the default layout as you may have guessed.
<!DOCTYPE html>
<html lang="en">
    <head>
        <meta charset="utf-8" />
        <title>{{ _site_name }}</title>
        <link rel="stylesheet" href="{{ theme:css }}">
    </head>
    <body>

        {{ layout_content }}

        <script src="http://ajax.googleapis.com/ajax/libs/jquery/1/jquery.min.js"></script>
        <script src="{{ theme:js }}"></script>

    </body>
</html>
Like I mentioned earlier, the layout is a good place to put code that is required on multiple pages (or templates rather), which is why the default layout in this file just contains the basic outline of an HTML file. Now we haven't really talked about it yet, but Statamic comes with its own templating engine, which is fairly easy to pick up. You basically just place a tag where you want something to be inserted, similar to Handlebars if you're familiar with that.
This layout contains a couple of tags which I thought I would go through, the first of which is _site_name. This tag actually refers to the property we set up inside of the settings.yaml file. You will find this convention all throughout Statamic. You can set YAML options either globally like this, or even on a per-file basis, and you can then get these options just by placing a tag with their names into your templates.
The next tag, which actually comes up twice, is the theme tag. Helpers in Statamic are more like independent modules, so they can have multiple different functions attached to the same name; you access the individual functions with a colon and then the name of the command you want.
The theme tag is all about loading in resources specific to this theme. It can be used to pull in things like scripts and stylesheets, but also things like images and partials. It's a helper function that basically allows you to just provide the name of the resource you want and it will fill in the path to the current templates directory. So for instance if you were to write:
{{ theme:js src="underscore.js" }}
It would replace that with a link to a file named underscore.js inside of the current theme's js folder. By default if no src parameter is set for the js or css command, it will assume you are referring to a js or css file with the name of the current theme, which is why we renamed those files to match; it's just a matter of convenience so we don't need to specify them and it cleans up the source a little bit.
The next tag that comes up is {{ layout_content }}. This is similar to yield in other templating engines, and it basically signifies where the inner template should be inserted.
The last thing I want to do in this file is remove the link to jQuery, because I won't be using it (if you will then you can of course leave it).
Next let's move onto the default template file (templates/default.html). It should be blank. For education's sake, let's add a tag called {{content}} which just inserts the contents of the current page being loaded.
So to recap, when you go to a page it will first load the layout file, and then wherever the {{layout_content}} tag is placed this template will get inserted. This template will then just output whatever the current page has inside.
With that done, save out these files and let's move on to content.
The Content
Content in Statamic is specified in Markdown files by default, and the default file loaded is called page.md. The same way a standard web server will load index.html if no file is specified, Statamic will load page.md.
It's also worth noting that routes, or URL links in your site, will be defined by the _content directory. For example, if you create a folder named demo in the _content directory, and in it place a file named link.md, this will correspond to the URL /demo/link. If you place a page.md file inside, it will be loaded if you navigate to /demo/ since it is the default file name.
Statamic comes with some demo content, but you can just delete everything inside the _content directory for this example (or move it aside for now).
Let's start with a basic home page. At the root of the _content directory, create a file named page.md with the following:
---
title: Home
---

# Welcome to the {{title}} Page
All content files are split into two sections; the YAML front-matter and the contents. The top part (between the dashed lines) is where you can put standard YAML specific to this file, and is a good way to set options to adjust your template files. The second part is the Markdown area, where you put the contents of the actual page. You can use standard Markdown as well as Statamic helper tags.
This page will load with the default layout and template files we just set up, but if you want it to use different ones, you can specify these as options in the YAML section at the top using _layout and _template respectively.
If you create a server at the root of your Statamic directory:
php -S localhost:7000
...and then navigate to http://localhost:7000 in your browser you should see the H1 tag with our welcome message.
This is all you need to know to create pages in Statamic, and if you are building a fairly static site, this would be enough. But for a lot of sites we need to be able to add dynamic data, which can take the form of blog posts, shop items, or in our case portfolio works.
Entries
There is no database in Statamic, so these kinds of entries are stored in Markdown files just like the page we just built, although a couple of things were done to subtly introduce multiple features to optimize things and to make it work in the admin.
First off you can name the files with a special date format so they can be sorted and filtered by date. You do this by pre-pending the title with a year-month-day pattern. If you wanted to create a post named 'foobar' you would name it something like:
2013-09-15-foobar.md
Any settings the post requires go inside the front-matter section at the top, and then the content is placed underneath. This follows the format of pages as outlined above.
While this is pretty cool, it's the equivalent of manually entering posts into a database of a traditional system. There is another option!
Statamic comes bundled with a really nice admin which can do all this for you, but in order to get it set up we need to tell it which fields this type of entry is supposed to have. This is done in a file appropriately named fields.yaml.
So for our example let's create a folder inside the _content directory named works, and inside the works folder let's create a file named fields.yaml. Inside the fields.yaml file we need to specify which properties our 'entries' will contain and the individual types for each of these settings.
You can either specify your fieldset (the list of fields) in the _config/fieldsets/ directory and pull in a definition, or you can just enter the definition here (or you can do both to extend an existing definition). For our simple example I am just going to put the definition here since we won't be reusing it anywhere:
type: date
fields:
 language:
   type: tags
   display: Programming Language
   required: true

 description:
    type: text
    display: Description
    required: false

 link:
    type: text
    display: Link
    required: true

 content:
    type: hidden
The first property just tells Statamic that we want these entry files to have a date property and to be named appropriately. Next we open up a YAML object named fields containing all the properties of our entries.
The first is the language field, which if you remember is the taxonomy we created in the settings.yaml. Inside each property we need to specify its type (or it defaults to a text box), its display text (which will default to the property name), and whether it is required. There are other options you can set, including instructions and the default value, You can view more information about these options on Statamic's website. Alongside these settings, different field types can have their own custom options.
For the language input, I set it to use the tag type, which allows you to set multiple tags for this option. It's just a different type of input for entering its value in the admin. You can view all the different fieldtypes in Statamic's documentation or on the official Statamic Cheat Sheet under 'Fieldtypes'.
The description and link are pretty much the same. They will both be text boxes, except one will be required and the other won't be. Besides the fields you specify, all entries will come with a title and content field. We don't really want a content field—in our works they will be more like links—so I have set it to hidden.
The last step before we go to the admin is to create a page.md file inside the works directory. This isn't required, but the admin will attempt to get the title of this entry type from here so it's a good idea to just place it. To do this, create a page.md file inside the works folder with just the title set to 'Works':
---
title: Works
---
The Admin
To get into the admin we need to first create a user. This is a simple YAML file inside of the config folder. The name of the file is the username you will use to log in, and inside the file you configure the user's details and password.
Let's create a new user with a username of editor. We do this by creating a file called editor.yaml inside of the _config/users/ folder. Insert the following data (except with your info instead of mine):
---
first_name: Gabriel
last_name: Manricks
roles: [admin]
email: [email protected]
password: password
---

The Editor of this Portfolio
Most of these columns are pretty straight forward and I don't think they require any explanation. The only field worth mentioning is the roles setting. Currently admin is the only option available, but in the future this will be where you would be able to adjust the user's editing permissions.
It's also worth mentioning that the password will not stay in plain-text. After the first login, Statamic will hash the password along with a salt and include those here instead.
Everything after the dashed lines will be stored as the content for this user, and can be used as a sort of bio for them.
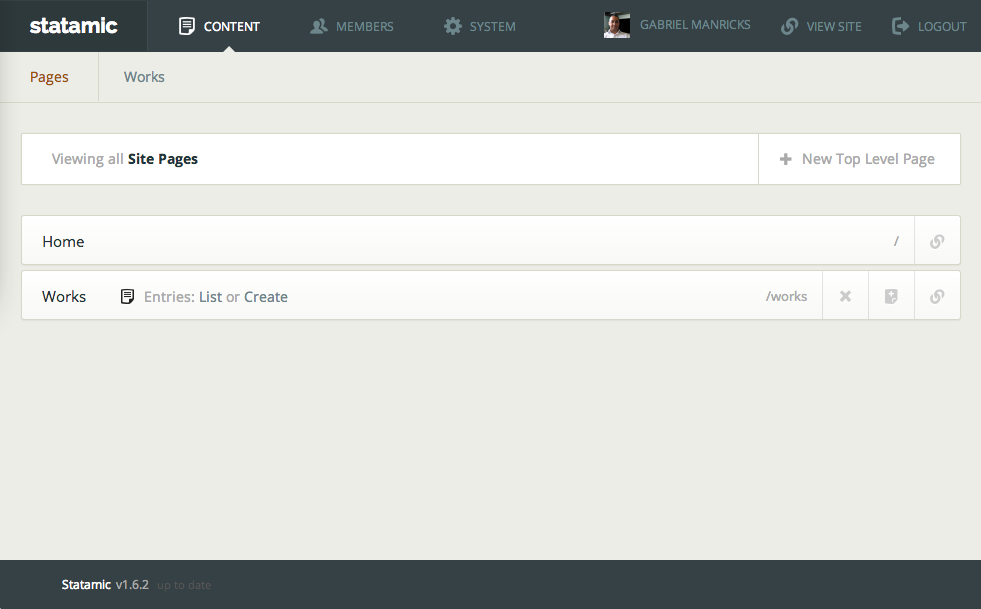
Now save this file, and if your web server is still running, navigate to /admin in your browser. This will open up the login console where you can enter these properties. The first time you log in you will need to do this twice, once to hash the password, and the second time to actually log in.
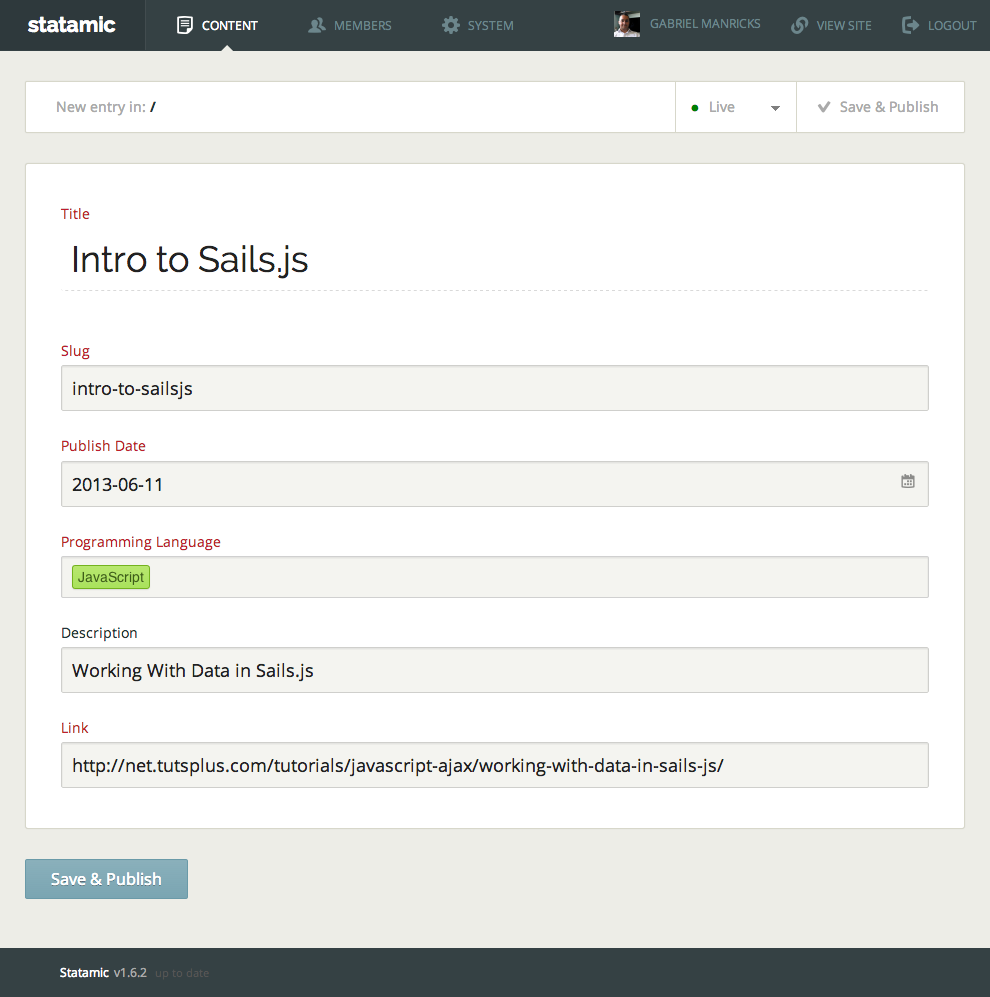
Once you're logged in you will see a list of our pages. Included is our home page as well as the 'Works' entry type. Let's take a look at what our fields declaration did for us. Click on the Create link inside of the Works bar.
You should see a nice form which includes all the fields we specified, and the title. Try adding a few posts to test it out.
With some posts stored, we have completed round one. You now know how to create pages, themes, users, and entries, it's a great first step. But there is a lot more Statamic has to offer.
The Templating Engine
Having some posts created is nice, but what would be better is if we could actually display them on a page. For this we will need to edit the default template.
This will be our first real interaction with the included templating engine, but not to worry, Statamic's intuitive design makes it easy to pick up.
To view a full list of the available tags you can take a look at Statamic's documentation. All we really need for this example is the entries tag, which is used to pull in entries from a specific folder in the _content directory. There are a lot of optional properties, allowing you to filter by date, or by conditions like taxonomies or even standard properties. We are going to keep it simple and just list the properties by date (which is the default).
Here is the complete new default template (templates/default.html):
<h1>Portfolio</h1>

<table>
 {{ entries:listing folder="works" }}
     <tr>
         <td class="lang"><p>{{ language }}</p></td>
         <td class="work">
             <a href="{{ link }}">
                 <span class="title">{{ title }} - </span>
                 <span class="desc">{{ description }}</span>
             </a>
         </td>
     </tr>
 {{ /entries:listing }}
</table>
In this code we are creating a table and looping through all posts in the 'works' directory. These kind of block tags, where you place more HTML inside, assign new placeholders. Aside from providing access to things like all the post's attributes, you also get special helper variables which can tell you things like the current index, or whether this is the first or last post. We won't be using any of those variables. All we need is to display the title, language, description and link. However if you load up the page in your browser, you will probably realize that instead of showing the language it just says "Array".
This is because we set this property to be a type tag, which means it could hold more than one language. So even though you may have only put one language, it is still being stored in an array. Luckily, Statamic comes with modifiers.
Modifiers
To finish off this guide, let's take a look at a few modifiers which will allow us to make this page even better.
The first and biggest problem is making the language show up. If you take a look at the Statamic Cheat Sheet, all the way at the bottom left, you will see a section named List Shortcuts. While not technically being modifiers, Statamic allows you to append these words to the end of a list variable, and it will instead return a string representation. The one I want to use in this situation is the standard _list helper. What this will do is separate multiple values in the array with a comma and space, and is what we would want in our situation.
To try it out, replace the {{ language }} tag with {{ language_list }}. Refresh your browser and it should now be displaying the languages correctly.
Next let's add a modifier to the title to make it all uppercase. If you have ever used something like the Smarty templating engine, this works the same way. You add a pipe to the end of the variable name and then add a modifier. In our example you just need to replace the call to {{ title }} with {{ title|upper }} and these are chainable so you can keep adding pipes indefinitely.
Now let's just add some CSS to style everything up. Remember, this goes in the css/portfolio.css file:
body { background: #FAFAF5; }

h1 {
 font: 800 64px 'Raleway', sans-serif;
 margin-bottom: 28px;
}

table { font: 15px 'Coustard', serif; }

td { padding: 10px 10px 0 10px; }
p { margin-bottom: 15px; }

.lang p {
 background: #CA9F53;
 color: #FFF;
 padding: 3px 5px;
 text-align: right;
}

.work { text-align:left; }
.work a{
 border-bottom: 1px solid #000;
 text-decoration: none;
}

.title {
 font-weight: 600;
 color: #000;
}

.desc { color: #666; }
And these two fonts are from Google Fonts, so you will need to add the following link at the top of your default layout file:
<!DOCTYPE html>
<html lang="en">
<head>
 <meta charset="utf-8" />
 <title>{{ _site_name }}</title>
 <link href='http://fonts.googleapis.com/css?family=Coustard|Raleway:800' rel='stylesheet' type='text/css'>
 <link rel="stylesheet" href="{{ theme:css }}">
</head>
<body>

 {{ layout_content }}

 <script src="{{ theme:js }}"></script>

</body>
</html>
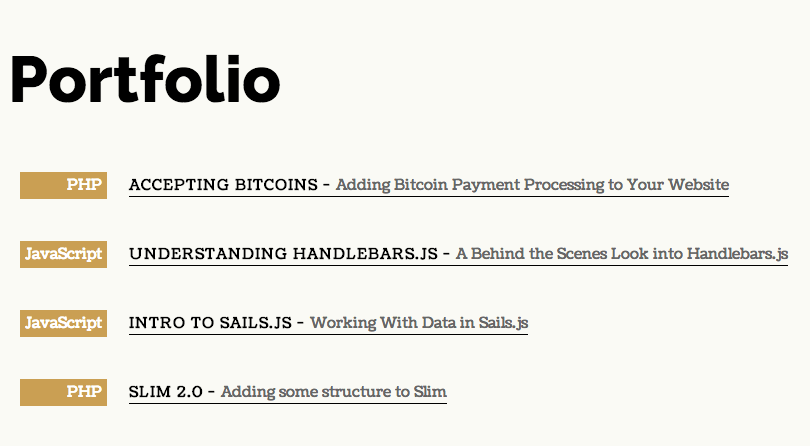
If everything worked out you should see the following page (except with the works you added):
Conclusion
In this tutorial I've taken you through the entire process from installing the framework, to setting everything up, creating a new entry type, and building a custom theme. It's a lot to do, and it's only possible because of how easy Statamic makes things.
We have seen a lot of functionality already and we haven't even touched on creating your own modules and extending Statamic with PHP, but I think the most amazing thing so far is that we haven't had to write a single line of PHP in this entire tutorial! That's something to brag about.
So I think the main question people might have is, "Should I use it?", or, "What should this replace in my current repertoire?" It's important to gauge what Statamic is for. If you are building a new startup and need the flexibility of a fully fledged framework, I am sure you would be able to get it running in Statamic, but it would be a lot of custom code, which might defeat the purpose. Where I think this will thrive is as a blogging platform or CMS.
Coming from a background in WordPress, this feels like a direct successor. It follows a lot of the same conventions in theory, but they are all implemented in a much smarter way. Comparing the amount of code required in each becomes a joke. Moving forward, Statamic has an incredible API for building custom tags, hooks, new fieldtypes and more, and you can imagine Statamic makes it as lean and simple to do as you might have come to expect.
I hope you enjoyed this article, if you have any questions feel free to ask me below, on twitter @gabrielmanricks, or on the Tuts+ web dev IRC channel on freenode (#nettuts).

Comments