Introduction
In this tutorial, the fifth and final installment of the SpriteKit From Scratch series, we look at some advanced techniques you can use to optimize your SpriteKit-based games to improve performance and user experience.
This tutorial requires that you are running Xcode 7.3 or higher, which includes Swift 2.2 and the iOS 9.3, tvOS 9.2, and OS X 10.11.4 SDKs. To follow along, you can either use the project you created in the previous tutorial or download a fresh copy from GitHub.
The graphics used for the game in this series can be found on GraphicRiver. GraphicRiver is a great source for finding artwork and graphics for your games.
1. Texture Atlases
In order to optimize the memory usage of your game, SpriteKit provides the functionality of texture atlases in the form of the SKTextureAtlas class. These atlases effectively combine the textures you specify into a single, large texture that takes up less memory than the individual textures on their own.
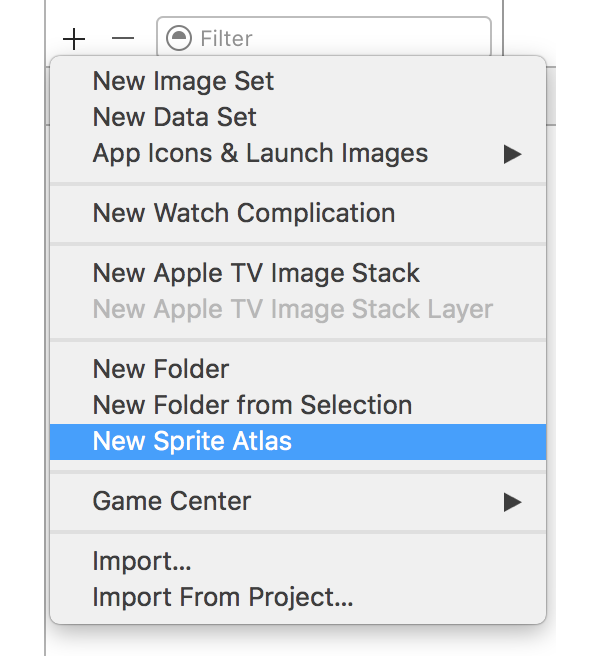
Luckily, Xcode can create texture atlases very easily for you. This is done in the same asset catalogs that are used for other images and resources in your games. Open your project and navigate to the Assets.xcassets asset catalog. At the bottom of the left sidebar, click the + button and select the New Sprite Atlas option.
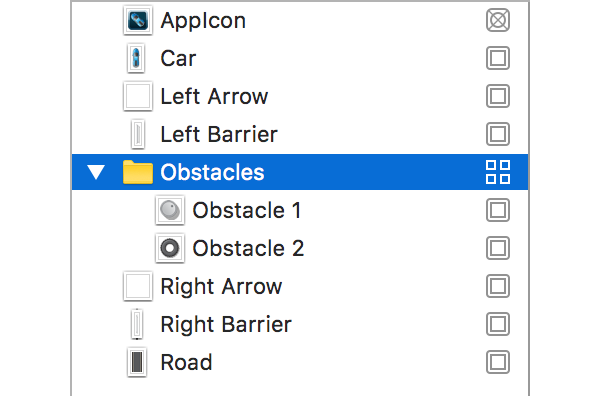
As a result, a new folder is added to the asset catalog. Click the folder once to select it and click again to rename it. Name it Obstacles. Next, drag the Obstacle 1 and Obstacle 2 resources into this folder. You can also delete the blank Sprite asset that Xcode generates if you want to, but that is not required. When completed, your expanded Obstacles texture atlas should look like this:
It's now time to use the texture atlas in code. Open MainScene.swift and add the following property to the MainScene class. We initialize a texture atlas using the name we entered in our asset catalog.
let obstaclesAtlas = SKTextureAtlas(named: "Obstacles")
While not required, you can preload the data of a texture atlas into memory before it is used. This allows your game to eliminate any lag that might occur when loading the texture atlas and retrieving the first texture from it. Preloading a texture atlas is done with a single method and you can also run a custom code block once the loading has completed.
In the MainScene class, add the following code at the end of the didMoveToView(_:) method:
override func didMoveToView(view: SKView) {

    ...

    obstaclesAtlas.preloadWithCompletionHandler {
        // Do something once texture atlas has loaded
    }
}
To retrieve a texture from a texture atlas, you use the textureNamed(_:) method with the name you specified in the asset catalog as a parameter. Let's update the spawnObstacle(_:) method in the MainScene class to use the texture atlas we created a moment ago. We fetch the texture from the texture atlas and use it to create a sprite node.
func spawnObstacle(timer: NSTimer) {
    if player.hidden {
        timer.invalidate()
        return
    }

    let spriteGenerator = GKShuffledDistribution(lowestValue: 1, highestValue: 2)
    let texture = obstaclesAtlas.textureNamed("Obstacle \(spriteGenerator)")
    let obstacle = SKSpriteNode(texture: texture)
    obstacle.xScale = 0.3
    obstacle.yScale = 0.3

    let physicsBody = SKPhysicsBody(circleOfRadius: 15)
    physicsBody.contactTestBitMask = 0x00000001
    physicsBody.pinned = true
    physicsBody.allowsRotation = false
    obstacle.physicsBody = physicsBody

    let center = size.width/2.0, difference = CGFloat(85.0)
    var x: CGFloat = 0

    let laneGenerator = GKShuffledDistribution(lowestValue: 1, highestValue: 3)
    switch laneGenerator.nextInt() {
    case 1:
        x = center - difference
    case 2:
        x = center
    case 3:
        x = center + difference
    default:
        fatalError("Number outside of [1, 3] generated")
    }

    obstacle.position = CGPoint(x: x, y: (player.position.y + 800))
    addChild(obstacle)

    obstacle.lightingBitMask = 0xFFFFFFFF
    obstacle.shadowCastBitMask = 0xFFFFFFFF
}
Note that, if your game takes advantage of On-Demand Resources (ODR), you can easily specify one or more tags for each texture atlas. Once you have successfully accessed the correct resource tag(s) with the ODR APIs, you can then use your texture atlas just like we did in the spawnObstacle(_:) method. You can read more about On-Demand Resources in another tutorial of mine.
2. Saving and Loading Scenes
SpriteKit also offers you the ability to easily save and load scenes to and from persistent storage. This allows players to quit your game, have it relaunched at a later time, and still be up to the same point in your game as they were before.
The saving and loading of your game is handled by the NSCoding protocol, which the SKScene class already conforms to. SpriteKit's implementation of the methods required by this protocol automatically allow for all of the details in your scene to be saved and loaded very easily. If you want to, you can also override these methods to save some custom data along with your scene.
Because our game is very basic, we are going to use a simple Bool value to indicate whether the car has crashed. This shows you how to save and load custom data that is tied to a scene. Add the following two methods of the NSCoding protocol to the MainScene class.
// MARK: - NSCoding Protocol

required init?(coder aDecoder: NSCoder) {
    super.init(coder: aDecoder)

    let carHasCrashed = aDecoder.decodeBoolForKey("carCrashed")

    print("car crashed: \(carHasCrashed)")
}

override func encodeWithCoder(aCoder: NSCoder) {
    super.encodeWithCoder(aCoder)

    let carHasCrashed = player.hidden
    aCoder.encodeBool(carHasCrashed, forKey: "carCrashed")
}
If you are unfamiliar with the NSCoding protocol, the encodeWithCoder(_:) method handles the saving of your scene and the initializer with a single NSCoder parameter handles the loading.
Next, add the following method to the MainScene class. The saveScene() method creates an NSData representation of the scene, using the NSKeyedArchiver class. To keep things simple, we store the data in NSUserDefaults.
func saveScene() {
    let sceneData = NSKeyedArchiver.archivedDataWithRootObject(self)
    NSUserDefaults.standardUserDefaults().setObject(sceneData, forKey: "currentScene")
}
Next, replace the implementation of didBeginContactMethod(_:) in the MainScene class with the following:
func didBeginContact(contact: SKPhysicsContact) {
    if contact.bodyA.node == player || contact.bodyB.node == player {
        if let explosionPath = NSBundle.mainBundle().pathForResource("Explosion", ofType: "sks"),
            let smokePath = NSBundle.mainBundle().pathForResource("Smoke", ofType: "sks"),
            let explosion = NSKeyedUnarchiver.unarchiveObjectWithFile(explosionPath) as? SKEmitterNode,
            let smoke = NSKeyedUnarchiver.unarchiveObjectWithFile(smokePath) as? SKEmitterNode {

            player.removeAllActions()
            player.hidden = true
            player.physicsBody?.categoryBitMask = 0
            camera?.removeAllActions()

            explosion.position = player.position
            smoke.position = player.position

            addChild(smoke)
            addChild(explosion)

            saveScene()
        }
    }
}
The first change made to this method is editing the player node's categoryBitMask rather than removing it from the scene entirely. This ensures that upon reloading the scene, the player node is still there, even though it is not visible, but that duplicate collisions are not detected. The other change made is calling the saveScene() method we defined earlier once the custom explosion logic has been run.
Finally, open ViewController.swift and replace the viewDidLoad() method with the following implementation:
override func viewDidLoad() {
    super.viewDidLoad()

    let skView = SKView(frame: view.frame)

    var scene: MainScene?

    if let savedSceneData = NSUserDefaults.standardUserDefaults().objectForKey("currentScene") as? NSData,
       let savedScene = NSKeyedUnarchiver.unarchiveObjectWithData(savedSceneData) as? MainScene {
        scene = savedScene

    } else if let url = NSBundle.mainBundle().URLForResource("MainScene", withExtension: "sks"),
              let newSceneData = NSData(contentsOfURL: url),
              let newScene = NSKeyedUnarchiver.unarchiveObjectWithData(newSceneData) as? MainScene {
        scene = newScene
    }

    skView.presentScene(scene)
    view.insertSubview(skView, atIndex: 0)

    let left = LeftLane(player: scene!.player)
    let middle = MiddleLane(player: scene!.player)
    let right = RightLane(player: scene!.player)

    stateMachine = LaneStateMachine(states: [left, middle, right])
    stateMachine?.enterState(MiddleLane)
}
When loading the scene, we first check to see if there is saved data in the standard NSUserDefaults. If so, we retrieve this data and recreate the MainScene object using the NSKeyedUnarchiver class. If not, we get the URL for the scene file we created in Xcode and load the data from it in a similar manner.
Run your app and run into an obstacle with your car. At this stage, you don't see a difference. Run your app again, though, and you should see that your scene has been restored to exactly how it was when you just crashed the car.
3. The Animation Loop
Before each frame of your game renders, SpriteKit executes a series of processes in a particular order. This group of processes is referred to as the animation loop. These processes account for the actions, physics properties, and constraints that you have added to your scene.
If, for whatever reason, you need to run custom code in between any of these processes, you can either override some specific methods in your SKScene subclass or specify a delegate that conforms to the SKSceneDelegate protocol. Note that, if you assign a delegate to your scene, the class' implementations of the following methods are not invoked.
The animation loop processes are as follows:
Step 1
The scene calls its update(_:) method. This method has a single NSTimeInterval parameter, which gives you the current system time. This time interval can be useful as it allows you to calculate the time it took for your previous frame to render.
If the value greater than 1/60th of a second, your game is not running at the smooth 60 frames per second (FPS) that SpriteKit aims for. This means that you may need to change some aspects of your scene (for example, particles, number of nodes) to reduce its complexity.
Step 2
The scene executes and calculates the actions you have added to your nodes and positions them accordingly.
Step 3
The scene calls its didEvaluateActions() method. This is where you can perform any custom logic before SpriteKit continues with the animation loop.
Step 4
The scene performs its physics simulations and changes your scene accordingly.
Step 5
The scene calls its didSimulatePhysics() method, which you can override with the didEvaluateActions() method.
Step 6
The scene applies the constraints that you have added to your nodes.
Step 7
The scene calls its didApplyConstraints() method, which is available for you to override.
Step 8
The scene calls its didFinishUpdate() method, which you can also override. This is the final method you can change your scene in before its appearance for that frame is finalized.
Step 9
Finally, the scene renders its contents and updates its containing SKView accordingly.
It is important to note that, if you use a SKSceneDelegate object rather than a custom subclass, each method gains an extra parameter and changes its name slightly. The extra parameter is an SKScene object, which allows you to determine which scene the method is being run in relation to. The methods defined by the SKSceneDelegate protocol are named as follows:
update(_:forScene:)-
didEvaluateActionsForScene(_:)
didSimulatePhysicsForScene(_:)-
didApplyConstraintsForScene(_:)
-
didFinishUpdateForScene(_:)
Even if you don't use these methods to make any changes to your scene, they can still be very useful for debugging. If your game consistently lags and the frame rate drops at a particular moment in your game, you could override any combination of the above methods and find the time interval between each one being called. This allows you to accurately find whether it is specifically your actions, physics, constraints, or graphics that are too complex for your game to run at 60 FPS.
4. Performance Best Practices
Batch Drawing
When rendering your scene, SpriteKit, by default, runs through the nodes in your scene's children array and draws them on to the screen in the same order as they are in the array. This process is also repeated and looped for any child nodes a particular node might have.
Enumerating through child nodes individually means that SpriteKit executes a draw call for each node. While for simple scenes this method of rendering does not significantly impact performance, as your scene gains more nodes this process becomes very inefficient.
To make rendering more efficient, you can organize the nodes in your scene into distinct layers. This is done through the zPosition property of the SKNode class. The higher a node's zPosition is, the "closer" it is to the screen, which means that it is rendered on top of other nodes in your scene. Likewise, the node with the lowest zPosition in a scene appears at the very "back" and can be overlapped by any other node.
After organizing nodes into layers, you can set an SKView object's ignoreSiblingOrder property to true. This results in SpriteKit using the zPosition values to render a scene rather than the order of the children array. This process is far more efficient as any nodes with the same zPosition are batched together into a single draw call rather than having one for each node.
It is important to note that the zPosition value of a node can be negative if needed. The nodes in your scene are still rendering in order of increasing zPosition.
Avoid Custom Animations
Both the SKAction and SKConstraint classes contain a large number of rules you can add to a scene to create animations. Being part of the SpriteKit framework, they are optimized as much as they possibly can be and also fit in perfectly with SpriteKit's animation loop.
The wide array of actions and constraints provided to you allow for almost any possible animation you could want. For these reasons, it is recommended that you always utilize actions and constraints in your scenes to create animations rather than performing any custom logic elsewhere in your code.
In some cases, especially if you are needing to animate a reasonably large group of nodes, physics force fields may also even be able to produce the result you want. Force fields are even more efficient as they are calculated alongside the rest of SpriteKit's physics simulations.
Bit Masks
Your scenes can be optimized even more by using only the appropriate bit masks for nodes in your scene. In addition to being crucial for physics collision detection, bit masks also determine how regular physics simulations and lighting affect the nodes in a scene.
For any pair of nodes in a scene, regardless of whether or not they will ever collide, SpriteKit monitors where they are relative to each other. This means that, if left with the default masks with all bits enabled, SpriteKit is keeping track of where each node is in your scene compared to every other node. You can greatly simplify SpriteKit's physics simulations by defining appropriate bit masks so that only the relationships between nodes that can potentially collide are tracked.
Likewise, a light in SpriteKit only affects a node if the logical AND of their category bit masks is a non-zero value. By editing these categories, so that only the most important nodes in your scene are affected by a particular light, you can greatly reduce the complexity of a scene.
Conclusion
You should now know how you can further optimize your SpriteKit games by using more advanced techniques, such as texture atlases, batch drawing, and optimized bit masks. You should also be comfortable with saving and loading scenes to give your players a better overall experience.
Throughout this series, we have looked through a lot of the features and functionality of the SpriteKit framework in iOS, tvOS, and OS X. There are even more advanced topics beyond the scope of this series, such custom OpenGL ES and Metal shaders as well as physics fields and joints.
If you want to learn more about these topics, I recommend starting with the SpriteKit Framework Reference and read up on the relevant classes.
As always, be sure to leave your comments and feedback in the comments below.

Comments