In the previous article, I've introduced two design principles aimed at wearables, signals and microinteractions. In this article, we'll create a sample Android Wear project to show how these principles apply in practice.
1. Concept
Imagine you're in the final hour of a bidding war for a much coveted item. The last thing you want, and what often happens, is being outbid just before the bid closes. In this scenario, there are obvious benefits in having a smartwatch that permits you a convenient way of being able to monitor such a bid and make timely actions without disturbing you, the user, too much. In our example project, we'll walk through how we can realize this on an Android Wear device.
The trading site we'll be basing our example on is called TradeMe, my home country's equivalent to eBay. As with the majority of successful online services, TradeMe provides a clean and simple API that exposes the majority of functionality to developers. Because this article is about Android Wear, we'll be focusing just on the code related to Android Wear.
The flow diagram below shows the main logic of our project.
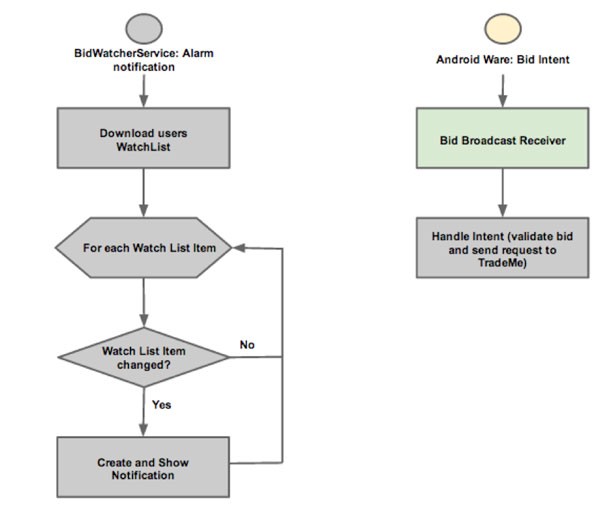
The bulk of the logic is handled by a service, BidWatcherService, on the paired handheld where it routinely pulls down the user's watch list. For each item, the service checks if there have been any changes and if the user has been outbid. For those that match these criteria, the service creates a notification whereby the user is notified of the changes and provided the opportunity to easily take action, for example, increasing their bid.
The actual Android Wear specific code accounts for very little of the overall application but, as hopefully emphasized in this article, the challenge is in designing appropriate contextual experiences rather than the actual implementation. Of course, you could create a custom and complex user interface if you so desire.
2. Extending Notifications for Android Wear
To use features specific to Android Wear, you must ensure your project is referencing the v4 Support Library. We start by obtaining a reference to the system's notification manager during initialization. To do this, we use the NotificationManagerCompat class from the support library rather than the NotificationManager class.
protected NotificationManagerCompat mNotificationManager;
...
mNotificationManager = NotificationManagerCompat.from(mContext);
For each of our watch list items that have changed and considered important enough to notify the user, we create and show a notification.
NotificationCompat.Builder notificationBuilder = new NotificationCompat.Builder(this)
    .setSmallIcon(R.drawable.small_icon)
    .setContentTitle(mContext.getString(R.string.title_auction_update))
	.setContentText(item.mTitle);

mNotificationManager.notify(notificationId, notificationBuilder.build());
That's it. We're now able to notify the user of any watched items that have changed. This is shown in the screenshots below.
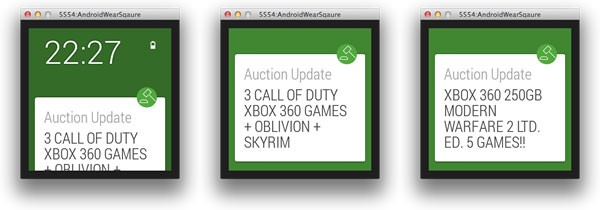
The above screenshots show the emulated version of our notification on an Android Wear device. The leftmost screenshot shows a preview of the notification. The center and rightmost screenshots show notifications in focus.
We can, as the Android Wear documentation suggests, make this information more glanceable by adding a background image to the notification to give it more context. There are two ways to achieve this. We can set the notification's BigIcon, using the setBigIcon method, or by extending the notification with a WearableExtender object and setting its background image. Because we're focusing on Android Wear, we'll use the WearableExtender class.
As its name suggests, the WearableExtender class is a helper class that wraps up the notification extensions that are specific to wearable devices. The following code demonstrates how we add a background image to our notifications.
NotificationCompat.WearableExtender wearableExtender = new NotificationCompat.WearableExtender();

wearableExtender.setBackground(
  BitmapFactory.decodeResource(
    getResources(), R.drawable.notification_background));

NotificationCompat.Builder notificationBuilder = new NotificationCompat.Builder(this)
  .setSmallIcon(R.drawable.small_icon)
  .setContentTitle(mContext.getString(R.string.title_auction_update))
  .setContentText(item.mTitle)
  .extend(wearableExtender);
We create a WearableExtender object, set its background, and assign it to the notification using the extend method. The following screenshot shows the updated notification.

I have three items on my watch list. At the moment, I have a separate Card for each of the items. When designing notifications for a handheld, we would use a summary notification, but this doesn't translate well to Android Wear devices. For this reason, the concept of a Stack was introduced.
Stacks are created by assigning related notifications to the same group. This allows the user to discard or ignore them as a group or expanding them to handle each notification individually. This is achieved by setting the group of each notification using the setGroup method as shown in the next code block.
NotificationCompat.Builder notificationBuilder = new NotificationCompat.Builder(this)
  .setSmallIcon(R.drawable.small_icon)
  .setContentTitle(mContext.getString(R.string.title_auction_update))
  .setContentText(item.mTitle)
  .setGroup(NOTIFICATION_GROUP_KEY)
  .extend(wearableExtender);
The following screenshots show examples of notifications being stacked and expanded.

Stacks are a substitute for summary notifications on a handheld. Stacks are not displayed on a handheld and you therefore need to explicitly create a summary notification for handhelds. Similar to what we did in the above code block, set the notification's group, using the setGroup method, to the stack group, but also set group summary to true by invoking the setGroupSummary method.
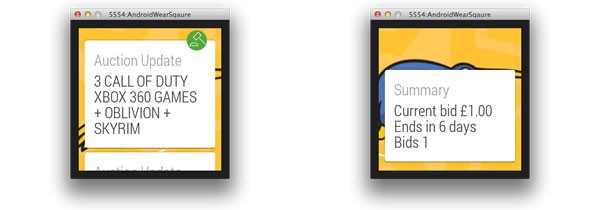
In some instances, you may want to display more detail to the user. This can be useful for giving the user additional information without requiring them to pull out their handheld. Android Wear has Pages for this exact reason. Pages allow you to assign additional Cards to a notification to expose more information. These are revealed by swiping left.
To add an additional page, we simply create a new notification and add it to our WearableExtender object using the addPage method.
BigTextStyle autionDetailsPageStyle =
  new NotificationCompat.BigTextStyle()
    .setBigContentTitle(mContext.getString(R.string.title_auction_details))
    .bigText(String.format(this.getString(
      R.string.copy_notification_details),
      item.mMaxBidAmount,
      item.getTimeRemainingAsString(),
      item.mBidCount));

Notification detailsPageNotification = new NotificationCompat.Builder(this)
  .setSmallIcon(R.drawable.small_icon)
  .setStyle(autionDetailsPageStyle)
  .build();

NotificationCompat.WearableExtender wearableExtender = new NotificationCompat.WearableExtender();

wearableExtender.setBackground(
  BitmapFactory.decodeResource(getResources(),
  R.drawable.notification_background));
  wearableExtender.addPage(detailsPageNotification);
The following screenshots show a notification with two pages. We are now providing the user with timely and relevant information.
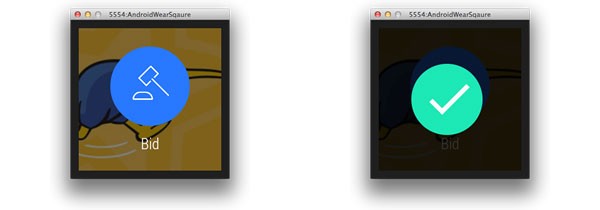
The final step is making this information actionable. To do this, we add actions just like we did with notifications earlier. The two actions we add allow the user to automatically increase their bid or explicitly set their bid.
Let's first add an automatic bid. The following code snippet should look familiar to any Android developer.
Intent defaultBidIntent = new Intent(DEFAULT_BID_ACTION)
  .putExtra(EXTRA_WATCHLIST_ITEM, item)
  .putExtra(EXTRA_NOTIFICATION_ID, notificationId);

PendingIntent pendingDefaultBidIntent = PendingIntent.getBroadcast(
  mContext,
  0,
  defaultBidIntent,
  PendingIntent.FLAG_UPDATE_CURRENT);

NotificationCompat.Action defaultBidAction = new NotificationCompat.Action.Builder(
  R.drawable.icon_action_bid,
  mContext.getString(R.string.label_auto_bid),
  pendingDefaultBidIntent).build();

NotificationCompat.WearableExtender wearableExtender = new NotificationCompat.WearableExtender();

wearableExtender.setBackground(
  BitmapFactory.decodeResource(getResources(),
  R.drawable.notification_background));

wearableExtender.addPage(detailsPageNotification);
wearableExtender.addAction(defaultBidAction);
The following screenshots show the action along with the confirmation state.
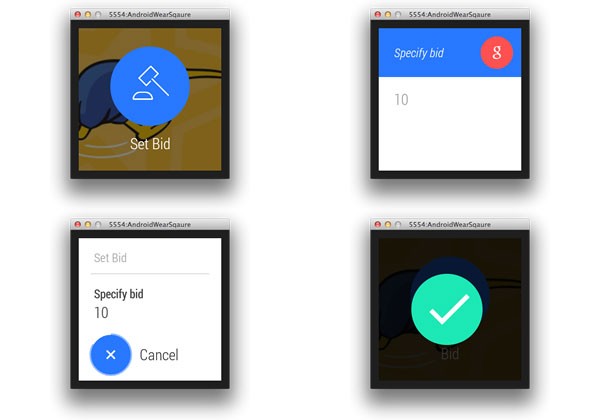
With the second action, we want to enable the user to set a specific price. Working with the constraints of the Android Wear device our options are:
- launch the appropriate screen on the handheld
- provide a stepper control the user can use to increment the current bid
- provide the user with some predefined options
- allow the user to use their voice
One of the attractive aspects of Android Wear is its architecture and design towards voice. This makes sense giving the form factor and context in which a wearable device like a smartwatch is used.
Implementing this is similar to the above, but, in addition to a RemoteInput object, we instantiate and assign a RemoteInput object to the action. The RemoteInput instance takes care of the rest.
Intent customBidIntent = new Intent(CUSTOM_BID_ACTION)
  .putExtra(EXTRA_WATCHLIST_ITEM, item)
  .putExtra(EXTRA_NOTIFICATION_ID, notificationId);

PendingIntent pendingCustomBidIntent = PendingIntent.getBroadcast(
  mContext,
  0,
  customBidIntent,
  PendingIntent.FLAG_UPDATE_CURRENT);

RemoteInput remoteInput = new RemoteInput
  .Builder(EXTRA_BID_AMOUNT)
  .setLabel(mContext.getString(R.string.copy_specify_bid))
  .build();

NotificationCompat.Action customBidAction = new NotificationCompat.Action
  .Builder(
    R.drawable.icon_action_bid,
    mContext.getString(R.string.label_bid),
    pendingCustomBidIntent).addRemoteInput(remoteInput).build();

NotificationCompat.WearableExtender wearableExtender = new NotificationCompat.WearableExtender();

wearableExtender.setBackground(
  BitmapFactory.decodeResource(getResources(),
  R.drawable.notification_background));

wearableExtender.addPage(detailsPageNotification);
wearableExtender.addAction(defaultBidAction).addAction(customBidAction);
The RemoteInput object takes a string in the constructor. This string, EXTRA_BID_AMOUNT, is the identifier used by the broadcast receiver when retrieving the result as shown below.
Bundle remoteInput = RemoteInput.getResultsFromIntent(intent);
if (remoteInput != null) {
  CharSequence inputAsCharSequence = remoteInput.getCharSequence(EXTRA_BID_AMOUNT);

  if( inputAsCharSequence != null ){
    input = inputAsCharSequence.toString();
  }
}
The following screenshot shows an example of a RemoteInput instance in action.
An obvious extension to this would be to enable the user to explicitly request an update. To implement this, you would create an Activity for the Android Wear device that listens for voice commands. Once received, broadcast the request to the paired mobile device and finish the Activity. But that's for another time.
Conclusion
That concludes our example project in which we now offer the user relevant and actionable information, delivering it to them with minimal disruption. As mentioned in the previous article, Android Wear let's you implement anything you want, but I hope this article has shown how enhanced notifications are an efficient and effective way to extend your service to Android Wear devices.

Comments