RxJava is one of the most popular libraries for bringing reactive programming to the Android platform, and in this three-part series I’ve been showing you how to start using this library in your own Android projects.
In Get Started With RxJava 2 for Android, we looked at what RxJava is and what it has to offer Android developers, before creating a Hello World app that demonstrated the three core components of RxJava: an Observable, an Observer, and a subscription.
In the Reactive Programming Operators in RxJava 2 tutorial, we looked at how to perform complex data transformations using operators, and how you can combine Operators and Schedulers to finally make multithreading on Android a pain-free experience.
We also touched on RxAndroid, a library specifically designed to help you use RxJava in your Android projects, but there’s much more to explore in RxAndroid. So, in this post, I’m going to focus solely on the RxAndroid family of libraries.
Much like RxJava, RxAndroid underwent a massive overhaul in its version 2 release. The RxAndroid team decided to modularise the library, moving much of its functionality into dedicated RxAndroid add-on modules.
In this article, I’m going to show you how to set up and use some of the most popular and powerful RxAndroid modules—including a library that can make listeners, handlers and TextWatchers a thing of the past by giving you the ability to handle any Android UI event as an Observable.
And since memory leaks caused by incomplete subscriptions are the biggest drawback to using RxJava in your Android apps, I’ll also show you how to use an RxAndroid module that can handle the subscription process for you. By the end of this article, you’ll know how to use RxJava in any Activity or Fragment, without running the risk of encountering any RxJava-related memory leaks.
Creating More Reactive Android UIs
Reacting to UI events such as taps, swipes and text input is a fundamental part of developing pretty much any Android app, but handling Android UI events isn’t particularly straightforward.
You’ll typically react to UI events using a combination of listeners, handlers, TextWatchers, and possibly other components depending on the kind of UI you’re creating. Each of these components requires you to write a significant amount of boilerplate code, and to make matters worse there’s no consistency in how you implement these different components. For example, you handle OnClick events by implementing an OnClickListener:
Button button = (Button)findViewById(R.id.button);
button.setOnClickListener(new View.OnClickListener() {
    @Override
    public void onClick(View v) {
        //Perform some work//
    }
});
But this is completely different to how you'd implement a TextWatcher:
final EditText name = (EditText) v.findViewById(R.id.name);
//Create a TextWatcher and specify that this TextWatcher should be called whenever the EditText’s content changes//
name.addTextChangedListener(new TextWatcher() {
    @Override
    public void beforeTextChanged(CharSequence s, int start, int count, int after) {
    }

    @Override
    public void onTextChanged(CharSequence s, int start, int before, int count) {
        //Perform some work//
    }

    @Override
    public void afterTextChanged(Editable s) {
    }
 });
This lack of consistency can potentially add a lot of complexity to your code. And if you have UI components that depend on the output of other UI components, then get ready for things to get even more complicated! Even a simple use case—such as asking the user to type their name into an EditText so you can personalise the text that appears in subsequent TextViews—requires nested callbacks, which are notoriously difficult to implement and maintain. (Some people refer to nested callbacks as “callback hell.”)
Clearly, a standardised approach to handling UI events has the potential to greatly simplify your code, and RxBinding is a library that sets out to do just that, by providing bindings that enable you to convert any Android View event into an Observable.
Once you’ve converted a view event into an Observable, it’ll emit its UI events as streams of data that you can subscribe to in exactly the same way you’d subscribe to any other Observable.
Since we’ve already seen how you’d capture a click event using Android’s standard OnClickListener, let’s look how you’d achieve the same results using RxBinding:
import com.jakewharton.rxbinding.view.RxView;

...

Button button = (Button) findViewById(R.id.button);
RxView.clicks(button)
      .subscribe(aVoid -> {
        //Perform some work here//
      });
Not only is this approach more concise, but it’s a standard implementation that you can apply to all the UI events that occur throughout your app. For example, capturing text input follows the same pattern as capturing click events:
RxTextView.textChanges(editText)
    .subscribe(charSequence -> {
        //Perform some work here//
    });
An Example App With RxBinding
So you can see exactly how RxBinding can simplify your app’s UI-related code, let’s create an app that demonstrates a few of these bindings in action. I’m also going to include a View that’s dependent on the output of another View, to demonstrate how RxBinding simplifies creating relationships between UI components.
This app is going to consist of:
- A
Buttonthat displays aToastwhen tapped. - An
EditTextthat detects text changes. - A
TextViewthat updates to display the contents of theEditText.
Project Setup
Create an Android Studio project with the settings of your choice, and then open your module-level build.gradle file and add the latest version of the RxBinding library as a project dependency. In the interests of keeping boilerplate code to a minimum, I’m also going to be using lambdas, so I’ve updated my build.gradle file to support this Java 8 feature:
apply plugin: 'com.android.application'
android {
      compileSdkVersion 25
      buildToolsVersion "25.0.2"
      defaultConfig {
          applicationId "com.jessicathornsby.myapplication"
          minSdkVersion 23
          targetSdkVersion 25
          versionCode 1
          versionName "1.0"
          testInstrumentationRunner "android.support.test.runner.AndroidJUnitRunner"

//Enable the Jack toolchain//

          jackOptions {
              enabled true
          }
      }

      buildTypes {
          release {
              minifyEnabled false
              proguardFiles getDefaultProguardFile('proguard-android.txt'), 'proguard-rules.pro'
          }
      }

//Set sourceCompatibility and targetCompatibility to JavaVersion.VERSION_1_8//

      compileOptions {
          sourceCompatibility JavaVersion.VERSION_1_8
          targetCompatibility JavaVersion.VERSION_1_8
      }
  }

  dependencies {
      compile fileTree(dir: 'libs', include: ['*.jar'])
      androidTestCompile('com.android.support.test.espresso:espresso-core:2.2.2', {
          exclude group: 'com.android.support', module: 'support-annotations'
      })

//Add the core RxBinding library//

      compile 'com.jakewharton.rxbinding:rxbinding:0.4.0'
      compile 'com.android.support:appcompat-v7:25.3.0'

//Don’t forget to add the RxJava and RxAndroid dependencies//

      compile 'io.reactivex.rxjava2:rxandroid:2.0.1'
      compile 'io.reactivex.rxjava2:rxjava:2.0.5'
      testCompile 'junit:junit:4.12'
  }
}
When you’re working with multiple RxJava libraries, it’s possible that you may encounter a Duplicate files copied in APK META-INF/DEPENDENCIES error message at compile time. If you do encounter this error, then the workaround is to suppress these duplicate files by adding the following to your module-level build.gradle file:
android {
      packagingOptions {

//Use “exclude” to point at the specific file (or files) that Android Studio is complaining about//

          exclude 'META-INF/rxjava.properties'
      }
Create the Main Activity Layout
Sync your Gradle files, and then create a layout consisting of a Button, an EditText, and a TextView:
<?xml version="1.0" encoding="utf-8"?>
<LinearLayout xmlns:android="http://schemas.android.com/apk/res/android"
  xmlns:tools="http://schemas.android.com/tools"
  android:layout_width="match_parent"
  android:layout_height="match_parent"
  android:orientation="vertical"
  tools:context=".MainActivity" >

  <Button
      android:text="Button"
      android:layout_width="wrap_content"
      android:layout_height="wrap_content"
      android:id="@+id/button" />

  <EditText
      android:layout_width="wrap_content"
      android:layout_height="wrap_content"
      android:inputType="textPersonName"
      android:text="Type here"
      android:ems="10"
      android:id="@+id/editText" />

  <TextView
      android:text="TextView"
      android:layout_width="match_parent"
      android:layout_height="wrap_content"
      android:id="@+id/textView" />

</LinearLayout>
Code the Event Bindings
Now let’s look at how you’d use these RxBinding to capture the various UI events our application needs to react to. For starters, declare your imports and define the MainActivity class.
package com.jessicathornsby.myapplication;

import android.os.Bundle;
import android.support.v7.app.AppCompatActivity;
import android.widget.Button;
import android.widget.EditText;
import android.widget.TextView;
import android.widget.Toast;

//Import the view.RxView class, so you can use RxView.clicks//

import com.jakewharton.rxbinding.view.RxView;

//Import widget.RxTextView so you can use RxTextView.textChanges//

import com.jakewharton.rxbinding.widget.RxTextView;

public class MainActivity extends AppCompatActivity {
  @Override
  protected void onCreate(Bundle savedInstanceState) {
      super.onCreate(savedInstanceState);
      setContentView(R.layout.activity_main);

      Button button = (Button) findViewById(R.id.button);
      TextView textView = (TextView) findViewById(R.id.textView);
      EditText editText = (EditText) findViewById(R.id.editText);

      //Code for the bindings goes here//
      //...//
  }
}
Now you can start adding bindings to respond to UI events. The RxView.clicks method is used to bind click events. Create a binding to display a toast whenever the button is clicked:
        RxView.clicks(button)
            .subscribe(aVoid -> {
                Toast.makeText(MainActivity.this, "RxView.clicks", Toast.LENGTH_SHORT).show();
            });
Next, use the RxTextView.textChanges() method to react to a text change event by updating the TextView with the contents of our EditText.
        RxTextView.textChanges(editText)
            .subscribe(charSequence -> {
                textView.setText(charSequence);
            });
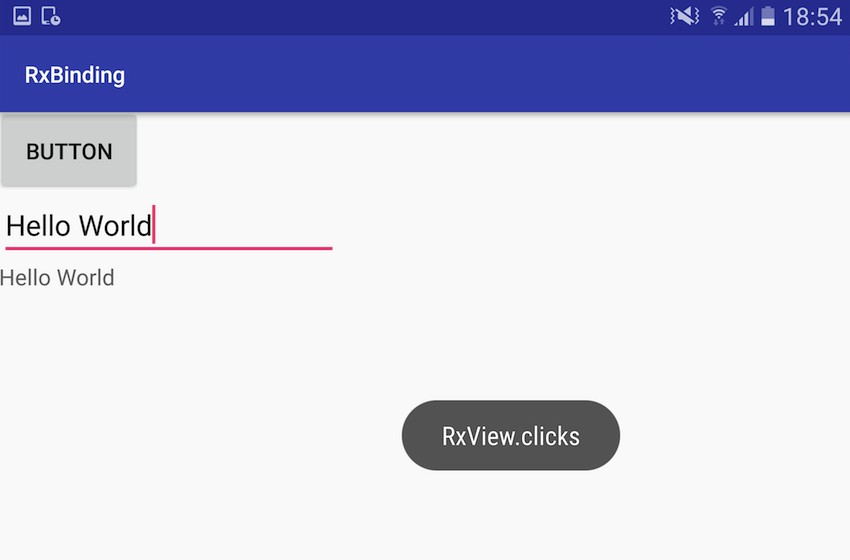
When you run your app, you'll end up with a screen like the following.

Install your project on a physical Android smartphone or tablet or a compatible AVD, and then spend some time interacting with the various UI elements. Your app should react to click events and text input as normal—and all without a listener, TextWatcher or callback in sight!
RxBinding for Support Library Views
While the core RxBinding library provides bindings for all the UI elements that make up the standard Android platform, there are also RxBinding sibling modules that provide bindings for the Views that are included as part of Android’s various support libraries.
If you’ve added one or more support libraries to your project, then you’ll typically want to add the corresponding RxBinding module, too.
These sibling modules follow a straightforward naming convention that makes it easy to identify the corresponding Android support library: each sibling module simply takes the support library’s name, and replaces com.android with com.jakewharton.rxbinding2:rxbinding.
compile com.jakewharton.rxbinding2:rxbinding-recyclerview-v7:2.0.0'compile 'com.jakewharton.rxbinding2:rxbinding-support-v4:2.0.0'compile 'com.jakewharton.rxbinding2:rxbinding-appcompat-v7:2.0.0'compile 'com.jakewharton.rxbinding2:rxbinding-design:2.0.0'compile 'com.jakewharton.rxbinding2:rxbinding-recyclerview-v7:2.0.0'compile 'com.jakewharton.rxbinding2:rxbinding-leanback-v17:2.0.0'
If you’re using Kotlin in your Android projects, then there’s also a Kotlin version available for each RxBinding module. To access the Kotlin version, simply append -kotlin to the name of the library you want to work with, so:
compile 'com.jakewharton.rxbinding2:rxbinding-design:2.0.0'
Becomes:
compile 'com.jakewharton.rxbinding2:rxbinding-design-kotlin:2.0.0'
Once you’ve converted a View event into an Observable, all of those events are emitted as a data stream. As we’ve already seen, you can subscribe to these streams and then perform whatever task you need this particular UI event to trigger, such as displaying a Toast or updating a TextView. However, you can also apply any of RxJava’s enormous collection of operators to this observable stream, and even chain multiple operators together to perform complex transformations on your UI events.
There are far too many operators to discuss in a single article (and the official docs list all the operators anyway) but when it comes to working with Android UI events, there are a few operators that can come in particularly useful.
The debounce() Operator
Firstly, if you’re worried that an impatient user might tap away at a UI element repeatedly, potentially confusing your app, then you can use the debounce() operator to filter out any UI events that are emitted in quick succession.
In the following example, I’m specifying that this button should react to an OnClick event only if there’s been at least a 500 millisecond gap since the previous click event:
RxView.clicks(button)
    .debounce(500, TimeUnit.MILLISECONDS)
    .subscribe(aVoid -> {
      Toast.makeText(MainActivity.this, "RxView.clicks", Toast.LENGTH_SHORT).show();
    });
The publish() Operator
You can also use the publish() operator to attach multiple listeners to the same view, something that’s traditionally been difficult to implement in Android.
The publish() operator converts a standard Observable into a connectable observable. While a regular observable starts emitting items as soon as the first observer subscribes to it, a connectable observable won’t emit anything until you explicitly instruct it to, by applying the connect() operator. This gives you a window of opportunity in which to subscribe multiple observers, without the observable starting to emit items as soon as the first subscription takes place.
Once you’ve created all your subscriptions, simply apply the connect() operator and the observable will start emitting data to all its assigned observers.
Avoid App-Breaking Memory Leaks
As we’ve seen throughout this series, RxJava can be a powerful tool for creating more reactive, interactive Android applications, with much less code than you’d typically need to get the same results using Java alone. However, there is one major drawback to using RxJava in your Android applications—the potential for memory leaks caused by incomplete subscriptions.
These memory leaks occur when the Android system tries to destroy an Activity that contains a running Observable. Since the observable is running, its observer will still be holding a reference to the activity, and the system will be unable to garbage collect this activity as a result.
Since Android destroys and recreates Activitys each time the device’s configuration changes, your app could be creating a duplicate Activity every single time the user switches between portrait and landscape mode, as well as each time they open and close their device’s keyboard.
These Activities will hang around in the background, potentially never getting garbage collected. Since Activities are large objects, this can quickly lead to serious memory management problems, especially since Android smartphones and tablets have limited memory to begin with. The combination of a large memory leak and limited memory can quickly result in an Out Of Memory error.
RxJava memory leaks may have the potential to wreak havoc with your application’s performance, but there is an RxAndroid library that allows you to use RxJava in your app without having to worry about memory leaks.
The RxLifecycle library, developed by Trello, provides lifecycle handling APIs that you can use to limit the lifespan of an Observable to the lifecycle of an Activity or Fragment. Once this connection is made, RxLifecycle will terminate the observable’s sequence in response to lifecycle events that occur in that observable’s assigned activity or fragment. This means you can create an observable that terminates automatically whenever an activity or fragment is destroyed.
Note that we’re talking about terminating a sequence, and not unsubscribing. Although RxLifecycle is often talked about in the context of managing the subscription/unsubscription process, technically it doesn’t unsubscribe an observer. Instead, the RxLifecycle library terminates the observable sequence by emitting either the onComplete() or onError() method. When you unsubscribe, the observer stops receiving notifications from its observable, even if that observable is still emitting items. If you specifically require unsubscribe behaviour, then that is something you’ll need to implement yourself.
Using RxLifecycle
To use RxLifecycle in your Android projects, open your module-level build.gradle file and add the latest version of the RxLifeycle library, plus the RxLifecycle Android library:
dependencies {
  ...
  ...
compile 'com.trello.rxlifecycle2:rxlifecycle:2.0.1'
compile 'com.trello.rxlifecycle2:rxlifecycle-android:2.0.1'
Then, in the Activity or Fragment where you want to use the library’s lifecycle handling APIs, extend either RxActivity, RxAppCompatActivity or RxFragment, and add the corresponding import statement, for example:
import com.trello.rxlifecycle2.components.support.RxAppCompatActivity;

...

public class MainActivity extends RxAppCompatActivity {
When it comes to binding an Observable to the lifecycle of an Activity or Fragment, you can either specify the lifecycle event where the observable should terminate, or you can let the RxLifecycle library decide when it should terminate the observable sequence.
By default, RxLifecycle will terminate an observable in the complementary lifecycle event to the one where that subscription occurred, so if you subscribe to an observable during your Activity’s onCreate() method, then RxLifecycle will terminate the observable sequence during that Activity’s onDestroy() method. If you subscribe during a Fragment’s onAttach() method, then RxLifecycle will terminate this sequence in the onDetach() method.
You can leave this decision up to RxLifecycle, by using RxLifecycleAndroid.bindActivity:
Observable<Integer> myObservable = Observable.range(0, 25);

...

  @Override
  public void onResume() {
      super.onResume();
      myObservable
              .compose(RxLifecycleAndroid.bindActivity(lifecycle))
              .subscribe();
  }
Alternatively, you can specify the lifecycle event where RxLifecycle should terminate an Observable sequence, using RxLifecycle.bindUntilEvent.
Here, I’m specifying that the observable sequence should be terminated in onDestroy():
@Override
public void onResume() {
  super.onResume();
  myObservable
    .compose(RxLifecycle.bindUntilEvent(lifecycle, ActivityEvent.DESTROY))
    .subscribe();
}
Working With Android Marshmallow Permissions
The final library we’re going to look at is RxPermissions, which was designed to help you use RxJava with the new permissions model introduced in Android 6.0. This library also allows you to issue a permission request and handle the permission result in the same location, instead of requesting the permission in one place and then handling its results separately, in Activity.onRequestPermissionsResult().
Start by adding the RxPermissions library to your build.gradle file:
compile 'com.tbruyelle.rxpermissions2:rxpermissions:0.9.3@aar'
Then, create an RxPermissions instance:
RxPermissions rxPermissions = new RxPermissions(this);
You’re then ready to start making permission requests via the RxPermissions library, using the following formula:
rxPermissions.request(Manifest.permission.READ_CONTACTS)
   .subscribe(granted -> {
       if (granted) {
          // The permission has been granted//
       } else {
         // The permission has been denied//
       }
   });
Where you issue your permissions request is crucial, as there’s always a chance that the hosting Activity may be destroyed and then recreated while the permissions dialogue is onscreen, usually due to a configuration change such as the user moving between portrait and landscape modes. If this occurs, then your subscription may not be recreated, which means you won’t be subscribed to the RxPermissions observable and won’t receive the user’s response to the permission request dialog. To guarantee that your application receives the user’s response, always invoke your request during an initialisation phase such as Activity.onCreate(), Activity.onResume(), or View.onFinishInflate().
It’s not uncommon for features to require several permissions. For example, sending an SMS message usually requires your app to have the SEND_SMS and READ_CONTACTS permissions. The RxPermissions library provides a concise method of issuing multiple permissions requests, and then combining the user’s responses into a single false (one or more permissions was denied) or true (all permissions were granted) response that you can then react to accordingly.
RxPermissions.getInstance(this)
   .request(Manifest.permission.SEND_SMS,
            Manifest.permission.READ_CONTACTS)
   .subscribe(granted -> {
       if (granted) {
          // All permissions were granted//
       } else {
          //One or more permissions was denied//
       }
   });
You’ll typically want to trigger a permission request in response to a UI event, such as the user tapping a menu item or button, so RxPermissions and RxBiding are two libraries that work particularly well together.
Handling the UI event as an observable and making the permission request via RxPermissions allows you to perform a lot of work with just a few lines of code:
RxView.clicks(findViewById(R.id.enableBluetooth))
   .compose(RxPermissions.getInstance(this).ensure(Manifest.permission.BLUETOOTH_ADMIN))
   .subscribe(granted -> {
       // The ‘enableBluetooth’ button has been clicked//
   });
Conclusion
After reading this article, you have some ideas of how to cut a lot of boilerplate code from your Android apps—using RxJava to handle all of your application’s UI events, and issuing your permission requests via RxPermissions. We also looked at how you can use RxJava in any Android Activity or Fragment, without having to worry about the memory leaks that can be caused by incomplete subscriptions.
We’ve explored some of the most popular and useful RxJava and RxAndroid libraries in this series, but if you’re eager to see what else RxJava has to offer Android developers, check out some of the many other RxAndroid libraries. You’ll find a comprehensive list of additional RxAndroid libraries over at GitHub.
In the meantime, check out some of our other Android development posts here on Envato Tuts+!


Comments