In the fundamental Git workflow, you develop a new feature in a dedicated topic branch, then merge it back into a production branch once it's finished. This makes git merge an integral tool for combining branches. However, it's not the only one that Git offers.
As an alternative to the above scenario, you could combine the branches with the git rebase command. Instead of tying the branches together with a merge commit, rebasing moves the entire feature branch to the tip of master as shown below.
This serves the same purpose as git merge, integrating commits from different branches. But there are two reasons why we might want to opt for a rebase over a merge:
- It results in a linear project history.
- It gives us the opportunity to clean up local commits.
In this tutorial, we'll explore these two common use cases of git rebase. Unfortunately, the benefits of git rebase come at a trade-off. When used incorrectly, it can be one of the most dangerous operations you can perform in a Git repository. So, we'll also be taking a careful look at the dangers of rebasing.
Prerequisites
This tutorial assumes that you're familiar with the basic Git commands and collaboration workflows. You should be comfortable staging and committing snapshots, developing features in isolated branches, merging branches together, and pushing/pulling branches to/from remote repositories.
1. Rebasing for a Linear History
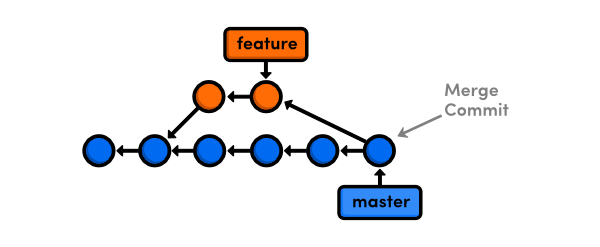
The first use case we'll explore involves a divergent project history. Consider a repository where your production branch has moved forward while you were developing a feature:
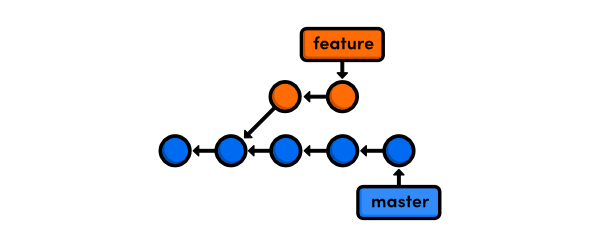
To rebase the feature branch onto the master branch, you would run the following commands:
git checkout feature
git rebase master
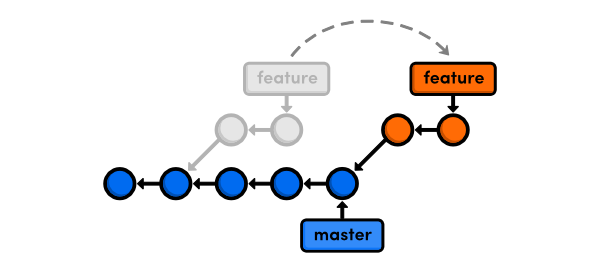
This transplants the feature branch from its current location to the tip of the master branch:
There are two scenarios where you would want to do this. First, if the feature relied on the new commits in master, it would now have access to them. Second, if the feature was complete, it would now be set up for a fast-forward merge into master. In both cases, rebasing results in a linear history, whereas git merge would result in unnecessary merge commits.
For example, consider what would happen if you integrated the upstream commits with a merge instead of a rebase:
git checkout feature
git merge master
This would have given us an extra merge commit in the feature branch. What's more, this would happen every time you wanted to incorporate upstream commits into your feature. Eventually, your project history would be littered with meaningless merge commits.
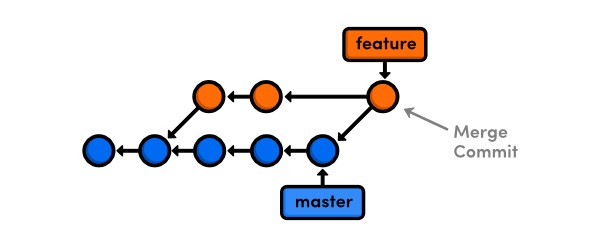
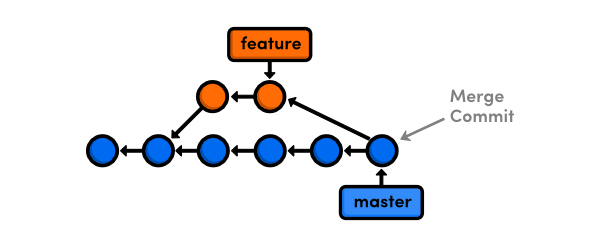
This same benefit can be seen when merging in the other direction. Without a rebase, integrating the finished feature branch into master requires a merge commit. While this is actually a meaningful merge commit (in the sense that it represents a completed feature), the resulting history is full of forks:
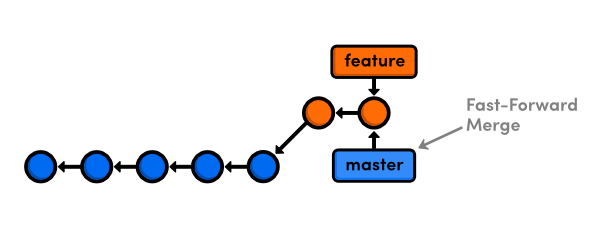
When you rebase before merging, Git is able to fast-forward master to the tip of feature. You'll find a linear story of how your project has progressed in the git log output—the commits in feature are neatly grouped together on top of the commits in master. This is not necessarily the case when branches are tied together with a merge commit.
Resolving Conflicts
When you run git rebase, Git takes each commit in the branch and moves them, one-by-one, onto the new base. If any of these commits alter the same line(s) of code as the upstream commits, it will result in a conflict.
The git merge command lets you resolve all of the branch's conflicts at the end of the merge, which is one of the primary purposes of a merge commit. However, it works a little bit differently when you're rebasing. Conflicts are resolved on a per-commit basis. So, if git rebase finds a conflict, it will stop the rebase procedure and display a warning message:
Auto-merging readme.txt
CONFLICT (content): Merge conflict in readme.txt
Failed to merge in the changes.
....
When you have resolved this problem, run "git rebase --continue".
If you prefer to skip this patch, run "git rebase --skip" instead.
To check out the original branch and stop rebasing, run "git rebase --abort".
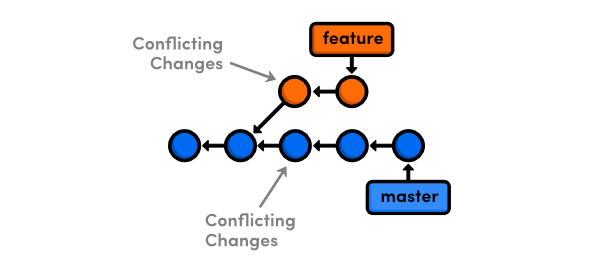
Visually, this is what your project history looks like when git rebase encounters a conflict:
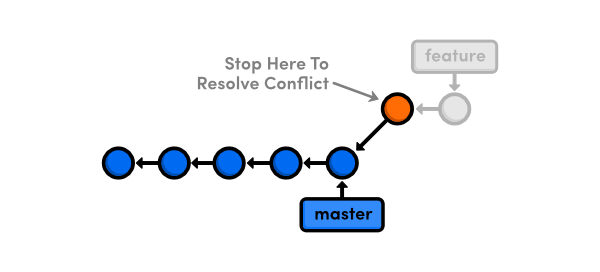
The conflicts can be inspected by running git status. The output looks very similar to a merge conflict:
Unmerged paths:
  (use "git reset HEAD <file>..." to unstage)
  (use "git add <file>..." to mark resolution)

    both modified:   readme.txt

no changes added to commit (use "git add" and/or "git commit -a")
To resolve the conflict, open up the conflicted file (readme.txt in the above example), find the affected lines, and manually edit them to the desired result. Then, tell Git that the conflict is resolved by staging the file:
git add readme.txt
Note that this is the exact same way you mark a git merge conflict as resolved. But remember that you're in the middle of a rebase—you don't want to forget about the rest of the commits that need to be moved. The last step is to tell Git to finish rebasing with the --continue option:
git rebase --continue
This will move the rest of the commits, one-by-one, and if any other conflicts arise, you'll have to repeat this process all over again.
If you don't want to resolve the conflict, you can opt for either the --skip or --abort flags. The latter is particularly useful if you have no idea what's going on and just want to get back to safety.
# Ignore the commit that caused the conflict
git rebase --skip

# Abort the entire rebase and go back to the drawing board
git rebase --abort
2. Rebasing to Clean Up Local Commits
So far, we've only been using git rebase to move branches, but it's much more powerful than that. By passing the -i flag, you can begin an interactive rebasing session. Interactive rebasing lets you define precisely how each commit will be moved to the new base. This gives you the opportunity to clean up a feature's history before sharing it with other developers.
For example, let's say you finished working on your feature branch and you're ready to integrate it into master. To begin an interactive rebasing session, run the following command:
git checkout feature
git rebase -i master
This will open an editor containing all the commits in feature that are about to be moved:
pick 5c43c2b [Description for oldest commit]
pick b8f3240 [Description for 2nd oldest commit]
pick c069f4a [Description for most recent commit]
This listing defines what the feature branch is going to look like after the rebase. Each line represents a commit and the pick command before each commit hash defines what's going to happen to it during the rebase. Note that the commits are listed from oldest to most recent. By altering this listing, you gain complete control over your project history.
If you want to change the order of the commits, simply reorder the lines. If you want to change a commit's message, use the reword command. If you want to combine two commits, change the pick command to squash. This will roll all of the changes in that commit into the one above it. For example, if you squashed the second commit in the above listing, the feature branch would look like the following after saving and closing the editor:
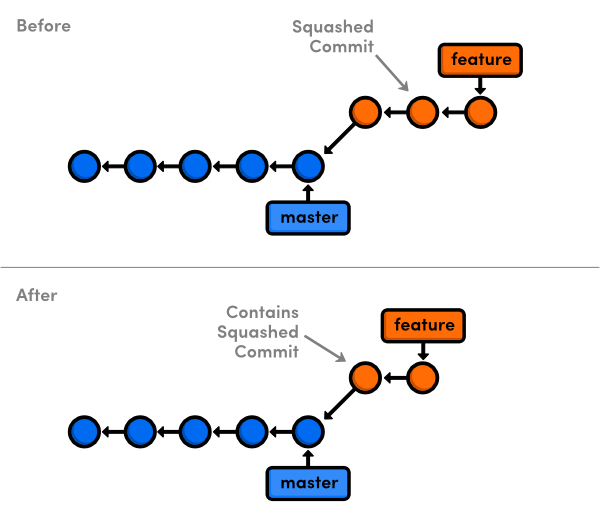
The edit command is particularly powerful. When it reaches the specified commit, Git will pause the rebase procedure, much like when it encounters a conflict. This gives you the opportunity to alter the contents of the commit with git commit --amend or even add more commits with the standard git add/git commit commands. Any new commits you add will be part of the new branch.
Interactive rebasing can have a profound impact on your development workflow. Instead of worrying about breaking up your changes into encapsulated commits, you can focus on writing your code. If you ended up committing what should be a single change into four separate snapshots, then that isn't a problem—rewrite history with git rebase -i and squash them all into one meaningful commit.
3. Dangers of Rebasing
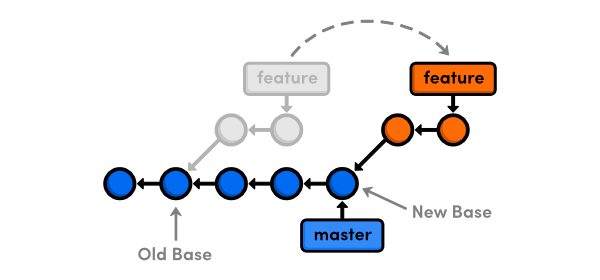
Now that you have an understanding of git rebase, we can talk about when not to use it. Internally, rebasing doesn't actually move commits to a new branch. Instead, it creates brand new commits that contain the desired changes. With this is mind, rebasing is better visualized as the following:
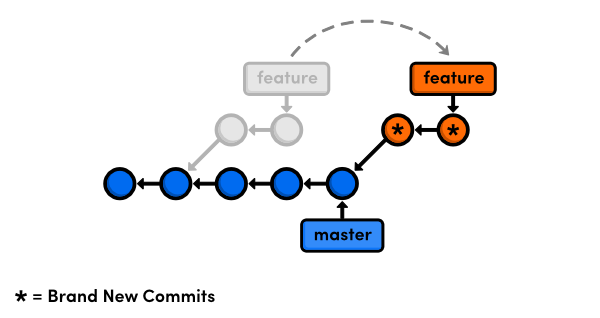
After the rebase, the commits in feature will have different commit hashes. This means that we didn't just reposition a branch—we've literally rewritten our project history. This is a very important side effect of git rebase.
When you're working alone on a project, rewriting history isn't a big deal. However, as soon as you start working in a collaborative environment, it can become very dangerous. If you rewrite commits that other developers are using (e.g., commits on the master branch), it will look as if those commits vanished the next time they try to pull in your work. This results in a confusing scenario that's difficult to recover from.
With this is mind, you should never rebase commits that have been pushed to a public repository unless you're positive that nobody has based their work off of them.
Conclusion
This tutorial introduced the two most common use cases of git rebase. We talked a lot about moving branches around, but keep in mind that rebasing is really about controlling your project history. The power to rewrite commits after the fact frees you to focus on your development tasks instead of breaking down your work into isolated snapshots.
Note that rebasing is an entirely optional addition to your Git toolbox. You can still do everything you need to with plain old git merge commands. Indeed, this is safer as it avoids the possibility of rewriting public history. However, if you understand the risks, git rebase can be a much cleaner way to integrate branches compared to merging commits.

Comments