Rapid development and deployment of applications is quickly becoming a requirement and goal for many projects, old and new. Fortunately, a vast array of options are springing up for developers to take advantage of in terms of deployment resources and tight integration with the programming language of your choice. Cloud deployments, where companies offer a vast amount of hardware which you can scale to your needs, are becoming increasingly popular due to their flexibility and cost effectiveness in following a pay as you use model.
One of the more exciting changes this move to cloud platforms has brought, particularly in the case of smaller projects, is that many clouds provide a free deployment opportunity albeit with minimal hardware usage. This allows for free hosting of prototype applications for example or beta products giving you a live, running application instance which you can make available to anyone you like, quickly. Similarly, it works perfectly for any website receiving a moderate amount of traffic, such as a small local business or even a portfolio website where you can showcase some of your work.
Introduction
This article focuses on my experience in rapidly developing a portfolio website in Python and the popular Django web framework using some bootstrap templates to style the site. With a neat site able to showcase the work, I'll show you how to add it in to a Django generated content management system (CMS), as well as how easily it can be to deploy to Heroku for the hosting of your site and then monitor traffic, errors and response times using Heroku's built in New Relic integration. All for free, within a few hours of work.
Create Your Website
First of all, you need a project that you wish to host on the cloud. As mentioned earlier, my project was to rapidly create a portfolio website from which to showcase my articles and other projects, along with my C.V and contact information. Python and Django offered a perfect match for these requirements and you can quickly begin building a dynamic website with Django and its ORM design, providing easy integration between your web templates and underlying data stored in a database.
Before writing any code, you should create a Python virtual environment for your project, to keep the dependencies for
this project separate from any others. Under the hood, virtualenv effectively copies your global Python installation
to the .virtualenvs folder under a named directory for your virtualenv. It then adds this location to the front of
your path so that your system uses this Python installation for your project. All dependencies are then installed
here instead of globally. You can do this by first installing virtualenv and virtualenvwrapper using Python's
package manager "pip".
    $ pip install virtualenv
    $ pip install virtualenvwrapper
After installing the virtualenv tools you should then add a source line to your .bashrc in your home directory
(Linux/Mac OS X), which enables the virtualenvwrapper scripts on the command line, allowing for easy creation,
activation and deletion of virtual environments. You can create the virtualenv as follows.
$ mkvirtualenv portfolio
With your environment setup you can then install Django which you will be using to define the web application. Django can be installed by executing the following command.
$ pip install django
With the dependencies in place, your first step in creating your Django project is to create a directory to hold your
files following a fairly standard structure as shown below. Fortunately, Django helps to automate this process with
the use of the django-admin.py command line tool. Execute the following to create your project and application
directory.
$ django-admin.py startproject tuts
This will produce the following structure.
    tuts/
        tuts/
            __init__.py
            settings.py
            urls.py
            wsgi.py
You can read more on the setup of Django applications over in the Django official documentation, but a basic summary of those files is as follows:
-
settings.py- configuration for your Django application, such as database connections and apps (see below). -
urls.py- the routes that link to the different parts of your sites. -
wsgi.py- a file to allow the starting of your application by web servers such as Apache.
The project created so far is just the outer container for your actual web application. The meat of the code should live inside an app and you can again make use of Django's helper methods to create the app structure for you.
$ python manage.py startapp portfolio
This will add in the following to our overall directory structure.
    tuts/
        tuts/
            __init__.py
            settings.py
            urls.py
            wsgi.py
        portfolio/
            admin.py
            models.py
            tests.py
            views.py
With your app created, you then need to register it to your Django project. Open up settings.py and add "portfolio" to the INSTALLED_APPS tuple:
    INSTALLED_APPS = (
        'django.contrib.admin',
        'django.contrib.auth',
        'django.contrib.contenttypes',
        'django.contrib.sessions',
        'django.contrib.messages',
        'django.contrib.staticfiles',
        'portfolio'
    )
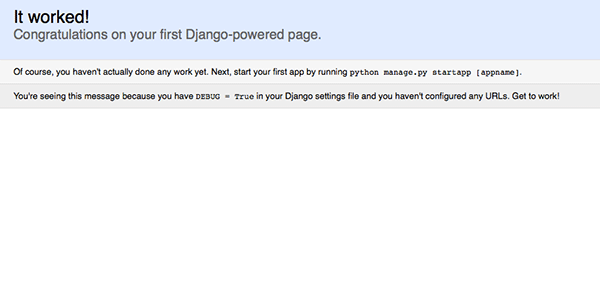
To check everything is working, enter the following command and visit http://localhost:8000 in your browser. You should see a page such as the one shown in the image below.
Defining the Model
Now that your project directory is set up, let's start fleshing out the code. As we know the type of data we want to add to the portfolio site, we can begin to define the model. This describes our data in the database and allows Django to go ahead and create the appropriate fields and tables in the database for us. On our website, we will be putting entries for articles, books and thesis material. Each of these could have its own individual model if you would like to give them unique data fields that do not apply to the other entry types. However for this website, each entry will be given a name, publish date, description and URL. In the models.py file under the portfolio app directory, you can define this entry data as:
    class Item(models.Model):
        publish_date = models.DateField(max_length=200)
        name = models.CharField(max_length=200)
        detail = models.CharField(max_length=1000)
        url = models.URLField()
        thumbnail = models.CharField(max_length=200)
With the model defined, you can then generate this in the database using Django's built in command line tools which are made available to you after installation. If you make use of the manage.py file again, you can also use the syncdb command to handle the database setup for you. If you issue the following command, you will be shown the available options this admin tool provides.
    $ python manage.py syncdb
    Creating tables ...
    Creating table portfolio_item
    Installing custom SQL ...
    Installing indexes ...
    Installed 0 object(s) from 0 fixture(s)
Using the syncdb method allows Django to read the model we have just created and setup the correct structure to store this data in the database. As this is the first time you have executed this command, Django will also prompt you to answer a few questions. These will include items such as creating a superuser for the database (essentially the administrator) allowing you to password protect against making updates and changes to the database. This user will also form the first user able to log in to the CMS which will be generated for the website once we have templates up and running.
With the user setup, the command should return showing that it has executed the SQL against the database. The next step is to now be able to access the data that will be stored to create a dynamic front end which you wish to display to the user. To achieve this, you will need to add code to the views to access the data you will store in the database. With the data available to the views, it can then pass this on to templates which can be interpreted as information to the end user. In this case, this will be in the form of HTML pages for a web browser. However, it is worth noting that this pattern could be used for other types of application such as producing JSON or XML, which again would just use the model to define and move the data, and the views presenting it, in the correct format of JSON/XML as opposed to HTML.
Our Views
In the views, you are going to make use of the data that will be stored in the database for display to the users. To do this, we import the Item class to access that model (with Django handling the access of the database underneath) and provide the data as variables to the "template" which Django will render. The template is mostly static HTML, with the addition of the ability to execute a restricted set of Python code to process your data and display it as required. For example, you may pass the entire list of item objects to the template, but then loop over that list inside the template to get just the name from each item and display it within an H1 tag. Hopefully, this will become clearer with the aid of examples below.
Open up the views.py file that was created for you earlier, and add the following code which will be executed when accessing the home (or index) page of your website.
def index(request):
    items = Item.objects.order_by("-publish_date")
    now = datetime.datetime.now()
    return render(request, 'portfolio/index.html', {"items": items, "year": now.year})
This will collect all items stored in the database, order them by the publish date field, allow you to display the most recent first and then pass these onto the template which you will create shortly. The dictionary passed to the render method is known as context and you will be able to access this context object easily in the template to display the data as required.
Templates
Django makes use of the Jinja2 templating library to handle the processing of its templates and is really nice to use, in that its syntax is straightforward and its abilities are powerful enough to produce what you need. It's worth noting however, a trap most developers fall into when working with Jinja2 is doing too much logic within the template. Whilst Jinja2 provides you with a large amount of standard Python operations, it is intended for simple processing to get the data in the format for display. The logic for retrieving and structuring the data should have all been done in controller and or view. You will know when you have fallen into this trap when you are coding a lot inside the templates and getting frustrated as Jinja2 outputs errors or your displayed data just will not appear as you want. At this point, it is worth revisiting the view to see if you can do more processing up front, before passing it on to the template.
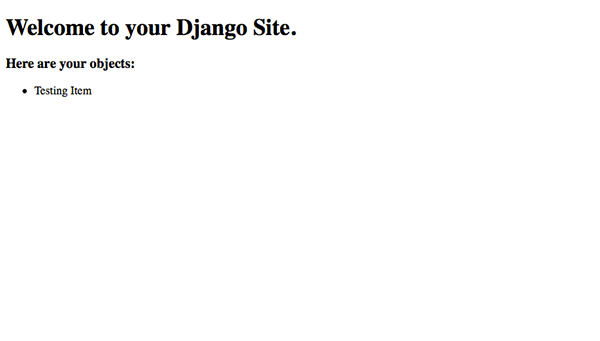
With our index method handling the accessing of data, all that's left is to define the template to display our items. As suggested by the index method, you need to add an index.html file within the portfolio app for it to render. Add that file with the following code.
<!DOCTYPE html>

<html>

<head lang="en">

    <meta charset="UTF-8">

    <title>Tuts+ Django Example</title>

</head>

<body>

<h1>Welcome to your Django Site.</h1>

<h3>Here are your objects:</h3>

<p>

    <ul>

    {% for item in items %}

    <li>

        {{ item.name }}

    </li>

    {% endfor %}

    </ul>

</p>


</body>

</html>
This is a basic HTML page that will loop over and produce a bullet point list of the item names. You can of course style this however you wish and I highly recommend the use of a bootstrap template if you are looking to get something professional up and running quickly. See more on Bootstrap's website.
URLs
The final piece to see if everything is working, is to go ahead and add the root URL to point at this template to be rendered. Under the app directory "tuts" open up urls.py and add the following URL directive to the auto generated examples and admin URL.
    urlpatterns = patterns('',
    # Examples:
    # url(r'^$', 'tuts.views.home', name='home'),
    # url(r'^blog/', include('blog.urls')),

    url(r'^admin/', include(admin.site.urls)),
    url(r'^$', views.index, name='index'),
)
Finally, open up admin.py to expose the Item class to the admin CMS, allowing you to enter the data to be displayed on the homepage.
    from portfolio.models import Item


    admin.site.register(Item)
You should then be able to start up your site (using run server as before) and perform the following tasks.
- Open up the homepage and see that no items are being displayed.
- Open http://localhost:8000/admin and enter the credentials created using
syncdbearlier. - Open items and add a new item filling out the fields.
- Visit the homage and you should see the item name as a bullet point.
Try accessing other aspects of the item data in the template. For example, change the code within the bullet point to add the publish date also. For example:
{{ item.publish_date }} - {{ item.name }}
You now have a working site that simply needs some styling and more content to be able to function as a working portfolio website.
Deploying to Heroku
Heroku is a great cloud platform made available to all developers and companies, as an enterprise class hosting service that is tailored to suit all hosting requirements. From hobby websites, all the way through to high traffic, critical business websites, Heroku can handle it all. Best of all, their pricing structure includes a free tier that is more than capable of running a small website such as the portfolio website we have been building.
Heroku leverages the ever popular Git source code management tool as their mechanism for controlling deployments to the platform. All you need to get started is a project, git installed and a Heroku account which can be obtained by visiting the sign up page.
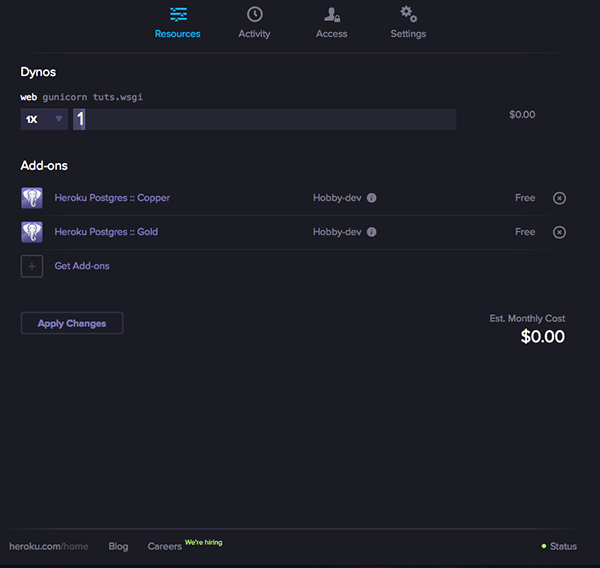
Once you have signed up, go into your Heroku account and create an app with one "web dyno". Heroku provides one dyne for free, which is capable of running a single application instance and moderate traffic to that instance. Give your app a name or let Heroku assign one for you. As we will need to use a database for our application, go into Add-Ons and attach the free PostgreSQL instance to your app.
With your app created, just follow these steps to setup your git repository and push to Heroku.
Install the Django Toolbelt which you can find in the developer section of the Heroku website.
Initialize the Git repo in your project directory by issuing the following commands:
    $ git init .
    $ git add .
    $ git commit -m "Initial project commit."
With the Git repository in place, add the Heroku application remote so that you can push the code to heroku.
$ heroku git:remote -a YOUR_APP_NAME
Heroku needs to know the command for exactly how to start your application. For this, you need to add a "Procfile". Add the file named "Procfile" into the root of your project directory, with the following contents.
web: gunicorn tuts.wsgi
To allow the Heroku app the ability to connect to the database instance attached to your application in the cloud, you need to add the following line to settings.py. This means you do not need to hard-code any config and Heroku will handle the connections for you.
    if not os.environ.get("HOME") == ‘/PATH/TO/YOUR/HOME‘:
        # Parse database configuration from $DATABASE_URL
        import dj_database_url
        DATABASES['default'] = dj_database_url.config()
By wrapping the setting of this database connection in the if statement, it allows the configuration to work as is on your local machine but setup the database correctly when on Heroku.
You also need to add a requirements.txt, which specifies your Python dependencies for the application so that Heroku can install them into the environment created. Add requirements.txt at the same level as the Procfile with the following contents:
    Django==1.6.2
    dj-database-url==0.3.0
    dj-static==0.0.5
    django-toolbelt==0.0.1
    gunicorn==18.0
    newrelic==2.16.0.12
    psycopg2==2.5.2
    wsgiref==0.1.2
With those files created, add them to Git and then push to the Heroku remote, where it will be received and started.
    $ git add .
    $ git commit -m "Added procfile and requirements.txt"
    $ git push heroku master
You should see some output as it is sent to Heroku and will finish with the following message:
"http://APP_NAME.herokuapp.com/ deployed to Heroku"
If you were to hit the URL now, you would see a failure message. If you recall on your local machine, you needed to run syncdb to create the tables in the database for the application to use. You need to reproduce this behavior on our Heroku instance. Fortunately, Heroku provided a simple way to execute these commands against your application instance in the tool belt you installed previously.
$ heroku run python manage.py syncdb
You should then be able to visit your link and see the website running on Heroku, for free. Try adding some items to your database in the same way as you did locally, to ensure that the database is all set up correctly.
Add New Relic
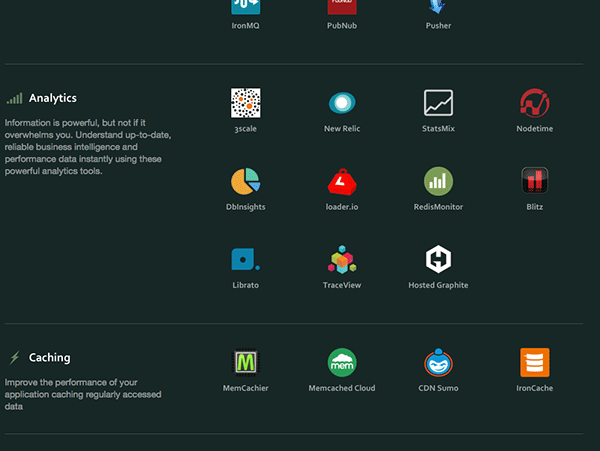
With your application deployed successfully to the Heroku platform, you can now begin to look at the many add-ons that are provided. Heroku provides a great range of add-ons ranging from databases, monitoring tools, advanced log tools, analytics, email providers and many more. The add-ons are one of the great aspects of hosting your application on Heroku as they can quickly and easily be assigned to your application and within minutes, be configured and working. Heroku has streamlined the process for adding in these tools and it takes a lot of the work out of your hands so that you can focus on delivering your product.
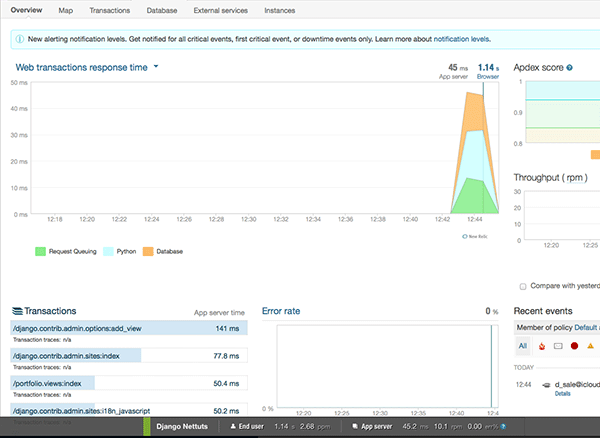
One of the add-ons this article will focus on, is attaching the great monitoring and analytics tool, New Relic. New Relic has many capabilities for digging into your application and providing statistics and data around items such as requests per minute, errors, response times and more. Best of all, Heroku once again provide a free tier for adding to your website to go along with the free hosting we currently have.
Adding New Relic to your Heroku application is simple and requires you to just log in to your Heroku account management page. Once there, click into the application you want to add it to and choose "+ Get Add-Ons". You will then be presented with the wide array of add-ons that Heroku provides. Search through for "New Relic" and click on it. A page showing the description and pricing will be displayed and a breakdown of the features enabled at each price level. For the free tier, you essentially get access to almost every feature but are tied to only the last seven days worth of data. From the New Relic add on page, you can simply copy and paste the code to attach New Relic to your application and run it on the command line.
$ heroku addons:add newrelic:stark
With that added, you can then revisit your app page within your Heroku account and you should now see New Relic listed below your database. Click it to begin the setup within your New Relic account. Here you will need to accept the terms and conditions and then follow the instructions for installing New Relic into your Django application. These are as follows:
- Add "
newrelic" to yourrequirements.txtand then execute:$ pip install -r requirements.txt - Execute this command substituting in the licence key shown to you:
$ newrelic-admin generate-config YOUR_LICENCE_KEY newrelic.ini - Open up the newly generated
newrelic.iniand change the "app_name" to something meaningful to you, e.g "Django Tuts+" or "Django Portfolio" - Edit the
Procfileto include the starting of the New Relic agent with the server:NEW_RELIC_CONFIG_FILE=newrelic.ini newrelic-admin run-program gunicorn tuts.wsgi - Commit and push these changes to Heroku and you should start to see application data reporting to New Relic shortly.
$ git add .$ git commit -m "Added New Relic config."$ git push heroku master - After clicking the "Connect App" button on New Relic and sending some requests to the application, New Relic should display that the application has connected and you can click through to your dashboard to see the data.
Wrap Up
That's all there is to it! Within around 15 minutes, you can have full New Relic application monitoring attached to your application, again for free.
Tuts+ have recently had a few great articles introducing New Relic and showing some more advanced techniques and usages for the monitoring tool. You can find the full range of articles or alternatively, you can go straight ahead to my other article on performance testing using New Relic and JMeter.
Hopefully you have found this tutorial informative and something which you can dive right into and try for yourself in a spare hour or two. With a bit of styling and some content entered through the admin page Django creates, you can rapidly develop a professional site, hosted and monitored for free.
Checkout my website in my author profile that was written in Django, hosted by Heroku and monitored by New Relic , which inspired the writing of this article.

Comments