This tutorial will introduce you to GameSalad, a game creation engine for rapidly prototyping 2D games without the need to open Xcode or Eclipse.
What is GameSalad?
The GameSalad motto is "Game creation for everyone", and that accurately sums up what GameSalad is and why it exists. The concept provokes the question: why should the ability to create a game be limited to those who can code? Sure, many are capable of reading a few tutorials (many found here on Mobiletuts+!) combined with a few books on native game development and eventually get to a point where they can code a game from scratch. At the same time, there are many more very creative people who just want to see their ideas come to life and be somewhat in control of their game without pulling up a code editor. That's where GameSalad comes to the rescue. Even for a coder such as myself, GameSalad gives me the opportunity to not have to think about the code and instead focus on the actual game.
GameSalad uses a drag-and-drop interface allowing you to piece your game together and then assign behaviors to all the elements of your game. You have a good deal of customization that you can apply to your game, with few limitations, and then you will have a working game at a far faster speed than hand coding everything. While you will not have to code anything while using GameSalad, you will have to have a little understanding of how programs work as the concept of looping and conditional execution is essential.
Does that mean that GameSalad is the end of hand coding games? No, not at all. There are limitations to what GameSalad can achieve. One of the most notable is 3D, as GameSalad can only do 2D games currently. Not to worry though, these restrictions only force you to be more creative!
Requirements
Before you get into development with GameSalad, there are some prerequisites that you must obtain. You will need at least the following:
- An Intel based Mac (from '06 onwards)
- Mac OSX 10.6 +
- 1 GB Ram
- An iOS device
The last one is not an absolute necessity, but it's alway good to have an actual mobile device to perform testing with.
As you can see from the above pre-requisites, right now GameSalad is Mac only. However, as of the 17th of May 2012, they announced that the game creator will be coming to Windows soon and you can sign up for the beta here. I haven't yet accessed the beta, so I can't explain if there is a different process for anything. I would suspect that the process will be the same or similar, but you will still need access to a mac (and an apple developer account) in order to publish to iOS app store. Thankfully, GameSalad has said that you will be able to move files between Windows and OS X easily.
Getting Started
So the first thing we need to do is go ahead and head on over to the GameSalad website and click on the creator link in the top navigation. You will then see a purple button in the top right hand side of the main content and you want to click that and download the creator. If you do intend on testing on a device, you can go ahead and download the relevant viewer (iOS or Android).
While you are waiting for your downloads to finish, go ahead and sign up for an account in the top right hand side of the site. When signing up, you will be asked if you wanted to upgrade from the Free account to the Pro account. At the time of writing a Pro account costs $299. The Pro version gives you a lot of extra features that are not in the free account.
With the free account you can create games with the creator, test them on your device with the viewer, publish to the web, Mac App Store, and iOS App Store (assuming that you have the relevant apple certificates), have a custom splash screen, and get basic technical support. The tradeoff is that the free version will display ads.
For the Pro account you get all of the above (minus the ad) and the ability to publish to the Android Market, Twitter integration, Game Center integration, additional monetization options, In-App purchases, external links, iAds, and premium technical support. It's all well-worth the price point, but, for now, a free account will suffice.
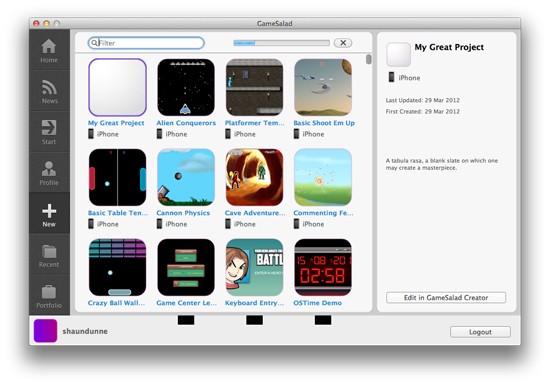
When you first start the creator you will be able to login to your account and look at some of the templates available. These will help you both see what GameSalad is capable of doing and how to do some of the tasks.

You will be on the new tab, which is where you can create a new project (from a template if you need to). The other tabs are:
-
Home: A basic webview for a bunch of GameSalad links.
-
News: Shows you the latest updates from the blog and what's new in the GameSalad community.
-
Start: Tutorials, Wiki, blog and a getting started guide.
-
Profile: Shows your GameSalad profile, notifications, messages, followers, and likes.
-
New: This is the screen you start on.
-
Recent: Shows all of your recently saved projects.
-
Portfolio: This shows all of your published applications.
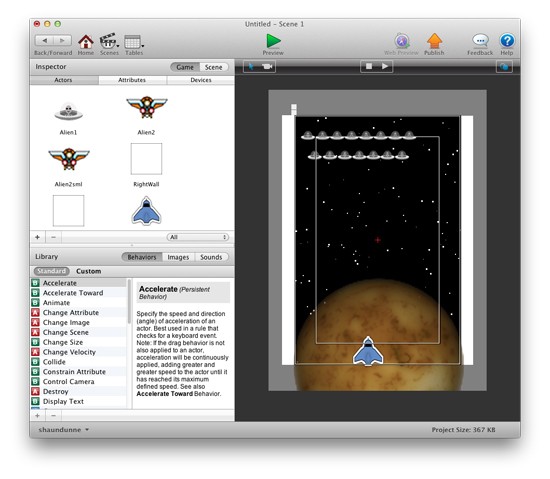
Let's go ahead and open up the Alien Conquest project and take a look at what a finished (or partly finished) game is like. When you double-click on the game icon, the first screen you come to is the overview screen for the project. Some basic info is presented here, all rather self-explanatory. You have a couple of tabs within this overview screen, these take you to overviews of the specific elements that make up your game. The scenes are your levels and the actors are all the other elements that make a level.
Click on the scenes tab and open up scene 1.

On the left-hand side we have all our components and library controls.
The Inspector allows you to dig deep into various attributes on either the scene or the game as a whole. The Library contains all the behaviors that you might want to assign to the scene, game, or actors that make up the game (and in the pro version this is where you control the Game Center integration and iAds). You can also look at all the images and sounds that make up the game (and this is where you also add them).
On the right hand side you have your layout of the scene. Go ahead and click preview in the top center and have a quick play of the basic game. The controls are left, right, and space to shoot.
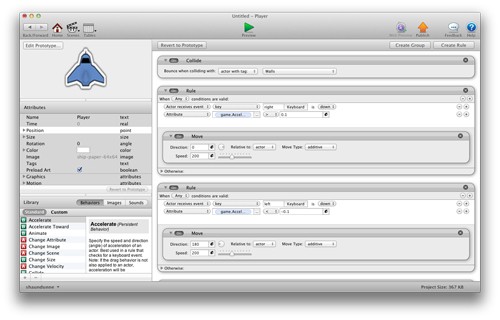
Once you've finished, come back to the scene overview and double-click on the spaceship in the scene. At first you will be presented with a grayed out screen with a padlock on it (we'll get back to that later). For now, go ahead and click to unlock it and you will see something as below:

Here you can see all the attributes that the spaceship actor has assigned to it.
-
It will bounce when it collides with any actor that has a tag of Walls.
-
There's a ruleset that only happens when the right key is down OR the Accelerometer on the X axis is greater than 0.1. This moves the actor relative to its current position.
-
A similar rule for moving left.
-
A rule for when the mouse button is down or the space button is pressed. This fires a bullet (spawns the bullet actor) in a position relative to the actor.
-
A timer rule.
I think that from the above you can tell that while you will not be directly coding the game, you still programatically put all the pieces of the game together.
Let's go ahead and add a couple of attributes to this game.
With the ship player still open, go ahead and click on the 'Create Rule' in the top right corner of the window. The create rule is used to define an action based on something else happening. You can set the rule to react when "All" or "Any" of your defined conditions occur. Setting it to "All" defines that the action can only happen if all the requirements are met. Setting to "Any" will let the action happen if any of the conditions are met. Within GameSalad, English is your programming language. We are going to set a rule that moves our actor forward when the up arrow key is pushed.
Go ahead and create a rule for when the Actor recieves the key event (you'll find it in the dropdown) when the keyboard up key is down. Then drag the move behavior from the library to the grey area under the conditions of the rule and set the direction to 90, relative to the actor and with the move type of additive. Set the speed at about 150. It's a hard process to really write in comprehensible instructions so check out the video below.
Now when you preview the game you can press the up key and move forward. The only problem is that we can't yet go backwards. Let's go back and now create another rule.
Rather than go through the process of clicking around to create another rule then drag-and-drop the move attribute, we can just use a simple keyboard shortcut. Hold down the ALT key then click-and-hold the rule we just created before dragging it down slightly. Release the mouse click and the rule has been duplicated. Now just change the key from up to down and the move direction to 270. Hit preview again and now we can move our ship both backward and forward. But when we complete the level, the new ship does not have these attributes. We could go in and make these rules for the actor too, but there is a quicker way that allows us not to continually repeat work already done, and also helps with reusable rules.
Select both the new rules (hold-shift and click-to-select) and then click on create group. These rules now get grouped together and we can title that group anything we like.
Grouping rules comes in handy when you might have a lot of rules to share or a lot of rules active on one attribute.
Now we can drag-and-drop our group into the library under behaviors -> Custom. If we back out of the actor overview and go back to our game inspector, you can scroll down the actors list until you see the player 2 actor. Click on this actor to enter its attribute overview and then simply drag-and-drop your custom behaviour. Now play the game again and you will have up and down control for both players. Again, another video to visually show the action:
Now let's go back to our actor list and click on player. As you scroll through the attributes, you will notice that the move forward and backward rule is missing. Why? Because when we first added the rule we added it to the instance of that particular player in that particular scene. What we are looking at here is the prototype of that actor. When you drop an actor into the scene it inherits all the attributes that its prototype has, but you can specify more ore fewer rules for any particular instance. Remember the padlock on the opaque screen before when we dove right into the rules? That was reminding us that we were editing the instance of the actor rather than it's prototype. If that actor was destroyed in that scene and we spawned a clone, then it would spawn from the prototype and not the instance, thus it would not have the move forward and backward action.
We can drag out our custom behavior here and drop it into the prototype. Go back and click on the actor in the scene and click 'Revert to Prototype' in the top left hand part of the window. Now the instance is the same as the prototype.
The GameSalad Viewer
Before we start building a game we need to install the GameSalad viewer onto our device. With iOS you get an Xcode project that you have to build onto your iOS device. If you don't know how to do this, you can easily search the GameSalad documentation for the step-by-step procedure for building an Xcode project on a device. The Android viewer is simply an APK you can install right to your device.
Once the viewer is up and running and connected to the same WiFi, the GameSalad creator will recognize it and give you an additional option to preview on the device. The game we have been playing with doesn't work with a device at the moment so let's quickly create something that does.
Start of a New Project
Go ahead and close the game and click on the My Great Project icon to get a new project going. You can fill out the project info at any time, so let's leave it for now and click on scenes -> intial scene.
Click on the + in the inspector to add a new actor and then drag that actor into the scene. Double-click on the actor's prototype and create a rule for when the actor receives an event when the touch is pressed. We will then drag-and-drop the constrain attribute behavior and edit it. Click the ellipses and the attribute browser will pop up. This is where we can access other attributes that we might want to use. We want to contrain the actor to the touch (or mouse), so first we will constrain the actor's X position. Set Actor 1 -> Position -> X To: Device -> Mouse -> Position -> X. Mouse and Touch are treated the same in GameSalad, so this will work fine. Now do the same for the Y-axis and preview either in the creator or on a device. You will now be able to click on the actor and drag it around.
Go back to the initial scene overview and create another actor and click to enter its prototype overview. Make this actor red (You will see the color attribute in the list of actor attribute and use the color picker to choose red). Add that actor to the scene and then click on actor 1 to add a new rule. This rule will be that when the actor recieves event -> overlaps or collides -> with actor of type -> actor 2 then drag and drop the attribute Display Text and change the text to whatever you want. Preview the game and drag actor 1 onto actor 2.
Wrap Up
We've got GameSalad installed, checked out some of the basics, and gotten a project started. Now, you're creativity is the limit. Check out some of the other game templates and see what kind of games you can create.
If you do want to venture further into GameSalad, then you should checkout the GameSalad cookbook and GSHelper which are both filled with tutorials on all the various aspect of creating games with GameSalad. If you'd like to see more tutorials on GameSalad, leave a comment below.
If you want real control over your code, GameSalad is not for you, but if you don't want to have to worry about the code and want to just get creative, GameSalad can be a great solution!


Comments