"How to Utilize Akamai CDN on Your WordPress Site Without Busting Your Bank Account" Sounds impressive? It is! I have found a solution to integrate the Akamai CDN without having me to pay a lot, thus making CDN affordable to a lot more people. It still isn't free and it won't work for every webhost/CDN setup, but it's definitely cheaper than some CDN setups... and it might just work for you!
Introduction
I have been testing numerous CDNs (Content Delivery Networks) for my blog starting from NetDNA, MaxCDN and EdgeCast. Each one of them has their own strength and weaknesses. One network offer an affordable solution but lacking the edge location in certain continent. Some offer extensive content delivery network, but the plans are rigid and is not suitable for certain type of site. Others, well as you have guessed simply unaffordable to the masses.
I recently developed a solution on how to utilize the Akamai's Content Delivery Network without ever spending too much money on it. The reason I'm choosing Akamai is because of its vast CDN facilities throughout the world that even Facebook uses it. So there's no question whether this company is good or not. Then again, this method can be used with other brands of CDN as long as the billing system is based on pay-as-you-use. I think Amazon CloudFront uses the same model... but feel free to add your own knowledge/corrections down below in the comments.
So far, I only found Rackspace Cloud Files that provide this type of service where you only pay for the CDN bandwidth that you use and yes, they provide access to the Akamai CDN network. Sweet!
The registration is a bit of a hassle. I think only Rackspace verifies each registration via phone call. Yes, even if you provide all the credit card details, they will still need to verify you via phone call. They do that most probably to avoid fraud usage of credit card. Your account will be activated instantly after the phone verification, usually within the same hour of your registration.
For the purposes of the tutorial, I'm going to assume you have a setup similar to mine. Naturally, this will work in theory for a lot of different scenarios... but I can't verify it as I haven't used every webhost/CDN/cache system out there:
- You're using Rackspace Cloud Files
- You have access to the Akamai CDN network
- You're using the W3 Total Cache plugin
Step 1 Get your API
Get your API from the account. You will later need to insert the API into your W3 Total Cache plugin. API enables the plugin to access and change your files in your Rackspace account directly via WordPress without ever having to log in after this.
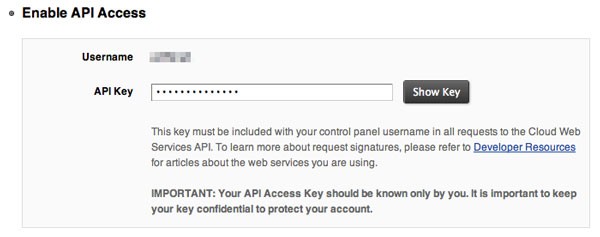
Important!
For safety reasons, don't ever reveal your API details.
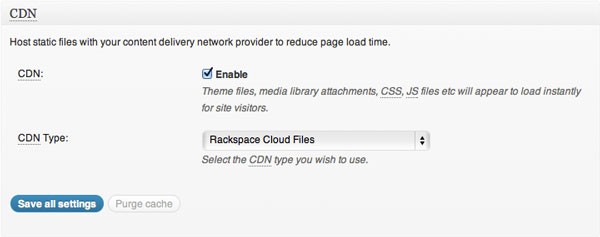
Step 2 Enable CDN in your W3 Total Cache Plugin
Go to the general settings of W3 Total Cache for WordPress and enable CDN for Rackspace Cloud Files. I'm not sure about other plugins though (sorry!) but in my opinion, W3 Total Cache handles this task perfectly.
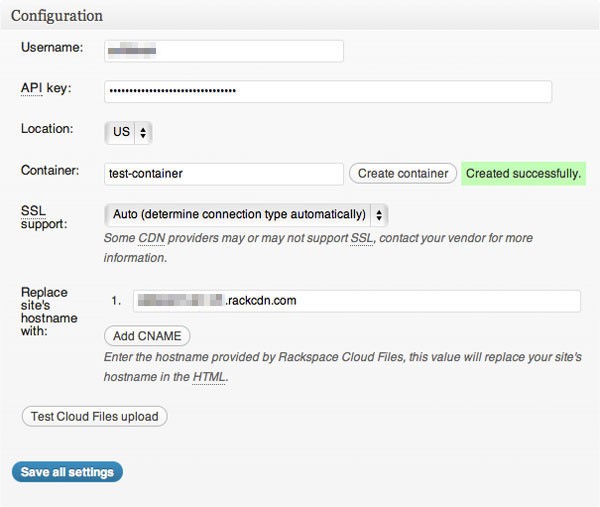
Step 3 CDN Settings
Go to the CDN settings tab. Insert your username and API. Give a suitable name for your container and click Create Container. The container will be created automatically and the designated URL for your container will be also be inserted automatically. For beautification or maybe showing off purposes, you can create subdomain and point it to the URL given by Rackspace using CNAME record in your DNS settings. Something like turbo.yourdomain.com or akamai.yourdomain.com sound good.
If you are unsure about adding the CNAME record part, it is advisable that you contact your domain host support for help. Most probably they already prepared some FAQ documents on how to create CNAME records. Some support team can also be kind enough to do it for you.
You can add up to 10 hostnames here with different CNAME pointing to the same provided URL. No problem. This enables parallel downloading from multiple hostnames instead of one.
Step 4 Upload Your Files
Now here's the good part. In the CDN general settings, uncheck the Host Attachment property. This means, you're not using the CDN to store and load any image or attachment files on your site but instead you're using your own hosting resources. Remember, your hosting bandwidth is cheaper than the CDN bandwidth.
By doing this, your server load is lessen as all the CSS and javascript are now served from Akamai's CDN. With the vast network around the world, those important files to build up your site will always be loaded from the nearest Edge location where your site user is located.
This is important. If you did not follow this and instead using the CDN to serve your attachments, then you're just wasting your time reading this entire article because most of the time, it is the image and attachment files that consume the most bandwidth.
Another good tip is to remove other WordPress themes in your theme directory that you are not using before clicking the Upload Theme Files button. The space you occupy in Rackspace Cloud Files is counted towards your monthly bill, so why waste your money hosting something there that you're not using?

How much money does this really save?
My CDN usage has been around 10-20 GB monthly, but after using this method it has not reached 1 GB of bandwidth used yet (it has been almost two weeks already). With a rate of 15 cents/GB storage monthly and 16 cents/GB of CDN bandwidth, go figure!
If your site has a traffic volume from medium to large and you care a lol about your site loading speed and your are readers all over the world, I believe this is a solution that you should explore yourself. It saves money by not having to buy a CDN package that you don't fully utilize every month and at the same time, works like a charm. I managed to speed up my site loading by at least 30% and majority of my users reported the loading speed has improved tremendously.
If you are planning on using CDN for your WordPress site, try this method first and see if it cuts cost. As for me, it did and I'm not planning to change to other solution anytime soon. So far I believe this is the best and the cheapest solution there is.
As I have mentioned before, this same method can probably be used with Amazon CloudFront as the package is pay per GB of usage but I haven't tried with it yet. Maybe you all can report back here if this same method works with Amazon CloudFront.
Having the redundancy of servers to serve your WordPress site to users around the world is always a good idea. Possibly, you don't even have to upgrade your server resources as the load is distributed evenly throughout the world and your server only manages database stuff and image files, but this is just a theory. I welcome readers' opinion on this.

Comments