As I’m sure you’ve well and truly gathered by this point, what makes PostCSS amazing is its thriving plugin ecosystem. And a huge reason there are so many great plugins, with more coming out all the time, is that PostCSS makes creating your own plugin so accessible for anyone who has some experience with JavaScript.
You don’t need special permission to make a PostCSS plugin; if you want to make one, you just go right ahead and make it. Through this freedom you have the ability to turn your CSS development processes into anything you want them to be, not to mention the opportunity to share your work with other members of the rapidly growing PostCSS community.
In this tutorial you’ll learn how to create a basic plugin of your own for PostCSS. We won’t be going too heavily into the plugin API, and we won’t use any super hardcore coding. I myself am a front-end developer, and my JavaScript skills are at the level you would expect them to be for a front-end person, yet that didn’t stop me making my first PostCSS plugin in just a few hours.
Follow along and see for yourself just how approachable PostCSS plugin development can be!
What We’re Going to Build
We’ll be creating a plugin that allows for easy insertion of font stacks into font-family declarations via the following syntax:
h1 {
    font-family: "Open Sans", fontstack("Arial");
}
After compilation, the above code will turn into:
h1 {
    font-family: "Open Sans", Arial, "Helvetica Neue", Helvetica, sans-serif;
}
Set Up a Project to Work Inside
Even though you’re creating your own plugin, you’ll still need to start by creating an empty Gulp or Grunt project. You’ll be loading your plugin into this project in the same way you’ve been using other people’s plugins throughout this series.
You can read about how to set up Gulp or Grunt projects for PostCSS in the previous tutorials:
If you don’t want to manually set up your project from scratch, though, you can download the source files attached to this tutorial, and extract either the provided Gulp or Grunt starter project into an empty project folder. Then, with a terminal or command prompt pointed at the folder, run the command npm install.
Create a Basic Plugin Shell
Create a folder in “node_modules” named “postcss-myplugin”. It’s common to use the prefix postcss- to make it clear your plugin is for PostCSS.
All PostCSS plugins are node modules, so we’ll need to turn your new folder into one. Open up a terminal/command prompt, pointed at the newly created folder, and run npm init. This will perform the basic setup of a node module, so just follow the prompts that come up in your terminal, leaving the “entry point” field as the default “index.js”.
When this is done, with your terminal still pointed at the folder, run the command npm install postcss --save. This will install PostCSS as a dependency for this module, something all PostCSS plugins need to do.
Create a file named “index.js” in the “postcss-myplugin” folder. Add this code to load in the main postcss module:
var postcss = require('postcss');
Then below it add this basic wrapper that will surround our plugin’s processing code:
var postcss = require('postcss');

module.exports = postcss.plugin('myplugin', function myplugin(options) {

    return function (css) {

		options = options || {};

        // Processing code will be added here

	}

});
Load Your New Plugin
Now we’re ready to load your newly created plugin into your project. It won’t do anything yet, but we just want to get the essential setup in place.
Load the Plugin via Gulp
If you're using Gulp, add this variable under the one already in the file:
var myplugin = require('postcss-myplugin');
Now add the new variable name into your processors array:
  var processors = [
      myplugin
  ];
Do a quick test that everything is working by running the command gulp css and checking that a new “style.css” file has appeared in your project’s “dest” folder.
Load the Plugin via Grunt
If you're using Grunt, update the processors object, which is nested under the options object, to the following:
        processors: [
          require('postcss-myplugin')()
        ]
Do a quick test that everything is working by running the command grunt postcss and checking that a new “style.css” file has appeared in your project’s “dest” folder.
Add the Plugin Functionality
Add Test CSS
Before we start adding processing code to our plugin, we’re going to add some test code to our stylesheet that the plugin can work on.
To your “src/style.css” file add this CSS:
h1 {
    font-family: "Open Sans", fontstack("Arial");
}
Right now, because our plugin isn’t doing anything yet, if you compile your CSS you’ll just see exactly the same code copied straight into your “dest” folder's “style.css” file.
Loop Through the Rules and Declarations
Now we want to start scanning the CSS of our file so we can find any instances of fontstack() and process them. To get started on this, add the following code after the options = options || {}; line:
    	css.walkRules(function (rule) {

			rule.walkDecls(function (decl, i) {


			});

		});
Using walkRules() in the first line iterates through every rule in your CSS; a rule is basically your selector and the styles you’ve set between its curly braces. In our test CSS a rule would be:
h1 {
    font-family: "Open Sans", fontstack("Arial");
}
Then, inside each rule, walkDecls() iterates through every declaration; a declaration is essentially each line in the style. In the above CSS, a declaration would be:
font-family: "Open Sans", fontstack("Arial");
Check if fontstack() Syntax Is Used
As we iterate through each declaration using the code we just added, the current declaration is represented by decl, which gives us access to both the declaration’s property and its value via decl.prop and decl.value respectively.
With our example CSS, decl.prop would give us font-family and decl.value would give us "Open Sans", fontstack("Arial").
We want to check every decl.value in our stylesheet to see if it contains the string fontstack(. If it does, we know someone is trying to use our plugin to add a font stack to their CSS.
Inside the walkDecl() loop, add:
    			var value = decl.value;

				if (value.indexOf( 'fontstack(' ) !== -1) {

					console.log("found fontstack");

				}
First we’re taking decl.value and storing it in the variable value. Any changes to decl.value will be sent into the compiled stylesheet; we’re storing its contents in the variable value so we can mess around with it.
Then we’re using the indexOf() method to search our new value variable for the string fontstack(. If it’s found, we’re logging “found fontstack” to the console so we can check if everything is working thus far.
Run gulp css or grunt postcss and you should see “found fontstack” output once in your terminal/command prompt.
Define Some Fontstacks
Now that our plugin is able to locate instances of fontstack() in our stylesheet, we can get ready to convert that instance into a font stack, i.e. a list of font names. But before we can do that, we need to first define these font stacks.
At the top of your file, under the existing postcss variable, create a variable named fontstacks_config. We’re going to turn this variable into an object containing key-value pairs.
For each entry in the object, the key should be the first font in the font stack, e.g. 'Arial'. It will be the string a user passes to specify the font stack they want to use, e.g. fontstack("Arial") or fontstack("Times New Roman").
The value in each pair should be a string of the full list of fonts contained in the font stack, e.g. 'Arial, "Helvetica Neue", Helvetica, sans-serif'.
Add two entries to your fontstacks_config object, one for 'Arial' and one for 'Times New Roman', using the font stacks provided by CSS Font Stack.
Your fontstacks_config variable should look like this:
// Font stacks from http://www.cssfontstack.com/
var fontstacks_config = {
    'Arial': 'Arial, "Helvetica Neue", Helvetica, sans-serif',
	'Times New Roman': 'TimesNewRoman, "Times New Roman", Times, Baskerville, Georgia, serif'
}
Check Which Fontstack Is Requested
The first thing we need to do when we find an instance of fontstack() being used is to figure out which font stack the user has requested, i.e. what string they have set between the brackets.
For example, if a user entered fontstack("Arial") we would want to extract the string Arial. The reason we want this string is it will give us a key we can use to look up the corresponding font stack from our fontstacks_config object.
Add this code immediately inside the if statement we added earlier, replacing the console.log("found fontstack"); line:
// Get the name of the fontstack requested by matching the string inside the brackets of fontstack().
// Then replace any double or single quotes therein.
var fontstack_requested = value.match(/\(([^)]+)\)/)[1].replace(/["']/g, "");
We are performing two steps here to extract the name of the fontstack as a string.
First we use the match() method to find whatever string is between the brackets in our value. This would give us a string like "Arial" or 'Arial'.
We only want the font name, without any double or single quotes, so we then use the replace() method to strip them from the string, leaving us with an unquoted string such as Arial.
This string is stored in the fontstack_requested variable.
Title Case the Requested Fontstack
We’re going to use our newly created fontstack_requested variable to look up a font stack from our fontstack_config option. The tricky part is the keys in this object are case sensitive, so if we try to look up the Arial entry with the key arial it will fail.
To solve this, we’re going to “Title Case” the string, so for example times new roman would be converted to Times New Roman. We’ll be doing this via a short custom function.
Under your fontstacks_config variable add this toTitleCase() function:
// Credit for this function to http://stackoverflow.com/questions/196972/convert-string-to-title-case-with-javascript/196991#196991
function toTitleCase(str) {
  return str.replace(/\w\S*/g, function(txt){return txt.charAt(0).toUpperCase() + txt.substr(1).toLowerCase();});
}
Now we’ll apply this function to our fontstack_requested variable. Under the line where you created the fontstack_requested variable, add this code:
// Title case the words in the font name, just in case the user didn't do it themselves
fontstack_requested = toTitleCase(fontstack_requested);
This passes the fontstack_requested variable through our toTitleCase() function, updating its value.
Lookup Fontstack From Config
Now we have our fonstack_requested variable set correctly, we can use it to look up the corresponding font stack. After the line you just added, insert this code:
// Lookup the requested fontstack in the fontstack_config object
var fontstack = fontstacks_config[fontstack_requested];
This finds the value in the fontstacks_config object that has a key matching the string contained in our fontstack_requested variable.
For example, if fontstack_requested contains the string Arial, the entry in fontstacks_config with the key Arial will be found and the value 'Arial, "Helvetica Neue", Helvetica, sans-serif' will be returned.
This returned value is then stored in the variable fontstack.
Check for Fonts Set Before fontstack()
Now we have our font stack string retrieved and ready to be inserted into the CSS, but there’s still one more thing we need to do. You’ll recall in our test code we included the font "Open Sans" as the preferred font, with the font stack acting as a fallback. We also need to retrieve this font name from the value so it can be added to the CSS we insert into the processed stylesheet.
Below the fontstack variable line, add this code:
// Find and store any font names that might be already be in the value, before the fontstack() call
var first_font = value.substr(0, value.indexOf('fontstack('));
This code uses the substr() method to find any content between the beginning of our value, (represented by 0), and our fontstack() instance (located by using the indexOf() method). Whatever content is found is stored in the variable first_font.
For example, in our test code value is equal to "Open Sans", fontstack("Arial"), so the first_font variable will be set as "Open Sans", .
Create a New Value
We now have all the pieces we need to create a new value with which to replace our test code’s original value of "Open Sans", fontstack("Arial").
After the last code you added, insert this code:
// Create the new value for this rule by combining the first_font and fontstack variables
var new_value = first_font + fontstack;
Here we’re combining our first_font and fontstack variables into a single string and storing it in the variable new_value.
In our test code, this would mean combining "Open Sans", and Arial, "Helvetica Neue", Helvetica, sans-serif.
Our new_value variable would then hold the string "Open Sans", 'Arial, "Helvetica Neue", Helvetica, sans-serif'.
This now gives us the complete value that we want to add into the processed stylesheet so that:
font-family: "Open Sans", fontstack("Arial");
... is transformed into:
font-family: "Open Sans", 'Arial, "Helvetica Neue", Helvetica, sans-serif';
Send the New Value Back to the Stylesheet
Now that we have our new value ready to be inserted into the processed stylesheet, all we have to do is update decl.value. PostCSS will take care of the rest, adding the new value into the processed CSS for us.
Add this code after the last line you added:
// Send the new value back into the stylesheet
decl.value = new_value;
This sets decl.value to equal the content of our new_value variable.
Test Your Plugin
Your plugin is now good to go. Give it a whirl by compiling your stylesheet with gulp css or grunt postcss (with your terminal pointed at your project folder, not your plugin folder).
Your “dest/style.css” file should now show a complete font stack:
h1 {
    font-family: "Open Sans", Arial, "Helvetica Neue", Helvetica, sans-serif;
}
(Optional) Add User-Configurable Fontstacks Options
You may wish to allow users of your plugin to set their own options, in the same way you have been setting options as you’ve used PostCSS plugins throughout this series.
We want users to be able to set a fontstacks option, either adding extra font stacks or redefining existing font stacks, for example:
fontstacks: {
	'Extra Stack': '"Extra Stack", "Moar Fonts", Extra, serif',
	'Arial': 'Arial, "Comic Sans"'
}
Note: this step is optional. If you wish you can skip it and your plugin will work perfectly fine, just without any user set configuration.
We already have the most essential part of enabling user set options in place in our plugin. In our module.exports line you’ll notice an options argument is being passed.
module.exports = postcss.plugin('myplugin', function (options) {
We’ll receive any user options a user sets through this.
You’ll also see we have the line:
options = options || {};
This checks to see if options has any value, and if it doesn’t, sets it to an empty object. This makes sure we don’t get any errors when we start working with options that might come from it being undefined.
To get started, we’re going to install Underscore.js into our project, as we’ll be using its handy extend() method. Run this command to install it into the plugin you’re building:
npm install underscore --save
Now load Underscore into your plugin by adding an _ variable to require it, under your existing postcss variable:
var postcss = require('postcss');
var _ = require('underscore');
Next what we’re going to do is take the fontstacks_config object we already created inside the plugin, and “extend” it with any font stacks the user has set through their options configuration.
Add this code directly under the options = options || {}; line:
    	// Extend the default fontstacks_config option with any custom fontstacks set in the plugin's options
		fontstacks_config = _.extend(fontstacks_config, options.fontstacks);
The fontstacks option that has been set by the user is represented by options.fontstacks.
By using Underscore’s extend() method, all the font stacks in options.fontstacks are added to those already in fontstacks_config. Wherever there is a matching key, the value from options.fontstacks will overwrite the one in fontstacks_config. This allows users to redefine any existing font stacks.
In your Gulpfile or Gruntfile, set a fontstacks option and pass a new font stack as well as redefining an existing one:
/* Gulpfile */
var processors = [
    myplugin({
        fontstacks: {
			'Extra Stack': '"Extra Stack", "Moar Fonts", Extra, serif',
			'Arial': 'Arial, "Comic Sans"'
		}
  	})
];

/* Gruntfile */
 processors: [
    require('postcss-myplugin')({
        fontstacks: {
            'Extra Stack': '"Extra Stack", "Moar Fonts", Extra, serif',
			'Arial': 'Arial, "Comic Sans"'
		}
  	})
]
Now add some extra CSS to your “src/style.css” file so we can test the new font stack we just added via our options:
h2 {
    font-family: "Droid Sans", fontstack("Extra Stack");
}
Recompile your CSS and you should see that your 'Arial' font stack now has different output, and that your 'Extra Stack' font stack has output correctly:
h1 {
    font-family: "Open Sans", Arial, "Comic Sans";
}

h2 {
	font-family: "Droid Sans", "Extra Stack", "Moar Fonts", Extra, serif;
}
Your Completed Plugin
That’s it! You’re all done. You’ve completed your first PostCSS plugin.
Here’s the entire thing on GitHub should you need to compare your code to it for reference.
Let’s Recap
You’ve just created an entire PostCSS plugin, and I hope some ideas are springing into your mind about other plugins you’d love to make. Maybe there’s that one little thing that’s always bugged you when writing CSS, and perhaps now you can come up with your own solution to get rid of it for good. Or maybe there’s something extra you really think CSS ought to have out of the box—well, now you can add it in for yourself!
To sum up what we’ve covered:
- Start developing a new plugin by setting up a Gulp or Grunt project to work in.
- Create a new node module inside your project, which will become your plugin.
- Load your new plugin into your project.
- Add some test CSS in the syntax you want your plugin to use.
- Use methods from the PostCSS API to scan through a stylesheet.
- Locate instances of your plugin's syntax being used.
- Write JavaScript and use the PostCSS API to make the appropriate transformations (and/or additions) to the original code and send it into the processed CSS.
For TypeScript Users
As part of the 5.0 release of PostCSS, Jed Mao has contributed a great set of TypeScript definitions that can help a great deal with plugin development through providing autocompletion and inline documentation as you type.
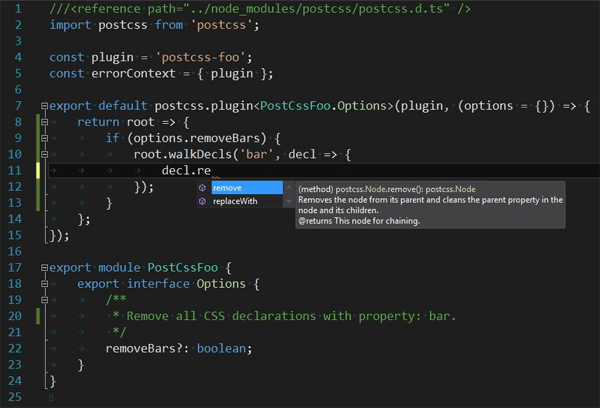
If you find yourself getting into PostCSS plugin development, this is really something worth looking at incorporating into your workflow. I myself am not a dab TypeScript hand, but am going to jump into coding with it anyway, almost purely so I can leverage this functionality.
If you’d like to try this out you don’t need to be on Windows or using Visual Studio, as you can use the free, open-source Visual Studio Code, which runs on Windows, Mac and Linux and is built on Electron, the same shell that powers Atom Editor.
For an example of how to incorporate these TypeScript definitions into your project, check out the postcss-font-pack plugin. Fork it and have a play in Visual Studio Code to see how the autocompletion and inline documentation works.
PostCSS Deep Dive: Wrapping Up
Thanks very much for following along with this PostCSS Deep Dive series. I hope you enjoyed reading it as much as I enjoyed creating it! More importantly, I hope you have a head full of ideas on how you can put PostCSS to work in your daily web development life.
PostCSS really is an incredible new addition to the front-end world, as the way it facilitates plugins opens up doors to possibilities we have never had before in CSS development. The range of plugins that are available right now is already enough to completely reshape a person’s daily workflows, and that’s just with what has been created in the space of a couple of years.
I would suggest that PostCSS has yet to peak, and that as it begins to be something the majority of CSS developers at least know about, if not swear by, we’ll see it really come into its stride. And with more front-end developers coming on board, we’ll see more contributions to the plugin ecosystem, adding new plugins and helping to build up existing ones.
With those plugins being free to cater to any type of CSS transformation a developer can dream up, the future of PostCSS is very intriguing indeed. I look forward to being a part of it, and hope you will come along for the ride too!

Comments