This tutorial is a step-by-step overview of how to integrate the MediaPlayer framework and work with the MPMoviePlayerController class in iOS4. With this knowledge, you will be able to playback fullscreen media in your own applications or display videos as a custom sized subview in your own view controllers. Read on for more!
Project Setup & Overview
This tutorial will use a simple application called "BigBuckBunny" to demonstrate using the MediaPlayer framework and the MPMoviePlayerController class for the iOS 4 SDK. This app will play a sample clip from the 2008, creative-commons animated short film Big Buck Bunny. By downloading the demo project attached to this post, you will be able to precisely follow all steps in this tutorial. However, if you already have an iPhone project that you would like to play your own movies within, you should still be able to follow along in your own code with only slight modifications to these steps. The download attached to this post contains two versions of the project: BigBuckBunny-Start should be used if you would like to integrate all the steps as you go along, and BigBuckBunny-Completed is the end result of this tutorial.
Step 1: Import the MediaPlayer Framework
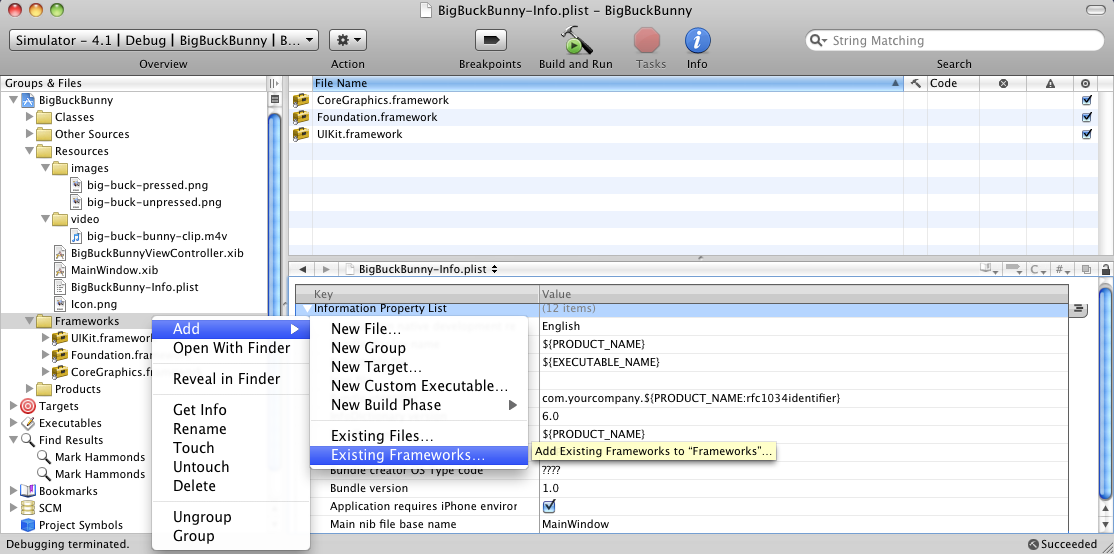
CTRL + Click (or right click) on the "Frameworks" folder in the "Groups & Files" pane in Xcode. Select Add > Existing Frameworks from the drop-down menu.
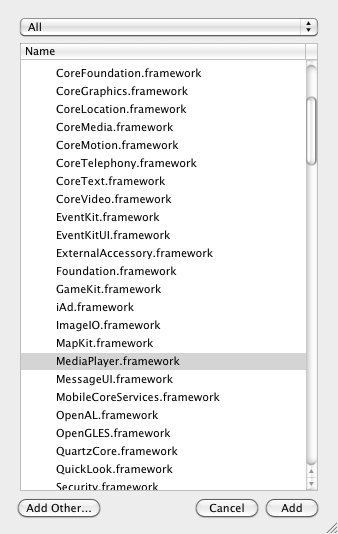
Select "MediaPlayer.framework" from the list of options presented, and click "Add."
Step 2: Import the MediaPlayer Framework and Declare the playMovie Method
Now that you have added the media player framework into your project, you need to actually import the code in that framework into the view controller that will be responsible for playing the movie. Go to the BigBuckBunnyViewController.h file, and insert the following line of code below the UIKit #import line:
#import <UIKit/UIKit.h>
#import <MediaPlayer/MediaPlayer.h>
This line of code will make the view controller aware of all that the MediaPlayer.framework has to offer.
Next, we need to declare an instance method of our view controller that will trigger movie playback. Just above the @end statement in the header file, add this line:
-(IBAction)playMovie:(id)sender;
With our playMovie method declared, we are ready to begin writing our view controller implementation code.
Step 3: Implement the playMovie Method
Open the BigBuckBunnyViewController.m file. Implement the playMovie method with the following lines of code:
-(IBAction)playMovie:(id)sender
{
    NSString *filepath   =   [[NSBundle mainBundle] pathForResource:@"big-buck-bunny-clip" ofType:@"m4v"];
    NSURL    *fileURL    =   [NSURL fileURLWithPath:filepath];
    MPMoviePlayerController *moviePlayerController = [[MPMoviePlayerController alloc] initWithContentURL:fileURL];
    [self.view addSubview:moviePlayerController.view];
    moviePlayerController.fullscreen = YES;
    [moviePlayerController play];
}
On line 3, we create an NSString containing the file path to our movie file. On line 4, we use that file path to create an NSURL to our local movie. On line 5 we implement this by passing the NSURL into the initWithContentURL: method of the MPMoviePlayerController object. Notice how we allocated memory for the movie player on this line; we will need to release that later! On line 6, we add the MPMoviePlayerController view to our custom view controller subview so it will appear on screen, on line 7 we specify that we want the video to play in fullscreen mode, and on line 8 we begin playback of the movie.
Before we can test our code, we need to link our button's "Touch Up Inside" action with the playMovie method. To do this, open BigBuckBunnyViewController.xib in Interface Builder. CTRL + Click (or right click) on the custom UIButton in the center of the screen to display the actions for this element. Drag from the circle next to "Touch Up Inside" to the "File's Owner" object, and then select the "playMovie:" text that appears. Save your progress in Interface Builder before switching back to Xcode.
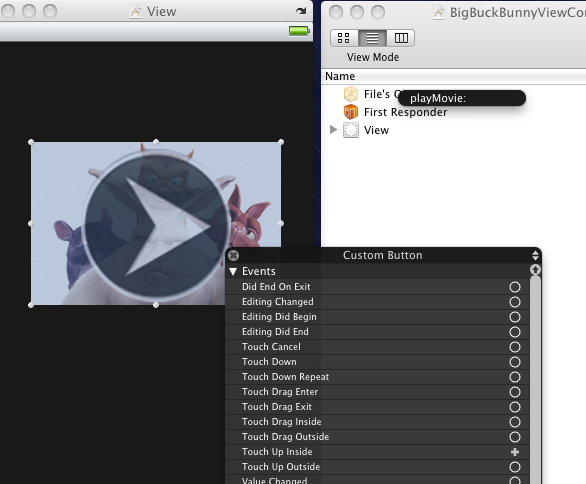
NOTE: You must actually select playMovie when it appears to complete this step. Be sure to save your changes!
If you build and debug the project at this point, you'll see that movie playback is working as expected when you tap the custom UIButton. However, don't celebrate just yet, because we aren't quite done.
As mentioned previously, we explicitly allocate memory for the moviePlayerController object, but we haven't yet released that memory. This is an interesting scenario. We can't explicitly release the object in the method we allocated it in because our movie will still be playing at the time this method completes execution. It also isn't safe to autorelease the object because we don't know if our movie will still be playing the next time the autorelease pool is drained. Fortunately, the MPMoviePlayerController object is prebuilt to handle this scenario, and will dispatch a notification called MPMoviePlayerPlaybackDidFinishNotification to the NSNotificationCenter when playback completes. In order to receive this notification, we must register an "observer" to respond to that specific notification. To do so, modify our playMovie method as follows:
    NSString *filepath   =   [[NSBundle mainBundle] pathForResource:@"big-buck-bunny-clip" ofType:@"m4v"];
    NSURL    *fileURL    =   [NSURL fileURLWithPath:filepath];
    MPMoviePlayerController *moviePlayerController = [[MPMoviePlayerController alloc] initWithContentURL:fileURL];

    [[NSNotificationCenter defaultCenter] addObserver:self
                                                                        selector:@selector(moviePlaybackComplete:)
                                                                            name:MPMoviePlayerPlaybackDidFinishNotification
                                                                           object:moviePlayerController];

    [self.view addSubview:moviePlayerController.view];
    moviePlayerController.fullscreen = YES;
    [moviePlayerController play];
We now need to create moviePlaybackComplete:, the selector we just registered. Add the following underneath the playMovie method:
- (void)moviePlaybackComplete:(NSNotification *)notification
{
    MPMoviePlayerController *moviePlayerController = [notification object];
    [[NSNotificationCenter defaultCenter] removeObserver:self
                                                                                 name:MPMoviePlayerPlaybackDidFinishNotification
                                                                                object:moviePlayerController];

    [moviePlayerController.view removeFromSuperview];
    [moviePlayerController release];
}
Remember the "object" parameter that we set to moviePlayerController in the playMovie method above? Whatever object you set for that value is sent along with the notification later. On line 3, we are retrieving that object with the [notification object] statement and referencing it with a new MPMoviePlayerController pointer. Next, on line 4, we again send a message to the NSNotificationCenter, this time removing the observer we registered in playMovie. On line 8 we cleanup our custom view controller by removing the moviePlayerController view from our display, and on line 9 we finish out by releasing the memory we originally allocated in the playMovie method.
At this point, our implementation file should look like this:
#import "BigBuckBunnyViewController.h"

@implementation BigBuckBunnyViewController

-(IBAction)playMovie:(id)sender
{
    NSString *filepath   =   [[NSBundle mainBundle] pathForResource:@"big-buck-bunny-clip" ofType:@"m4v"];
    NSURL    *fileURL    =   [NSURL fileURLWithPath:filepath];
    MPMoviePlayerController *moviePlayerController = [[MPMoviePlayerController alloc] initWithContentURL:fileURL];

    [[NSNotificationCenter defaultCenter] addObserver:self
                                                                       selector:@selector(moviePlaybackComplete:)
                                                                           name:MPMoviePlayerPlaybackDidFinishNotification
                                                                          object:moviePlayerController];

    [self.view addSubview:moviePlayerController.view];
    moviePlayerController.fullscreen = YES;
    [moviePlayerController play];
}

- (void)moviePlaybackComplete:(NSNotification *)notification
{
    MPMoviePlayerController *moviePlayerController = [notification object];
    [[NSNotificationCenter defaultCenter] removeObserver:self
										 name:MPMoviePlayerPlaybackDidFinishNotification
                                                                                object:moviePlayerController];

    [moviePlayerController.view removeFromSuperview];
    [moviePlayerController release];
}


- (void)dealloc {
    [super dealloc];
}

@end
Congratulations! You should now have a working movie player in your application. The rest of this tutorial is dedicated to customization of the player.
Step 4: Customize the Movie Display Size
Your work in the previous step enabled you to play movies in fullscreen mode. However, the great part about the MPMoviePlayerController enhancements in iOS 4 is that you can now specify a custom display size for playback within your own view controllers. To take advantage of this, modify the playMovie method as follows:
    [moviePlayerController.view setFrame:CGRectMake(38, 100, 250, 163)];

    [self.view addSubview:moviePlayerController.view];
    //moviePlayerController.fullscreen = YES;

    [moviePlayerController play];
On line 1 we create a custom frame size for the movie playback with the CGRectMake function. The values I have entered were taken from Interface Builder and match the origin, height, and width of the custom UIButton we use to play the movie. Note that I also commented out the fullscreen command on line 4.
If you build and go with your project code now, you should see that clicking the button will now play the video within our custom view controller, right on top of the UIButton. This works well enough, but what if you want to move the button around a bit to find the right look? It's a bit cumbersome to constantly copy the literal CGRect values all the time. Update the playMovie method to do this dynamically:
-(IBAction)playMovie:(id)sender
{
    UIButton *playButton = (UIButton *) sender;

    NSString *filepath   =   [[NSBundle mainBundle] pathForResource:@"big-buck-bunny-clip" ofType:@"m4v"];
    NSURL    *fileURL    =   [NSURL fileURLWithPath:filepath];
    MPMoviePlayerController *moviePlayerController = [[MPMoviePlayerController alloc] initWithContentURL:fileURL];

    [[NSNotificationCenter defaultCenter] addObserver:self
                                                                       selector:@selector(moviePlaybackComplete:)
                                                                           name:MPMoviePlayerPlaybackDidFinishNotification
                                                                          object:moviePlayerController];

    [moviePlayerController.view setFrame:CGRectMake(playButton.frame.origin.x,
                                                                                     playButton.frame.origin.y,
                                                                                 playButton.frame.size.width,
                                                                              playButton.frame.size.height)];

    [self.view addSubview:moviePlayerController.view];
    //moviePlayerController.fullscreen = YES;

    [moviePlayerController play];
}
On line 3 above, we typecast the "sender" parameter to a UIButton object as we know that is the kind of object that will be sending this message to our view controller. We then access this object directly to get the X and Y origin of the button as well as the button width and height. With the code above implemented, we are free to move the UIButton anywhere on the canvas and not have to worry about constantly updating our CGRectMake function call.
A Word on Scaling Mode
When displaying video in a custom rectangle, you will sometimes need to modify the scalingMode property of the MPMoviePlayerController object. Setting this property will determine how the movie image adapts to fill the playback size you have defined. The available scaling mode settings are as follows:
- MPMovieScalingModeNone
- MPMovieScalingModeAspectFit
- MPMovieScalingModeAspectFill
- MPMovieScalingModeFill
Each of the above options functions as you might expect, with MPMovieScalingModeAspectFill and MPMovieScalingModeFill likely being the two most commonly used modifications. The default scaling mode is MPMovieScalingModeAspectFit.
To experiment with this property in our code, insert the following line just before the [moviePlayerController play] statement:
moviePlayerController.scalingMode = MPMovieScalingModeFill;
You will see that our video now fills all available space in the playback rectangle.
Conclusion
This tutorial has presented a fundamental introduction to using the MPMoviePlayerController class with the MediaPlayer framework. The MPMoviePlayerController class has additional options that we haven't covered here, but I'll leave the exploration of those as an exercise for the reader. With the foundation from this tutorial in place, you should be able to begin experimenting on your own! Please leave any feedback or questions you may have in the comments section below. Also feel free to send in questions or comments via either my personal twitter @markhammonds or the official Mobiletuts+ twitter account @mobtuts. Thanks for reading, and best of luck on your own projects!

Comments