In this tutorial I am going to show you how you can take payments using the PayPal REST API and C#. All the libraries that they have for different languages such as Ruby, Node.js, Python, PHP are very similar, so all the concepts here apply to all the libraries.
Project Setup
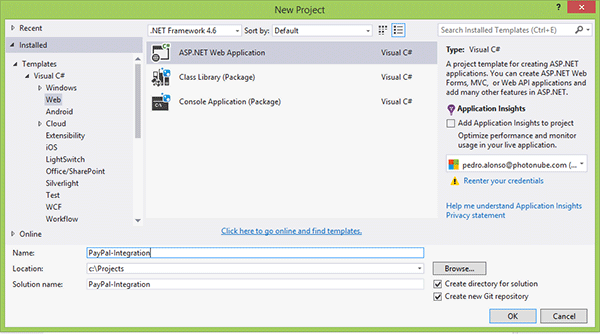
To start, I have created an MVC project in Visual Studio 2015: File > New > Project, and select ASP.NET Application.
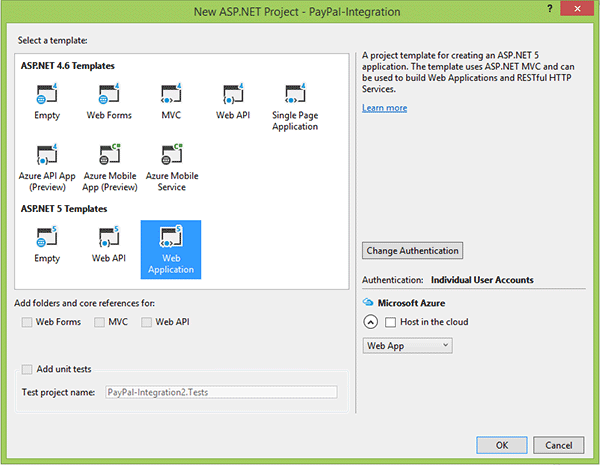
Select the ASP.NET 5 Web Application Template, which uses the new MVC 6. It is similar to MVC 5 if you are familiar with it.
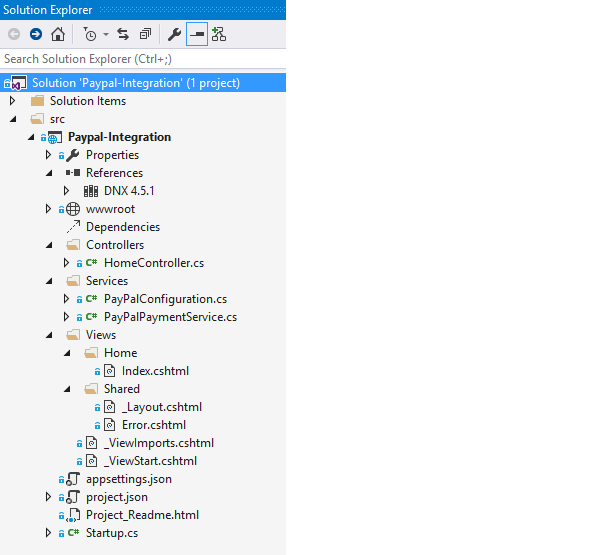
As you can see in the photo below, I have added a few files and folders to the solution. The main two things to notice are:
In References I have removed the target DNX Core 5.0, which is what would allow us to run this project in Mac OS X or Linux, but the PayPal library that we need hasn't been updated yet.
I have added the folder "Services", where I am going to wrap the logic for PayPal calls, so we can keep the controllers nice and short.
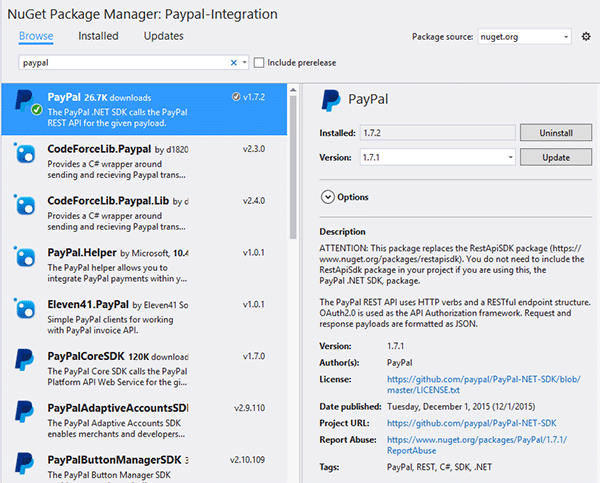
Install PayPal SDK using NuGet. Right click on the name of the solution and select Manage NuGet Packages, and then search for "PayPal" and install it.
Create a PayPal App
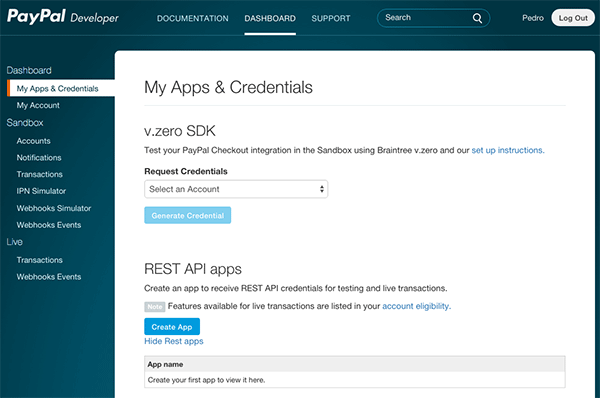
To integrate our application with PayPal, we need to navigate to PayPal Developers, and then under REST API apps, click on Create App.
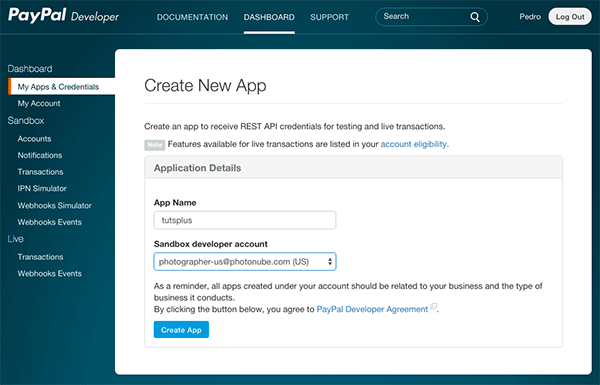
Give your app a name and choose a sandbox developer account associated with the app. For testing purposes, we can then navigate to http://sandbox.paypal.com and log in with the sandbox login details to see the test PayPal account and transactions.
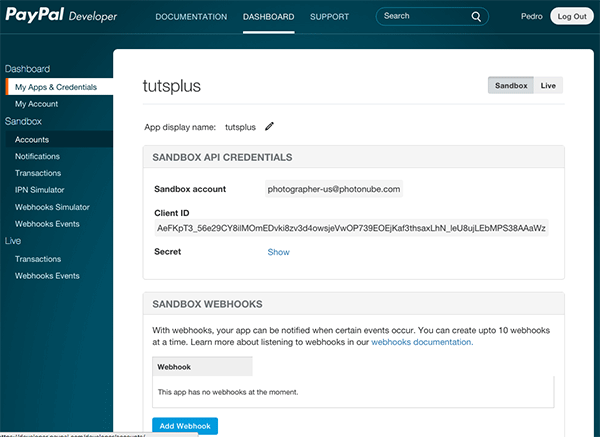
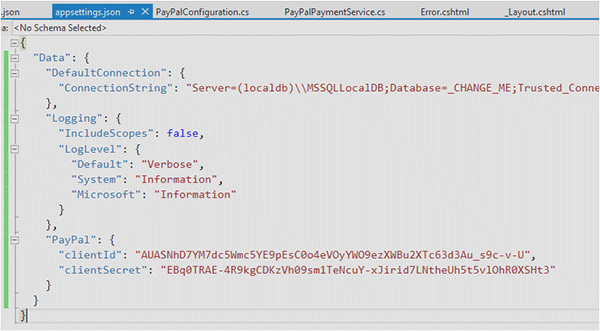
After clicking on Create App, we see the confirmation screen with the Client ID and Secret tokens.
Copy the clientId and clientSecret tokens to appsettings.json, as you can see in the screenshot below:
Testing Payments
PayPal provides a Sandbox environment for testing. You can create test buyer and seller accounts from there. When you sign up, you will have a Business account in the Sandbox that is tied to your developer account.
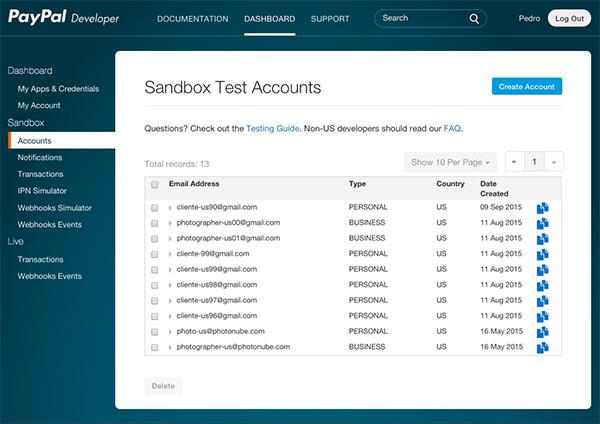
To create a new test account, log in to the Developer site, and then click the Dashboard tab and navigate to Sandbox > Accounts. Here you can see the list of test accounts if you have any:
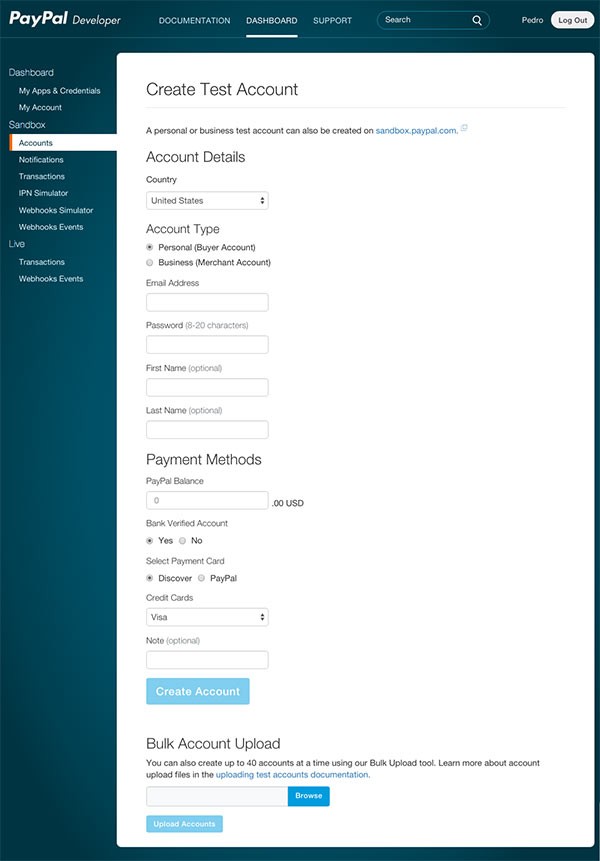
If you haven't created your test accounts yet, go ahead and click on Create Account, on the top right, to create at least one test personal account and one test business account.
After creating the test accounts, you can log in through www.sandbox.paypal.com with the test email address and password that you assigned to each account on the previous form. This is really useful to test that when you are purchasing something with your 'personal test account' the funds are being transferred to your 'test business account'. Now you're ready to start integrating with PayPal and test that the funds are moving from one account to another.
Single PayPal Payment
PayPal offers different methods of payment. You can use direct credit card payments, which means that your customers don't get to see the PayPal login page or summary—it all happens in your website. You need to be PCI compliant for this, and I recommend using Stripe, as you only need SSL using their JavaScript library. On the other hand, to take payments via PayPal payments, it takes three steps:
Specify payment information to create a payment.
Get payment approval, by redirecting your customer to PayPal to approve the transaction.
Execute the payment to capture the funds after PayPal redirects your customer back to your website.
In my MVC project, in the Services folder, I have created the PayPalPaymentService class where I have added these methods:
public static Payment CreatePayment(string baseUrl, string intent)
{
    // ### Api Context
    // Pass in a `APIContext` object to authenticate
    // the call and to send a unique request id
    // (that ensures idempotency). The SDK generates
    // a request id if you do not pass one explicitly.
    var apiContext = PayPalConfiguration.GetAPIContext();

    // Payment Resource
    var payment = new Payment()
    {
        intent = intent,    // `sale` or `authorize`
        payer = new Payer() { payment_method = "paypal" },
        transactions = GetTransactionsList(),
        redirect_urls = GetReturnUrls(baseUrl, intent)
    };

    // Create a payment using a valid APIContext
    var createdPayment = payment.Create(apiContext);

    return createdPayment;
}

private static List<Transaction> GetTransactionsList()
{
    // A transaction defines the contract of a payment
    // what is the payment for and who is fulfilling it.
    var transactionList = new List<Transaction>();

    // The Payment creation API requires a list of Transaction;
    // add the created Transaction to a List
    transactionList.Add(new Transaction()
    {
        description = "Transaction description.",
        invoice_number = GetRandomInvoiceNumber(),
        amount = new Amount()
        {
            currency = "USD",
            total = "100.00",       // Total must be equal to sum of shipping, tax and subtotal.
            details = new Details() // Details: Let's you specify details of a payment amount.
            {
                tax = "15",
                shipping = "10",
                subtotal = "75"
            }
        },
        item_list = new ItemList()
        {
            items = new List<Item>()
            {
                new Item()
                {
                    name = "Item Name",
                    currency = "USD",
                    price = "15",
                    quantity = "5",
                    sku = "sku"
                }
            }
        }
    });
    return transactionList;
}

private static RedirectUrls GetReturnUrls(string baseUrl, string intent)
{
    var returnUrl = intent == "sale" ? "/Home/PaymentSuccessful" : "/Home/AuthorizeSuccessful";

    // Redirect URLS
    // These URLs will determine how the user is redirected from PayPal
    // once they have either approved or canceled the payment.
    return new RedirectUrls()
    {
        cancel_url = baseUrl + "/Home/PaymentCancelled",
        return_url = baseUrl + returnUrl
    };
}

public static Payment ExecutePayment(string paymentId, string payerId)
{
    // ### Api Context
    // Pass in a `APIContext` object to authenticate
    // the call and to send a unique request id
    // (that ensures idempotency). The SDK generates
    // a request id if you do not pass one explicitly.
    var apiContext = PayPalConfiguration.GetAPIContext();

    var paymentExecution = new PaymentExecution() { payer_id = payerId };
    var payment = new Payment() { id = paymentId };

    // Execute the payment.
    var executedPayment = payment.Execute(apiContext, paymentExecution);

    return executedPayment;
}
There are a few parameters being passed in this call:
Intent: Three possible values: 'sale' for immediate payments, 'authorize' to authorize a payment to capture later, or 'order' to create an order. When you get the authorization for a payment to capture later, you have 3 days guaranteed, although you can attempt to capture the payment up to 29 days later.
Payer: Source of the funds for this payment, payment method being used—PayPal Wallet payment, Bank Direct Debit or Direct Credit card.
Transactions: This is used to specify the amount for the payment, and optionally specify the items being paid for. You can also specify the subtotal, shipping and tax if needed.
Redirect URLs: Specify the URL to which PayPal will redirect your customers after a transaction, so you can update your database and display a confirmation message.
The previous functions can be used from your controller like this:
public IActionResult CreatePayment()
{
    var payment = PayPalPaymentService.CreatePayment(GetBaseUrl(), "sale");

    return Redirect(payment.GetApprovalUrl());
}

public IActionResult PaymentCancelled()
{
    // TODO: Handle cancelled payment
    return RedirectToAction("Error");
}

public IActionResult PaymentSuccessful(string paymentId, string token, string PayerID)
{
    // Execute Payment
    var payment = PayPalPaymentService.ExecutePayment(paymentId, PayerID);

    return View();
}
As you can see, I have created three actions:
CreatePayment: This is the action triggering the payment. It's making a call to PayPal to create the Payment, then is redirecting the user to PayPal to approve the transaction.
PaymentSuccessful: This is the action where PayPal redirects our customer back after a successful payment. At this point we can execute the payment to get the funds transferred to our merchant account.
PaymentCancelled: This action is where the user is redirected from PayPal if the user cancels the approval process. At this time you'll probably want to give the option to the customer to try again or get in touch with you.
Authorize a Payment to Capture Later
This scenario is very similar to the previous case. You might want to use this method if you are trying to take pre-orders for a product that isn't available yet. The steps to get this payment are:
Authorize the payment: The 'intent' parameter for this call should be 'authorize'.
Capture the payment: Bear in mind that authorizations are guaranteed for up to 3 days, although you can attempt to capture a payment for up to 29 days.
In order to implement this type of payment, I have only added one new method to the class PayPalPaymentService to capture the payment:
public static Capture CapturePayment(string paymentId)
{
    var apiContext = PayPalConfiguration.GetAPIContext();

    var payment = Payment.Get(apiContext, paymentId);
    var auth = payment.transactions[0].related_resources[0].authorization;

    // Specify an amount to capture.  By setting 'is_final_capture' to true, all remaining funds held by the authorization will be released from the funding instrument.
    var capture = new Capture()
    {
        amount = new Amount()
        {
            currency = "USD",
            total = "4.54"
        },
        is_final_capture = true
    };

    // Capture an authorized payment by POSTing to
    // URI v1/payments/authorization/{authorization_id}/capture
    var responseCapture = auth.Capture(apiContext, capture);

    return responseCapture;
}
Then from the HomeController, I have added two new actions to show this type of payment:
public IActionResult AuthorizePayment()
{
    var payment = PayPalPaymentService.CreatePayment(GetBaseUrl(), "authorize");

    return Redirect(payment.GetApprovalUrl());
}

public IActionResult AuthorizeSuccessful(string paymentId, string token, string PayerID)
{
    // Capture Payment
    var capture = PayPalPaymentService.CapturePayment(paymentId);

    return View();
}
AuthorizePayment is the action triggering the payment. It's very similar to the previous 'CreatePayment' function, but we are passing 'authorize' as the intent parameter in this case.
AuthorizeSuccessful is the action where your customer will be redirected after successfully approving the payment on PayPal. At this point I'm capturing the payment, but you could save the paymentId in your database and capture the payment when you need to.
In these code samples, for simplicity, I have hard-coded the payment variable values. In your real application, you will probably wrap them in methods that take all those values as variables so that everything can be set dynamically and reused.
Subscriptions
This is called "Billing Plans" in PayPal—you can create recurring payment plans, and subscribe your customers to a billing plan by creating a billing agreement. Using the PayPal REST API you can create, update or delete billing plans; this is something that you might use if you want to build an admin panel to manage these things for your business.
The steps to create recurring charges to your customers would be:
Create a billing plan and activate it. After you create a Billing Plan, it's in a CREATED state. It needs to be activated by making a PATCH request.
Create a billing agreement and execute it: The response to the call to Create a billing agreement includes the links to approval_url and execute_url. We need to get the approval for the billing agreement and then execute the billing agreement.
Billing Plans
Create a Billing Plan
Create a billing plan that defines the billing periods. This is a summary of the parameters that we need to pass to create a plan.
Name: Name of the billing plan.
Description: Description of the billing plan.
Type: Allowed values are 'FIXED' for a set number of recurring payments, or 'INFINITE' for a plan that recurs until it's manually cancelled.
Merchant Preferences: This is an object that specifies preferences such as setup fee, maximum fail attempts of a payment, return URL, cancel URL, notify URL, where PayPal will redirect the user after a payment.
Payment Definitions: Array of payment definitions for this plan. Normally this array would have one or two payment definitions. If we want to offer a free trial or a trial at a discounted price, then we set up two payment definitions. The first will be the definition for the trial period, and the second definition would be the regular payment. The properties for a Payment Definition are name, type (trial or regular), frequency (day, week, month, year), frequency interval (if we set the frequency to 'WEEK' and the frequency interval to '1', we are defining a weekly payment), amount to charge the customer, and cycles is the number of total payments. Charge Models is to specify the shipping cost and tax additional to the amount value for the plan.
This is a code snippet that shows how to create a Billing Plan:
// Define the plan and attach the payment definitions and merchant preferences.
// More Information: https://developer.paypal.com/webapps/developer/docs/api/#create-a-plan
var billingPlan = new Plan
{
    name = "Tuts+ Plus",
    description = "Monthly plan for courses.",
    type = "fixed",
    // Define the merchant preferences.
    // More Information: https://developer.paypal.com/webapps/developer/docs/api/#merchantpreferences-object
    merchant_preferences = new MerchantPreferences()
    {
        setup_fee = GetCurrency("0"), // $0
        return_url = "returnURL", // Retrieve from config
        cancel_url = "cancelURL", // Retrieve from config
        auto_bill_amount = "YES",
        initial_fail_amount_action = "CONTINUE",
        max_fail_attempts = "0"
    },
    payment_definitions = new List<PaymentDefinition>
    {
        // Define a trial plan that will only charge $9.99 for the first
        // month. After that, the standard plan will take over for the
        // remaining 11 months of the year.
        new PaymentDefinition()
        {
            name = "Trial Plan",
            type = "TRIAL",
            frequency = "MONTH",
            frequency_interval = "1",
            amount = GetCurrency("0"), // Free for the 1st month
            cycles = "1",
            charge_models = new List<ChargeModel>
            {
                new ChargeModel()
                {
                    type = "TAX",
                    amount = GetCurrency("1.65") // If we need to charge Tax
                },
                new ChargeModel()
                {
                    type = "SHIPPING",
                    amount = GetCurrency("9.99") // If we need to charge for Shipping
                }
            }
        },
        // Define the standard payment plan. It will represent a monthly
        // plan for $19.99 USD that charges once month for 11 months.
        new PaymentDefinition
        {
            name = "Standard Plan",
            type = "REGULAR",
            frequency = "MONTH",
            frequency_interval = "1",
            amount = GetCurrency("15.00"),
            // > NOTE: For `IFNINITE` type plans, `cycles` should be 0 for a `REGULAR` `PaymentDefinition` object.
            cycles = "11",
            charge_models = new List<ChargeModel>
            {
                new ChargeModel
                {
                    type = "TAX",
                    amount = GetCurrency("2.47")
                },
                new ChargeModel()
                {
                    type = "SHIPPING",
                    amount = GetCurrency("9.99")
                }
            }
        }
    }
};

// Get PayPal Config
var apiContext = PayPalConfiguration.GetAPIContext();

// Create Plan
plan.Create(apiContext);
A newly created billing plan is in a CREATED state. Activate it to the ACTIVE state, so your customers can subscribe to the plan. To activate the plan, we need to make a PATCH request:
// Activate the plan
var patchRequest = new PatchRequest()
{
    new Patch()
    {
        op = "replace",
        path = "/",
        value = new Plan() { state = "ACTIVE" }
    }
};
plan.Update(apiContext, patchRequest);
As you can see, PayPal libraries are a direct wrapper over their REST API, which is good, but the API is also really complex compared to others like Stripe. For this reason, it's really a good option to wrap all PayPal communication in objects with clearer and simpler APIs for our applications. Here you can see what this code wrapped in multiple functions taking parameters looks like:
public static Plan CreatePlanObject(string planName, string planDescription, string returnUrl, string cancelUrl,
    string frequency, int frequencyInterval, decimal planPrice,
    decimal shippingAmount = 0, decimal taxPercentage = 0, bool trial = false, int trialLength = 0, decimal trialPrice = 0)
{
    // Define the plan and attach the payment definitions and merchant preferences.
    // More Information: https://developer.paypal.com/docs/rest/api/payments.billing-plans/
    return new Plan
    {
        name = planName,
        description = planDescription,
        type = PlanType.Fixed,

        // Define the merchant preferences.
        // More Information: https://developer.paypal.com/webapps/developer/docs/api/#merchantpreferences-object
        merchant_preferences = new MerchantPreferences()
        {
            setup_fee = GetCurrency("1"),
            return_url = returnUrl,
            cancel_url = cancelUrl,
            auto_bill_amount = "YES",
            initial_fail_amount_action = "CONTINUE",
            max_fail_attempts = "0"
        },
        payment_definitions = GetPaymentDefinitions(trial, trialLength, trialPrice, frequency, frequencyInterval, planPrice, shippingAmount, taxPercentage)
    };
}

private static List<PaymentDefinition> GetPaymentDefinitions(bool trial, int trialLength, decimal trialPrice,
    string frequency, int frequencyInterval, decimal planPrice, decimal shippingAmount, decimal taxPercentage)
{
    var paymentDefinitions = new List<PaymentDefinition>();

    if (trial)
    {
        // Define a trial plan that will charge 'trialPrice' for 'trialLength'
        // After that, the standard plan will take over.
        paymentDefinitions.Add(
            new PaymentDefinition()
            {
                name = "Trial",
                type = "TRIAL",
                frequency = frequency,
                frequency_interval = frequencyInterval.ToString(),
                amount = GetCurrency(trialPrice.ToString()),
                cycles = trialLength.ToString(),
                charge_models = GetChargeModels(trialPrice, shippingAmount, taxPercentage)
            });
    }

    // Define the standard payment plan. It will represent a 'frequency' (monthly, etc)
    // plan for 'planPrice' that charges 'planPrice' (once a month) for #cycles.
    var regularPayment = new PaymentDefinition
    {
        name = "Standard Plan",
        type = "REGULAR",
        frequency = frequency,
        frequency_interval = frequencyInterval.ToString(),
        amount = GetCurrency(planPrice.ToString()),
        // > NOTE: For `IFNINITE` type plans, `cycles` should be 0 for a `REGULAR` `PaymentDefinition` object.
        cycles = "11",
        charge_models = GetChargeModels(trialPrice, shippingAmount, taxPercentage)
    };
    paymentDefinitions.Add(regularPayment);

    return paymentDefinitions;
}

private static List<ChargeModel> GetChargeModels(decimal planPrice, decimal shippingAmount, decimal taxPercentage)
{
    // Create the Billing Plan
    var chargeModels = new List<ChargeModel>();
    if (shippingAmount > 0)
    {
        chargeModels.Add(new ChargeModel()
        {
            type = "SHIPPING",
            amount = GetCurrency(shippingAmount.ToString())
        });
    }
    if (taxPercentage > 0)
    {
        chargeModels.Add(new ChargeModel()
        {
            type = "TAX",
            amount = GetCurrency(String.Format("{0:f2}", planPrice * taxPercentage / 100))
        });
    }

    return chargeModels;
}
Update Billing Plan
You can update the information for an existing billing plan by making a 'PATCH' request. This is a function that wraps that call:
public static void UpdateBillingPlan(string planId, string path, object value)
{
    // PayPal Authentication tokens
    var apiContext = PayPalConfiguration.GetAPIContext();

    // Retrieve Plan
    var plan = Plan.Get(apiContext, planId);

    // Activate the plan
    var patchRequest = new PatchRequest()
    {
        new Patch()
        {
            op = "replace",
            path = path,
            value = value
        }
    };
    plan.Update(apiContext, patchRequest);
}
To update the Billing Plan description, we can call this function and pass the right parameters:
UpdateBillingPlan(
    planId: "P-5FY40070P6526045UHFWUVEI",
    path: "/",
    value: new Plan { description = "new description" });
Delete a Billing Plan
Ideally, when you don't want to accept new customers to a Billing Plan, you'll want to update it to the 'INACTIVE' state. This is not going to affect to existing billing agreements on this plan. This can be done simply by calling the UpdateBillingPlan function:
UpdateBillingPlan(
    planId: "P-5FY40070P6526045UHFWUVEI",
    path: "/",
    value: new Plan { state = "INACTIVE" });
Billing Agreements
Create a Billing Agreement
Once you have created one or more billing plans, you want to start getting customers signing up for your subscription plans. In order to do this, you need to collect your customer details and make a request to PayPal. To be able to test this functionality, I have added several actions to the HomeController:
public IActionResult Subscribe()
{
    var plan = PayPalSubscriptionsService.CreateBillingPlan("Tuts+ Plan", "Test plan for this article", GetBaseUrl());

    var subscription = PayPalSubscriptionsService.CreateBillingAgreement(plan.id,
        new PayPal.Api.ShippingAddress
        {
            city = "London",
            line1 = "line 1",
            postal_code = "SW1A 1AA",
            country_code = "GB"
        }, "Pedro Alonso", "Tuts+", DateTime.Now);

    return Redirect(subscription.GetApprovalUrl());
}

public IActionResult SubscribeSuccess(string token)
{
    // Execute approved agreement
    PayPalSubscriptionsService.ExecuteBillingAgreement(token);

    return View();
}

public IActionResult SubscribeCancel(string token)
{
    // TODO: Handle cancelled payment
    return RedirectToAction("Error");
}
Subscribe: This is the first action that is called. It's creating a test Billing Plan, and then a Billing Agreement (subscription) to that plan is created, and the user is redirected to PayPal to confirm the payment.
SubscribeSuccess: This action is the one used as 'Return URL' after a successful subscription. The agreement token identifier is passed in the query string, and we use this token to execute the billing agreement and make it active.
SubscribeCancel: This action is the one used as 'Cancel URL'. If for some reason the payment fails, or your customer cancels the payment on PayPal, the user is taken to this action, and you need to handle this. Maybe offer the option to try again.
As you can see in the previous code snippet, I have wrapped most of the functionality in several methods. The first one is "CreateBillingPlan" that was explained in the previous section. The second one is "CreateBillingAgreement" that is used to subscribe a user to a plan:
public static Agreement CreateBillingAgreement(string planId, ShippingAddress shippingAddress,
    string name, string description, DateTime startDate)
{
    // PayPal Authentication tokens
    var apiContext = PayPalConfiguration.GetAPIContext();

    var agreement = new Agreement()
    {
        name = name,
        description = description,
        start_date = startDate.ToString("yyyy-MM-ddTHH:mm:ss") + "Z",
        payer = new Payer() { payment_method = "paypal" },
        plan = new Plan() { id = planId },
        shipping_address = shippingAddress
    };

    var createdAgreement = agreement.Create(apiContext);
    return createdAgreement;
}
The third method is "ExecuteBillingAgreement". After a successful subscription approval, we use the token returned to activate the subscription:
public static void ExecuteBillingAgreement(string token)
{
    // PayPal Authentication tokens
    var apiContext = PayPalConfiguration.GetAPIContext();

    var agreement = new Agreement() { token = token };
    var executedAgreement = agreement.Execute(apiContext);
}
Suspend a Billing Agreement
Use this method to suspend an agreement:
public static void SuspendBillingAgreement(string agreementId)
{
    var apiContext = PayPalConfiguration.GetAPIContext();

    var agreement = new Agreement() { id = agreementId };
    agreement.Suspend(apiContext, new AgreementStateDescriptor()
        { note = "Suspending the agreement" });
}
Reactivate a Billing Agreement
This one is really similar to the previous one:
public static void ReactivateBillingAgreement(string agreementId)
{
    var apiContext = PayPalConfiguration.GetAPIContext();

    var agreement = new Agreement() { id = agreementId };
    agreement.ReActivate(apiContext, new AgreementStateDescriptor()
        { note = "Reactivating the agreement" });
}
Cancel a Billing Agreement
Use this function to cancel a plan:
public static void CancelBillingAgreement(string agreementId)
{
    var apiContext = PayPalConfiguration.GetAPIContext();

    var agreement = new Agreement() { id = agreementId };
    agreement.Cancel(apiContext, new AgreementStateDescriptor()
        { note = "Cancelling the agreement" });
}
Update a Billing Agreement
This option is very limited, and what I would expect from this call is the possibility to change the subscription plan, for upgrading or downgrading a customer. This is not supported in a single call as it is in Stripe. You need to handle this scenario by cancelling the current agreement and creating a new one for upgrades or downgrades. It's not ideal, but it might change in the future.
Conclusion
This is an overview of the most common functions that people use to integrate with PayPal. Their API is far bigger than the integration methods explained in this article—you can also issue refunds and partial refunds, and they have many different options for edge cases in the samples covered in this article. If you are interested in getting more details about any specific integration, please leave a suggestion in the comments.

Comments